element14 Community
element14 Community
    Register Log In
  • Site
  • Search
  • Log In Register
  • Community Hub
    Community Hub
    • What's New on element14
    • Feedback and Support
    • Benefits of Membership
    • Personal Blogs
    • Members Area
    • Achievement Levels
  • Learn
    Learn
    • Ask an Expert
    • eBooks
    • element14 presents
    • Learning Center
    • Tech Spotlight
    • STEM Academy
    • Webinars, Training and Events
    • Learning Groups
  • Technologies
    Technologies
    • 3D Printing
    • FPGA
    • Industrial Automation
    • Internet of Things
    • Power & Energy
    • Sensors
    • Technology Groups
  • Challenges & Projects
    Challenges & Projects
    • Design Challenges
    • element14 presents Projects
    • Project14
    • Arduino Projects
    • Raspberry Pi Projects
    • Project Groups
  • Products
    Products
    • Arduino
    • Avnet & Tria Boards Community
    • Dev Tools
    • Manufacturers
    • Multicomp Pro
    • Product Groups
    • Raspberry Pi
    • RoadTests & Reviews
  • About Us
  • Store
    Store
    • Visit Your Store
    • Choose another store...
      • Europe
      •  Austria (German)
      •  Belgium (Dutch, French)
      •  Bulgaria (Bulgarian)
      •  Czech Republic (Czech)
      •  Denmark (Danish)
      •  Estonia (Estonian)
      •  Finland (Finnish)
      •  France (French)
      •  Germany (German)
      •  Hungary (Hungarian)
      •  Ireland
      •  Israel
      •  Italy (Italian)
      •  Latvia (Latvian)
      •  
      •  Lithuania (Lithuanian)
      •  Netherlands (Dutch)
      •  Norway (Norwegian)
      •  Poland (Polish)
      •  Portugal (Portuguese)
      •  Romania (Romanian)
      •  Russia (Russian)
      •  Slovakia (Slovak)
      •  Slovenia (Slovenian)
      •  Spain (Spanish)
      •  Sweden (Swedish)
      •  Switzerland(German, French)
      •  Turkey (Turkish)
      •  United Kingdom
      • Asia Pacific
      •  Australia
      •  China
      •  Hong Kong
      •  India
      • Japan
      •  Korea (Korean)
      •  Malaysia
      •  New Zealand
      •  Philippines
      •  Singapore
      •  Taiwan
      •  Thailand (Thai)
      • Vietnam
      • Americas
      •  Brazil (Portuguese)
      •  Canada
      •  Mexico (Spanish)
      •  United States
      Can't find the country/region you're looking for? Visit our export site or find a local distributor.
  • Translate
  • Profile
  • Settings
Freedom development platform
  • Products
  • Dev Tools
  • Freedom development platform
  • More
  • Cancel
Freedom development platform
Blog [FRDM-K64F - KDS - OpenSDAv2] Tutorial: Set-up the debug interface
  • Blog
  • Forum
  • Documents
  • Files
  • Members
  • Mentions
  • Sub-Groups
  • Tags
  • More
  • Cancel
  • New
Join Freedom development platform to participate - click to join for free!
  • Share
  • More
  • Cancel
Group Actions
  • Group RSS
  • More
  • Cancel
Engagement
  • Author Author: bheemarao
  • Date Created: 30 Jul 2014 9:38 AM Date Created
  • Views 845 views
  • Likes 0 likes
  • Comments 0 comments
  • frdm-k64
  • opensda-v2
  • freedom
  • kinetis-k
Related
Recommended

[FRDM-K64F - KDS - OpenSDAv2] Tutorial: Set-up the debug interface

bheemarao
bheemarao
30 Jul 2014


In this demo, I am using OpenSDA / OpenSDA V2 firmware provided from Segger, this firmware supports all ARM based Freescale boards which comes with on-board OpenSDA and Implements SWD debug protocol and virtual COM port functionality.


By default the board comes loaded with MSD application driver by which you can reprogram the board with available different binaries. 

The FRDM-K64F platform features OpenSDAv2, the Freescale open-source hardware embedded serial and debug adapter running an open-source bootloader. OpenSDAv2 comes preloaded with the CMSIS-DAP bootloader – an open-source mass storage device (MSD) bootloader and the CMSIS-DAP Interface firmware (aka mbed interface), which provides a MSD flash programming interface, a virtual serial port interface, and a CMSIS-DAP debug protocol interface. 

Now since we need to develop a new project and debug / run it on boards, the board should be loaded with different application driver i.e Debug application driver OpenSDA V2 which is supported by Segger, P&E Micro. 

OpenSDAv2 is a serial and debug adapter circuit which includes an open-source hardware design, an open-source bootloader, and debug interface software. It bridges serial and debug communications between a USB host and an embedded target processor


There are two alternative firmware files available for the FRDM-K64F (which runs OpenSDAv2)


  1. P&E OpenSDAv2 which emulates a P&E OpenSDA/Multilink
  2. Segger OpenSDAv2 which emulates a Segger J-Link


   To install the firmware: 


  1. Go to http://www.segger.com/opensda.htmland come down to “Getting started with OpenSDA V2” section and download the firmware scroll to the end of the page with the OpenSDAv2 section and download the firmware.

    (The firmware can be downloaded here: Firmware download)

  2. Unpack the content of the zip file (JLink_OpenSDA_V2.bin).


     image


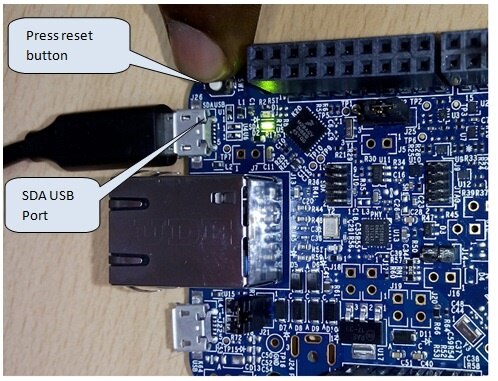
3. Connect the board to the PC via SDA USB while keeping the reset button of the board pressed.


image

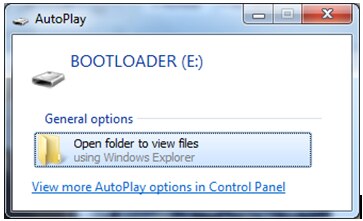
4. The board enumerates as BOOTLOADER as shown below:


image


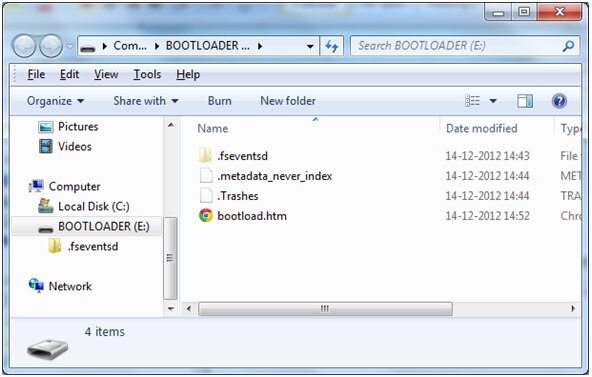
5. Copy the file “JLink_OpenSDA_V2.bin” which was extracted earlier and paste this into the BOOTLOADER drive (you can drag and drop too)


image


6. After the file is copied, the green OpenSDAv2 LED will blink faster. Unplug the board and power it again


7. After power-cycling the hardware, the OpenSDA platform will enumerate as J-Link on the PC.


KDS Debug configuration:


Now as our board is loaded with J-link driver we need to configure the same in KDS debug settings. This is done as shown below:


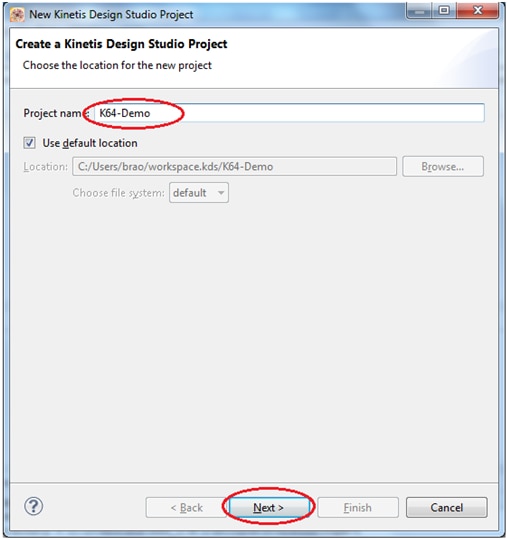
Steps to create new project


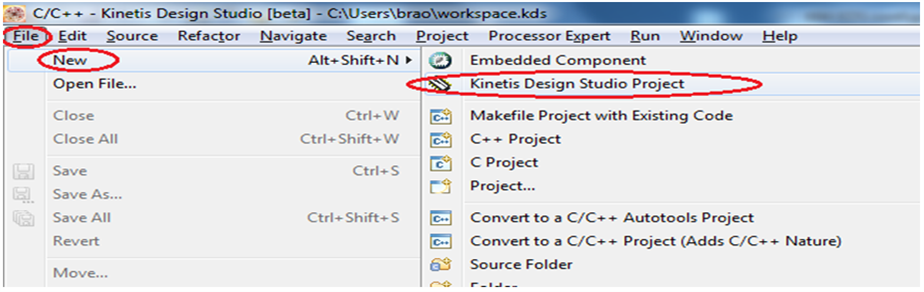
  1. Create a New project in KDS


    1. File > New  > Kinetis Design Studio Project


      image


2. Provide Project Name


image


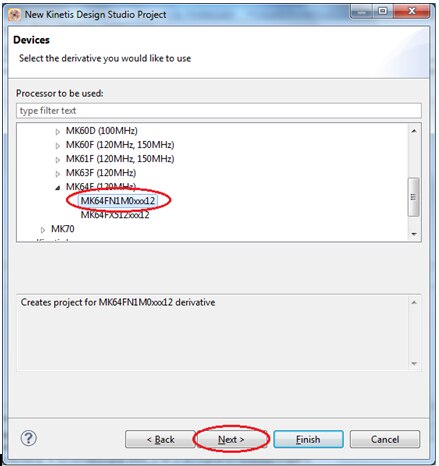
3. Select Device “MK64FN1M0XXX12” from the filter as shown


Kinetis K > MK60 > MK64F(120MHz) >  MK64FN1M0XXX12

  image


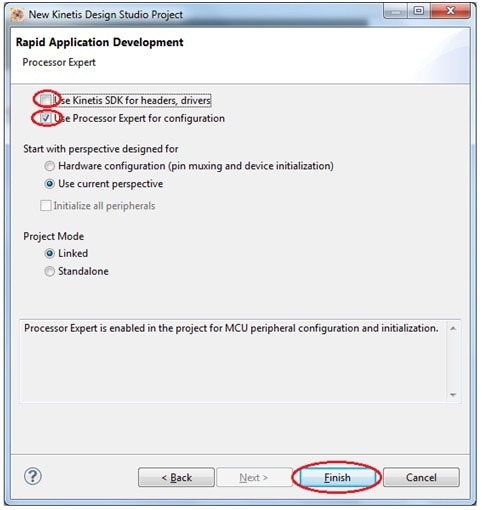
4. Now select the option “Use Processor Expert for configuration” and click finish


image


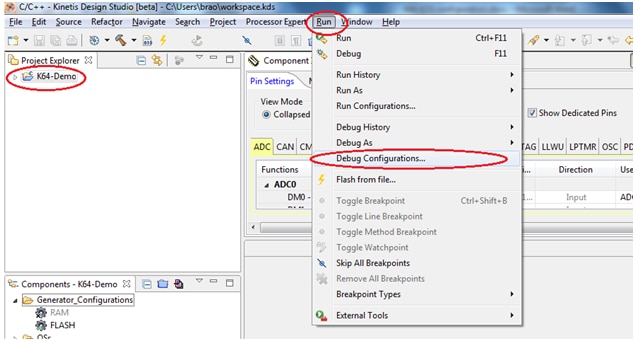
Now we need to create New Segger Debug Configuration

  Select Menu Run > Debug Configurations as shown below:


image


Now select ‘GDB Segger J-Link Debugging’


Double Click Or: use 'New' icon as shown


  image


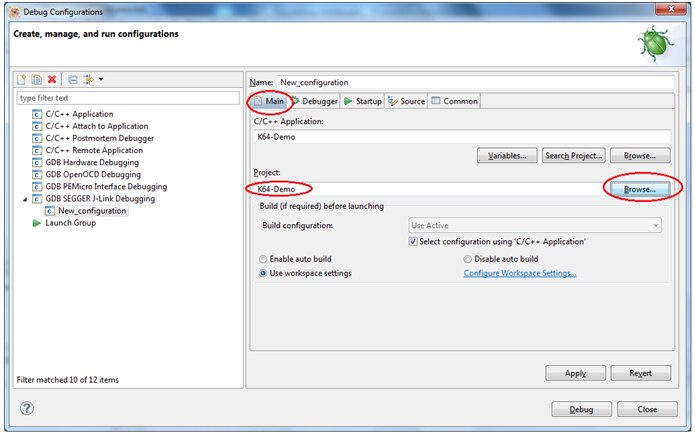
Ensure application file and project are selected by clicking Browse button as shown:

    image


Under Debugger tab Specify device name “MK64FN1M0xxx12” and click on apply and close the Debug configuration window as shown below:


    image


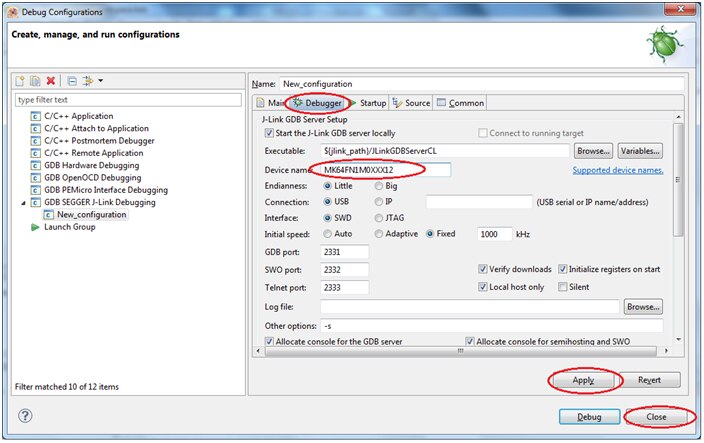
Now our project setting is configured for Segger debug driver.

Proceed further as per your project requirement. 

  • Sign in to reply
element14 Community

element14 is the first online community specifically for engineers. Connect with your peers and get expert answers to your questions.

  • Members
  • Learn
  • Technologies
  • Challenges & Projects
  • Products
  • Store
  • About Us
  • Feedback & Support
  • FAQs
  • Terms of Use
  • Privacy Policy
  • Legal and Copyright Notices
  • Sitemap
  • Cookies

An Avnet Company © 2025 Premier Farnell Limited. All Rights Reserved.

Premier Farnell Ltd, registered in England and Wales (no 00876412), registered office: Farnell House, Forge Lane, Leeds LS12 2NE.

ICP 备案号 10220084.

Follow element14

  • X
  • Facebook
  • linkedin
  • YouTube