element14 Community
element14 Community
    Register Log In
  • Site
  • Search
  • Log In Register
  • Community Hub
    Community Hub
    • What's New on element14
    • Feedback and Support
    • Benefits of Membership
    • Personal Blogs
    • Members Area
    • Achievement Levels
  • Learn
    Learn
    • Ask an Expert
    • eBooks
    • element14 presents
    • Learning Center
    • Tech Spotlight
    • STEM Academy
    • Webinars, Training and Events
    • Learning Groups
  • Technologies
    Technologies
    • 3D Printing
    • FPGA
    • Industrial Automation
    • Internet of Things
    • Power & Energy
    • Sensors
    • Technology Groups
  • Challenges & Projects
    Challenges & Projects
    • Design Challenges
    • element14 presents Projects
    • Project14
    • Arduino Projects
    • Raspberry Pi Projects
    • Project Groups
  • Products
    Products
    • Arduino
    • Avnet Boards Community
    • Dev Tools
    • Manufacturers
    • Multicomp Pro
    • Product Groups
    • Raspberry Pi
    • RoadTests & Reviews
  • About Us
  • Store
    Store
    • Visit Your Store
    • Choose another store...
      • Europe
      •  Austria (German)
      •  Belgium (Dutch, French)
      •  Bulgaria (Bulgarian)
      •  Czech Republic (Czech)
      •  Denmark (Danish)
      •  Estonia (Estonian)
      •  Finland (Finnish)
      •  France (French)
      •  Germany (German)
      •  Hungary (Hungarian)
      •  Ireland
      •  Israel
      •  Italy (Italian)
      •  Latvia (Latvian)
      •  
      •  Lithuania (Lithuanian)
      •  Netherlands (Dutch)
      •  Norway (Norwegian)
      •  Poland (Polish)
      •  Portugal (Portuguese)
      •  Romania (Romanian)
      •  Russia (Russian)
      •  Slovakia (Slovak)
      •  Slovenia (Slovenian)
      •  Spain (Spanish)
      •  Sweden (Swedish)
      •  Switzerland(German, French)
      •  Turkey (Turkish)
      •  United Kingdom
      • Asia Pacific
      •  Australia
      •  China
      •  Hong Kong
      •  India
      •  Korea (Korean)
      •  Malaysia
      •  New Zealand
      •  Philippines
      •  Singapore
      •  Taiwan
      •  Thailand (Thai)
      • Americas
      •  Brazil (Portuguese)
      •  Canada
      •  Mexico (Spanish)
      •  United States
      Can't find the country/region you're looking for? Visit our export site or find a local distributor.
  • Translate
  • Profile
  • Settings
Freedom development platform
  • Products
  • Dev Tools
  • Freedom development platform
  • More
  • Cancel
Freedom development platform
Blog Freescale FRDM-KL25Z & Kinetis Design Studio
  • Blog
  • Forum
  • Documents
  • Files
  • Members
  • Mentions
  • Sub-Groups
  • Tags
  • More
  • Cancel
  • New
Join Freedom development platform to participate - click to join for free!
  • Share
  • More
  • Cancel
Group Actions
  • Group RSS
  • More
  • Cancel
Engagement
  • Author Author: fvan
  • Date Created: 26 Apr 2015 8:11 AM Date Created
  • Views 1813 views
  • Likes 3 likes
  • Comments 9 comments
  • freescale
  • kinetis
  • frdm
  • Design
  • kds
  • kl25z
  • studio
Related
Recommended

Freescale FRDM-KL25Z & Kinetis Design Studio

fvan
fvan
26 Apr 2015

Not so long ago, I picked up a Freescale FRDM board from Farnell purely because I had never worked with one before and wanted to give it a try. While browsing, I came across the KL25Z which looked like a perfect entry model at a very reasonable price.


FRDM-KL25Z


What is it ?


The Freescale Freedom KL25Z or FRDM-KL25Z is a low cost development board, featuring a Kinetis L series microcontroller, built on the ARM Cortex-M0+ core.image


The board features:

  • max operating frequency of 48MHz
  • 128KB of flash memory
  • full-speed USB controller
  • plenty of analog and digital peripherals
  • Arduino R3 compatible pin layout
  • onboard interfaces such as:
    • RGB LED
    • 3-axis accelerometer
    • capacitive touch slider
    • push button


It is also the first board to feature Freescale's open standard embedded serial and debug adapter or OpenSDA, which offers serial communication, flash programming and run-control debugging. Even though the board was launched in late 2012, it is still very popular today due to the availability of a lot of content online.


What's in the box ?


image

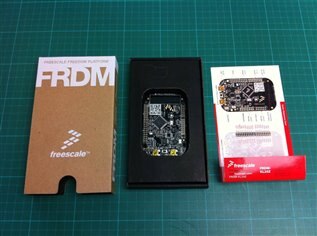
Well, not so much actually. The packaging is rather basic but good looking and is generic enough to be used for other FRDM boards, which is nice.


The box contains two things:

  • FRDM-KL25Z board
  • a quick reference card


It's a bit of a pity that no USB cable is provided, but as someone who is regularly playing with other dev kits, it was no problem to find one. Another thing to note is that the I/O pins are not populated with header pins, nor is the coin cell battery holder. The kit can be obtained for a bit less than 15EUR from Farnell, which is a totally acceptable price point for anyone looking to get started with something new.


Out of box demo


By default, the board comes with a program showcasing some of the onboard components:

  • an RGB LED
  • a touch slider
  • an accelerometer


The program first cycles through some colours on the RGB LED and then changes colour based on data from the accelerometer. The brightness of the LED can be changed using the touch slider.


You don't have permission to edit metadata of this video.
Edit media
x
image
Upload Preview
image


Kinetis Design Studio


Kinetis Design Studio (or KDS) is a freely available IDE for Kinetis MCUs, which can be downloaded from the Freescale website. It is based on opensource software like Eclipse, GCC, GDB and others. Unfortunately for me, downloads are only available for Windows and Linux, not OSX. Not a big problem using virtual machines, but not ideal. KDS download links can be found here. Note that you will need to register before being able to download the IDE.


Installation


As stated earlier, there is no OSX download available. I proceeded by installing KDS in a virtual Windows XP environment. The installation took a couple of minutes and right at the end, and error was reported. I ignored the error and proceeded ti start the IDE. Starting the IDE for the first time took some time to set up the workspace and so on and once done, it was ready for a first program.


imageimage

Drivers


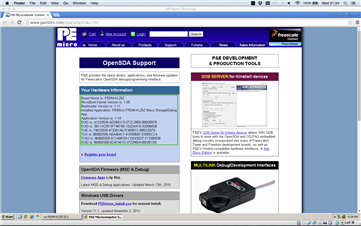
Using the board straight out of the box, it wouldn't show up in the debugger configuration interface, even though Windows detected the device and installed the drivers. Opening one of the html pages on the KL25Z drive that appears when the board is plugged in, an overview of software versions is provided. I searched for my issue online and verified if no new versions were available.


imageimage


I found that my board wasn't running the latest version of the Bootloader (1.09 vs 1.11) and that no applications was installed. After upgrading the bootloader and installing the debug application, which is done by putting the board in bootloader mode (holding reset button while powering on the board) and dropping the upgrade files on the BOOTLOADER drive, the board was listed in the debugger configuration.


imageimage

Usage


Having worked mainly with Arduino and Raspberry Pi before this, the IDE needed some getting used to. After some exploring and trying things out, I managed to get started on my first program.


First program


The "Hello World" of electronics: flashing an LED. In this particular case, I tried to light the RGB LED in different colours. As I was not familiar with the syntax, it took some time before I figured it out. The more I'll experiment with the board, the easier things should go in the future. To start, I created a new project, gave it a name, selected the correct processor and enabled "processor expert mode". You can follow the steps in the screenshots below:


imageimage

imageimage


Once the new project is created, it is possible to drag in components to control. I've found two ways to control the RGB LED: either configuring the BitIO_LDD component from scratch or using the predefined FRDM_KL25_LEDRGB components. Using the predefined components will ensure among other things that the correct pin is used as an output. Using the predefined components, some fields are not editable. If needed, they can be edited by switching to "advanced" mode.


imageimage


When using the BitIO_LDD component, use following pins to control the RGB LED:

  • RED: PTB18
  • GREEN: PTB19
  • BLUE: PTD1


Once the components have been defined, they can be accessed from the code. This can be done with following commands in the "main.c" file, assuming the component for the red LED has been called "RED":


RED_ClrVal(RED_DeviceData); //turn RED LED ON

RED_SetVal(RED_DeviceData); //turn RED LED OFF


To be able to blink the LED however, some form of delay is required. It seems there is no "sleep" or "delay" function by default in KDS. An external component called "WAIT" needs to be loaded, which comes bundled with a bunch of other components. The bundle can be downloaded here. Once downloaded, extract the zip file and import the resulting PEupd files using KDS.


imageimage


After importing, the components should be available to use immediately. I double-clicked the "WAIT" component in order to be able to use it. The new code to cycle through the three colours and light up each for 500ms is as follows:


while(1) {

   RED_ClrVal(RED_DeviceData); //turn RED LED ON

   WAIT1_Waitms(500);

   RED_SetVal(RED_DeviceData); //turn RED LED OFF

   GREEN_ClrVal(GREEN_DeviceData); //turn GREEN LED ON

   WAIT1_Waitms(500);

   GREEN_SetVal(GREEN_DeviceData); //turn GREEN LED OFF

   BLUE_ClrVal(BLUE_DeviceData); //turn BLUE LED ON

   WAIT1_Waitms(500);

   BLUE_SetVal(BLUE_DeviceData); //turn BLUE LED OFF

}


After compiling, the onboard LED is cycling through all three colours over and over again.


KL25Z-RGB


Conclusion


Aside from the minor driver problems to get the board properly detected by KDS, everything went rather smoothly. There is of course the learning curve of using a new IDE if not familiar with other Eclipse based versions, but that is to be expected. I have only touched a fraction of what this board is capable of for this post, but I plan on gradually diving deeper into it and eventually build a project around it. If you're wanting to try and learn something new, this board is a great entry point to the Freescale FRDM ecosystem. The price is very reasonable and with the amount of content available, you should be up and running in no time.

  • Sign in to reply

Top Comments

  • mcb1
    mcb1 over 10 years ago +1
    fvan The FRDM range of boards are very good value. I've been wanting to use them more in some applications but I got stuck on the learning a new IDE and the 'strange' conventions. They are also supported…
  • shabaz
    shabaz over 10 years ago +1
    Hi Frederick! Great article : ) They are way better value than Arduino - better performance, cheaper, tons of on-board sensors and I/O... Freescale did a good job when they created these boards. Personally…
  • clem57
    clem57 over 10 years ago in reply to shabaz +1
    Agreed shabaz . A very open article extolling yet warning of the pitfalls. I have the K64F and will try to follow your example. I started with MBED to experience online and really liked it. BTW, do you…
  • mcb1
    mcb1 over 10 years ago in reply to FreescaleTools_and_Software

    FreescaleTools_and_Software

    The range is truly a very good platform.

    While they have Arduino capability, the full range of connections are not available and the only other shield I could find (by another manufacturer) was many more times more than the board.


    Is there a plan to produce a cheap prototyping board to suit these.?


    Thanks

    Mark

    • Cancel
    • Vote Up 0 Vote Down
    • Sign in to reply
    • More
    • Cancel
  • FreescaleTools_and_Software
    FreescaleTools_and_Software over 10 years ago

    Hi Frederick Vandenbosch

    Congratulation for this detailed Getting Started review of the FRDM-KL25Z board and our Kinetis Design Studio free IDE.
    It seems like your MCU user experience helped to properly setup your board and create your first project.


    If you are interested in evaluating the mbed online compiler, I have published on Design Center two tutorials using the FRDM-KL05Z, whose instructions also apply to FRDM-KL25Z just changing the I/O connections.

    [FRDM-KL05Z - mbed] Chapter 1: Create your first mbed project !!

    [FRDM-KL05Z - mbed] Chapter 1 bis: Create more mbed projects !!


    The FRDM-K64F is another interesting board, currently the most powerful of the FRDM portfolio featuring the K64F (ARM Cortex-M4F core @120MHz with 1MB Flash / 256KB RAM and an Ethernet 10/100 controller).
    bheemarao has posted several tutorials featuring KDS with or without PE and the new SDK low-level driver package (available only for the latest FRDM boards).


    In general, the instructions of most of the tutorials published on design center can be easily adapted to every FRDM boards just using board schematics (available at www.freescale.com/FRDM-Kxxxx).

    • Cancel
    • Vote Up +1 Vote Down
    • Sign in to reply
    • More
    • Cancel
  • fvan
    fvan over 10 years ago in reply to clem57

    Hi Clem,


    no specific project in mind, yet. I needed parts and picked one up out of curiosity, always interested in trying out new things image


    I'm not familiar with MBED, so I might give it a try as well. What did you like about it ?

    • Cancel
    • Vote Up 0 Vote Down
    • Sign in to reply
    • More
    • Cancel
  • fvan
    fvan over 10 years ago in reply to shabaz

    Thanks shabaz! I like the fact that there are a couple of sensors onboard. No need to buy external components while learning to master this board.


    I suppose the Arduino header has its pros and cons. Nowadays, it's not uncommon to see Arduino header compatibility, as there is a vast amount of shields out there to be reused.

    Makes it possible to upgrade the controller while using the same shield you already own and are familiar with.

    On the downside, it might indeed be annoying for others due to the spacing and different sized headers as you say. Especially if some female headers are not included. A more straightforward layout like the Beaglebone Black's comes to mind.

    • Cancel
    • Vote Up 0 Vote Down
    • Sign in to reply
    • More
    • Cancel
  • fvan
    fvan over 10 years ago in reply to mcb1

    The new IDE and syntax are currently the biggest hurdle to overcome. I hope to be able to spend more time on it, between the challenge and roadtest activities in.

    Once I master the tools and this board, I'll probably explore the more recent models like the K64F. Could take some time though image

    • Cancel
    • Vote Up +1 Vote Down
    • Sign in to reply
    • More
    • Cancel
>
element14 Community

element14 is the first online community specifically for engineers. Connect with your peers and get expert answers to your questions.

  • Members
  • Learn
  • Technologies
  • Challenges & Projects
  • Products
  • Store
  • About Us
  • Feedback & Support
  • FAQs
  • Terms of Use
  • Privacy Policy
  • Legal and Copyright Notices
  • Sitemap
  • Cookies

An Avnet Company © 2025 Premier Farnell Limited. All Rights Reserved.

Premier Farnell Ltd, registered in England and Wales (no 00876412), registered office: Farnell House, Forge Lane, Leeds LS12 2NE.

ICP 备案号 10220084.

Follow element14

  • X
  • Facebook
  • linkedin
  • YouTube