


This document shows how to import the existing project of Kinetis SDK v1.3 using the kinetis Design Studio version 3.2.0 implemented using FRDM-KW40ZFRDM-KW40Z
The FRDM-KW40ZFRDM-KW40Z development board is an evaluation environment supporting Freescale MKW40Z SoC transceiver The MKW40Z SoC integrates a radio transceiver operating in the 2.36 GHz to 2.48 GHz range(supporting a range of FSK/GFSK and O-QPSK modulations and an ARM Cortex-M0 MCU into a single package
Freescale supports the MKW40Z SOC with tools and software that include hardware evaluation and development boards, software development IDE, applications, drivers, custom PHY usable with IEEE Std. 802.15.4 compatible MAC, BLE Link Layer, and enables the usage of the Bluetooth Low Energy protocol in the MBAN frequency range for proprietary applications.

The FRDM-KW40ZFRDM-KW40Z development board consists of the MKW40Z device with 32 MHz reference oscillator crystal RF circuitry(including antenna 2-Mbit external serial flash and supporting circuitry in the popular Freedom form The board is a standalone PCB and supports application development with Freescale IEEE Std 802.15.4 protocol stacks
The FRDM-KW40ZFRDM-KW40Z development board is based on Freescale Freedom development platform It is the most diverse reference design containing the MKW40Z device and all necessary I/O connections for use as a standalone board or connected to an application You can also connect it to the Freedom development platform
The FRDM-KW40ZFRDM-KW40Z board is an evaluation board based on Freescale MKW40Z transceiver and it provides a platform to evaluate the MKW40Z SoC device and to develop software and applications The core device is accompanied by a 32 MHz reference oscillator crystal RF circuitry(including antenna and supporting circuitry
The FRDM-KW40ZFRDM-KW40Z board is intended as the core PCB for MKW40Z device evaluation and application development and can be used in the following modes
• Simple standalone evaluation platform.
• Daughter card for other Freedom development platform boards.
• Mother card for application-specific daughter cards, such as a shield card.
Highlights:
- Multi-Protocol Radio – High performance radio supporting Bluetooth Smart/Bluetooth Low Energy (BLE) v4.1 and IEEE 802.15.4 based standards
- Low Power – Low transmit, receive and standby currents as low as 206nA that maximizes battery life including standard coin-cells
- Analog Integration – DC-DC Converter with Buck or Boost configuration, high-precision 16-bit Analog-to-Digital (ADC) converter for highly accurate sensor measurements, 12-bit Digital-to-Analog (DAC) and 6-bit Comparator (CMP)
- Software – Fully compliant, certified Bluetooth Low Energy and 802.15.4 MAC

To proceed further the below are the prerequisites:
1. The freedom hardware board i.e FRDM-KW40Z-2 No’s as shipped in a box(It is preloaded with“Wireless Connectivity Connectivity Test Application Example Demos on the FRDM-KW40ZFRDM-KW40Z
2. Install the boot loader driver with OpenSDA_V2_1.bin from below segger link:
https://www.segger.com/downloads/jlinkopensda
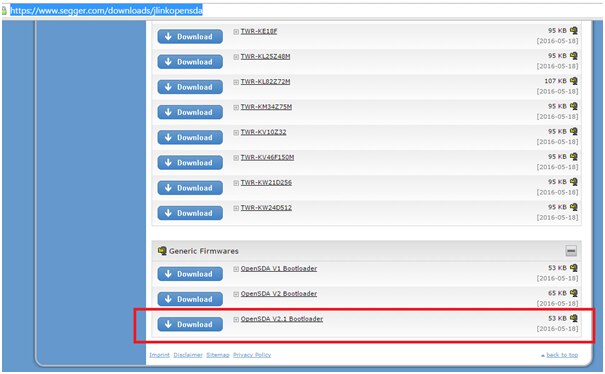
I have enclosed the driver for your quick download
1. KDS3.2.0 installed on your computer
(You can download latest version of KDS from Here or direct download from below link:)
Below are the steps involved in this demo activity:
Step-1 Download the Kinetis SDK builder to your computer
Step-2 Build a KSDK platform library
Step-2 Import the example project from the downloaded SDK
Step-3 Build your project and execute it
Download the Kinetis SDK builder from below link
Click HERE for the Link
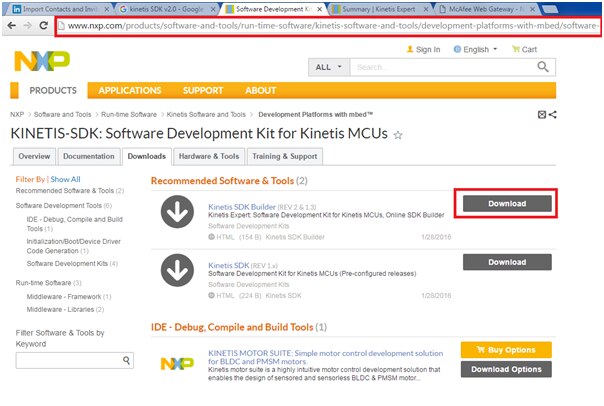
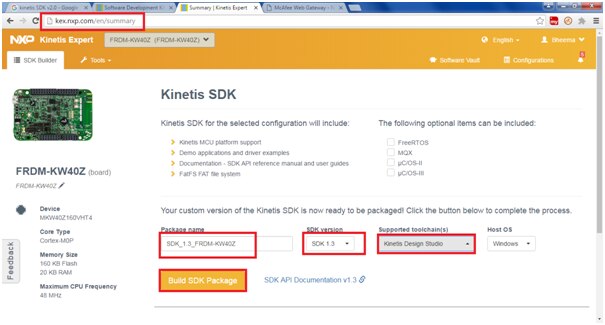
Then proceed to download the SDK1.3 version as shown in below snap shot:
Currently SDK2.0 is unavailable hence we are proceeding with SDK1.3
Build a KSDK platform library
These steps show how to open and build the platform library project in KDS IDE. The platform library is required by the demo and does not build without it.
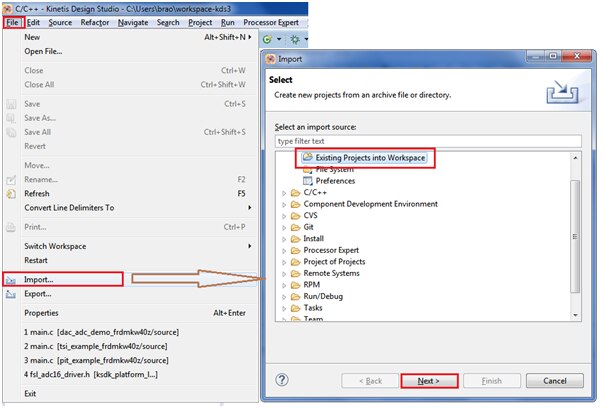
Select "File->Import" from the KDS IDE menu.
And select "Existing Projects into Workspace".
Then, click the "Next" button.
Point to the platform library project from the downloaded path for the KW40Z device, which can be found using this path:
C:\Users\brao\Desktop\kw40Z\SDK_1.3_FRDM-KW40Z\lib\ksdk_platform_lib\kds\KW40Z4
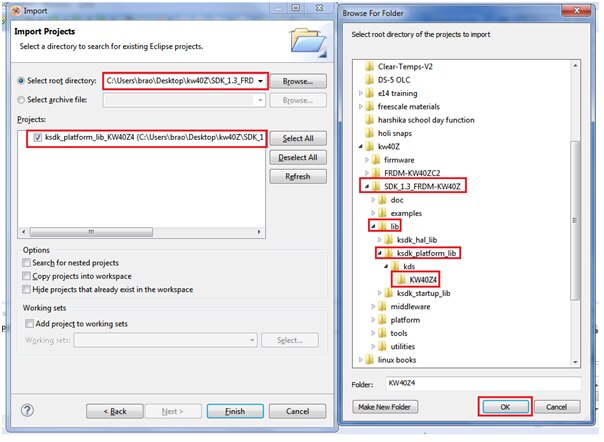
Click on finish to proceed further

You can see the tool builds the necessary library files required for the KW40Z board
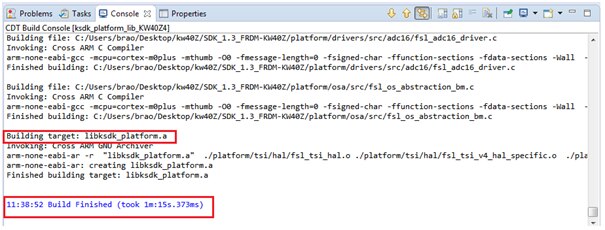
Finally the lib file “libksdk_platform.a” is generated which is required to build our application project
Next we will proceed further in importing the example project from the downloaded folder.
Importing the downloaded project
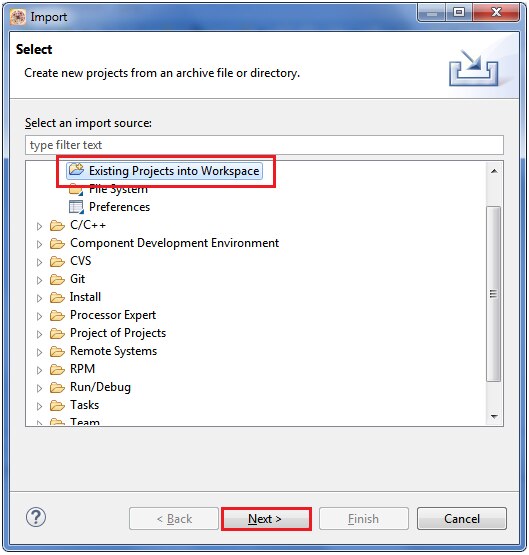
Click on File>Import as shown below:

Next select on “Existing Projects into Workspace” as shown below:
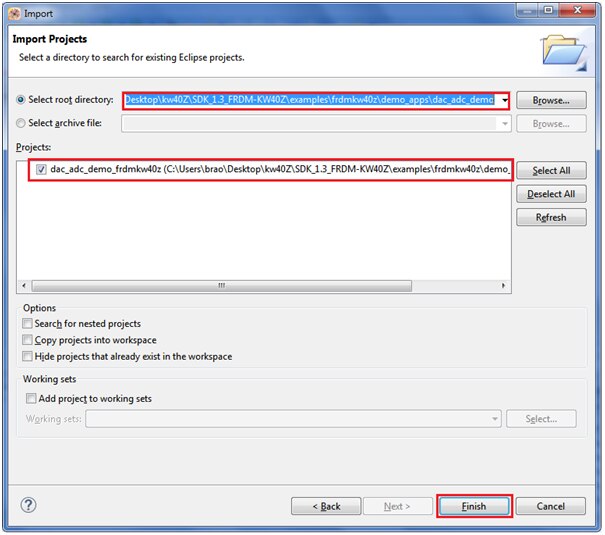
Navigate to the downloaded folder (unzipped) inside demo apps i.e below path:
C:\Users\brao\Desktop\kw40Z\SDK_1.3_FRDM-KW40Z\examples\frdmkw40z\demo_apps
Select “dac_adc_demo” as your current project from location:
C:\Users\brao\Desktop\kw40Z\SDK_1.3_FRDM-KW40Z\examples\frdmkw40z\demo_apps\dac_adc_demo
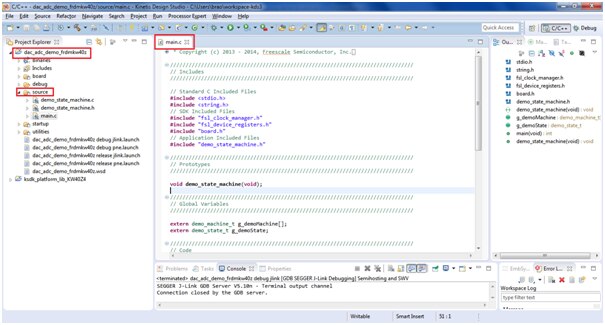
After opening the project the KDS windows looks like below:
Now we will proceed to build and execute the project
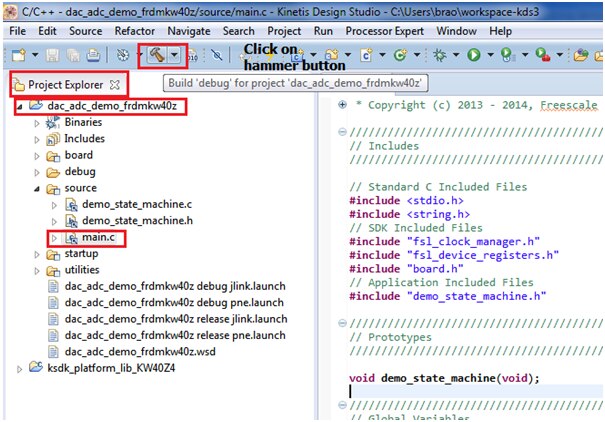
Build your project and execute it
Click on the hammer button as shown below
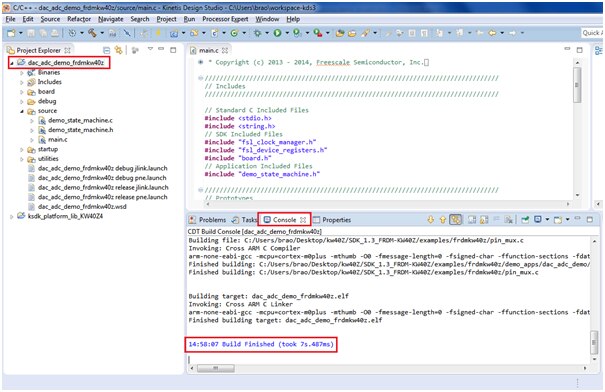
If everything is fine then your project will build with no errors as shown below:
This application demonstrates how to configure the DAC and set the output on the DAC using software. It also demonstrates how to configure the ADC in ’Blocking Mode’ and read ADC values.
Note: Make sure your board is loaded with segger OpenSDA_V2_1.bin as usual method
Executing the project
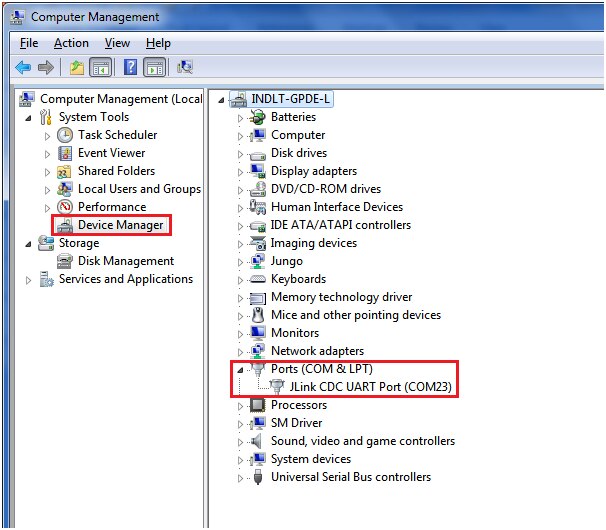
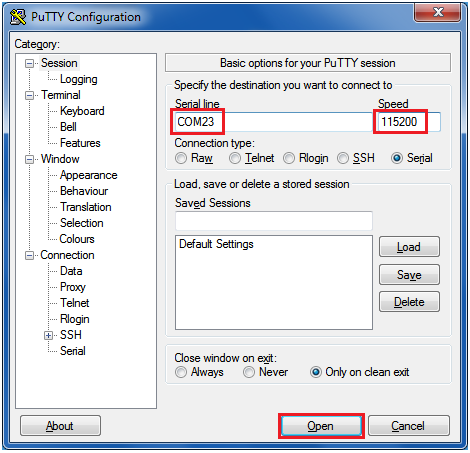
Plug in the boards to your computer and open the device manager from your control panel, you can see the com ports connected as shown below (in my case it is com23)
Open hyper terminal application from your computer, in my computer i am having putty terminal
Configure COM23 port to below configuration:
After opening putty terminal press the reset button then you can see the below execution window:

After pressing the space bar key from your computer, the user is prompted to enter a voltage to output on the DAC:
After entering a valid input, the ADC captures the voltage set by the DAC and displays the result in the terminal:
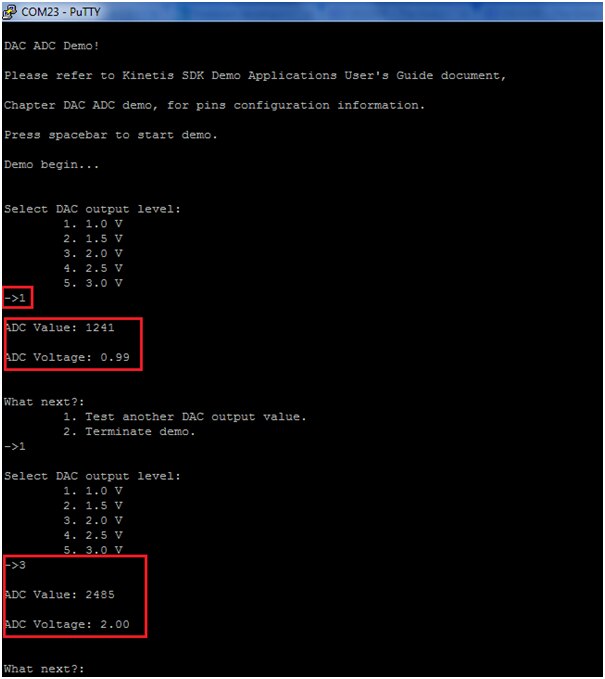
At this point, the user can test another DAC output value or terminate the demo. This configuration exhibits up to 2% error when reading back voltage.
Please check below the video output for quick understanding:
Happy Executing example demo apps from KSDK1.3 package on KW40Z (wireless MCU)... 