


Kinetis Software Development Kit (KSDK) 2.0 provides a comprehensive software package with pre-integrated FreeRTOS OS. Freescale provides FreeRTOS OS additions, such as RTOS driver wrappers, RTOS ready FatFs file system, and the implementation of FreeRTOS tickless mode.
This blog describes steps required to configure supported development tools used to build run, and debug applications with the FreeRTOS OS targeted for KSDK.
This blog describes the steps required to configure Kinetis Design Studio(KDS IDE to build run and debug example applications The helloworld demo application targeted for the FRDM-K64FFRDM-K64F Freedom hardware platform is used as an example though these steps can be applied to any example application in the KSDK
The Kinetis Software Development Kit (KSDK) is a software framework for developing applications on Kinetis MCUs. The software components in the framework include peripheral drivers, middleware and real time operating systems. This version of KSDK provides FreeRTOS OS version 8.2.3. Detail information about the distribution can be found on www.freertos.org. Framework contains a set of examples which shows basic FreeRTOS OS features. This makes it easy to start a new FreeRTOS project or just begin experimenting
with FreeRTOS OS. Selected drivers and middleware are RTOS ready with related FreeRTOS adaptation layer.
Steps involved:
1) Importing the project into workspace
2) Build and Run an example application
Preliminaries:
Download KW41Z Connectivity Software
The KW41Z Connectivity Software package integrates the Kinetis Software Development Kit v2.0 and all the wireless connectivity stacks required to develop your solution using IEEE 802.15.4 and/or Bluetooth Low Energy.
Click below Link to download the KW41Z Connectivity Software appropriate for your computer's operating system.
After installation you can find Connectivity Example Codes at below folder location:
C:\NXP\MKW41Z_ConnSw_1.0.2
Install Your Toolchain
NXP offers a complimentary toolchain called Kinetis Design Studio (KDS)
https://nxp.flexnetoperations.com/control/frse/download?element=7490587
Importing the project into workspace
Open Kinetis Design Studio Version: 3.2.0
it prompts the user to select a workspace location. KDS IDE is built on top of Eclipse, which uses workspace to store information about its current configuration; you can choose your own location
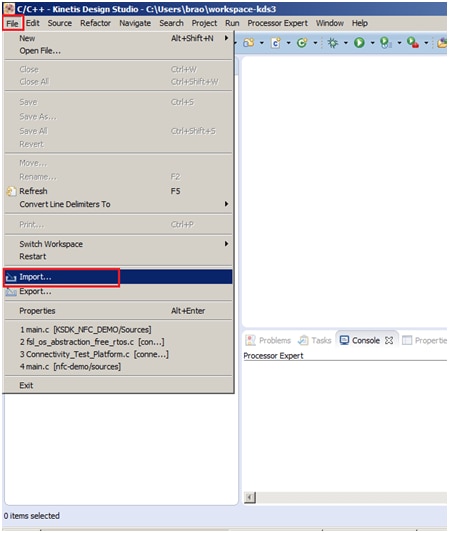
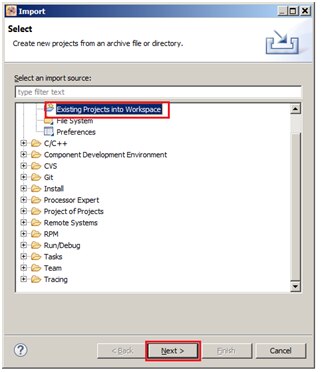
Select "File -> Import" from the KDS IDE menu. In the window that appears, expand the "Project of Projects" folder and select "Existing Projects Sets". Then, click the "Next" button
As we have installed the KW41 connectivity software at below location: point the browse option to this location or copy the path and paste it as shown in picture
“C:\nxp\MKW41Z_ConnSw_1.0.2\boards\frdmkw41z\rtos_examples\freertos_mutex\kds”

After pointing to the correct directory, your "Import Working Sets and Projects" window should look like the figure below. Click the "Finish" button.

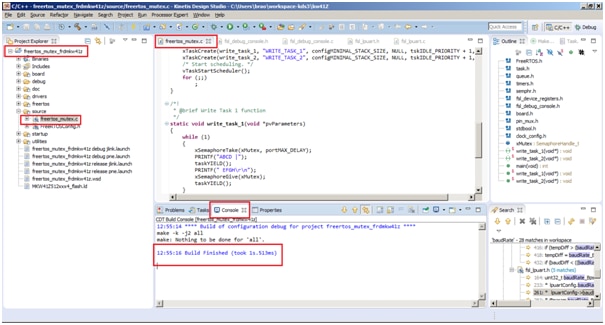
The workspace will look like figure shown below:

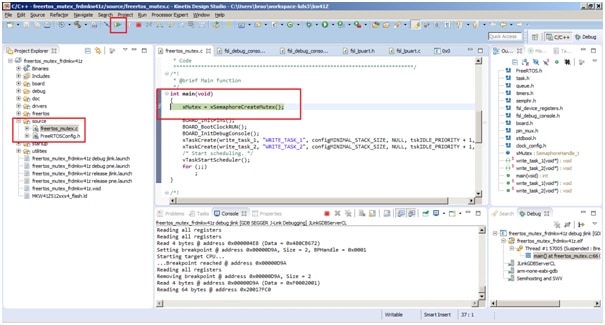
You can browse to source folder “freertos_mutex.c” where our main program is present
All the required includes can be found here: like supporting for kernel FreeRTOS and Freescale kinetis supported includes
/* Kernel includes. */
#include "FreeRTOS.h"
#include "task.h"
#include "queue.h"
#include "timers.h"
#include "semphr.h"

/* Freescale includes. */
#include "fsl_device_registers.h"
#include "fsl_debug_console.h"
#include "board.h"

#include "pin_mux.h"
#include <stdbool.h>
#include "clock_config.h"
Here in this example we are demonstrating how mutex manage access to common resource (terminal output)
The example application creates two identical instances of write_task. Each task will lock the mutex before printing and unlock it after printing to ensure that the outputs from tasks are not mixed together.
The test_task accept output message during creation as function parameter. Output message have two parts. If xMutex is unlocked, the write_task_1 acquire xMutex and print first part of message. Then rescheduling is performed. In this moment scheduler check if some other task could run, but second task write_task+_2 is blocked because xMutex is already locked by first write task. The first write_task_1 continue from last point by printing of second message part. Finaly the xMutex is unlocked and second instance of write_task_2 is executed.
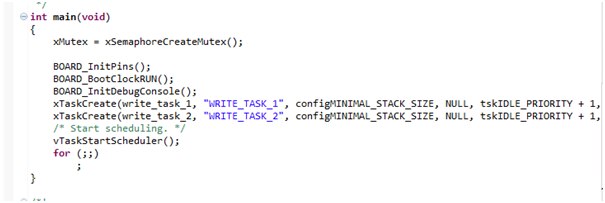
int main(void)
{
    xMutex = xSemaphoreCreateMutex();

    BOARD_InitPins();
 BOARD_BootClockRUN();
 BOARD_InitDebugConsole();
 xTaskCreate(write_task_1, "WRITE_TASK_1", configMINIMAL_STACK_SIZE, NULL, tskIDLE_PRIORITY + 1, NULL);
    xTaskCreate(write_task_2, "WRITE_TASK_2", configMINIMAL_STACK_SIZE, NULL, tskIDLE_PRIORITY + 1, NULL);
    /* Start scheduling. */
 vTaskStartScheduler();
    for (;;)
        ;
}

/*!
 * @brief Write Task 1 function
 */
static void write_task_1(void *pvParameters)
{
    while (1)
    {
 xSemaphoreTake(xMutex, portMAX_DELAY);
        PRINTF("ABCD |");
        taskYIELD();
        PRINTF(" EFGH\r\n");
 xSemaphoreGive(xMutex);
        taskYIELD();
    }
}

/*!
 * @brief Write Task 2 function
 */
static void write_task_2(void *pvParameters)
{
    while (1)
    {
 xSemaphoreTake(xMutex, portMAX_DELAY);
        PRINTF("1234 |");
        taskYIELD();
        PRINTF(" 5678\r\n");
 xSemaphoreGive(xMutex);
        taskYIELD();
    }
}
xMutex = xSemaphoreCreateMutex();
Creates a mutex, and returns a handle by which the created mutex can be referenced. Mutexes cannot be used in interrupt service routines.
If the mutex type semaphore was created successfully then a handle to the created mutex is returned. If the mutex was not created because the memory required to hold the mutexcould not be allocated then NULL is returned.
xTaskCreate(write_task_1, "WRITE_TASK_1", configMINIMAL_STACK_SIZE, NULL, tskIDLE_PRIORITY + 1, NULL);
vTaskStartScheduler();
Create a new task and add it to the list of tasks that are ready to run.
Each task requires RAM that is used to hold the task state, and used by the task as its stack. If a task is created using xTaskCreate() then the required RAM is automatically allocated from the FreeRTOS heap. If a task is created using xTaskCreateStatic() then the RAM is provided by the application writer, so can be statically allocated at compile time.
xSemaphoreTake():
Macro to obtain a semaphore. The semaphore must have previously been created with a call to xSemaphoreCreateBinary(), xSemaphoreCreateMutex() or xSemaphoreCreateCounting().
xSemaphoreGive(xMutex)
Macro to release a semaphore. The semaphore must have previously been created with a call to xSemaphoreCreateBinary(), xSemaphoreCreateMutex() or xSemaphoreCreateCounting(), and obtained using sSemaphoreTake().
taskYIELD();
taskYIELD() is used to request a context switch to another task. However, if there are no other tasks at a higher or equal priority to the task that calls taskYIELD() then the RTOS scheduler will simply select the task that called taskYIELD() to run again.
Debug UART port details can be found in Fsl_lpuart.c:
void LPUART_GetDefaultConfig(lpuart_config_t *config)
config->baudRate_Bps = 115200U;
Defined in fsl_lpuart.h:
status_t DbgConsole_Init(uint32_t baseAddr, uint32_t baudRate, uint8_t device, uint32_t clkSrcFreq);
void LPUART_SetBaudRate(LPUART_Type *base, uint32_t baudRate_Bps, uint32_t srcClock_Hz);
lpuartConfig.baudRate_Bps = 115200U;
Debugging (Build and Run an example application)
There are two project configurations (build targets) supported for each KSDK project:
• Debug – Compiler optimization is set to low, and debug information is generated for the executable. This target should be selected for development and debug.
• Release – Compiler optimization is set to high, and debug information is not generated. This target should be
selected for final application deployment.
Choose the appropriate build target, "Debug" or "Release", by clicking the downward facing arrow next to the hammer icon, as shown below. For this example, select the "Debug" target.

Run an example application
Now connect the KW41Z board to your machine USB port and click on hammer button to build the project to check whether the project is compiling and building without errors
You can see the result in console window as shown below:
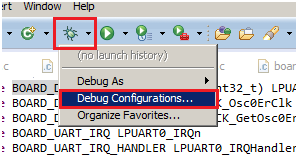
Now we will proceed to execute this project by clicking on debug configuration as shown:
Make sure to connect the development platform to your PC via USB cable between the OpenSDA USB and the PC USB connector.
Make the selection as shown
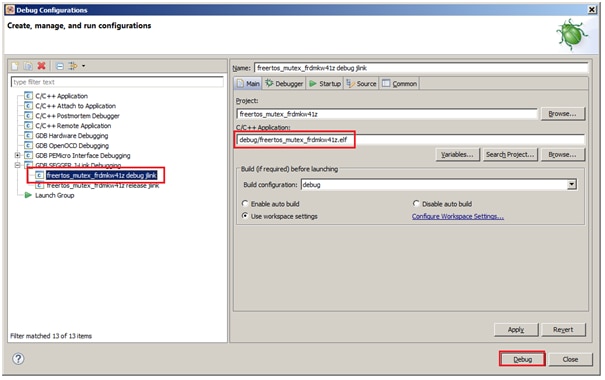
The application is downloaded to the target and automatically run to main(): You will see the execution window as shown below:
Now open an serial hyper terminal window to test this application:
My board is connected to com44 port as shown in device manager:

I am having putty serial terminal application with me, open with below set up configuration:

Now go back to the KDS execution window and
Start the application by clicking the "Resume" button

The FreeRTOS-Mutex application is now running watch what appears on serial terminal

Happy “FreeRTOS-Mutex execution using KW41Z”