


The content of this Tutorial has been extracted from mbed.com
Introduction to mbed OS
mbed OS is the operating system created for mbed-enabled boards. It allows C++ applications to run on these boards by providing APIs that you can use from your application to control the hardware.
mbed OS designed specifically for constrained devices, so it works behind the scenes to automatically make the most of the limited hardware and network resources available: It’s modular, It’s single-threaded and event-driven, It abstracts the hardware, It efficiently manages power and schedules tasks, It manages both device and communication security using mbed OS uVisor and mbed TLS, It supports multiple networking options
mbed-drivers: Abstract drivers for common hardware peripherals and communications interfaces such as SPI and I2C. Provides a higher level interface than the mbed HAL; these are the APIs that applications should use.
mbed OS and yotta
yotta is the build system used for mbed OS.whaat you need to understand at this point is that mbed OS applications cannot be built without yotta.
Working with mbed OS means you use yotta to combine your own application code with the mbed OS code base. yotta gets the relevant parts of mbed OS for you from its own registry.
yotta combines our code (application) with the mbed OS code-base and any other module (reusable library) that we may need. To tell yotta what our application needs, we add a list of dependencies to each application we write. The easiest way to add mbed OS to our application when we build it is to describe the component mbed-drivers as a dependency of our application, because mbed-drivers has most other components as its own dependencies, so yotta will build what we need. mbed OS applications are yotta executable modules, as opposed to yotta library modules.
What this all means is that to build applications that can run on top of mbed OS, you need:
- yotta.
- mbed OS modules and optional additional libraries, which yotta gets for you.
- Your own application code.

We begin our tutorial from here
Yotta Installing on Windows
To install yotta on windows you can either use the one shot windows installer or install all the dependencies and yotta manually.
1. Download the latest yotta windows installer.
2. Run the installer.
3. Click on Run Yotta shortcut on desktop or in start menu to run session with yotta path temporarily pre-pended to system path.
Let us proceed to test blinky example on yotta using FRDM-K64FFRDM-K64F freedom board
After installing yotta you can see the icon on your desktop as shown

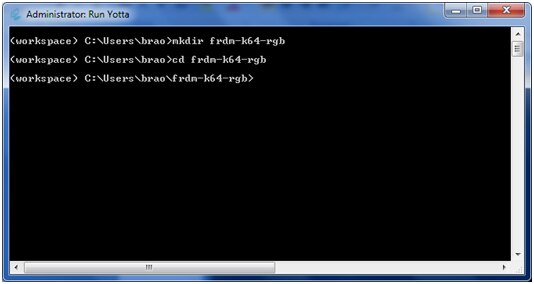
Double click on this icon and you will see the command prompt window as shown

Create an application
First create a directory with the name we want, and cd into it. I have created directory by name “frdm-k64-rgb”
Next we need to create module description by typing command
‘yotta init’
Initialize the module with yotta init and fill in the details.
Make sure you select executable as the module type: “yes”

You should now have several folders and files in your project directory as shown below

- The module.json file contains all the settings for your application; everything you just entered can be found in that file, so if you want to edit it later, for example to add a repository URL, that’s not a problem.
- The /source directory contains all the source files.
- The /test directory contains all tests you’ll write to test your module.
- The /blinky directory is where header files for your application will be created.
Select a target board:
yotta can build the same code for multiple targets it therefore needs to be told which target every build is for. So now that you have created a basic application, you need to set the target.
In this example we are going to use the Freescale FRDM-K64FFRDM-K64F board configured for building with gcc so you use target frdm-k64f-gcc
Type below command to build the target for frdm-K64 board
yotta target frdm-k64f-gcc

To check that the target has been set correctly run the ‘target’ command without parameters. It shows what yotta is currently targeting for its builds:
The information for this target has been downloaded to a directory named /yotta_targets. Do not edit or modify files here because they can be modified without your knowledge.

Install dependencies:
When you have a dependency, you need to install it before you can build your own project. You need to do this from the module directory.
Now you need to install the dependencies. In this application, you have mbed-drivers as your dependency:
yotta install mbed-drivers
You need to be online for the installation to work, because yotta downloads the modules from the yotta Registry.
yotta downloads and installs the modules to a directory named /yotta_modules. Do not edit or modify files here as they can be modified without your knowing.

Adding project code
Now that you have an application and its dependencies, you need source code to make the module useful.
In the /source folder, create a file called “rgb_blinky.cpp” with the following contents:
#include "mbed-drivers/mbed.h"
static void blinky_red(void) {
    static DigitalOut led1(LED1);
    led1 = 0;
     printf("LED Red = %d \n\r",led1.read());
    wait(1);
    led1 = 1;
     printf("LED Red = %d \n\r",led1.read());
     wait(1);
 }


static void blinky_green(void) {
    static DigitalOut led2(LED2);
    led2 = 0;
   printf("LED Green = %d \n\r",led2.read());
    wait(1);
   led2 = 1;
   printf("LED Green = %d \n\r",led2.read());
      wait(1);
  }

static void blinky_blue(void) {
      static DigitalOut led3(LED3);
    led3 = 0;
   printf("LED Blue = %d \n\r",led3.read());
     wait(1);
     led3 = 1;
     printf("LED Blue = %d \n\r",led3.read());
     wait(1);
}
void app_start(int, char**){
    // set 115200 baud rate for stdout
    get_stdio_serial().baud(115200);
 minar::Scheduler::postCallback(blinky_red).period(minar::milliseconds(1000));
 minar::Scheduler::postCallback(blinky_green).period(minar::milliseconds(2000));
 minar::Scheduler::postCallback(blinky_blue).period(minar::milliseconds(4000));
}

To support board-agnostic programming, the mapping of functionality to a pin is handled by board-specific HAL implementations.
static DigitalOut led(LED1);
DigitalOut.h is a header in mbed-drivers. The class DigitalOut in that header creates a digital output connected to a pin specified in the code.
This application causes Red led on-off every 1000 milli seconds (1 sec) defined by minar scheduler by calling blinky_red() function
And Green led on-off every 2000 milli seconds (2 sec) defined by minar scheduler by calling blinky_green() function
And Green led on-off every 4000 milli seconds (4 sec) defined by minar scheduler by calling blinky_blue() function
Building the module
The build command (like the target command) must be performed from within the directory of the module you’re trying to build. It must also be performed after selecting a yotta target, as explained above.
To build the application:
Run the
yotta build
command in the top level directory:

After the build is executed we can see the folder “build” is created which includes all the necessary headers required for the mbed os target. yotta compiles the binary to the /build folder.
Run the application on your board
Connect FRDM-K64 (pre loaded with mbed driver) board to your computer over USB. It should appear as removable storage.
Copy the binary “frdm-k64-rgb.bin” or From your file explorer, drag and drop the file onto your mbed board and see the LED blink.

The application is now on your board. This boards needs reset to start your application running.
Output execution:
The status of RGB led on the board will be as given below:

Hence the sequences of the LED are
“(R on/off) (R on/off) (G on/off) (R on/off) (R on/off) (G on/off) (B on/off)” “(R on/off) (R on/off) (G on/off) (R on/off) (R on/off) (G on/off) (B on/off)”... it repeats
Same sequence can be seen at the output hyperterminal by opening any hyperterminal of your choice, i am having putty terminal..
Configure the settings as shown below:

You can see the output of the RGB sequence in hyper terminal as shown below:

The video output of RGB blinking sequence is shown below
Helpful Links:
http://yottadocs.mbed.com/tutorial/tutorial.html
https://docs.mbed.com/docs/getting-started-mbed-os/en/latest/FirstProjectmbedOS/
https://docs.mbed.com/docs/getting-started-mbed-os/en/latest/
The project folder is attached along with this for quick evaluation
Happy starting mbedos... 
