


This document tutorial show the steps how to use LPCXpresso NXP IDE with KDS processor expert and kinetis SDK1.3 implementing using FRDM-K64FFRDM-K64F freedom board
NXP LPCXpresso IDE
LPCXpresso is a low-cost microcontroller (MCU) development platform ecosystem from NXP, which provides an end-to-end solution enabling engineers to develop embedded applications from initial evaluation to final production.
The LPCXpresso platform ecosystem includes:
- The LPCXpresso IDE, a software development environment for creating applications for NXP’s ARM-based “LPC” range of MCUs.
- The range of LPCXpresso development boards, each of which includes a built-in “LPC-Link”, “LPC-Link2”, or CMSIS-DAP debug probe. These boards are developed in collaboration with Embedded Artists.
- The standalone “LPC-Link2” debug probe.
The LPCXpresso IDE is based on the Eclipse IDE and features many ease-of-use and MCU specific enhancements. The LPCXpresso IDE also includes the industry standard ARM GNU toolchain, providing professional quality development tools at low cost. The fully featured debugger supports both SWD and JTAG debugging, and features direct download to on-chip flash.
Download LPCXpresso from
https://www.lpcware.com/lpcxpresso/download
and install it.
i have installed the recent one: LPCXpresso v8.1.4 [Build 606] [2016-03-14]
GNU ARM Eclipse Plugins
After installing the LPCXpresso open the tool and proceed to instal GNU ARM Eclipse Plugin.
LPCXpresso comes with its own build tools integration. As we are using Freescale/NXP parts i.e K64F cortex-M4 development board we need to install plugins using the open source GNU ARM Eclipse plugins.
Navigate to menu Help > Install New Software as shown below:

Then provide the following update website link
http://gnuarmeclipse.sourceforge.net/updates

Press ‘Next’ and go through the installation process.
Freescale Kinetis SDK
Kinetis SDK (KSDK) is a Software Development Kit that provides comprehensive software support for Freescale Kinetis devices. The KSDK includes a Hardware Abstraction Layer (HAL) for each peripheral and peripheral drivers built on top of the HAL. Demo and driver example applications are provided to demonstrate driver and HAL usage and to highlight the main features of supported SoCs.
Here we need to install Kinetis SDK software as we will be using its tools merged along with LPCXpresso
Proceed to install KSDK from below link:
click Here

I have installed KSDK version 1.3.0 it gets installed in below folder:
C:\Freescale\KSDK_1.3.0
The Kinetis SDK comes with an update package for Eclipse. On Windows, it is as shown below:

Install that package in LPCXpresso using the menu
Help > Install New Software
and then install that archive: as shown in below snap shot


Press ‘Next’ and go through the installation process.
Freescale Processor Expert
Next we need to install the processor expert package plugin to LPCXpresso:
Download Processor Expert V3.0.0 from below link:

This downloads you the “PEx_for_Kinetis_3.0.0_Install_into_Eclipse_4.4_Unzip_me.zip” file: as the name indicates:
unpack that archive. Besides documentation, there are two software packages in it.
“freescale_updater.zip” and
“PEx_for_Kinetis_3.0.0.zip”

Now we need to install plugin for this from LPCXpresso the menu Help > Install new Software and install the freescale_updater.zip first

Proceed further

Go through the installation process. Then, do the same, but this time install the PEx_for_Kinetis_3.0.0.zip:

Proceed further

The first time the IDE is launched with the new installed Processor Expert, it will update the list of supported processors:
Now the LPCXpresso platform is ready to work on with Kinetis SDK, we can create New project and test the execution.
Just to demonstrate it works properly with KSDK we will try to create a project for toggling an LED
Follow below snaps to create New Project


Select‘boards and pop down to FRDM-K64FFRDM-K64F

Select KSDK 1.3.0 as kinetis sdk
And make sure to click on Processor expert button


Now the project is created

You can see there is a red cross mark on the project created this is because we need to assign Build path and Toolchain path for this working set
LPCXpresso is using its own custom GNU toolchain and libraries, and not the de-facto standard one from ARM (GNU ARM Embedded from launchpad. The GNU ARM Eclipse make it easy to use different tool chains.
I will be giving the path of installed one of KDS 3.0 which can be found in your machine i.e
C:\Freescale\KDS_3.0.0
We need to provide paths here:

For build tools folder select “C:\Freescale\KDS_3.0.0\bin”
And for Toolchain folder “C:\Freescale\KDS_3.0.0\toolchain\bin”

Apply and click on ok
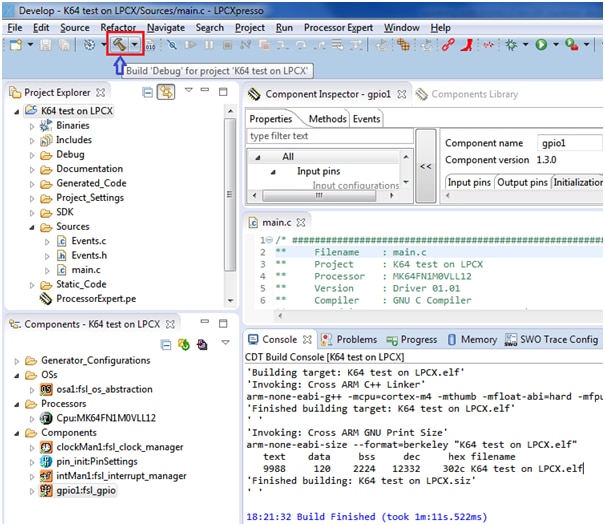
With this, the project should compile with out errors

Now in order to toggle the led we are going to add the fsl_gpio component from component library:

Open the component inspector for fsl_gpio to configure a Led to our project


Now to toggle just add below lines to main.c
for(;;) {
GPIO_DRV_TogglePinOutput(LEDRGB_RED);
for(int i=0;i<=10000000;i++);
}
Make sure you have loaded FRDM-K64 with J-Link driver for debugging purpose
Visit below link to download the firmware for K64F (j-link/mbed drivers)
click on debug configuration as shown below:

Now select “K64test on LPCX” under GDB SEGGER J-Link Debugging as shown below:

Click on resume button to run

Click on the resume button to ‘Run’ the project or ‘Step into’ and ‘Step over’ button for single stepping execution:
Now you can see the RED led toggling with some delay.
The project folder and executables are attached along with this for quick evaluation
Happy Merging the KSDK with LPCXpresso... 

