


Good day comrades!
Today I want to move aside from tricopter and tell you about one more common project.

Introduction
Not so long ago I was participating in AXP Logic Design Contest and took an honorable place there. I created an ultra-miniature robot that I called "nanoRobot". If you are interested in this project you can read about it in my article.
On the prototyping stage I had to significantly increase the robot’s size. After that I created a new power system, control system and sensors system. As you understand it was an absolutely different robot. I called it "miniRobot" and want to tell about this project in this post.
Hardware
So what is a miniRobot?
- 4WD robot chassis with two DC motors.
- Dual DC Motor Driver (H-bridge type).
- The heart of the system: Arduino Yun.
- Echo sensor: HC-SR04.
- Power supply: 2S LiPo battery.
- Some little things.
My regular readers probably know that I wanted to use Arduino Yun in my tricopter's OSD system (link), But after some reflections I rejected this solution: and the reason was simple: Yun is excessively powerful board for this project. So, look at pictures of my miniRobot:

Firmware
Arduino Yun is a dual processor module and for this board you need two independent software modules: MCU firmware and Linux software.
The first part – MCU firmware responsible for the connection between low level hardware and the core of the system (Linino Linux PC). Low level hardware consits of:
- DC Motor Drivers;
- echo Sensor;
- voltmeter.
#include <Bridge.h>
#define trigPin A1
#define echoPin A0
#define volt_Pin A2
#define LM1 10
#define LM2 9
#define RM1 5
#define RM2 6
#define SPEED 64

void setup()
{
  Bridge.begin();
  pinMode(trigPin, OUTPUT);
  pinMode(echoPin, INPUT);
  GoForward(0);
}

void GoForward(char spd)
{
  analogWrite(LM1,spd);
  analogWrite(LM2,0);
  analogWrite(RM1,spd);
  analogWrite(RM2,0);
}

void GoBack(char spd)
{
  analogWrite(LM1,0);
  analogWrite(LM2,spd);
  analogWrite(RM1,0);
  analogWrite(RM2,spd);
}

void TurnRight(char spd)
{
  analogWrite(LM1,spd);
  analogWrite(LM2,0);
  analogWrite(RM1,0);
  analogWrite(RM2,spd);
}

void TurnLeft(char spd)
{

  analogWrite(LM1,0);
  analogWrite(LM2,spd);
  analogWrite(RM1,spd);
  analogWrite(RM2,0);
}

int getEcho(void)
{
  long duration, distance;
  digitalWrite(trigPin,LOW);
  delayMicroseconds(2000);
  digitalWrite(trigPin, HIGH);
  delayMicroseconds(1000);
  digitalWrite(trigPin, LOW);

  duration = pulseIn(echoPin, HIGH);
  distance = (duration/2) / 29.1;

  if (distance > 200) return 200;
  if (distance < 0) return 0;
  return distance;
}

int charToInt(char a, char b, char c)
{
  int ans;
  if (a>'9' || b>'9' || c>'9') return 0;
  if (a<'0' || b<'0' || c<'0') return 0;
  ans = (a - 48)*100 + (b - 48)*10 + (c - 48);
  if (ans > 255) ans = 255;
  return ans;
}

char str[4];
void intToChar(int dat)
{
  int d = dat;

  if (dat<100) str[0] = '0';
  else
  {
    str[0] = d/100 + 48;
    d %= 100;
  }
  if (dat<10) str[1] = '0';
  else
  {
    str[1] = d/10 + 48;
    d %= 10;
  }
  str[2] = d + 48;
}
void loop()
{
  char dat[5], b;
  Bridge.get("COM",dat,4);
  b = toupper(dat[0]);

  int spd = charToInt(dat[1],dat[2],dat[3]);

  if (b == 'F') GoForward(spd);
  if (b == 'B') GoBack(spd);
  if (b == 'R') TurnRight(spd);
  if (b == 'L') TurnLeft(spd);
  if (b == 'N') GoForward(0);

  if (b == 'V')
  {
    intToChar(analogRead(volt_Pin) / 4);
    Bridge.put("DAT",str);
  }
  if (b == 'E')
  {
    intToChar(getEcho());
    Bridge.put("DAT",str);
  }
}
The second part – Actually I have a lot of control software, all of them written in my favorite programming language: python (files *.py):

However in this post I wish to talk only about two of them:
- remote control software (RC);
- autonomous control software (AC).
RC-software works in the following way: you are connecting to the robot via SSH (you can use KiTTY for this goal), run the python script and after that you use your keyboard to move the robot. Pretty simple! I made an interesting experiment: I provided access in my LAN to my friend who lives in South Africa. He connects to my WEB-camera and to the SSH terminal of my robot. He was able to control my robot from another point of the planet! After this experiment I know that we live in a world of the future 

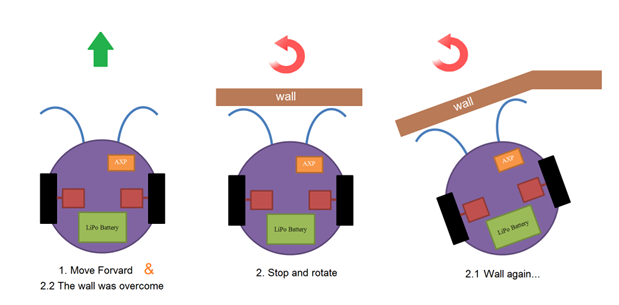
The second program is created for the bypassing the obstacles: if the robot sees the wall in his way it stops then moves back and rotates by ~90 degrees (actually, everything is more complicated, but the essence is not in it), after that the robot goes forward and the cycle repeats. For more info look at this picture with my nanoRobot:
This is a really funny experiment! Look at this:
In the end I realize that my miniRobot is so beautiful that I have not opportunities to hide it in "my little world". As you probably know, I work as a teacher in the university and in this semester I decided to implement this wonderful machine in my work program. For this goal I created a special set of control programs but it is a theme of another article
European Freedom Design Contest 2014
Everything went on as usual but one day I received a message from eeweb with proposals to participate in the European Freedom Design Contest. No doubt, I should participate and the project, of course, must be miniRobot. But there was one problem: in my project I must use one of Freescale FRDM development board. Carefully reading the documentation, I decided to opt for FRDM K64F. Why for this model? It's very simple! It has pin-to-pin compatibility with Arduino Yun and has a similar functionality, i.e. I only need to unmount my Arduino Yun and mount a new FREM K64F. Pretty simple!

But of course we need to start from the schematics. For development of the scheme according to the contest rules I need to use free online scheme editor from DigiKey (link). No sooner said than done!

The scheme is pretty simple and I think you'll not have problems with understanding. By the way, it is my first encounter with cloud CAD. By the way this is my first experience with online scheme editor. I was greatly surprised that this editor works even on my Nokia Lumia smartphone!

I need to found a FRDM board after that I need to fork my Arduino firmware on the new board. But I did the opposite: first of all I wrote the firmware. for this goal according to the contest rules I used another cloud service: mbed.org. I'll be honest - never in my life working with FRDM, I have finished forking just over an hour! This service is worked out so perfectly! I'll not go into technical details, I'll only show the final result:
#include "mbed.h"
#include "echo_sensor.h" // echo sensor library

#define LM1_ D3
#define LM2_ D7
#define RM1_ D6
#define RM2_ D5
#define RX_  D0
#define TX_  D1

PwmOut LM1(LM1_); // motors configuration
PwmOut LM2(LM2_);
PwmOut RM1(RM1_);
PwmOut RM2(LM2_);

//Serial link(TX_, RX_);  // bluetooth serial port
Serial link(USBTX, USBRX); // USB serial port

void analogWrite(mbed::PwmOut *prt, char spd) // write to PWM
{
  float a = spd / 2.56; // convert 0..256 to '%'
  *prt = a;
}

void GoForward(char spd)
{
  analogWrite(&LM1,spd);
  analogWrite(&LM2,0);
  analogWrite(&RM1,spd);
  analogWrite(&RM2,0);
}

void GoBack(char spd)
{
  analogWrite(&LM1,0);
  analogWrite(&LM2,spd);
  analogWrite(&RM1,0);
  analogWrite(&RM2,spd);
}

void TurnRight(char spd)
{
  analogWrite(&LM1,spd);
  analogWrite(&LM2,0);
  analogWrite(&RM1,0);
  analogWrite(&RM2,spd);
}

void TurnLeft(char spd)
{

  analogWrite(&LM1,0);
  analogWrite(&LM2,spd);
  analogWrite(&RM1,spd);
  analogWrite(&RM2,0);
}

int charToInt(char a, char b, char c)
{
  int ans;
  if (a>'9' || b>'9' || c>'9') return 0;
  if (a<'0' || b<'0' || c<'0') return 0;
  ans = (a - 48)*100 + (b - 48)*10 + (c - 48);
  if (ans > 255) ans = 255;
  return ans;
}

char str[4];
void intToChar(int dat)
{
  int d = dat;

  if (dat<100) str[0] = '0';
  else
  {
    str[0] = d/100 + 48;
    d %= 100;
  }
  if (dat<10) str[1] = '0';
  else
  {
    str[1] = d/10 + 48;
    d %= 10;
  }
  str[2] = d + 48;
}

char toupper(char ch)
{
  if (ch >= 'a' && ch <= 'z') return ch;
  if (ch >= 'A' && ch <= 'Z') return ch - 'A' + 'a';
  return 0;
}

int main(void)
{
  char dat[5], b, i;
  link.baud(9600);
  initEcho();  // initialize echo sensor
  GoForward(0); // stop all motors

  while (!link.readable());    // we are trying to find a starting byte
  while (link.getc() != 'Z');

  while (true)
  {
    if(link.readable()) // read data from the bluetooth serial port
    {
        for (i=0; i<5; i++)
        dat[i] = link.getc();
    }

    b = toupper(dat[0]);

    int spd = charToInt(dat[1],dat[2],dat[3]);

    if (b == 'F') GoForward(spd); // movements
    if (b == 'B') GoBack(spd);
    if (b == 'R') TurnRight(spd);
    if (b == 'L') TurnLeft(spd);
    if (b == 'N') GoForward(0);

    if (b == 'E') // echo sensor
    {
      intToChar(getEcho());
      link.printf(str);
    }
  }
}
In general all is simple: the robot receives the package of data from PC (via USB, RS-232 or Bluetooth), decodes it and after that runs one of procedures:
- Nxxx – robot stops;
- Fxxx – robot goes forward at ‘xxx’ speed;
- Bxxx – robot goes back at ‘xxx’ speed;
- Lxxx / Rxxx – robot turns left / right at ‘xxx’ speed;
- Exxx – the robot measures the distance to the obstacle and returns the result to the sender;
As you can see, everything is very simple! For normal operation of the program some debugging is needed, but in general I think everything is OK.
At the end of the road to the rebuilding of the robot, I was in for an unpleasant surprise: the contest would end in just 2 weeks! And I still did not have a development board. Unfortunately it was impossible to deliver the parcel to Russia for such a short time and I was never able to complete tests of the robot with the new board… However, I am absolutely sure that if I had at hand this board, final debugging of the program would take me a couple of hours and the robot undoubtedly would show a good drive
Unfortunately at this place I have to put a point now. But the project is alive and I will try to please my readers with new articles in near future! Of course, I can't fully describe the miniRobot in one post, so if you have any questions, do not hesitate to ask them! Wish me luck and see you soon!
UPD: Good news! FRDM K64F will soon be in my hands, so the project will continue!

