This tutorial was extracted from Erich Styger blog http://mcuoneclipse.wordpress.com with his agreement.
Sometimes it takes a very long time to realize a project. Adding the Arduino Ethernet Shield R3Arduino Ethernet Shield R3 to one of my Freescale FRDM boards is one of it: it took me a year until I have found a few days to work on using the Ethernet Shield with my FRDM-KL25ZFRDM-KL25Z.
FRDM-KL25Z with Ethernet Shield
I have not everything in place yet, so I decided to publish things in parts. So this is about part one: using the Micro SD Card on the Shield.
List of Tutorials
- FRDM with Arduino Ethernet Shield R3, Part 1: SD Card
- FRDM with Arduino Ethernet Shield R3, Part 2: Ping
- FRDM with Arduino Ethernet Shield R3, Part 3: Embedded Web Server
Arduino Ethernet Shield
The Arduino Ethernet Shield R3 has two main features:
Arduino Ethernet Shield with FRDM-KL25Z
- The Wiznet W5100 Ethernet Chip which makes an Ethernet connection possible for small microcontrollers. The W5100 has a Ethernet PHY and a microcontroller can use a simple socket API over SPI to communicate over Ethernet.
- A Micro-SD card socket which is on the same SPI bus as the W5100 chip. The SD card can be used for data logging or to host web pages/etc.
There might be better or less expensive solutions to connect a microcontroller to the Internet, but that Arduino Ethernet Shield is very affordable and easy to use. The shield is available for less than $15 from many online vendors. There is the option to add a PoE (Power over Ethernet) to the shield too (I don’t have this option).The schematics and Eagle files of the shield are available on the official Arduino site here. There are different versions of the shield: earlier versions had problems with the W5100 and SPI signals. I’m using the ’06 R3′ version which to my knowledge is the latest version.
Hardware Modification
Both the SD card and the W5100 are connected with SPI to the microcontroller. The shield is using the Arduino programming (SPI) adapter, and the SPI MISO/MOSI/CLK signals are *not* connected to the Arduino headers! So to have it working with my FRDM boards, I have to route the signals to the header.
Removal of SPI Programming Header
First, I removed the 2×3 SPI programming socket on the bottom side of the board:
Remove SPI Programming Header
Connecting SPI Signals to Header
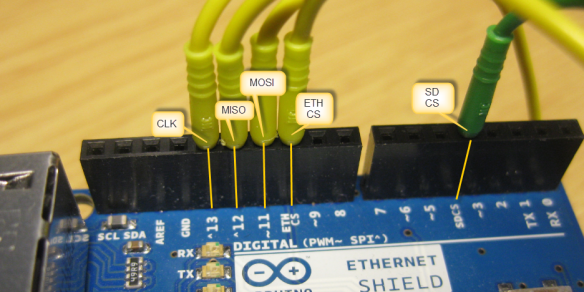
Next, I wired the SPI Signals MISO, MOSI and CLK to the Arduino header pins:
Routing SPI Signals
Pin Assignments
With this, I have all the SPI Signals on the header:
- Pin 13: CLK (SPI Clock) (to FRDM-KL2Z: PTD1)
- Pin 12: MISO (to FRDM-KL2Z: PTD3)
- Pin 11: MOSI (to FRDM-KL2Z: PTD2)
- Pin 10: ETH CS (Chip Select of W5100) (to FRDM-KL2Z: PTD0)
- Pin: 4: SC CS (Chip Select of SD Card) (to FRDM-KL2Z: PTA4)
With this, I can nicely check the signals with a logic analyzer too:
SPI Signal Connections
Application with SD Card Driver
For my project I’m using FatFS with FreeRTOS. Using multiple Processor Expert components the project is easily built up like with Lego bricks:
Processor Expert Components for Ethernet Shield
Concurrent Access to SPI Bus
Because both the SD card and the W5100 are using the same SPI bus, I need to make sure that access to it is protected with a critical section. For this I use a FreeRTOS semaphore.
First, I enable in FatFS reentrant and protected access to the file system:
Reentrant FatFS
This not only gives me fully reentrant access to the file system (multiple tasks can access the file system without reentrancy problems). It creates as well events for activating/deactivating the bus:
Activate and Deactivate of SD Card
These events I can route to my W5100 driver which there could lock/unlock a semaphore to protect access to the SPI bus, both for the SD card driver and for the Ethernet/W5100 driver:
1
2 3 4 5 6 7 8 9 10 11 12 13 14 15 16 17 18 19 |
static xSemaphoreHandle SPImutex = NULL; /* Semaphore to protect shell SCI access */
|
More about this in a future post.
Mounting File System
Because there is no ‘card detect’ pin available with the SD card socket, I have added the ‘mount’ and ‘unmount’ commands to the application shell command handler:
1
2 3 4 5 6 7 8 9 10 11 12 13 14 15 16 17 18 19 20 21 22 23 24 25 26 27 28 29 30 31 32 33 34 35 36 37 38 39 40 41 |
static bool cardMounted = FALSE;
|
With the Shell I have a command line interface to my application running on the board:
Shell Interface
With a card inserted, I can mount the file system.
Mounting File System
Summary
In this part I have covered how to use the SD card of the Arduino Ethernet Shield. The software project is available on GitHub here. That project already has an first version of the W5100 driver, and this will be subject of a future post.


