element14 Community
element14 Community
    Register Log In
  • Site
  • Search
  • Log In Register
  • About Us
  • Community Hub
    Community Hub
    • What's New on element14
    • Feedback and Support
    • Benefits of Membership
    • Personal Blogs
    • Members Area
    • Achievement Levels
  • Learn
    Learn
    • Ask an Expert
    • eBooks
    • element14 presents
    • Learning Center
    • Tech Spotlight
    • STEM Academy
    • Webinars, Training and Events
    • Learning Groups
  • Technologies
    Technologies
    • 3D Printing
    • FPGA
    • Industrial Automation
    • Internet of Things
    • Power & Energy
    • Sensors
    • Technology Groups
  • Challenges & Projects
    Challenges & Projects
    • Design Challenges
    • element14 presents Projects
    • Project14
    • Arduino Projects
    • Raspberry Pi Projects
    • Project Groups
  • Products
    Products
    • Arduino
    • Avnet Boards Community
    • Dev Tools
    • Manufacturers
    • Multicomp Pro
    • Product Groups
    • Raspberry Pi
    • RoadTests & Reviews
  • Store
    Store
    • Visit Your Store
    • Choose another store...
      • Europe
      •  Austria (German)
      •  Belgium (Dutch, French)
      •  Bulgaria (Bulgarian)
      •  Czech Republic (Czech)
      •  Denmark (Danish)
      •  Estonia (Estonian)
      •  Finland (Finnish)
      •  France (French)
      •  Germany (German)
      •  Hungary (Hungarian)
      •  Ireland
      •  Israel
      •  Italy (Italian)
      •  Latvia (Latvian)
      •  
      •  Lithuania (Lithuanian)
      •  Netherlands (Dutch)
      •  Norway (Norwegian)
      •  Poland (Polish)
      •  Portugal (Portuguese)
      •  Romania (Romanian)
      •  Russia (Russian)
      •  Slovakia (Slovak)
      •  Slovenia (Slovenian)
      •  Spain (Spanish)
      •  Sweden (Swedish)
      •  Switzerland(German, French)
      •  Turkey (Turkish)
      •  United Kingdom
      • Asia Pacific
      •  Australia
      •  China
      •  Hong Kong
      •  India
      •  Korea (Korean)
      •  Malaysia
      •  New Zealand
      •  Philippines
      •  Singapore
      •  Taiwan
      •  Thailand (Thai)
      • Americas
      •  Brazil (Portuguese)
      •  Canada
      •  Mexico (Spanish)
      •  United States
      Can't find the country/region you're looking for? Visit our export site or find a local distributor.
  • Translate
  • Profile
  • Settings
Freedom development platform
  • Products
  • Dev Tools
  • Freedom development platform
  • More
  • Cancel
Freedom development platform
Documents Low Power LLS Mode on Freescale's Kinetis FRDM-KL25Z board
  • Blog
  • Forum
  • Documents
  • Files
  • Members
  • Mentions
  • Sub-Groups
  • Tags
  • More
  • Cancel
  • New
Join Freedom development platform to participate - click to join for free!
Actions
  • Share
  • More
  • Cancel
Engagement
  • Author Author: bheemarao
  • Date Created: 7 Apr 2014 6:52 AM Date Created
  • Last Updated Last Updated: 8 Oct 2021 7:50 AM
  • Views 1069 views
  • Likes 0 likes
  • Comments 2 comments
Related
Recommended

Low Power LLS Mode on Freescale's Kinetis FRDM-KL25Z board

This tutorial was extracted from Erich Styger blog http://mcuoneclipse.wordpress.com with his agreement.


In “IoT: FreeRTOS Down to the Micro Amps” I’m using an application with FreeRTOS to get down in micro amps low power mode. Well, nearly all or my applications are using FreeRTOS because it makes the application scalable and extensible. Still, for anyone not used to an RTOS, that might be a hard start. So here we go: how to get into the Kinetis Low Power LLS Mode *without* an RTOS.


                         Power Measurement

                                                                 Power Measurement


Outline

In this project I create a very simple bare-metal application for the Freescale FRDM-KL25Z board. All what it does is to blink an LED from the Low Power wake-up interrupt to show that the application is running. Right after the wake-up interrupt, it enters again the LLS low power mode. So I enter LLS low power mode, and the timer interrupt will wake me up every second. As in LLS mode only a few timer and wake-up sources are available, I’m going to use the 1 kHz Low Power clock source.

The project and all the settings is available on GitHub at the link provided at the end of this article.

Processor Expert Components

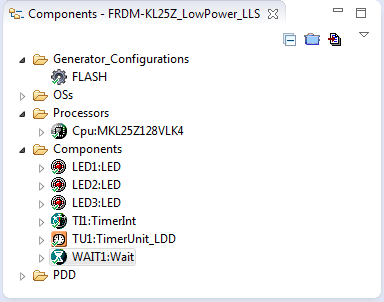
In this project, I’m using the following components:

  1. 3 LED components (RGB)
  2. TimerInt with TimerUnit_LDD for the low power wake-up timer
  3. WAIT component to flash different LED’s after power-up with a delay.

                         Processor Expert Components

                                   Processor Expert Components

Timer

As timer I use the LPTMR with a period of one second:

                         Low Power 1 Second Timer

                                                            Low Power 1 Second Timer

Inside the period settings, I configure it to use the LPO 1 kHz timer as clock source, as this clock still will run in LLS mode:

                         LPO 1 kHz Source

                                                            LPO 1 kHz Source

CPU Component

First, we need to configure the CPU component to be ready for low power mode. I enable the methods SetOperationMode() and GetLLSWakupFlags() (so the black x is removed):

                         Enabled SetOperationMode and GetLLSWakeupFlags

                                        Enabled SetOperationMode and GetLLSWakeupFlags

In the CPU properties, I enable all low power modes, configure LPTMR0 as wake-up source, and enable the INT_LLW wake-up interrupt:

                         Enabled Low Power Modes

                                                           Enabled Low Power Modes

Then I configure the WAIT, SLEEP and STOP modes (these are the three different low power modes in Processor Expert):

                         WAIT, SLEEP and STOP modes

                                                  WAIT, SLEEP and STOP modes

Source Files

Time to write the application code. I’m using Application.h and Application.c:


/*

* Application.h

*

*  Created on: Mar 16, 2014

*      Author: Erich Styger

*/

#ifndef APPLICATION_H_

#define APPLICATION_H_

/*! \brief callback called from the LLS wake-up interrupt */

voidAPP_OnLLSWakeUpInterrupt(void);

/*! \brief callback called from low power timer interrupt */

voidAPP_TimerInterrupt(void);

/*! \brief application main entry point */

voidAPP_Run(void);

#endif /* APPLICATION_H_ */


The the Application.c looks like this:

1


2

3

4

5

6

7

8

9

10

11

12

13

14

15

16

17

18

19

20

21

22

23

24

25

26

27

28

29

30

31

32

33

34

35

36

37

38


/*


* Application.c

*

*  Created on: Mar 16, 2014

*      Author: Erich Styger

*/


#include "Application.h"

#include "LED1.h"

#include "LED2.h"

#include "LED3.h"

#include "WAIT1.h"

#include "LPTMR_PDD.h"


void APP_OnLLSWakeUpInterrupt(void) {

  uint32_t tmp;


  tmp = Cpu_GetLLSWakeUpFlags();

  if (tmp&LLWU_INT_MODULE0) { /* LPTMR */

    LPTMR_PDD_ClearInterruptFlag(LPTMR0_BASE_PTR); /* Clear interrupt flag */

  }

}


void APP_TimerInterrupt(void) {

  LED1_Neg(); /* red LED */

}


void APP_Run(void) {

  LED2_On();

  WAIT1_Waitms(1000);

  LED2_Off();

  for(;;) {

    //LED3_Neg(); /* blue LED */

    //Cpu_SetOperationMode(DOM_WAIT, NULL, NULL); /* next interrupt will wake us up */

    //Cpu_SetOperationMode(DOM_SLEEP, NULL, NULL); /* next interrupt will wake us up */

    Cpu_SetOperationMode(DOM_STOP, NULL, NULL); /* next interrupt will wake us up */

  }

}

From main() in ProcessorExpert.c I call APP_Run():


1


2

3

4

5

6

7

8

9

10

11

12

13

14

15

16

17

18

19

20

21

22

23

24

25

26

27

28

29

30


#include "PE_Types.h"


#include "PE_Error.h"

#include "PE_Const.h"

#include "IO_Map.h"


/* User includes (#include below this line is not maintained by Processor Expert) */

#include "Application.h"


/*lint -save  -e970 Disable MISRA rule (6.3) checking. */

int main(void)

/*lint -restore Enable MISRA rule (6.3) checking. */

{

  /* Write your local variable definition here */


  /*** Processor Expert internal initialization. DON'T REMOVE THIS CODE!!! ***/

  PE_low_level_init();

  /*** End of Processor Expert internal initialization.                    ***/


  APP_Run();


  /*** Don't write any code pass this line, or it will be deleted during code generation. ***/

  /*** RTOS startup code. Macro PEX_RTOS_START is defined by the RTOS component. DON'T MODIFY THIS CODE!!! ***/

  #ifdef PEX_RTOS_START

    PEX_RTOS_START();                  /* Startup of the selected RTOS. Macro is defined by the RTOS component. */

  #endif

  /*** End of RTOS startup code.  ***/

  /*** Processor Expert end of main routine. DON'T MODIFY THIS CODE!!! ***/

  for(;;){}

  /*** Processor Expert end of main routine. DON'T WRITE CODE BELOW!!! ***/

} /*** End of main routine. DO NOT MODIFY THIS TEXT!!! ***/

And from Events.c I call my hooks:


1


2

3

4

5

6

7

8

9

10

11

12

13

14

15

16

17

18

19

20

21

22

23

24

25

26

27

28

29

30

31

32

33

34

35

36

37

38

39

40

41


/*


** ===================================================================

**     Event       :  TI1_OnInterrupt (module Events)

**

**     Component   :  TI1 [TimerInt]

**     Description :

**         When a timer interrupt occurs this event is called (only

**         when the component is enabled -  and the events are

**         enabled - ). This event is enabled only if a

**          is enabled.

**     Parameters  : None

**     Returns     : Nothing

** ===================================================================

*/

void TI1_OnInterrupt(void)

{

  APP_TimerInterrupt();

}


/*

** ===================================================================

**     Event       :  Cpu_OnLLSWakeUpINT (module Events)

**

**     Component   :  Cpu [MKL25Z128LK4]

*/

/*!

**     @brief

**         This event is called when Low Leakage WakeUp interrupt

**         occurs. LLWU flags indicating source of the wakeup can be

**         obtained by calling the [GetLLSWakeUpFlags] method. Flags

**         indicating the external pin wakeup source are automatically

**         cleared after this event is executed. It is responsibility

**         of user to clear flags corresponding to internal modules.

**         This event is automatically enabled when [LLWU interrupt

**         request] is enabled.

*/

/* ===================================================================*/

void Cpu_OnLLSWakeUpINT(void)

{

  APP_OnLLSWakeUpInterrupt();

}

Summary

This application shows how to set up an application for Low Power LLS mode, in a bare-metal mode. So it should be useful for you if you want to have a starting point for your own project without an RTOS.

The project and sources are available on GitHub.


  • Share
  • History
  • More
  • Cancel
  • Sign in to reply

Top Comments

  • shabaz
    shabaz over 7 years ago in reply to nik_mel +1
    Hi Nikolaos, The schematic (available from NXP website) can be examined for this, but from what I can see in the photo, it looks like J4. According to the schematic, you'd need to desolder a couple of…
  • shabaz
    shabaz over 7 years ago in reply to nik_mel

    Hi Nikolaos,


    The schematic (available from NXP website) can be examined for this, but from what I can see in the photo, it looks like J4. According to the schematic, you'd need to desolder a couple of zero-ohm resistors (R81 and R73) and then you could use J4 to insert your test equipment.

    • Cancel
    • Vote Up +1 Vote Down
    • Sign in to reply
    • More
    • Cancel
  • nik_mel
    nik_mel over 7 years ago

    Good evening

    I work with kl25z platform and i am trying to meassure the difference in current consumption when i go from high resolution to low-power.  Referring to the image at the top of the page, I wanted to know on which pins do you connected the two jump wires???


    friendly

    Nikos

    • Cancel
    • Vote Up 0 Vote Down
    • Sign in to reply
    • More
    • Cancel
element14 Community

element14 is the first online community specifically for engineers. Connect with your peers and get expert answers to your questions.

  • Members
  • Learn
  • Technologies
  • Challenges & Projects
  • Products
  • Store
  • About Us
  • Feedback & Support
  • FAQs
  • Terms of Use
  • Privacy Policy
  • Legal and Copyright Notices
  • Sitemap
  • Cookies

An Avnet Company © 2025 Premier Farnell Limited. All Rights Reserved.

Premier Farnell Ltd, registered in England and Wales (no 00876412), registered office: Farnell House, Forge Lane, Leeds LS12 2NE.

ICP 备案号 10220084.

Follow element14

  • X
  • Facebook
  • linkedin
  • YouTube