element14 Community
element14 Community
    Register Log In
  • Site
  • Search
  • Log In Register
  • About Us
  • Community Hub
    Community Hub
    • What's New on element14
    • Feedback and Support
    • Benefits of Membership
    • Personal Blogs
    • Members Area
    • Achievement Levels
  • Learn
    Learn
    • Ask an Expert
    • eBooks
    • element14 presents
    • Learning Center
    • Tech Spotlight
    • STEM Academy
    • Webinars, Training and Events
    • Learning Groups
  • Technologies
    Technologies
    • 3D Printing
    • FPGA
    • Industrial Automation
    • Internet of Things
    • Power & Energy
    • Sensors
    • Technology Groups
  • Challenges & Projects
    Challenges & Projects
    • Design Challenges
    • element14 presents Projects
    • Project14
    • Arduino Projects
    • Raspberry Pi Projects
    • Project Groups
  • Products
    Products
    • Arduino
    • Avnet Boards Community
    • Dev Tools
    • Manufacturers
    • Multicomp Pro
    • Product Groups
    • Raspberry Pi
    • RoadTests & Reviews
  • Store
    Store
    • Visit Your Store
    • Choose another store...
      • Europe
      •  Austria (German)
      •  Belgium (Dutch, French)
      •  Bulgaria (Bulgarian)
      •  Czech Republic (Czech)
      •  Denmark (Danish)
      •  Estonia (Estonian)
      •  Finland (Finnish)
      •  France (French)
      •  Germany (German)
      •  Hungary (Hungarian)
      •  Ireland
      •  Israel
      •  Italy (Italian)
      •  Latvia (Latvian)
      •  
      •  Lithuania (Lithuanian)
      •  Netherlands (Dutch)
      •  Norway (Norwegian)
      •  Poland (Polish)
      •  Portugal (Portuguese)
      •  Romania (Romanian)
      •  Russia (Russian)
      •  Slovakia (Slovak)
      •  Slovenia (Slovenian)
      •  Spain (Spanish)
      •  Sweden (Swedish)
      •  Switzerland(German, French)
      •  Turkey (Turkish)
      •  United Kingdom
      • Asia Pacific
      •  Australia
      •  China
      •  Hong Kong
      •  India
      •  Korea (Korean)
      •  Malaysia
      •  New Zealand
      •  Philippines
      •  Singapore
      •  Taiwan
      •  Thailand (Thai)
      • Americas
      •  Brazil (Portuguese)
      •  Canada
      •  Mexico (Spanish)
      •  United States
      Can't find the country/region you're looking for? Visit our export site or find a local distributor.
  • Translate
  • Profile
  • Settings
NI LabVIEW Community
  • Products
  • Dev Tools
  • NI LabVIEW Community
  • More
  • Cancel
NI LabVIEW Community
LabVIEW Challenge Blogs Learning LabVIEW: 4 - Anatomy of a Class
  • Blog
  • LabVIEW Challenge Blogs
  • Forum
  • Documents
  • Quiz
  • Files
  • Members
  • Mentions
  • Sub-Groups
  • Tags
  • More
  • Cancel
  • New
Join NI LabVIEW Community to participate - click to join for free!
  • Share
  • More
  • Cancel
Group Actions
  • Group RSS
  • More
  • Cancel
Engagement
  • Author Author: Andrew J
  • Date Created: 13 Oct 2023 1:53 PM Date Created
  • Views 879 views
  • Likes 5 likes
  • Comments 4 comments
  • test automation
  • labview 2023
  • ni
  • development
  • learning
  • labview
  • scpi
Related
Recommended

Learning LabVIEW: 4 - Anatomy of a Class

Andrew J
Andrew J
13 Oct 2023
Image to capture the idea of learning LabVIEW

Introduction

In this post I'm going to cover how LabVIEW represents a Class.  At the most basic level, LabVIEW programs consists of data being processed by Virtual Instruments (VIs); that is, a LabView application consists of functions called Virtual Instruments that operate on the data passed to it, returning zero to many pieces of data.  It's no different to any other programming language in that respect except that the syntax, if I can call it that, is wholly visual rather than text based.  A Class then is just a mechanism used by LabVIEW to provide a wrapper around a set of data (attributes) and VIs (methods.)

Table of Contents

  • Introduction
  • Anatomy of a Class
  • Anatomy of a Class, Briefly
  • Summary

Anatomy of a Class

In this video I walk through, amongst other things, the structure of a LabVIEW class, its attributes and methods, a method interface and a discussion on by-value and by-reference.  TLDW; the following sections give a much briefer overview.

You don't have permission to edit metadata of this video.
Edit media
x
image
Upload Preview
image

Anatomy of a Class, Briefly

Image showing the Project Explorer with an annotated class showing the attributes and methods that make it up

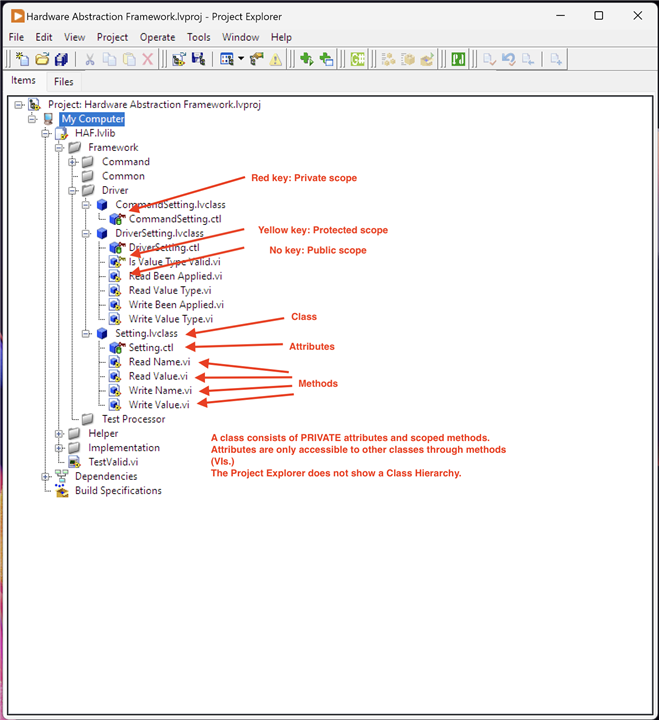
So the image above shows the make up of a Class: nothing different really to any other OO language.  Attributes are ALWAYS private and can only be accessed directly by the class itself, so accessor methods must be created if non-private access is required.  These can be created automatically by LabVIEW, including the Block Diagram implementing the functionality.  Methods can be defined as Static, only accessible by an instance of the class in which they are defined, or Dynamic Despatch, accessible by the class or its subclass.  In practice, this means you can pass any subclass into the method and it will work on that instance.  Methods can be overridden in this manner; it is not possible to overload a method.

Opening the Setting.ctl item:

Image showing the attributes of the Setting class consisting of a Cluster control containing two String Controls representing a Name attribute and a Value attribute.

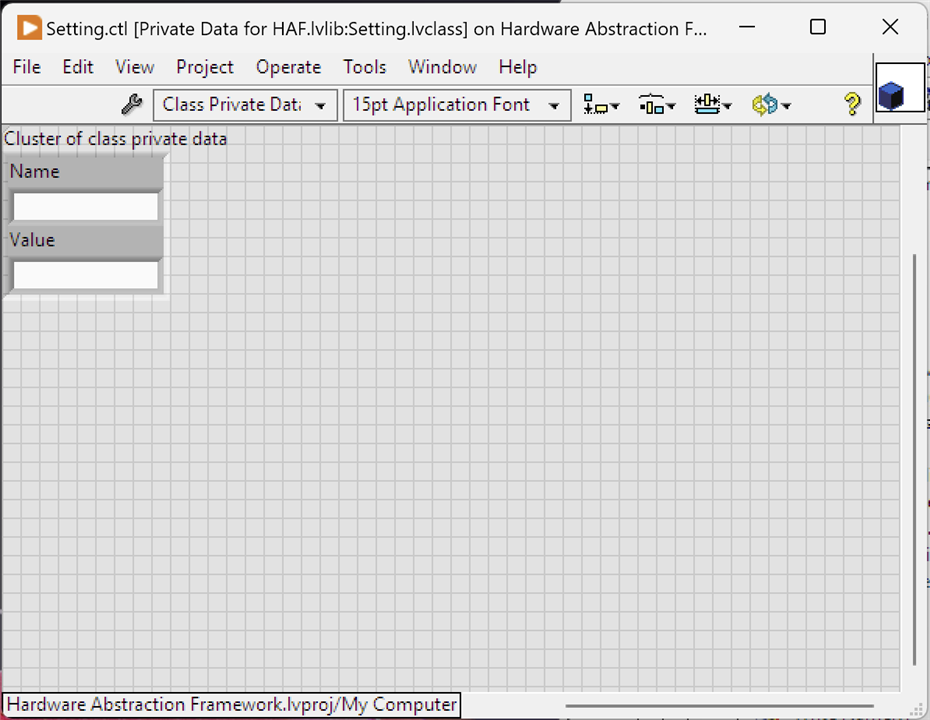
Here you can see that a class' private attributes are all contained within a Cluster, a Container type in LabVIEW that groups one or more controls together.  In this case, two String controls to hold a Name and a Value.  The previous image shows the Accessor methods created for these:  Read XXXX and Write XXXX.

Opening Read Name.VI shows the Front Panel:

Image showing the Front Panel of the method Read Name on class Setting.

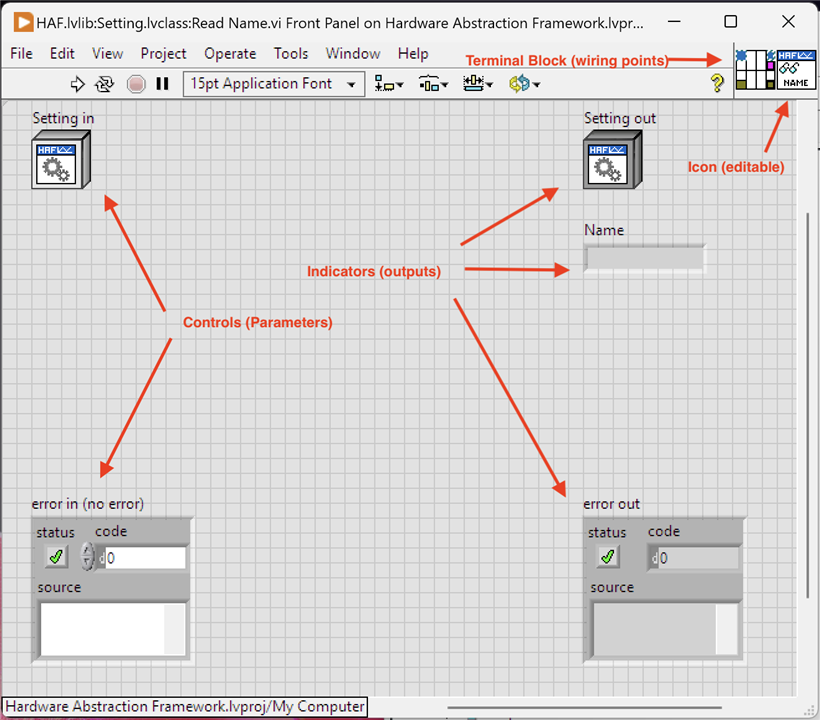
So the method's parameters are termed Controls and the outputs are termed Indicators.  These are wired in a Block Diagram by connections to the appropriate terminal (one per input control and one per output control) on the Terminal Block.   LabVIEW will load the appropriate control with the data passed along a wire connected to its terminal and will load the wire connected to the terminal of an indicator.

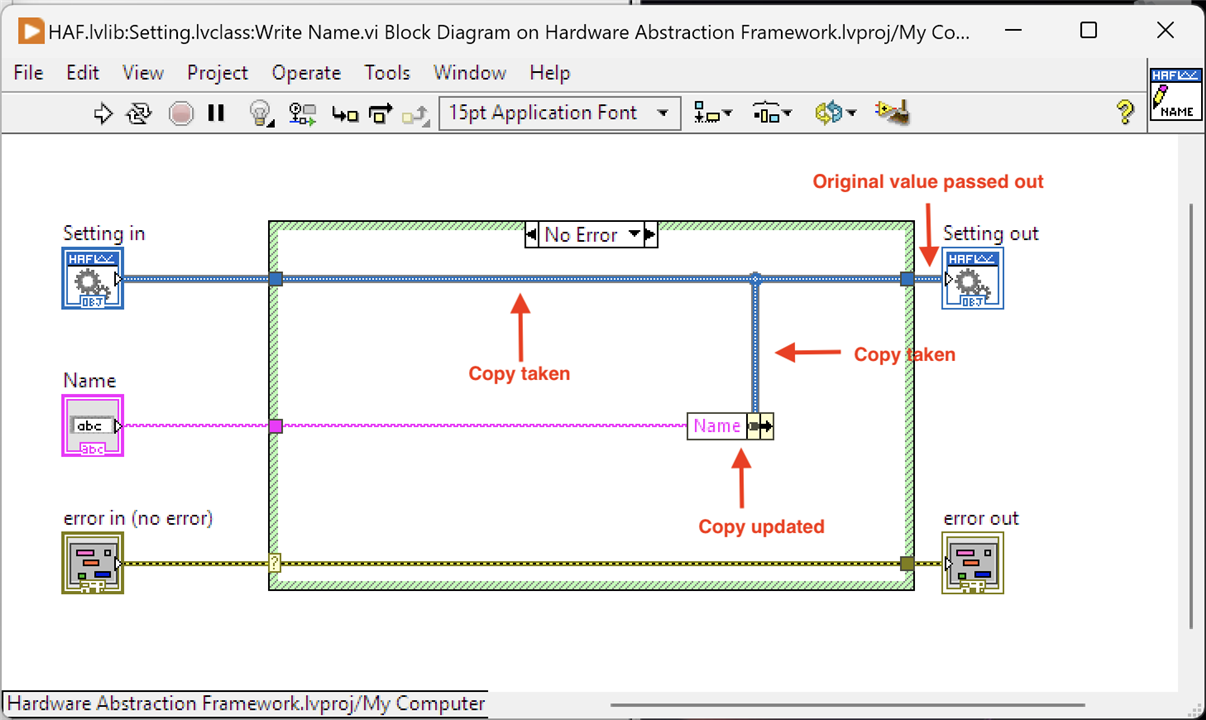
Looking at the Block Diagram for Read Name and Write Name:

Image showing the Block Diagram for Read Name method

Image showing the Block Diagram for method Write Name

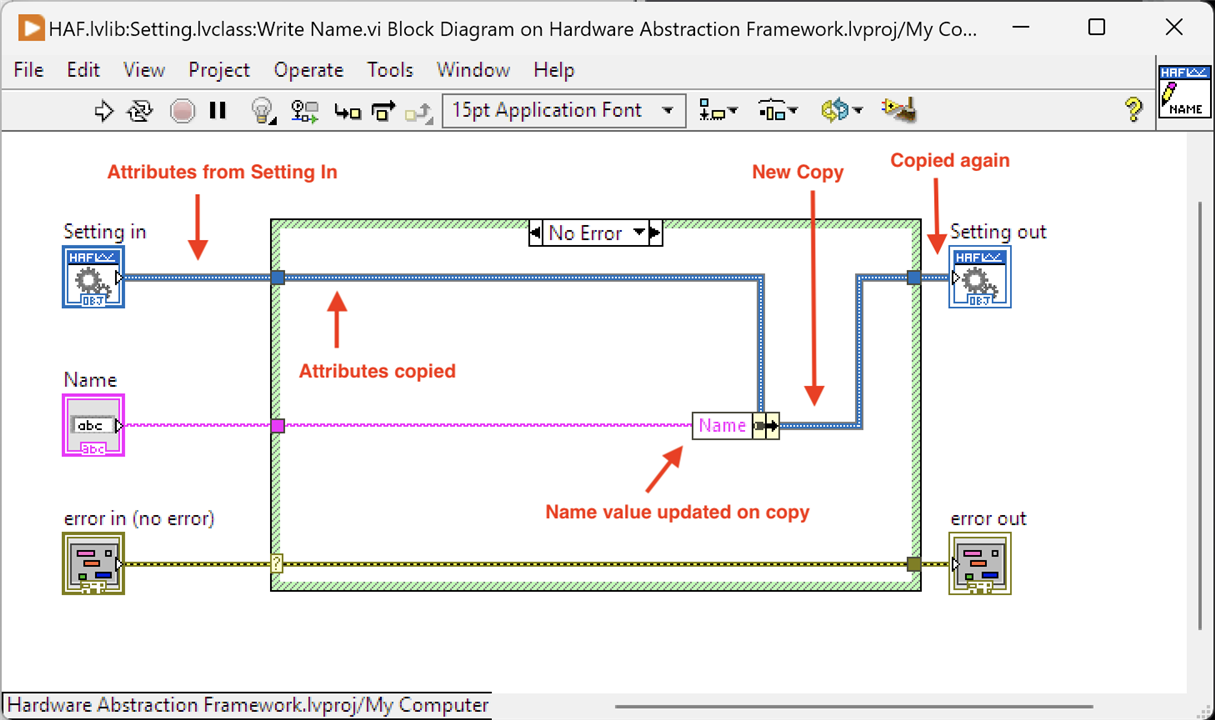
These block diagrams show how the controls and indicators are wired up.  More importantly, they show the by-value nature of LabVIEW: copies of the incoming instance's attributes are taken at many points.  For the Read Name function, the input Setting instance has its attributes copied and passed to a NEW instance to pass as an output value.  Setting In and Setting OUT are NOT the same instance in memory (i.e. these are not references.)  Note how the Write Name function does not wire the Setting In directly to Setting Out.  Instead, the copy of its attributes are updated with a new name value then this copy is used to populate a NEW instance of a Setting for passing as an output value.

What if I made a mistake and forgot that these copies occurred - i.e. I assumed I was given an object reference and was updating the single instance passed in and passed out:

Image showing an incorrect Write Name method as if LabVIEW worked by reference

If I assumed a by-reference architecture it would look like the above and I would think that when I changed the Name, I was changing it on the single instance referenced.  However, because it isn't by-reference you can see that when I change the Name value, it is on a copy of the data and is then discarded because I don't carry it forward to the Setting Out.  

Summary

  • Class make up is similar to other OO languages.
  • Access Scoping is used to control what other classes can access the methods of a class instance, just like other OO languages
  • It's extremely important to remember that LabVIEW works by-value and not by-reference.  It's easy to make a mistake when you are used to a more traditional OO language where objects are accessed by-reference.

Next: Setting up the Raspberry Pi Pico

  • Sign in to reply
  • Andrew J
    Andrew J over 1 year ago in reply to Jan Cumps

    Ha!  Have you tried Feedback Nodes yet?  Like shift registers but don't need to wire up at the structure edge which is handy in, say, a state machine, with a case structure with lots of cases.  It basically takes an output from a  vi/function and feeds it straight back to the input remembering the value between iterations.  Try it with your inner case, insert into array.

    • Cancel
    • Vote Up 0 Vote Down
    • Sign in to reply
    • More
    • Cancel
  • Jan Cumps
    Jan Cumps over 1 year ago in reply to Andrew J

    Yes - the "pass on" part is my own invention Slight smile

    • Cancel
    • Vote Up 0 Vote Down
    • Sign in to reply
    • More
    • Cancel
  • Andrew J
    Andrew J over 1 year ago in reply to Jan Cumps

    I know about Shift Registers but not heard of Shift Register Pass On. Are they the same thing?

    • Cancel
    • Vote Up 0 Vote Down
    • Sign in to reply
    • More
    • Cancel
  • Jan Cumps
    Jan Cumps over 1 year ago

    Have you encountered the shift-registers-pass-on mechanism yet? See the "arrow-shaped" connectors on the Consumer Loop below:

    image

    • Cancel
    • Vote Up 0 Vote Down
    • Sign in to reply
    • More
    • Cancel
element14 Community

element14 is the first online community specifically for engineers. Connect with your peers and get expert answers to your questions.

  • Members
  • Learn
  • Technologies
  • Challenges & Projects
  • Products
  • Store
  • About Us
  • Feedback & Support
  • FAQs
  • Terms of Use
  • Privacy Policy
  • Legal and Copyright Notices
  • Sitemap
  • Cookies

An Avnet Company © 2025 Premier Farnell Limited. All Rights Reserved.

Premier Farnell Ltd, registered in England and Wales (no 00876412), registered office: Farnell House, Forge Lane, Leeds LS12 2NE.

ICP 备案号 10220084.

Follow element14

  • X
  • Facebook
  • linkedin
  • YouTube