element14 Community
element14 Community
    Register Log In
  • Site
  • Search
  • Log In Register
  • About Us
  • Community Hub
    Community Hub
    • What's New on element14
    • Feedback and Support
    • Benefits of Membership
    • Personal Blogs
    • Members Area
    • Achievement Levels
  • Learn
    Learn
    • Ask an Expert
    • eBooks
    • element14 presents
    • Learning Center
    • Tech Spotlight
    • STEM Academy
    • Webinars, Training and Events
    • Learning Groups
  • Technologies
    Technologies
    • 3D Printing
    • FPGA
    • Industrial Automation
    • Internet of Things
    • Power & Energy
    • Sensors
    • Technology Groups
  • Challenges & Projects
    Challenges & Projects
    • Design Challenges
    • element14 presents Projects
    • Project14
    • Arduino Projects
    • Raspberry Pi Projects
    • Project Groups
  • Products
    Products
    • Arduino
    • Avnet Boards Community
    • Dev Tools
    • Manufacturers
    • Multicomp Pro
    • Product Groups
    • Raspberry Pi
    • RoadTests & Reviews
  • Store
    Store
    • Visit Your Store
    • Choose another store...
      • Europe
      •  Austria (German)
      •  Belgium (Dutch, French)
      •  Bulgaria (Bulgarian)
      •  Czech Republic (Czech)
      •  Denmark (Danish)
      •  Estonia (Estonian)
      •  Finland (Finnish)
      •  France (French)
      •  Germany (German)
      •  Hungary (Hungarian)
      •  Ireland
      •  Israel
      •  Italy (Italian)
      •  Latvia (Latvian)
      •  
      •  Lithuania (Lithuanian)
      •  Netherlands (Dutch)
      •  Norway (Norwegian)
      •  Poland (Polish)
      •  Portugal (Portuguese)
      •  Romania (Romanian)
      •  Russia (Russian)
      •  Slovakia (Slovak)
      •  Slovenia (Slovenian)
      •  Spain (Spanish)
      •  Sweden (Swedish)
      •  Switzerland(German, French)
      •  Turkey (Turkish)
      •  United Kingdom
      • Asia Pacific
      •  Australia
      •  China
      •  Hong Kong
      •  India
      •  Korea (Korean)
      •  Malaysia
      •  New Zealand
      •  Philippines
      •  Singapore
      •  Taiwan
      •  Thailand (Thai)
      • Americas
      •  Brazil (Portuguese)
      •  Canada
      •  Mexico (Spanish)
      •  United States
      Can't find the country/region you're looking for? Visit our export site or find a local distributor.
  • Translate
  • Profile
  • Settings
Cypress Kits
  • Products
  • Dev Tools
  • Cypress Kits
  • More
  • Cancel
Cypress Kits
Blog PWM Controled by on board Capacitive Slider
  • Blog
  • Forum
  • Documents
  • Polls
  • Files
  • Members
  • Mentions
  • Sub-Groups
  • Tags
  • More
  • Cancel
  • New
Join Cypress Kits to participate - click to join for free!
  • Share
  • More
  • Cancel
Group Actions
  • Group RSS
  • More
  • Cancel
Engagement
  • Author Author: jason721
  • Date Created: 30 Jul 2013 9:01 PM Date Created
  • Views 940 views
  • Likes 2 likes
  • Comments 1 comment
  • pioneer_kit
  • psoc4
  • psoc4_project2
  • capacitive_slider
  • pwm
  • single_board_computer
  • 100day
  • cypress_semiconductor
  • capacitive_slide
  • psoc4_project_2
  • capacitive_touch
  • psoc_creator
Related
Recommended

PWM Controled by on board Capacitive Slider

jason721
jason721
30 Jul 2013

From what I have used this for the thing that sold me the most about using this more in the future is the ease of using the PSoC Creator. It reminded me a lot of simulator software I used in school.


I decided to start with Project 2 CapSense Slider. Because I wanted to see how that worked as it is the one extra that intrigued me the most about the board when I first saw it.


Set up is very easy I downloaded the example and just extracted it to my Desktop. When the file loaded all that had to be done was clicking the Program button.


You don't have permission to edit metadata of this video.
Edit media
x
image
Upload Preview
image

That was nice but now I wanted to start changing it around a bit.


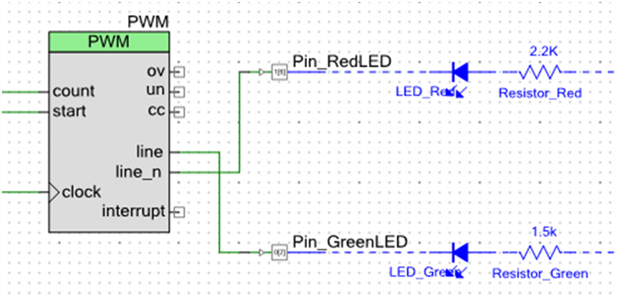
First thing I thought was to switch the LED order around. So I removed the wires from the Pin to the PWM and used the Wire Tool to re-draw them so the Red went to Line_n and the Green went to Line.


image

image


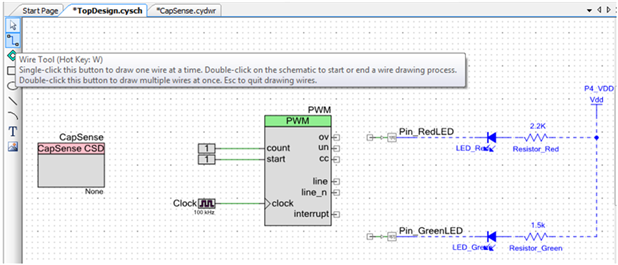
After reprogramming it worked beautifully.


You don't have permission to edit metadata of this video.
Edit media
x
image
Upload Preview
image

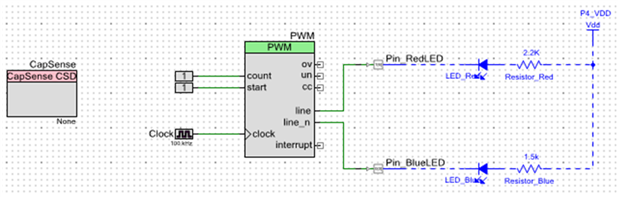
Next thing I wanted to do was to use the Blue LED instead of the Green one, because it was a very over powering light even when the duty cycle was just to about 0%.


First thing I did was look at Project 1 Blinking LED to find the pin address for the Blue LED P0(3) [Pin 27]. Next for doing this I knew I had to change the pin address. Reason being the text on the schematic had no bearing on what was actually being done. (Though, it would be awesome if it was that easy.) This is where all of a sudden I had a lot of difficulty. I looked all over the pin configuration and even went into the LED. But I was still not finding where to change the pin address.  All of the directions I found started from a blank project and showed me how to assign a pin but I didn’t know what screen that was on an existing project. Till finally I found where it stated cydwr file and over in the left side in the Workspace Explorer. That was what I was looking for all along. So I changed the Pin_GreenLED from pin 26 to pin 27.


image


Then for cosmetics I changed all of the naming of the part from Green to Blue.


image


I then programmed this to the board. It was nice a nice change because now I can see the transition easier.


You don't have permission to edit metadata of this video.
Edit media
x
image
Upload Preview
image


The last thing to I wanted to do was to really see how much each LED was on or off. I double clicked on the PWM and changed the clock speed to 1kHz.


image


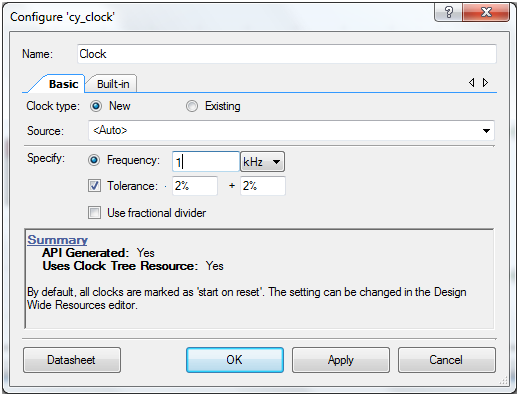
This way only one LED would be on at a time. Plus it also gives a nice strobe effect.


You don't have permission to edit metadata of this video.
Edit media
x
image
Upload Preview
image


Next I think I’m going to try and replicate starting from scratch and using some high output off board LEDs.

  • Sign in to reply
  • cy.gul
    cy.gul over 12 years ago

    Great work, Jason!

    And thanks for capturing your workflow and design process, very informative indeed!

    Maybe as a next step you could try mixing the RGB LEDs to create your own colors? =)

    • Cancel
    • Vote Up 0 Vote Down
    • Sign in to reply
    • More
    • Cancel
element14 Community

element14 is the first online community specifically for engineers. Connect with your peers and get expert answers to your questions.

  • Members
  • Learn
  • Technologies
  • Challenges & Projects
  • Products
  • Store
  • About Us
  • Feedback & Support
  • FAQs
  • Terms of Use
  • Privacy Policy
  • Legal and Copyright Notices
  • Sitemap
  • Cookies

An Avnet Company © 2025 Premier Farnell Limited. All Rights Reserved.

Premier Farnell Ltd, registered in England and Wales (no 00876412), registered office: Farnell House, Forge Lane, Leeds LS12 2NE.

ICP 备案号 10220084.

Follow element14

  • X
  • Facebook
  • linkedin
  • YouTube