element14 Community
element14 Community
    Register Log In
  • Site
  • Search
  • Log In Register
  • About Us
  • Community Hub
    Community Hub
    • What's New on element14
    • Feedback and Support
    • Benefits of Membership
    • Personal Blogs
    • Members Area
    • Achievement Levels
  • Learn
    Learn
    • Ask an Expert
    • eBooks
    • element14 presents
    • Learning Center
    • Tech Spotlight
    • STEM Academy
    • Webinars, Training and Events
    • Learning Groups
  • Technologies
    Technologies
    • 3D Printing
    • FPGA
    • Industrial Automation
    • Internet of Things
    • Power & Energy
    • Sensors
    • Technology Groups
  • Challenges & Projects
    Challenges & Projects
    • Design Challenges
    • element14 presents Projects
    • Project14
    • Arduino Projects
    • Raspberry Pi Projects
    • Project Groups
  • Products
    Products
    • Arduino
    • Avnet Boards Community
    • Dev Tools
    • Manufacturers
    • Multicomp Pro
    • Product Groups
    • Raspberry Pi
    • RoadTests & Reviews
  • Store
    Store
    • Visit Your Store
    • Choose another store...
      • Europe
      •  Austria (German)
      •  Belgium (Dutch, French)
      •  Bulgaria (Bulgarian)
      •  Czech Republic (Czech)
      •  Denmark (Danish)
      •  Estonia (Estonian)
      •  Finland (Finnish)
      •  France (French)
      •  Germany (German)
      •  Hungary (Hungarian)
      •  Ireland
      •  Israel
      •  Italy (Italian)
      •  Latvia (Latvian)
      •  
      •  Lithuania (Lithuanian)
      •  Netherlands (Dutch)
      •  Norway (Norwegian)
      •  Poland (Polish)
      •  Portugal (Portuguese)
      •  Romania (Romanian)
      •  Russia (Russian)
      •  Slovakia (Slovak)
      •  Slovenia (Slovenian)
      •  Spain (Spanish)
      •  Sweden (Swedish)
      •  Switzerland(German, French)
      •  Turkey (Turkish)
      •  United Kingdom
      • Asia Pacific
      •  Australia
      •  China
      •  Hong Kong
      •  India
      •  Korea (Korean)
      •  Malaysia
      •  New Zealand
      •  Philippines
      •  Singapore
      •  Taiwan
      •  Thailand (Thai)
      • Americas
      •  Brazil (Portuguese)
      •  Canada
      •  Mexico (Spanish)
      •  United States
      Can't find the country/region you're looking for? Visit our export site or find a local distributor.
  • Translate
  • Profile
  • Settings
Cypress Kits
  • Products
  • Dev Tools
  • Cypress Kits
  • More
  • Cancel
Cypress Kits
Forum PSoC 4 Pioneer Kit Community Project#05 - USB-I2C Utility
  • Blog
  • Forum
  • Documents
  • Polls
  • Files
  • Members
  • Mentions
  • Sub-Groups
  • Tags
  • More
  • Cancel
  • New
Join Cypress Kits to participate - click to join for free!
Actions
  • Share
  • More
  • Cancel
Forum Thread Details
  • Replies 9 replies
  • Subscribers 29 subscribers
  • Views 2727 views
  • Users 0 members are here
  • 100projects
Related

PSoC 4 Pioneer Kit Community Project#05 - USB-I2C Utility

cy.wbz
cy.wbz over 12 years ago

Hello!


Today's community project expands on a similar topic discussed in Project#04. We want to provide users with another method, and a software utility, to easily spit out data from their application over a serial interface. The users can then take that data and display it on a PC utility. As discussed in Project#04, we covered the USB-UART capabilities provided in the onboard PSoC 5LP device. For this post we want to discuss the USB-I2C capabilities also provided on the PSoC 5LP device.


This project demonstrats the I2C communication over the kit USB-I2C bridge. This project uses the Cypress Bridge Control Panel software with the Pioneer Kit. In this example we will write firmware for the PSoC 4 device that will communicate with the onboard PSoC 5LP device over the I2C protocol. The PSoC 5LP will then communicate up over the USB connection to the PC and display the I2C data in the Bridge Control Panel software.


It is important to note that the Bridge Control Panel software is included in every installation of PSoC Programmer. To find the Bridge Control Panel (BCP) software simply navigate to the software through the start menu Start>All Programs>Cypress>Bridge Control Panel. To utilize the USB-I2C capabilities on the Pioneer Kit the user will need to ensure they have installed PSoC Programmer 3.18, or later, which includes the Bridge Control Panel version 1.8 or later.


The example project is included at the bottom of this post. I'll walk the user thruogh various aspects of this example.


Project Schematic:


First the user will need to create their firmware for the PSoC 4 device. The project uses the PSoC 4 Serial Communication Block (SCB) component configured as a slave device.

image

                              (Actual PSoC Creator   Schematic "TopDesign.cysch")


Configure the component by right clicking on the component in your Top Design schematic view and selecting Configure. Please enable the following selections in the Configure menu window.


image

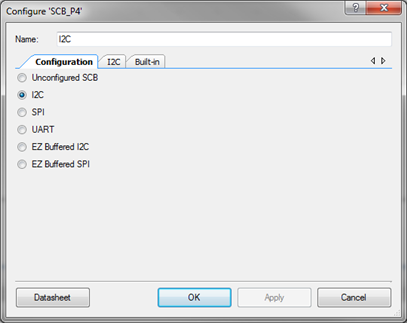
                              (Configure menu with I2C selected)


image


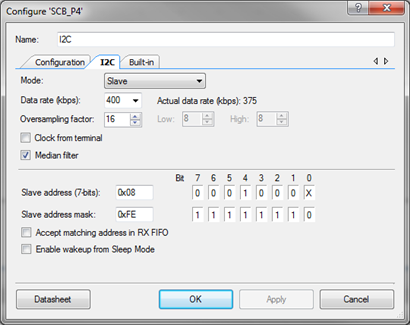
                              (Project I2C Settings)


As part of this example we will also want to ensure that we've connected the I2C component to the correct pins. We will select pins P3[0] (SCL I2C) and P3[1] (SDA I2C). The user can do this by opening the Design Resource window from the file tree. You will see in the example the 'USB-I2C.cydwr' listed in the workspace tree. Double click this item and then select the correct pins from the pin allocation window.


image

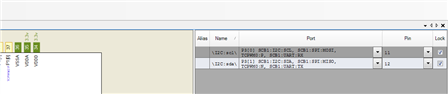
                              (Project I2C pin selections)


The main.c firmware in this project is very simple, it will enable the PSoC 4 device to transmit and receive I2C data to and from the BCP applciation using the PSoC 5LP as a USB-I2C bridge.


image


                              (PSoC Creator main.c firmware)


Hardware Connections:


For this example project you will not need to connect any hardware to the kit. As part of the kit design the PSoC 5LP and the PSoC 4 share the I2C connection. The PSoC 5LP is already connected to the PSoC 4 pins P3[0] and P3[1], no need for wires. We enabled these pin selections from within PSoC Creator in the steps above.


Once you have built the project and programmed the PSoC 4 device from within PSoC Creator you will be able to enable the functionality in the Bridge Control Panel. Simply open the Bridge Control Panel by navigating through the Start menu under the Cypress folder. Launch the Bridge Control Panel and select the KitProg option from the port menu.


image


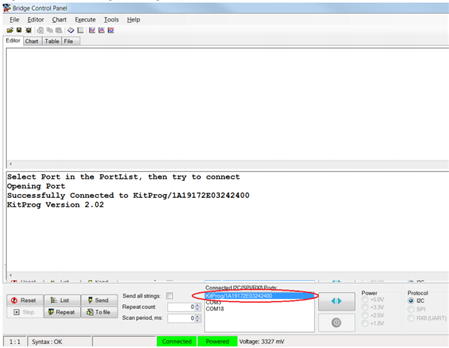
                              (Bridge Control Panel)


First we will need to setup the protocol configuration. You will see that under the protocol radio buttons (bottom right of the Bridge Control Panel) the I2C option is already selected. Navigate to the menu option Toos>Protocol Configuration. This will launch the configuration windows. Select the I2C tab and select the 400 kHz speed. Now that the Bridge Control Panel has been configured to align with our example project we can add in our commands to the Editor window.


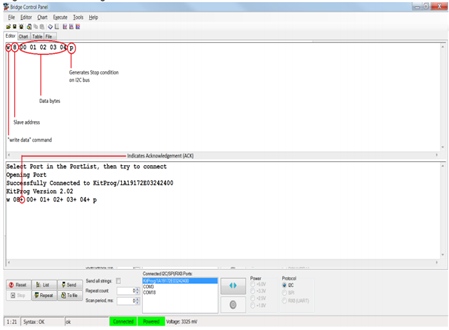
Navigate to the Editor window and add the following "Write" command into the window.


w 8 01 02 03 04 p


This command will generate a write command from the Bridge Control Panel to the target PSoC 4 device using the PSoC 5LP as a USB-I2C Bridge. The command initiates a write command with a slave address of 0x08 and a set of data ending with a Stop Condition on the I2C bus. The user will then click the 'Send' button at the bottom of the Bridge Control Panel window. If this write command is successful the output window will echo back the command with '+' signs to indicate successful transmission. A failed command will have '-' signs in from of the echoed command in the output window.


image

                              (Bridge Control Panel write command)


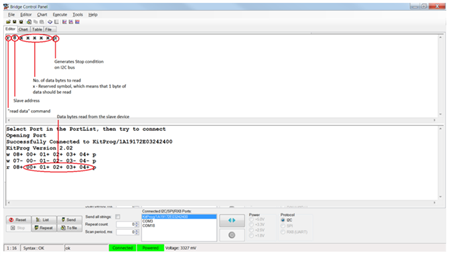
We can also initiate a read command from the Bridge Control Panel to read I2C data back from the PSoC 4 device. The image below shows an example of a read command.


r 8 x x x x p


The command initiates a read command targeting a device with a slave ID of 0x08 and then asks for values from the I2C buffer. The 'x' is a reserved Bridge Control Panel character that indicates a 1 byte data value. Again if the command is successful the output window will echo back the command and indicate success with '+' signs for all passing data. For the read action the output window will display the data that has been read from the device.


image


                              (Bridge Control Panel read command)


For more information on the Bridge Control Panel please see the help guide included in the root installation path of the Bridge Control Panel. Additionally there are a number of example projects that can help users understand how to use the Bridge Control Panel.


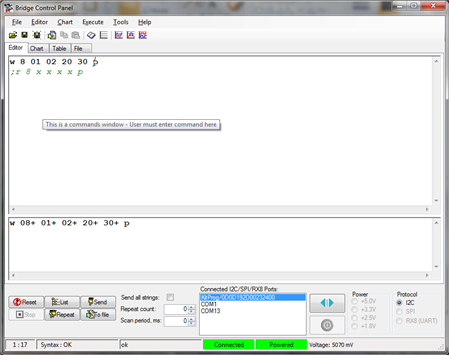
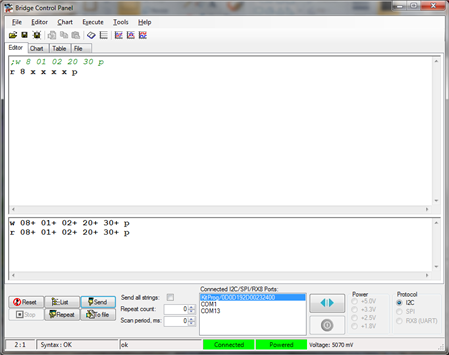
If you want to play around with the Bridge Control Panel and this example you can change the values that you are writing to the PSoC 4. Enter in the following text to the Bridge Control Panel (Note: to enter a new line in Bridge Control Panel you need to hit Ctrl+Enter):


w 8 01 02 20 30 p

;r 8 x x x x p


What this example does is to write a new set of data and then read back the values. I've used the ";" character in front of the read command to comment out the command and that is indicated by the green text. By pressing the Send button we will send the write command.


image


                              (Bridge Control Panel write/read commands)


Then comment out the write command using the ';' character and then decomment the read command and click the Send button. You will see that we've read back the values we wrote to the PSoC 4 device.


image


                              (Bridge Control Panel reading back new values)


Typically you can use this feature to control aspects of your application. For example turning on LEDs or starting motors. There are may more features available in the Bridge Control Panel that enable looping and charting of values so please see the help guide for more information.


I hope this example can help you out in your design.


Best,

Matt


Attachments:
USB-I2C example project.zip
  • Sign in to reply
  • Cancel

Top Replies

  • cy.gul
    cy.gul over 12 years ago +1
    Here's a short video demonstrating the project, specifically on how to use the Cypress Bridge Control Panel to talk to the USB-I2C bridge. players.brightcove.net/.../index.html
  • DAB
    DAB over 12 years ago in reply to cy.gul +1
    Hi Gagan, Does the Cypress software have and option to load in a prebuilt test script to exercise the I2C or other ports? I like the manual mode for initial testing, but it would be really neat if I could…
  • cy.wbz
    cy.wbz over 12 years ago in reply to DAB +1
    DAB, Also check out the PSoC Programmer COM hardware layer. This is an abstract layer that gives users access to APIs to write custom scripts. We support C#, C++, Perl, and Python examples. The examples…
  • cy.gul
    cy.gul over 12 years ago

    Here's a short video demonstrating the project, specifically on how to use the Cypress Bridge Control Panel to talk to the USB-I2C bridge.


    You don't have permission to edit metadata of this video.
    Edit media
    x
    image
    Upload Preview
    image

    • Cancel
    • Vote Up +1 Vote Down
    • Sign in to reply
    • Cancel
  • DAB
    DAB over 12 years ago in reply to cy.gul

    Hi Gagan,


    Does the Cypress software have and option to load in a prebuilt test script to exercise the I2C or other ports?


    I like the manual mode for initial testing, but it would be really neat if I could then set up a comprehensive set of test messages to exercise devices I might connect to the board.


    Just a thought,

    DAB

    • Cancel
    • Vote Up +1 Vote Down
    • Sign in to reply
    • Cancel
  • cy.gul
    cy.gul over 12 years ago in reply to DAB

    Hi DAB,


    The Bridge Control Panel software (BCP) has the ability to load in text files for a list of commands ('Open File...' under the File menu). You can then 'Send' or 'Send Repeat' these commands from the Execute menu. This could work as a means to script your tests to the board over I2C.


    This is also described pretty well in the help file that comes with the BCP (under Help menu).


    Hope that helps,

    -Gagan

    • Cancel
    • Vote Up 0 Vote Down
    • Sign in to reply
    • Cancel
  • cy.wbz
    cy.wbz over 12 years ago in reply to DAB

    DAB,


    Also check out the PSoC Programmer COM hardware layer. This is an abstract layer that gives users access to APIs to write custom scripts. We support C#, C++, Perl, and Python examples. The examples are in the root installation directory of PSoC Programmer. We also have an extensive user guide that describes the APIs. We are constantly adding more examples to this directory for custom scripting.


    This interface layer will support the Pioneer Kit and other Cypress programmers and bridges.


    Best,

    Matt

    • Cancel
    • Vote Up +1 Vote Down
    • Sign in to reply
    • Cancel
  • Former Member
    Former Member over 11 years ago

    Hi Matt,


    I downloaded the project file and successfully built and programmed it to my psoc 4. I set up the Bridge Control as stated in your instructions, but when I issue a read or write, both operations fail. I'm not sure where to start looking. I started the debugger but I quickly found out that I can have the debugger going and have the bridge control working as expected. Would you have any ideas?


    Thanks

    • Cancel
    • Vote Up 0 Vote Down
    • Sign in to reply
    • Cancel
  • Former Member
    Former Member over 10 years ago

    Gagan,


    Looking at Project #5, and working with Creator 3.0 (Component Pack 7).  Appears that some API functions may have changed from publication date to present.  Line 46 function does not exist in lates SCB datasheet; rather, I believe we're to use SCB_Start (), vs. I2C_Start ().  Can you confirm that main.c must be scrutinized line-by-line for this and other instances like it, where perhaps the SBC component may have been updated?


    Thanks for any clarifications &/or updates.


    Steven P.

    NY

    • Cancel
    • Vote Up 0 Vote Down
    • Sign in to reply
    • Cancel
  • Former Member
    Former Member over 10 years ago in reply to Former Member

    Daniel,


    I downloaded the project, upgraded the components to those available in PSoC Creator 3.1 SP1 and programmed the PSoC 4. I used Bridge Control Panel (BCP) to read and write data to the PSoC 4 and it works fine. Can you please confirm the following:

    1. The I2C address of PSoC 4 is listed when you click on "List" in BCP.

    2. The I2C protocol settings in BCP are the same as in the project.

    3. You have used the correct I2C pins for SCL and SDA.


    Your response " I started the debugger but I quickly found out that I can have the debugger going and have the bridge control working as expected" says you could use the debugger as well as use BCP for I2C at the same time? This cannot be done. You can either use BCP or the Debugger at a time but not both. Can you please confirm.


    Regards,

    Saheem

    • Cancel
    • Vote Up 0 Vote Down
    • Sign in to reply
    • Cancel
  • Former Member
    Former Member over 10 years ago in reply to Former Member

    Dear Saheem,


    I'm Steven P. from NY.  Perhaps 'Daniel' and I are having the same problem?


    I will review in the morning (EST).


    Thank you much.


    Steven P.

    NY

    • Cancel
    • Vote Up 0 Vote Down
    • Sign in to reply
    • Cancel
  • hey-guy
    hey-guy over 5 years ago

    This connection is working very well. Now I want to use python read and write the I2C buffers of the PSoC4. Is there a python libary?

    • Cancel
    • Vote Up 0 Vote Down
    • Sign in to reply
    • Cancel
element14 Community

element14 is the first online community specifically for engineers. Connect with your peers and get expert answers to your questions.

  • Members
  • Learn
  • Technologies
  • Challenges & Projects
  • Products
  • Store
  • About Us
  • Feedback & Support
  • FAQs
  • Terms of Use
  • Privacy Policy
  • Legal and Copyright Notices
  • Sitemap
  • Cookies

An Avnet Company © 2025 Premier Farnell Limited. All Rights Reserved.

Premier Farnell Ltd, registered in England and Wales (no 00876412), registered office: Farnell House, Forge Lane, Leeds LS12 2NE.

ICP 备案号 10220084.

Follow element14

  • X
  • Facebook
  • linkedin
  • YouTube