element14 Community
element14 Community
    Register Log In
  • Site
  • Search
  • Log In Register
  • Members
    Members
    • Benefits of Membership
    • Achievement Levels
    • Members Area
    • Personal Blogs
    • Feedback and Support
    • What's New on element14
  • Learn
    Learn
    • Learning Center
    • eBooks
    • STEM Academy
    • Webinars, Training and Events
    • More
  • Technologies
    Technologies
    • 3D Printing
    • FPGA
    • Industrial Automation
    • Internet of Things
    • Power & Energy
    • Sensors
    • More
  • Challenges & Projects
    Challenges & Projects
    • Design Challenges
    • element14 presents
    • Project14
    • Arduino Projects
    • Raspberry Pi Projects
    • More
  • Products
    Products
    • Arduino
    • Dev Tools
    • Manufacturers
    • Raspberry Pi
    • RoadTests & Reviews
    • Avnet Boards Community
    • More
  • Store
    Store
    • Visit Your Store
    • Choose Another Store
      • Europe
      •  Austria (German)
      •  Belgium (Dutch, French)
      •  Bulgaria (Bulgarian)
      •  Czech Republic (Czech)
      •  Denmark (Danish)
      •  Estonia (Estonian)
      •  Finland (Finnish)
      •  France (French)
      •  Germany (German)
      •  Hungary (Hungarian)
      •  Ireland
      •  Israel
      •  Italy (Italian)
      •  Latvia (Latvian)
      •  
      •  Lithuania (Lithuanian)
      •  Netherlands (Dutch)
      •  Norway (Norwegian)
      •  Poland (Polish)
      •  Portugal (Portuguese)
      •  Romania (Romanian)
      •  Russia (Russian)
      •  Slovakia (Slovak)
      •  Slovenia (Slovenian)
      •  Spain (Spanish)
      •  Sweden (Swedish)
      •  Switzerland(German, French)
      •  Turkey (Turkish)
      •  United Kingdom
      • Asia Pacific
      •  Australia
      •  China
      •  Hong Kong
      •  India
      •  Korea (Korean)
      •  Malaysia
      •  New Zealand
      •  Philippines
      •  Singapore
      •  Taiwan
      •  Thailand (Thai)
      • Americas
      •  Brazil (Portuguese)
      •  Canada
      •  Mexico (Spanish)
      •  United States
      Can't find the country/region you're looking for? Visit our export site or find a local distributor.
  • Translate
  • Profile
Cypress Kits
  • Products
  • Dev Tools
  • Cypress Kits
  • More
  • Cancel
Cypress Kits
Forum PSoC 4 Pioneer Kit Community Project#036 – What? I can use the PSoC 5LP too?
  • Blog
  • Forum
  • Documents
  • Members
  • Mentions
  • Sub-Groups
  • Tags
  • More
  • Cancel
  • New
Cypress Kits requires membership for participation - click to join
Actions
  • Share
  • More
  • Cancel
Forum Thread Details
  • Replies 7 replies
  • Subscribers 14 subscribers
  • Views 442 views
  • Users 0 members are here
  • 100projects
Related

PSoC 4 Pioneer Kit Community Project#036 – What? I can use the PSoC 5LP too?

cy.wbz
cy.wbz over 8 years ago

Hello!


We all know that we use a PSoC 5LP device on the Pioneer kit as a programmer, debugger, and USB-I2C/UART bridge. What I wanted to showcase today is that this PSoC 5LP is not limited to the programming and bridging functionality. In the PSoC 5LP device we have included a USB Bootloader for field upgrades. Due to this feature you have the ability to bootload your own custom PSoC 5LP code into the device. By doing this you overwrite the existing PSoC 5LP functionality for your custom project. Don’t worry about overwriting the PSoC 5LP code, you can easily restore the PSoC 5LP to its factory setting as a programmer and debugger. This bootloader allows you the opportunity to try out the PSoC 5LP device and enable your Pioneer kit as a dual ARM development platform.


The PSoC 5LP firmware is a single HEX file but has two components, the Bootloader Code and the Application Code. The application code is the programming, debugging, and bridging functionality we’ve see in our previous examples. The bootloader code governs the application code space, ensuring that the application code is correct and providing updates through serial interfaces (USB in this case). In this example we are creating new application code that will be sent to the PSoC 5LP device.


What I want to stress with this example is that while you purchased the Pioneer kit for the ARM PSoC 4 device but we have also given you access to our ARM Cortex M3 PSoC 5LP device. This makes the kit a dual chip kit for you to use and develop applications.


Forum Post Attachments:


At the bottom of this post we are including the following items:

  • Example Project Zip File
  • Zip File of Images
    • Project Schematic
    • Component Configurations


Components Used:


The user can download the example project at the bottom of this post. The project uses the following list of Creator Components:

  • PWM
  • Bootloadable
  • CyPins
  • CyClock


The components are configured by right clicking on the component in your Top Design schematic view and selecting Configure. Please enable the following selections in the Configuration windows for the listed components above.


Firmware Description:


The main.c firmware is included in the example project. Please review the commented sections for more details.


In this example we are showcasing the bootloadable characteristics of the PSoC 5LP. Using this bootloader the user can develop custom code targeting the PSoC 5LP device. The key point of this example is that you will lose the programming and debugging functionality of the device if you bootload custom application code. We will also show you how to recover the PSoC 5LP device to its factory settings.


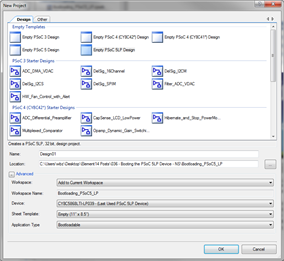
To create our example we will use PSoC Creator. Open PSoC Creator and create a new project. Select an empty Design, name the project, select the CY8C5868LTI-LP039 device, and select Bootloadable under the application type.


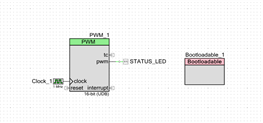
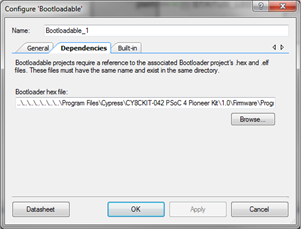
In our example we are going to create a simple blinking LED using a PWM. The example project below includes project design, components and routing. The only addition to our project is to add the ‘Bootloadable’ component. We must double click on this component to open the component options menu and select the dependencies tab. In this tab we must add the Bootloader hex file path. You can navigate to the kit install path:


…\Program Files\Cypress\CY8CKIT-042 PSoC 4 Pioneer Kit\[Kit Version]\Firmware\Programmer\KitProg_Bootloader\KitProg_Bootloader.hex


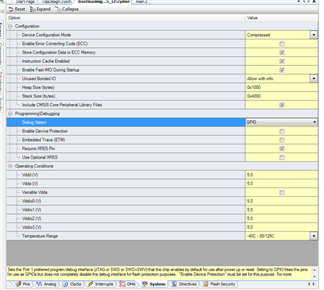
We need to ensure that the bootloadable file we are trying to create matches the same form and structure as the bootloader that is on the PSoC 5LP. This will allow us to boot in our application code over the USB interface.Next go to the DWR selections for 'System' and configure your settings:


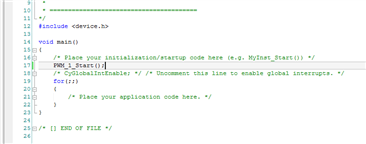
Next we will need to add in a little code in our main.c file. This code will start the PWM. In this example I’ve implemented the PWM and LED control in hardware so there will be no need for any C code to control the PWM or LED. All we need is a single line of code to start the PWM. Build and compile this example.


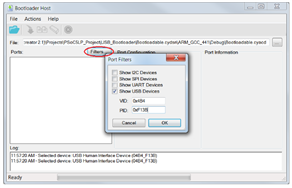
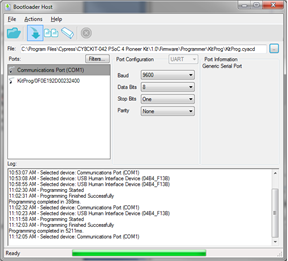
Once the project is built we will want to launch the Bootloader Host tool within PSoC Creator. This application will allow us to bootload our code into the PSoC 5LP device. Navigate to Tools>Bootloader Host. This will launch the tool. We are going to need to add a VID and PID ID to the filter. Please select the Filter button and then add in 0x4B4 for the VID and 0xF13B for the PID. This will allow us to identify the Bootloader on the PSoC 5LP.


Next we will want to connect the Pioneer kit to the PC. We will want to initiate the Bootloader sequence on the PSoC 5LP device so ensure that you are holding down the SW1 (RESET) button as you plug in the USB cable. Once the kit is plugged in release the SW1 switch. You will notice that the green status LED will be blinking once every second. This is how you know the PSoC 5LP is in Bootloader mode and waiting to be updated by the Host tool.


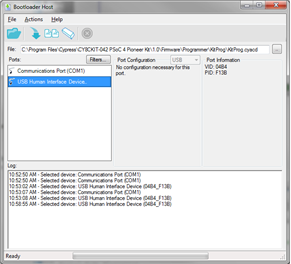
You will see a USB Human Interface Device in the port window. Select that port option, this is the PSoC 5LP bootloader.


Next we will want to select our new application code. Navigate up to the open folder button and select your new code file:


[Example]\Bootloading_PSoC5_LP\Bootloading_PSoC5_LP.cydsn\CortexM3\ARM_GCC_441\Debug \Bootloading_PSoC5_LP.cyacd


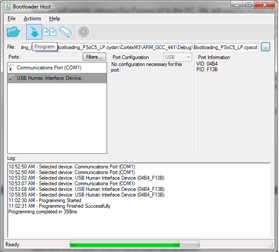
Next click the program button (downward facing arrow). The program will immediately bootload into the PSoC 5LP device over the USB connection. After the bootloading was complete you will see the Status LED blinking very fast. This is our new application on the PSoC 5LP device! I call it Rave Party LED!


The next steps will show you how to recover the PSoC 5LP device to its factory settings, to re-enable the programming, debugging, and bridging functionality. Again configure the Pioneer kit into bootloader mode by holding down the SW1 button and then replugging the kit into the PC using the USB cable. After releasing the SW1 switch the green status LED will blink at the 1 pulse per second rate, you are in bootloader mode. Next open the Bootloader Host tool, select the USB HID device from the port window. Next you will want to open the original application code source file. Click the open file button and navigate to the following file:


\CY8CKIT-042 PSoC 4 Pioneer Kit\1.0\Firmware\Programmer\KitProg\KitProg.cyacd


Click the program button and see the kit updated to the factory firmware.


Hardware Connections:


There are no hardware connections other than connecting the Pioneer Board to the PC using the USB cable.


Test Your Project:


After bootloading your example into the PSoC 5LP device you will see that the Status LED will be blinking very fast. You can expand on the Pioneer kit by creating custom PSoC 5LP examples. Please take some time to review the Pioneer Kit user guide for more information on what PSoC 5LP features and pins are available to users. The user guide can be found here:


www.cypress.com/CY8CKit-042


I hope this example can help you in your design.


Best,

Matt

Attachments:
8883.Project Images.zip
Bootloading_PSoC5_LP.zip
  • Reply
  • Cancel
  • Cancel

Top Replies

  • johnbeetem
    johnbeetem over 8 years ago +2

    Programming the PSoC 5LP is a great feature.  It has a lot of digital and analog resources and getting it at no extra cost is terrific.


    Do you know whether the factory programmer/debugger code allows the…

  • jesusantoniocar
    jesusantoniocar over 8 years ago in reply to DAB +2

    hello John.

    Please look at  section 3.2.2 in the user manual for pioneer kit .

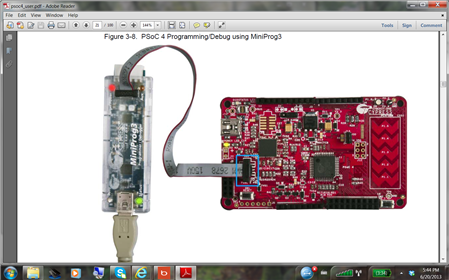
    you can use a minprog 3 to program and debug psoc 5 chip inside on the pionner kit.


    best regards,


    Jesus Antonio.

  • jesusantoniocar
    jesusantoniocar over 8 years ago in reply to jesusantoniocar +2

    John.

    you can downloag this :


    http://www.cypress.com/?docID=43713


    Really amazing and inexpensive kit , we can get only for $25 dollars this kit and explore two platforms (psoc4 and psoc5).


    regards,


    jesus

  • johnbeetem
    johnbeetem over 8 years ago

    Programming the PSoC 5LP is a great feature.  It has a lot of digital and analog resources and getting it at no extra cost is terrific.


    Do you know whether the factory programmer/debugger code allows the PSoC 5LP JTAG to be used for debugging?  If so, does it allow 4-wire JTAG or just 2-wire SWD?  This would allow PSoC 5LP experimentation by executing small programs in its 64KB SRAM without modifying Flash.


    Thanks!

    • Cancel
    • Up +2 Down
    • Reply
    • Cancel
  • cy.wbz
    cy.wbz over 8 years ago in reply to johnbeetem

    John,


    I'll have to check with the Firmware engineers on the NVL selections made on the P5LP firmware selections. I will get back with you.


    Thanks,

    Matt Buza

    • Cancel
    • Up +1 Down
    • Reply
    • Cancel
  • cy.wbz
    cy.wbz over 8 years ago in reply to johnbeetem

    John,


    We also provide a 10 pin header (J7 unpopulated) that can mate with the Miniprog3 programmer and debugger if you need debugging support for the PSoC 5LP. The J6 header (populated) is the same connector for the Miniprog3, but for the PSoC 4.


    -MattB

    • Cancel
    • Up +1 Down
    • Reply
    • Cancel
  • DAB
    DAB over 8 years ago

    I agree, being able to write applications for the 5LP presents the developer with a lot of additional flexibility in applications.


    The more I see, the more I am very impressed with this board and chip set.


    DAB

    • Cancel
    • Up 0 Down
    • Reply
    • Cancel
  • jesusantoniocar
    jesusantoniocar over 8 years ago in reply to DAB

    hello John.

    Please look at  section 3.2.2 in the user manual for pioneer kit .

    you can use a minprog 3 to program and debug psoc 5 chip inside on the pionner kit.


    best regards,


    Jesus Antonio.

    • Cancel
    • Up +2 Down
    • Reply
    • Cancel
  • jesusantoniocar
    jesusantoniocar over 8 years ago in reply to jesusantoniocar

    John.

    you can downloag this :


    http://www.cypress.com/?docID=43713


    Really amazing and inexpensive kit , we can get only for $25 dollars this kit and explore two platforms (psoc4 and psoc5).


    regards,


    jesus

    • Cancel
    • Up +2 Down
    • Reply
    • Cancel
  • ailtonljr
    ailtonljr over 7 years ago

    How can i make this work with Creator 3.0?

    • Cancel
    • Up 0 Down
    • Reply
    • Cancel
Element14

element14 is the first online community specifically for engineers. Connect with your peers and get expert answers to your questions.

  • Members
  • Learn
  • Technologies
  • Challenges & Projects
  • Products
  • Store
  • About Us
  • Feedback & Support
  • FAQs
  • Terms of Use
  • Privacy Policy
  • Legal and Copyright Notices
  • Sitemap
  • Cookies

An Avnet Company © 2022 Premier Farnell Limited. All Rights Reserved.

Premier Farnell Ltd, registered in England and Wales (no 00876412), registered office: Farnell House, Forge Lane, Leeds LS12 2NE.

ICP 备案号 10220084.

Follow element14

  • Facebook
  • Twitter
  • linkedin
  • YouTube