element14 Community
element14 Community
    Register Log In
  • Site
  • Search
  • Log In Register
  • About Us
  • Community Hub
    Community Hub
    • What's New on element14
    • Feedback and Support
    • Benefits of Membership
    • Personal Blogs
    • Members Area
    • Achievement Levels
  • Learn
    Learn
    • Ask an Expert
    • eBooks
    • element14 presents
    • Learning Center
    • Tech Spotlight
    • STEM Academy
    • Webinars, Training and Events
    • Learning Groups
  • Technologies
    Technologies
    • 3D Printing
    • FPGA
    • Industrial Automation
    • Internet of Things
    • Power & Energy
    • Sensors
    • Technology Groups
  • Challenges & Projects
    Challenges & Projects
    • Design Challenges
    • element14 presents Projects
    • Project14
    • Arduino Projects
    • Raspberry Pi Projects
    • Project Groups
  • Products
    Products
    • Arduino
    • Avnet Boards Community
    • Dev Tools
    • Manufacturers
    • Multicomp Pro
    • Product Groups
    • Raspberry Pi
    • RoadTests & Reviews
  • Store
    Store
    • Visit Your Store
    • Choose another store...
      • Europe
      •  Austria (German)
      •  Belgium (Dutch, French)
      •  Bulgaria (Bulgarian)
      •  Czech Republic (Czech)
      •  Denmark (Danish)
      •  Estonia (Estonian)
      •  Finland (Finnish)
      •  France (French)
      •  Germany (German)
      •  Hungary (Hungarian)
      •  Ireland
      •  Israel
      •  Italy (Italian)
      •  Latvia (Latvian)
      •  
      •  Lithuania (Lithuanian)
      •  Netherlands (Dutch)
      •  Norway (Norwegian)
      •  Poland (Polish)
      •  Portugal (Portuguese)
      •  Romania (Romanian)
      •  Russia (Russian)
      •  Slovakia (Slovak)
      •  Slovenia (Slovenian)
      •  Spain (Spanish)
      •  Sweden (Swedish)
      •  Switzerland(German, French)
      •  Turkey (Turkish)
      •  United Kingdom
      • Asia Pacific
      •  Australia
      •  China
      •  Hong Kong
      •  India
      •  Korea (Korean)
      •  Malaysia
      •  New Zealand
      •  Philippines
      •  Singapore
      •  Taiwan
      •  Thailand (Thai)
      • Americas
      •  Brazil (Portuguese)
      •  Canada
      •  Mexico (Spanish)
      •  United States
      Can't find the country/region you're looking for? Visit our export site or find a local distributor.
  • Translate
  • Profile
  • Settings
Cypress Kits
  • Products
  • Dev Tools
  • Cypress Kits
  • More
  • Cancel
Cypress Kits
Forum PSoC 4 Pioneer Kit Community Project#026 – XBee API RxTx Example
  • Blog
  • Forum
  • Documents
  • Polls
  • Files
  • Members
  • Mentions
  • Sub-Groups
  • Tags
  • More
  • Cancel
  • New
Join Cypress Kits to participate - click to join for free!
Actions
  • Share
  • More
  • Cancel
Forum Thread Details
  • Replies 5 replies
  • Subscribers 28 subscribers
  • Views 1309 views
  • Users 0 members are here
  • 100projects
Related

PSoC 4 Pioneer Kit Community Project#026 – XBee API RxTx Example

cy.wbz
cy.wbz over 12 years ago

Hello!


Today’s example demonstrates how to create and receive transmission packets with the XBee modules when they are in API mode. We will set up a network between two Pioneer kits using two Arduino wireless shields and two XBee wireless modules. The following hardware will be used:

  • CY8CKit-042 (x2) Buy Now!Buy Now!
  • Arduino wireless shield board (x2) Buy Now!Buy Now!
  • XBee wireless module (x2) Buy Now!Buy Now!


image

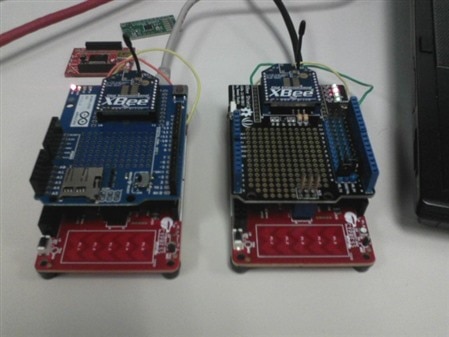
(Note: in the image above I'm using a different wireless board on the right, Seeedstudio. No changes needed to the example project)


Forum Post Attachments:


At the bottom of this post we are including the following items:

  • Example Project Zip File
  • Zip File of Images
    • Project Schematic
    • Component Configurations


Components Used:


The user can download the example project at the bottom of this post. The project uses the following list of Creator Components:

  • TX (Coordinator Example)
    • Two UARTs
      • XBee_UART
      • PC_COM_UART
    • Tinyprintf
  • RX (Router Example)
    • Two UARTs
      • XBee_UART
      • PC_COM_UART
    • Tinyprintf


The components are configured by right clicking on the component in your Top Design schematic view and selecting Configure. Please enable the following selections in the Configuration windows for the listed components above.


Firmware Description:


The main.c firmware is included in the example project. Please review the commented sections for more details.


This example project requires two separate firmware projects, one for each Pioneer kit. One pioneer kit will serve as the TX module and the second pioneer kit will serve as the RX module. In the attached zip file our example project contains two example projects in the workspace explorer (RX and TX). Each project needs to be built and programmed in their respective unit. It might be helpful when examining this project to mark on your respective kit which functionality it contains (RX or TX).


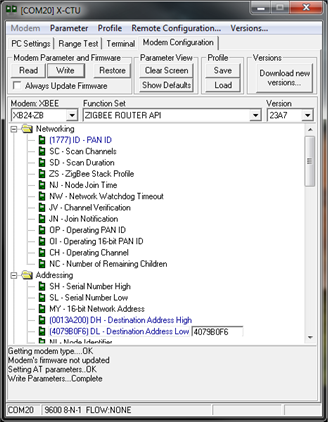
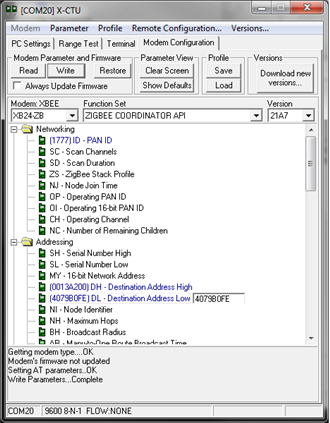
As in examples #024 and #025 we will need to configure both XBee wireless modules for our example. Again I used the sparkfun explorer module and the X-CTU software to perform the configuration. Please follow the configuration examples detailed in examples #024 and #025, with the following settings:


Coordinator Settings (TX) Module:

PAND ID: 1777 (Any address from 0 to FFFF works, must match router)

Destination Address High: 0013A200

Destination Address Low: (Unique address printed below the 0013A200 on the Router module).

Once the information has been entered into the system, click the Write Button in the X-CTU GUI to configure the module.


Router Settings (RX) Module:

PAND ID: 1777 (Any address from 0 to FFFF works, must match router)

Destination Address High: 0013A200

Destination Address Low: (Unique address printed below the 0013A200 on the Coordinator module).

Once the information has been entered into the system, click the Write Button in the X-CTU GUI to configure the module.


imageimage


Once the XBee modules have been configured program the respective kits with the correct project. A key point here will be to make sure you are connected to the correct ‘Active Project’. You will notice in the Workspace Explorer window that there are two examples, only one bolded. The bold text indicates the active project. When programming the target Pioneer kit you will need to make sure you have the correct active project selected. You can do this by simply right clicking on the project and setting to ‘Active’.


image


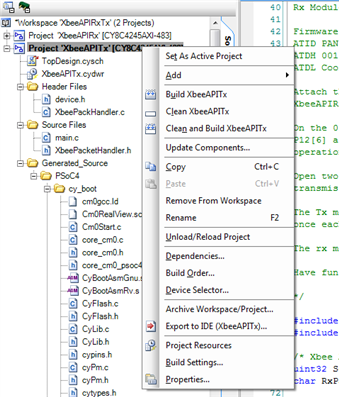
When programming the respective Pioneer kit from inside PSoC Creator it is easiest to ensure that only one Pioneer kit is connected to the PC at a time.


In both example projects you will notice two additional files “XbeePacketHandler.c” and “XbeePacketHandler.h”. These two files are additional code modules included in this example. They expose a number of additional APIs for your use. Please review the .h file for more information on the available features. This code module is analogous to the RGB LED code module shipped with example #014.


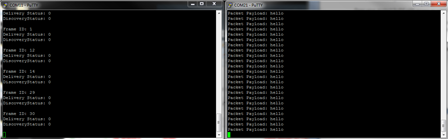
Once the user has connected the TX kit to the hyperterminal software you will see that the TX unit is displaying two values “Delivery Status” and “DiscoveryStatus”. These values are detailed in the “XbeePacketHandler.h” file. The returned value corresponds to a certain state of the radio network. Please review those values for more details.


Hardware Connections:


For this example you will need the following hardware:

  1. Two Pioneer Kits
  2. Two Wireless Shields
  3. Two XBee wireless modules


Connect the wireless modules to the wireless shield boards. Then connect the shield board to the Pioneer kits.


Enable the PSoC 4 UART connections to the PSoC 5LP on both Pioneer kits. Using wires make the following connections on each Pioneer kit:


PSoC 4 P4[1] -> P5LP P12[6]

PSoC 4 P4[0] -> P5LP P12[7]


Test Your Project:


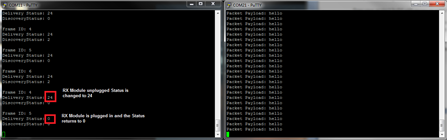
Once you have configured the wireless modules, programmed your PSoC 4s, and connect through the COM port to the Pioneer Board for each kit. You will see the hyperterminal software updating the values every second.


You can see that the ‘Payload’ from the TX kit has been delivered to the RX kit and then displayed on the COM port display from the RX kit.


image


image


As a final note, this is probably our most complex example. A lot of information was covered so please feel free to ask any questions in the comments below. We’ll be happy to answer and clarify any aspect of the example.


I hope this example can help you out in your design.


Best,


Matt


P.S. I was just sent an email from a Cypress engineer to some Pioneer Kit robot videos. Another engineer, watching the videos with me, just took the Xbee system off my desk to go and add remote control to his robot. So stay tuned more projects are coming...

Attachments:
XbeeAPIRxTx.cywrk.Archive01.zip
8640.Project Images.zip
  • Sign in to reply
  • Cancel

Top Replies

  • jesusantoniocar
    jesusantoniocar over 12 years ago +1
    Hello Matt. Another excellent project that teach me how can use and buld a wireless application with XBE hardware. what wil be the amazing project for today friday ?.. best regards, Jesus Antonio
  • cy.wbz
    cy.wbz over 12 years ago in reply to jesusantoniocar +1
    I'm writing it up now. Another XBee project. This time, homemade boards for the Pmod port on the Pioneer kit using XBee. It should be up in a few hours. Best, Matt
  • jesusantoniocar
    jesusantoniocar over 12 years ago

    Hello Matt.

    Another excellent project that teach me  how can use and buld a wireless application with XBE hardware.

    what wil be the amazing project for today  friday ?..


    best regards,


    Jesus Antonio

    • Cancel
    • Vote Up +1 Vote Down
    • Sign in to reply
    • Cancel
  • cy.wbz
    cy.wbz over 12 years ago in reply to jesusantoniocar

    I'm writing it up now. Another XBee project. This time, homemade boards for the Pmod port on the Pioneer kit using XBee. It should be up in a few hours.


    Best,

    Matt

    • Cancel
    • Vote Up +1 Vote Down
    • Sign in to reply
    • Cancel
  • Former Member
    Former Member over 10 years ago in reply to cy.wbz

    Dear Matt,


    Nice topic.Well done!


    But download link is broken.


    Can you please send the project to my email.please


    seephane@gmail.com

    • Cancel
    • Vote Up 0 Vote Down
    • Sign in to reply
    • Cancel
  • Former Member
    Former Member over 10 years ago

    Great Matt!!

    Can I use these API's with psoc 5lp??


    Regards

    Edgard

    • Cancel
    • Vote Up 0 Vote Down
    • Sign in to reply
    • Cancel
  • clem57
    clem57 over 10 years ago in reply to Former Member

    If you use Psoc Creator and change the target. Also check pin assignments. Yes is the qualified answer

    Clem.

    • Cancel
    • Vote Up 0 Vote Down
    • Sign in to reply
    • Cancel
element14 Community

element14 is the first online community specifically for engineers. Connect with your peers and get expert answers to your questions.

  • Members
  • Learn
  • Technologies
  • Challenges & Projects
  • Products
  • Store
  • About Us
  • Feedback & Support
  • FAQs
  • Terms of Use
  • Privacy Policy
  • Legal and Copyright Notices
  • Sitemap
  • Cookies

An Avnet Company © 2025 Premier Farnell Limited. All Rights Reserved.

Premier Farnell Ltd, registered in England and Wales (no 00876412), registered office: Farnell House, Forge Lane, Leeds LS12 2NE.

ICP 备案号 10220084.

Follow element14

  • X
  • Facebook
  • linkedin
  • YouTube