element14 Community
element14 Community
    Register Log In
  • Site
  • Search
  • Log In Register
  • About Us
  • Community Hub
    Community Hub
    • What's New on element14
    • Feedback and Support
    • Benefits of Membership
    • Personal Blogs
    • Members Area
    • Achievement Levels
  • Learn
    Learn
    • Ask an Expert
    • eBooks
    • element14 presents
    • Learning Center
    • Tech Spotlight
    • STEM Academy
    • Webinars, Training and Events
    • Learning Groups
  • Technologies
    Technologies
    • 3D Printing
    • FPGA
    • Industrial Automation
    • Internet of Things
    • Power & Energy
    • Sensors
    • Technology Groups
  • Challenges & Projects
    Challenges & Projects
    • Design Challenges
    • element14 presents Projects
    • Project14
    • Arduino Projects
    • Raspberry Pi Projects
    • Project Groups
  • Products
    Products
    • Arduino
    • Avnet Boards Community
    • Dev Tools
    • Manufacturers
    • Multicomp Pro
    • Product Groups
    • Raspberry Pi
    • RoadTests & Reviews
  • Store
    Store
    • Visit Your Store
    • Choose another store...
      • Europe
      •  Austria (German)
      •  Belgium (Dutch, French)
      •  Bulgaria (Bulgarian)
      •  Czech Republic (Czech)
      •  Denmark (Danish)
      •  Estonia (Estonian)
      •  Finland (Finnish)
      •  France (French)
      •  Germany (German)
      •  Hungary (Hungarian)
      •  Ireland
      •  Israel
      •  Italy (Italian)
      •  Latvia (Latvian)
      •  
      •  Lithuania (Lithuanian)
      •  Netherlands (Dutch)
      •  Norway (Norwegian)
      •  Poland (Polish)
      •  Portugal (Portuguese)
      •  Romania (Romanian)
      •  Russia (Russian)
      •  Slovakia (Slovak)
      •  Slovenia (Slovenian)
      •  Spain (Spanish)
      •  Sweden (Swedish)
      •  Switzerland(German, French)
      •  Turkey (Turkish)
      •  United Kingdom
      • Asia Pacific
      •  Australia
      •  China
      •  Hong Kong
      •  India
      •  Korea (Korean)
      •  Malaysia
      •  New Zealand
      •  Philippines
      •  Singapore
      •  Taiwan
      •  Thailand (Thai)
      • Americas
      •  Brazil (Portuguese)
      •  Canada
      •  Mexico (Spanish)
      •  United States
      Can't find the country/region you're looking for? Visit our export site or find a local distributor.
  • Translate
  • Profile
  • Settings
Cypress Kits
  • Products
  • Dev Tools
  • Cypress Kits
  • More
  • Cancel
Cypress Kits
Forum PSoC 4 Pioneer Kit Community Project#059 – But Wait There’s More! Single PWM with 3 Outputs
  • Blog
  • Forum
  • Documents
  • Polls
  • Files
  • Members
  • Mentions
  • Sub-Groups
  • Tags
  • More
  • Cancel
  • New
Join Cypress Kits to participate - click to join for free!
Actions
  • Share
  • More
  • Cancel
Forum Thread Details
  • Replies 4 replies
  • Subscribers 27 subscribers
  • Views 704 views
  • Users 0 members are here
Related

PSoC 4 Pioneer Kit Community Project#059 – But Wait There’s More! Single PWM with 3 Outputs

cy.wbz
cy.wbz over 12 years ago

Hello!


Today’s example plays like one of those late night TV infomercials. First we showed you how to use a PWM with the PSoC 4. We then had an example that showed you how to create two PWM outputs using one PWM. Like in those late night infomercials we say “But wait there’s more”! In today’s example we present a custom component that takes one PWM and creates three outputs.


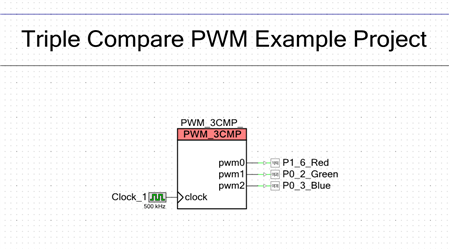
In this example we create a custom PWM component that performs a triple compare, implements an 8-bit PWM with three separate outputs, and independently configurable values. This custom component uses one Universal Digital Block (UDB) resource to implement the triple output. The component uses one datapath and three macrocells resources. This is very useful since the PSoC 4 device only has four UDB resources and four TCPWM modules. Implementing this PWM will allow the user to save resource space and add more value to their system.


image


Forum Post Attachments:


At the bottom of this post we are including the following items:

  • Example Project Zip File
  • Zip File of Images
    • Project Schematic
    • Component Configurations


Components Used:


The user can download the example project at the bottom of this post. The project uses the following list of Creator Components:

  • PWM
  • CyClock
  • CyPin


The components are configured by right clicking on the component in your Top Design schematic view and selecting Configure. Please enable the following selections in the Configuration windows for the listed components above.


Firmware Description:


The main.c firmware is included in the example project. Please review the commented sections for more details.


In this example we dive deeper into the guts of what makes a PSoC so unique and useful for engineers. As described earlier we show you the progression of a single output PWM, dual output PWM, and now a triple output PWM. As we increase in complexity we dive deeper into the programmable peripherals of the PSoC.


This custom component allows users to connect three outputs to a single PWM. This is extremely useful when trying to maximize on-chip resources. In our previous examples such as LED Memory and Paint The Night we used three PWM components to drive the RGB LED on the Pioneer kit. This is very wasteful of the UDB and TCPWM resources on the PSoC 4 device. Custom components like the triple PWM will allow users the ability to better manage chip resources and still design the system to meet the design expectations.


The triple PWM component supports the following set of APIs to control the PWM capabilities:

  • PWM_3CMP_Start()
  • PWM_3CMP_ReadPeriod()
  • PWM_3CMP_WritePeriod(uint8 value)
  • PWM_3CMP_ReadComparex()
  • PWM_3CMP_Write_RGB(uint32 color)
  • PWM_3CMP_WriteComparex(uint8 value)
  • PWM_3CMP_WriteIntensityx(uint8 value)


(Where ‘x’ is 0,1, or 2).


In a later post we will discuss more with Antonio about how this component was developed and how that knowledge can help you re-think how you approach to embedded designs.


Hardware Connections:


There are no hardware connections in this example. Simply map out the PWM outputs to three pins, select your PWM output and connect the output to the RGB LED or connect it to an Oscope to test the ranges of outputs.


Test Your Project:


Program the Pioneer kit with the example and connect the PWM outputs to the RGB LED or to an Oscope to test the PWM capabilities.


I hope this example can help you in your design.


Best,

Matt

Attachments:
PWM_CMP3.Bundle01.zip
1055.Project Images.zip
imagePWM_3CMP_v1_00.pdf
  • Sign in to reply
  • Cancel
  • Former Member
    Former Member over 12 years ago

    Hey Matt,

    Thanks for this post.

    Note that we also have another way of using this triple PWM as well as a dual PWM in post 11 of this thread:

    http://www.element14.com/community/message/77464#77464/l/psoc-4-pioneer-kit-community-project16--proximity-theremin

    Best,

    Antonio

    • Cancel
    • Vote Up 0 Vote Down
    • Sign in to reply
    • Cancel
  • jesusantoniocar
    jesusantoniocar over 12 years ago in reply to Former Member

    You don't have permission to edit metadata of this video.
    Edit media
    x
    image
    Upload Preview
    image
    Hello Antonio, Matt.

    Thanks for this project.
    The level of integration that  has psoc  allows the option to design components of this type.  
    The PWM_3CMP implements a single period-counter, triple compare 8-bit PWM in a single UDB.


    Best regards,


    Jesus Antonio.


    • Cancel
    • Vote Up 0 Vote Down
    • Sign in to reply
    • Cancel
  • Former Member
    Former Member over 12 years ago in reply to jesusantoniocar

    J. Antonio,

    Thanks for posting the video - it makes thing so much clearer.


    Your summary is spot-on.


    So far, this is the most efficient way I have seen to drive an RGB LED. It is also very convenient.


    Using this Component, you could get 12 PWM outputs from the UDBs, and still have spare PLD logic to use.


    I appreciate your continued interest and posts, J. Antonio. Keep up the excellent work.

    Antonio

    • Cancel
    • Vote Up 0 Vote Down
    • Sign in to reply
    • Cancel
  • DAB
    DAB over 12 years ago

    Hi Matt,


    I like the efficiency of the design and it shows off more of the programmable hardware capability within the Psoc 4.


    Very cool.

    DAB

    • Cancel
    • Vote Up 0 Vote Down
    • Sign in to reply
    • Cancel
element14 Community

element14 is the first online community specifically for engineers. Connect with your peers and get expert answers to your questions.

  • Members
  • Learn
  • Technologies
  • Challenges & Projects
  • Products
  • Store
  • About Us
  • Feedback & Support
  • FAQs
  • Terms of Use
  • Privacy Policy
  • Legal and Copyright Notices
  • Sitemap
  • Cookies

An Avnet Company © 2025 Premier Farnell Limited. All Rights Reserved.

Premier Farnell Ltd, registered in England and Wales (no 00876412), registered office: Farnell House, Forge Lane, Leeds LS12 2NE.

ICP 备案号 10220084.

Follow element14

  • X
  • Facebook
  • linkedin
  • YouTube