


Hello!
Today’s example we showcase the Thin Film Transistor (TFT) Touchscreen Shield with the PSoC 4 Pioneer kit. Cypress is well known for our TrueTouch product lines and touchscreen solutions for cellphones and tables. In our example the Touchscreen is a resistive touch screen, while most modern touchscreens on handsets and tablets are capacitive touch solutions.
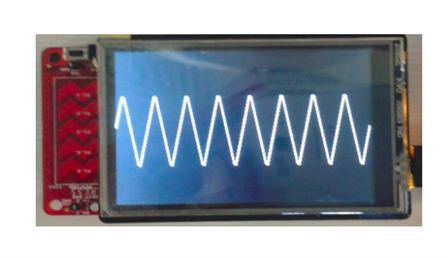
This example introduces the user to the screen, how to interface and display images. Our example will allow users to enter in values to a hyperterminal software and then generate wave outputs on the TFT touchscreen shield. Today’s example focuses on how to interface with the TFT touchscreen. Tomorrow’s example will show you how to use the touch interface built into the screen.
Forum Post Attachments:
At the bottom of this post we are including the following items:
- Example Project Zip File
- Zip File of Images
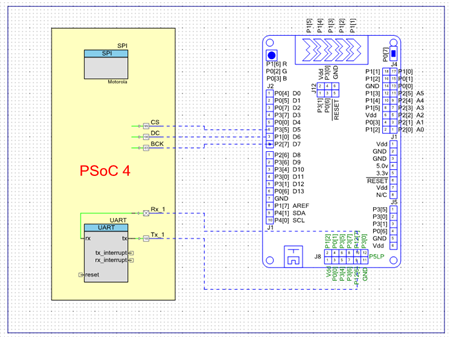
- Project Schematic
- Component Configurations
Components Used:
The user can download the example project at the bottom of this post. The project uses the following list of Creator Components:
- SPI
- UART
- CyClock
- CyPins
Firmware Description:
The main.c firmware is included in the example project. Please review the commented sections for more details.
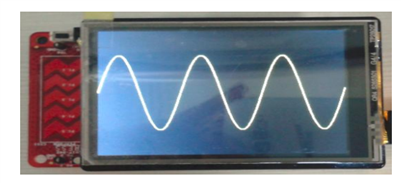
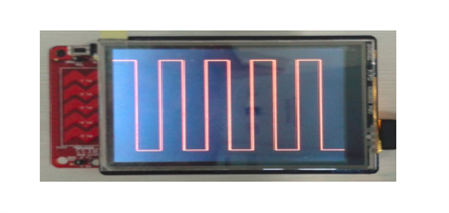
The example project can be used to display different waves on a the TFT Touchscreen shield. In the example project we use a UART based user interface to provide options for the user to display waveforms on the screen. The user will be able to enter in different values to control the waveform characteristics such as Amplitude, Number of Cycles, and Color. The user will be able to generate Sine, Square, and Triangular Waves.
As part of this example we have included two source files, TFT_Display.h and TFT_Display.c, which includes API support for you to interface with the TFT display. These APIs function by waiting for the user to give inputs via the hyperterminal and then displays the waveforms based on those inputs. The main.c file is very spartan so please take some time to review the TFT files.
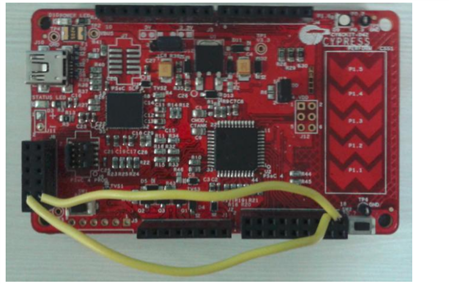
Hardware Connections:
In this example you will need to connect two wires to enable the USB-UART bridge from the PSoC 5LP device. Connect two wires between the PSoC 4 header, J4 P1[1] and P1[2], to the PSoC 5LP header, J8 P12[7] and P12[6]. Next connect the TFT Touchscreen to the Pioneer board using the Arduino compatible headers.
Test Your Project:
Program the Pioneer kit with the example project and connect the hardware. Launch the Hyperterminal software (Putty or Coolterm) and begin enter in values to the onscreen menu. Change those values to see different wave outputs on the touchscreen.
I hope this example can help you in your design.
Best,
Matt
