element14 Community
element14 Community
    Register Log In
  • Site
  • Search
  • Log In Register
  • Community Hub
    Community Hub
    • What's New on element14
    • Feedback and Support
    • Benefits of Membership
    • Personal Blogs
    • Members Area
    • Achievement Levels
  • Learn
    Learn
    • Ask an Expert
    • eBooks
    • element14 presents
    • Learning Center
    • Tech Spotlight
    • STEM Academy
    • Webinars, Training and Events
    • Learning Groups
  • Technologies
    Technologies
    • 3D Printing
    • FPGA
    • Industrial Automation
    • Internet of Things
    • Power & Energy
    • Sensors
    • Technology Groups
  • Challenges & Projects
    Challenges & Projects
    • Design Challenges
    • element14 presents Projects
    • Project14
    • Arduino Projects
    • Raspberry Pi Projects
    • Project Groups
  • Products
    Products
    • Arduino
    • Avnet & Tria Boards Community
    • Dev Tools
    • Manufacturers
    • Multicomp Pro
    • Product Groups
    • Raspberry Pi
    • RoadTests & Reviews
  • About Us
    About the element14 Community
  • Store
    Store
    • Visit Your Store
    • Choose another store...
      • Europe
      •  Austria (German)
      •  Belgium (Dutch, French)
      •  Bulgaria (Bulgarian)
      •  Czech Republic (Czech)
      •  Denmark (Danish)
      •  Estonia (Estonian)
      •  Finland (Finnish)
      •  France (French)
      •  Germany (German)
      •  Hungary (Hungarian)
      •  Ireland
      •  Israel
      •  Italy (Italian)
      •  Latvia (Latvian)
      •  
      •  Lithuania (Lithuanian)
      •  Netherlands (Dutch)
      •  Norway (Norwegian)
      •  Poland (Polish)
      •  Portugal (Portuguese)
      •  Romania (Romanian)
      •  Russia (Russian)
      •  Slovakia (Slovak)
      •  Slovenia (Slovenian)
      •  Spain (Spanish)
      •  Sweden (Swedish)
      •  Switzerland(German, French)
      •  Turkey (Turkish)
      •  United Kingdom
      • Asia Pacific
      •  Australia
      •  China
      •  Hong Kong
      •  India
      •  Japan
      •  Korea (Korean)
      •  Malaysia
      •  New Zealand
      •  Philippines
      •  Singapore
      •  Taiwan
      •  Thailand (Thai)
      •  Vietnam
      • Americas
      •  Brazil (Portuguese)
      •  Canada
      •  Mexico (Spanish)
      •  United States
      Can't find the country/region you're looking for? Visit our export site or find a local distributor.
  • Translate
  • Profile
  • Settings
Atmel Xplained Boards
  • Products
  • Dev Tools
  • Atmel Xplained Boards
  • More
  • Cancel
Atmel Xplained Boards
Blog Boot Debian from an SD Card on the SAMA5D3 Xplained
  • Blog
  • Forum
  • Documents
  • Files
  • Members
  • Mentions
  • Sub-Groups
  • Tags
  • More
  • Cancel
  • New
Join Atmel Xplained Boards to participate - click to join for free!
  • Share
  • More
  • Cancel
Group Actions
  • Group RSS
  • More
  • Cancel
Engagement
  • Author Author: cstanton
  • Date Created: 25 Apr 2014 12:08 AM Date Created
  • Views 6623 views
  • Likes 5 likes
  • Comments 27 comments
  • sama5d3_xplained
  • sama5d3-ek
  • atmel_sama5d3
  • sama5d3
  • sama
  • atmel_sama5d3_xplained
  • atmel
  • xplained
Related
Recommended

Boot Debian from an SD Card on the SAMA5D3 Xplained

cstanton
cstanton
25 Apr 2014

So when I wanted to build a version of Linux for the SAMA5D3 board that wasn't Yocto or a demonstration image, then I started to struggle to find solutions.image
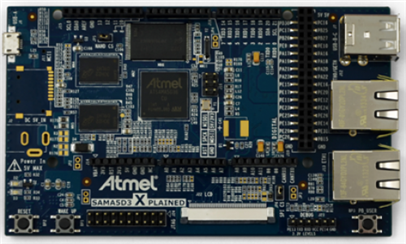
 

Here I present the steps I took to have Debian working on the SAMA5D3, I also have a .IMG of the SD Card I created available.


I set this up using a laptop with Debian Linux installed; I imagine it doesn't matter which version of Linux you have; you could probably use Cygwin on windows.


You will need:


  • An SD card (I tend to work with at least a Class 6, 8GByte)
  • An Atmel SAMA5D3Atmel SAMA5D3 board with a Micro-A to USB-A cable (should come with the board)
  • A computer with Linux (unless you're able to translate the steps to Windows, feel free) with an internet connection
  • An FTDI 3v3 TTL type cableFTDI 3v3 TTL type cable


I built the SAMA5D3 image on an installation of Debian Wheezy, 64bit. Because the pre-compiled GCC compiler is 32bit you need to have the i386 architecture added and some packages installed (you'll have to find the relevant equivalent for your Linux distribution):


sudo dpkg --add-architecture i386

sudo apt-get update

sudo apt-get install libc6:i386 libstdc++6:i386 libncurses5:i386 zlib1g:i386 -y


Open up a terminal, create a directory to work in and run the following commands to grab Linaro, the ARM cross compiler:


    wget -c http://releases.linaro.org/latest/components/toolchain/binaries/gcc-linaro-arm-linux-gnueabihf-4.9-2014.09_linux.tar.xz
    tar x -f gcc-linaro-arm-linux-gnueabihf-4.9-2014.09_linux.tar.xz
    export CC=`pwd`/gcc-linaro-arm-linux-gnueabihf-4.9-2014.09_linux/bin/arm-linux-gnueabihf-


The version of the cross compiler will change as it is updated, if you don't keep up to date with it then you may discover unexpected errors as the make files below might expect a more recent version. You can grab the latest compiled binary of gcc-linaro here.


Then test the version of gcc:


    ${CC}gcc --version


Which should output something like this:


    arm-linux-gnueabihf-gcc (crosstool-NG linaro-1.13.1-4.8-2014.03 - Linaro GCC 2014.03) 4.8.3 20140303 (prerelease)
    Copyright (C) 2013 Free Software Foundation, Inc.
    This is free software; see the source for copying conditions.  There is NO
    warranty; not even for MERCHANTABILITY or FITNESS FOR A PARTICULAR PURPOSE.


Now we need to grab U-Boot and patch it for the SAMA5D3, you will need to have GIT installed on your distribution of Linux:


    git clone git://git.denx.de/u-boot.git
    cd u-boot/
    git checkout v2014.04 -b tmp
    wget -c https://raw.github.com/eewiki/u-boot-patches/master/v2014.04/0001-sama5d3_xplained-uEnv.txt-bootz-n-fixes.patch
    patch -p1 < 0001-sama5d3_xplained-uEnv.txt-bootz-n-fixes.patch
    make ARCH=arm CROSS_COMPILE=${CC} distclean
    make ARCH=arm CROSS_COMPILE=${CC} sama5d3_xplained_mmc_config
    make ARCH=arm CROSS_COMPILE=${CC}


If you're reading this and you have the SAMA5D3-EK, then the steps are different in which patch you get and apply (thanks mathivanan) :


git clone git://git.denx.de/u-boot.git

cd u-boot/

git checkout v2014.04 -b tmp

wget -c https://raw.githubusercontent.com/eewiki/u-boot-patches/master/v2014.04/0001-sama5d3xek-uEnv.txt-bootz-n-fixes.patch

patch -p1 < 0001-sama5d3xek-uEnv.txt-bootz-n-fixes.patch

make ARCH=arm CROSS_COMPILE=${CC} distclean

make ARCH=arm CROSS_COMPILE=${CC} sama5d3xek_mmc_config

make ARCH=arm CROSS_COMPILE=${CC}


Now time to build a kernel for the board!


    git clone https://github.com/RobertCNelson/armv7_devel.git
    cd armv7_devel/

As of the time of writing the current mainline kernel was v3.14:


    git checkout origin/v3.14.x-sama5-armv7 -b tmp
    ./build_kernel.sh


After the kernel has compiled, you're presented with a menu config screen where you can include or build additional modules. For example, you can incorporate GSPCA webcam support.


Now, we want to acquire the root system files for Debian, which are handily available (check https://rcn-ee.net/deb/minfs/wheezy/ for latest version(s)) :


    wget -c https://rcn-ee.net/deb/minfs/wheezy/debian-7.5-minimal-armhf-2014-07-07.tar.xz
    tar x -f debian-7.4-minimal-armhf-2014-04-01.tar.xz

Then insert your SDCard, either using a USB SDCard reader or one on your computer if you have one. I had to use a USB SDCard reader. In Linux we can type "dmesg" at a terminal to give us the /dev/ information for the device we've plugged in (for example mine's /dev/sdb), in the following examples, we use mmcblk0, so just replace it for your relevant device id.


In the following steps we will erase the SDCard and set it up with the relevant partitions:


    export DISK=/dev/mmcblk0
    sudo dd if=/dev/zero of=${DISK} bs=1M count=16

    sudo sfdisk --in-order --Linux --unit M ${DISK} <<-__EOF__
    1,48,0xE,*
    ,,,-
    __EOF__


If the linux system you're using identifies the device as something similar to mmcblk0 then to format and mount, execute:


    sudo mkfs.vfat -F 16 ${DISK}p1 -n boot
    sudo mkfs.ext4 ${DISK}p2 -L rootfs

    sudo mkdir -p /media/boot/
    sudo mkdir -p /media/rootfs/


    sudo mount ${DISK}p1 /media/boot/
    sudo mount ${DISK}p2 /media/rootfs/

Else if the device identifies itself as something similar to sdb then to format and mount, execute:


    sudo mkfs.vfat -F 16 ${DISK}1 -n boot
    sudo mkfs.ext4 ${DISK}2 -L rootfs


    sudo mkdir -p /media/boot/
    sudo mkdir -p /media/rootfs/


    sudo mount ${DISK}1 /media/boot/
    sudo mount ${DISK}2 /media/rootfs/

Note: You may not need to mount the partitions as new(ish/er) distributions tend to automatically mount partitions upon detection/insertion/creation.


Create a text file using your editor of choice (for the record I prefer vi ...) called uEnv.txt and put in it the following, the sama board uses the 'mmc' naming convention:


    optargs=quiet init=/lib/systemd/systemd
    console=ttyS0,115200
    mmcroot=/dev/mmcblk0p2 ro
    mmcrootfstype=ext4 rootwait fixrtc


Now we'll extract and copy across all of the necessary files, the locations should all be relative to the initial directory we've been working in and you created, they should all be executed as root/sudo:


    sudo cp -v ./u-boot/spl/u-boot-spl.bin /media/boot/BOOT.BIN
    sudo cp -v ./u-boot/u-boot.img /media/boot/


    sudo cp -v ./uEnv.txt /media/boot/


    sudo tar -xvp --same-owner --numeric-owner -f ./debian-0.4-minimal-armhf-2014-04-01/armhf-rootfs-debian-wheezy.tar -C /media/rootfs


    sudo cp -v ./armv7_devel/deploy/3.14.0-sama5-armv7-r9.zImage /media/boot/zImage
   
    sudo mkdir -p /media/boot/dtbs/
    sudo tar xvo -f 3.14.0-sama5-armv7-r9-dtbs.tar.gz -C /media/boot/dtbs


    sudo tar xv -f 3.14.0-sama5-armv7-r9-modules.tar.gz -C /media/rootfs

And to setup the partition mounting (if you don't like vi, replace with nano, emacs or whatever your preferred editor is):


    sudo vi /media/rootfs/etc/fstab


Insert into it (in vi, press 'i' on your keyboard, then type it in, or copy/paste it into your terminal window):


    /dev/mmcblk0p2  /          auto  errors=remount-ro  0  1
    /dev/mmcblk0p1  /boot/uboot auto  defaults            0  2


Close and save the file (in vi, press ESC then type in : x (colon then x) and hit enter, which saves and quits).


Then setup the network interfaces:


    sudo vi /media/rootfs/etc/network/interfaces


With the following at the end of the file (you can use your cursor keys to navigate vi until you get to where you want to insert):


    allow-hotplug eth0
    iface eth0 inet dhcp

    allow-hotplug eth1
    iface eth1 inet dhcp


And setup our serial line:


    sudo vi /media/rootfs/etc/inittab


With the following at the end of the file:


    T0:23:respawn:/sbin/getty -L ttyS0 115200 vt102


Now we want to unmount our SD Card, so close down any windows/open files that're on the card and run the following from a terminal:


    sync
    sudo umount /media/boot
    sudo umount /media/rootfs


Our SD Card should be setup! The only thing to do now, is remove the jumper at JP5 on the SAMA5D3 to ensure it'll boot from the SD Card, connect a serial cable to the debug header J23 so we can see what it's doing, with the settings in minicom/Putty/your terminal editor of choice:


    Baud:        115200
    Data Bits:    8
    Stop Bits:    1
    Parity:        None
    Flow Control:    None


Then connect the USB cable to power the board, then press the reset button for good measure and watch it boot up!


The login details are:


User: root

Pass: root


User: debian

Pass: temppwd

When I created this image from scratch initially I encountered a number of problems. The main part is that the SD Card needs to be setup as root, with the files copied over as root. This is because of the permission level required to read the SD Card when the SAMA5D3 board loads up.


The other problem I encountered was the settings for uEnv were confusing me on the eewiki guide.


Something that might trip up anyone following this guide word for word in future is if the kernel version increases, this will need to be altered in the filenames in the guide above. Failing that, the SD Card img I have prepared should help.


The SD Card IMG file is available here and is sized at approximately 544MByte, and an MD5 to check it against. IT Support lost the file Q_Q;


If you have any questions, login/register to the site and add a comment below. If I've made an error, let me know, chances are that I have.


I've also found alternate guides, which worked well when building on Debian Jessie.

  • Sign in to reply

Top Comments

  • e14 Contributor
    e14 Contributor over 11 years ago in reply to sjcchuma +2
    Same here, but i do figured it out. In uEnv.txt file, comment out all 4 lines, and put there only this: fdt_file=/dtbs/sama5d36ek.dtb The put this line g_serial into /etc/modules empty file to load the…
  • e14 Contributor
    e14 Contributor over 12 years ago in reply to e14 Contributor +1
    Okay, tested on your image: # modprobe g_serial This should make the device show up in dmesg on the host # getty -L ttyGS0 115200 vt102 And now you should be able to picocom/minicom into it over usb!
  • e14 Contributor
    e14 Contributor over 12 years ago in reply to e14 Contributor +1
    I figured out the way to do it. Now SAMA5D3x-EK runs the debian. I just changed way of building the u-boot: git clone git://git.denx.de/u-boot.git cd u-boot/ git checkout v2014.04 -b tmp wget -c https…
  • vsluiter
    vsluiter over 12 years ago in reply to cstanton

    I don't know how you intend to use 'lmgtfy', but I find it a bit humiliating, I think my question was not so very dumb. For a PremierFarnell employee who should be welcoming interaction on element14, that might not be the effect you wished for.


    My background is in analog electronics and in 'bare metal' Atmel AVR/Attiny/Xmega programming, furthermore I'm doing EnergyMicro and ST. From those vendors I'm used to get a lot of documentation on how to interface to peripherals, and how to set up more complicated features (DMA, interrupt systems, event handling). For the Linux market it seems like there's just a bunch of tools available, and once Linux is running you're on your own. When I'm experimenting with the ATSAMA5D3 Xplained, I'd like to set up some services, like a web server. On the 'big' systems, like BBB or Rasberry Pi there are package managers, or at least there's a  C compiler so I can ./configure; make; make install. I know there are a gazillion packages I can use for Linux systems, but I can't find a complete tutorial on how to start from an Xplained board and go further from there to create my own functionality. Do I need a cross compiler? Do I need Yocto project? To me, it's a big ecosystem full of undocumented tools where I just have to enter commands in a command line without knowing what I'm doing.


    Same issue with the examples you gave; I'd like to be able to setup my PWM with the register settings from Atmel. Can I still do that, or do I have to write my own drivers? Where does this whole device tree come in? I'm very n00bish in this, but maybe you can provide some info on where you got your info, or what  good sites are that explain some of the basics.

    • Cancel
    • Vote Up 0 Vote Down
    • Sign in to reply
    • More
    • Cancel
  • davorin
    davorin over 12 years ago

    A little bit further with Debian from flash...but still not there yet (o;


    UBIFS: background thread "ubifs_bgt0_1" started, PID 694                                                                                      UBIFS: mounted UBI device 0, volume 1, name "rootfs"(null)                                                                                    UBIFS: LEB size: 126976 bytes (124 KiB), min./max. I/O unit sizes: 2048 bytes/2048 bytes                                                      UBIFS: FS size: 39489536 bytes (37 MiB, 311 LEBs), journal size 9023488 bytes (8 MiB, 72 LEBs)                                                UBIFS: reserved for root: 0 bytes (0 KiB)                                                                                                     UBIFS: media format: w4/r0 (latest is w4/r0), UUID ED88DA58-84C4-4D4B-9664-4A2775E143DF, small LPT model                                      VFS: Mounted root (ubifs filesystem) on device 0:12.                                                                                          devtmpfs: mounted                                                                                                                             Freeing unused kernel memory: 116K (c05b5000 - c05d2000)                                                                                      INIT: version 2.88 booting                                                                                                                    [info] Using makefile-style concurrent boot in runlevel S.                                                                                    [....] Starting the hotplug events dispatcher: udevdudevd[809]: starting version 175                                                          . ok                                                                                                                                          [....] Synthesizing the initial hotplug events...UBI error: ubi_open_volume: cannot open device 0, volume 1, error -16                        done.                                                                                                                                         [....] Waiting for /dev to be fully populated...done.                                                                                         /etc/init.d/hwclock.sh: 61: /etc/init.d/hwclock.sh: cannot create /etc/adjtime: No space left on device                                       [....] Activating swap...done.                                                                                                                UBIFS: background thread "ubifs_bgt0_1" stops                                                                                                 [....] Checking root file system...fsck from util-linux 2.20.1                                                                                fsck: fsck.auto: not found                                                                                                                    fsck: error 2 while executing fsck.auto for /run/rootdev                                                                                      fsck died with exit status 8                                                                                                                  failed (code 8).                                                                                                                             

    [....] An automatic file system check (fsck) of the root filesystem failed. A manual fsck must be performed, then the system restarted. The fsck s!

    [....] The root filesystem is currently mounted in read-only mode. A maintenance shell will now be started. After performing system maintenance, p.

    Give root password for maintenance                                                                                                            (or type Control-D to continue):                                                                                                              root@arm:~#                                                                                                                                  
    • Cancel
    • Vote Up 0 Vote Down
    • Sign in to reply
    • More
    • Cancel
  • e14 Contributor
    e14 Contributor over 12 years ago

    Ethernet is not working i got the following dmesg output

    Board: SAMA5D3x-EK

    Linux Version: Linux version 3.16.0-rc4-sama5-armv7-r4


    [0.300000] macb f0028000.ethernet (unregistered net_device): invalid hw addm[0.390000] macb f0028000.ethernet eth0: Cadence GEM at 0xf0028000 irq 46 (7)[0.390000] macb f0028000.ethernet eth0: attached PHY driver [Micrel KSZ9021)

    [   12.280000] IPv6: ADDRCONF(NETDEV_UP): eth0: link is not ready


    ifconfig output:

    eth0  Link encap:Ethernet  HWaddr 72:c2:12:5e:c4:a9                    UP BROADCAST MULTICAST  MTU:1500  Metric:1                      RX packets:0 errors:0 dropped:0 overruns:0 frame:0               TX packets:0 errors:0 dropped:0 overruns:0 carrier:0             collisions:0 txqueuelen:1000                                    RX bytes:0 (0.0 B)  TX bytes:0 (0.0 B)                           Interrupt:46 Base address:0x8000


    any idea how to resolve this issue?

    • Cancel
    • Vote Up 0 Vote Down
    • Sign in to reply
    • More
    • Cancel
  • davorin
    davorin over 12 years ago

    Hmmm...


    UBI: attaching mtd7 to ubi0

    UBI: scanning is finished

    UBI: attached mtd7 (name "rootfs", size 248 MiB) to ubi0

    UBI: PEB size: 131072 bytes (128 KiB), LEB size: 126976 bytes

    UBI: min./max. I/O unit sizes: 2048/2048, sub-page size 2048

    UBI: VID header offset: 2048 (aligned 2048), data offset: 4096

    UBI: good PEBs: 1977, bad PEBs: 7, corrupted PEBs: 0

    UBI: user volume: 1, internal volumes: 1, max. volumes count: 128

    UBI: max/mean erase counter: 0/0, WL threshold: 4096, image sequence number: 479848448

    UBI: available PEBs: 1618, total reserved PEBs: 359, PEBs reserved for bad PEB handling: 33

    UBI: background thread "ubi_bgt0d" started, PID 681

    input: gpio_keys.3 as /devices/gpio_keys.3/input/input0

    at91_rtc fffffeb0.rtc: setting system clock to 2014-02-05 14:01:45 UTC (1391608905)

    atmel_mci f0000000.mmc: version: 0x505

    atmel_mci f0000000.mmc: using dma0chan5 for DMA transfers

    atmel_mci f0000000.mmc: Atmel MCI controller at 0xf0000000 irq 17, 1 slots

    atmel_mci f8000000.mmc: version: 0x505

    atmel_mci f8000000.mmc: using dma1chan7 for DMA transfers

    atmel_mci f8000000.mmc: Atmel MCI controller at 0xf8000000 irq 27, 1 slots

    ALSA device list:

      No soundcards found.

    UBIFS: static UBI volume - read-only mode

    UBIFS error (pid 1): mount_ubifs: cannot mount read-write - read-only media

    VFS: Cannot open root device "ubi0:rootfs" or unknown-block(0,0): error -30

    Please append a correct "root=" boot option; here are the available partitions:

    1f00 256 mtdblock0 (driver?)

    1f01 512 mtdblock1 (driver?)

    1f02 256 mtdblock2 (driver?)

    1f03 256 mtdblock3 (driver?)

    1f04 256 mtdblock4 (driver?)

    1f05 512 mtdblock5 (driver?)

    1f06 6144 mtdblock6 (driver?)

    1f07 253952 mtdblock7 (driver?)

    1f08 39928 mtdblock8 (driver?)

    Kernel panic - not syncing: VFS: Unable to mount root fs on unknown-block(0,0)


    Something still missing....guess I have to download the Yocto stuff and examine how the build the ubifs image...

    • Cancel
    • Vote Up 0 Vote Down
    • Sign in to reply
    • More
    • Cancel
  • davorin
    davorin over 12 years ago

    Ah no..it is...but file types are different:


    me@nuc:~/Downloads/linux4sam-poky-sama5d3_xplained-4.3$ file debian.ubifs.img

    debian.ubifs.img: data


    me@nuc:~/Downloads/linux4sam-poky-sama5d3_xplained-4.3$ file atmel-xplained-demo-image-sama5d3_xplained.ubi

    atmel-xplained-demo-image-sama5d3_xplained.ubi: HIT archive data

    • Cancel
    • Vote Up 0 Vote Down
    • Sign in to reply
    • More
    • Cancel
<>
element14 Community

element14 is the first online community specifically for engineers. Connect with your peers and get expert answers to your questions.

  • Members
  • Learn
  • Technologies
  • Challenges & Projects
  • Products
  • Store
  • About Us
  • Feedback & Support
  • FAQs
  • Terms of Use
  • Privacy Policy
  • Legal and Copyright Notices
  • Sitemap
  • Cookies

An Avnet Company © 2026 Premier Farnell Limited. All Rights Reserved.

Premier Farnell Ltd, registered in England and Wales (no 00876412), registered office: Farnell House, Forge Lane, Leeds LS12 2NE.

Follow element14

  • X
  • Facebook
  • linkedin
  • YouTube