


1. INTRO TO THE MAAXBOARD
A slightly more streamlined version of this project is available on Hackster.
Avnet's MaaXBoard, which is based on NXP i.MX 8M, is kind of like Raspberry Pi, but with hi-def video and audio processing.
MaaXBoard is designed using the NXP i.MX 8M processor based on Arm Cortex-A53 and Cortex-M4 cores. It provides 20-channel hi-fidelity audio and 4K video processing for applications that scale from consumer home audio to industrial building automation and mobile computers. If you're curious how MaaXBoard compares with Raspberry Pi, here:

To make setup easy, I'll be using a keyboard, mouse, and external monitor. You can also connect to the board via TTL and use an SSH client like PuTTY to do the same setup via terminal (steps are outlined here). You can also connect to a MIPI display. Embest sells the recommended display here.
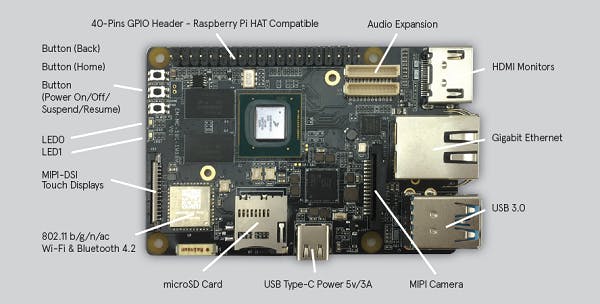
Hardware Overview
When you unbox the MaaXBoard, you'll find a getting started guide. You can refer to this diagram as we get the board set up:
2. FLASH THE SD CARD
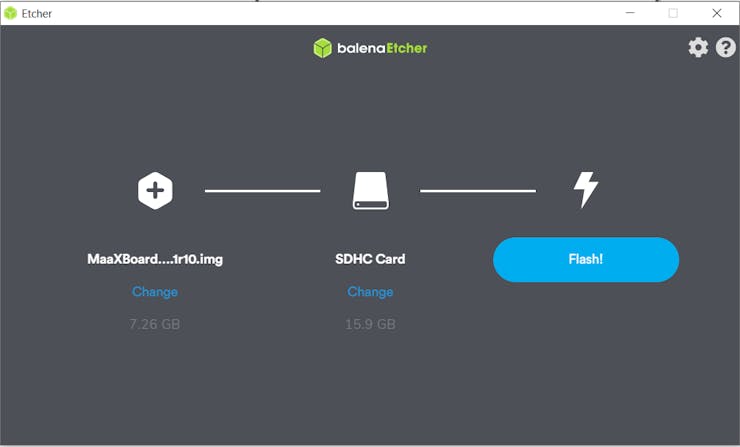
Currently, (March 2020) the only working image is the Debian image. An Android9 image is in development.
- Download the Debian image from the "Reference Designs" tab on Element14.
- Unzip it using a program like 7zip (you should end up with a.img file)
- Download and install Balena Etcher. Select your image and flash it to an SD card (SD card should be between 8 and 64GB).
3. BOOT THE BOARD
Insert the SD card into the board. Plug in your USB mouse/keyboard. Connect your Ethernet cable. Plug your HDMI cable in your external monitor. Power the board on by plugging it into USB-C.
NOTE: If you use a USB-C cable to power your board, don't plug it into your computer's USB ports, since it may draw more power than your USB ports can supply. You can also purchase the recommended 5V 3A power supply for the board here.

When your board boots, you'll see the Weston Desktop Environment.
NOTE: Be careful when handling the board when it's powered on, because the heatsink can get very hot and may cause burns.
4. UPDATE YOUR TOOLS
Open Terminal and enter the bash shell by typing "bash" or "su." Then check to make sure you have the correct image:
bash
cat /etc/*release
uname -a
I'm on Debian GNU/Linux 10, and it's Linux MaaXBoard 4.14.78.
Find your IP address and make sure Ethernet is working:
ifconfig eth0
ping www.avnet.com
4.a Make sure you have the latest apt
Make sure your Advanced Package Tool (or APT) is up to date. Install evtest (it's a package that monitors button presses and other input devices)
apt update
apt install evtest
4.b Fixes for missing/out of date packages in the image
NOTE: You may have trouble with apt in Debian version 1.1.1. I'll walk you through the fixes. There is more information about these fixes here. Here's what to do if you see this output:
ldconfig: /usr/lib/aarch64-linux-gnu/libqmi-glib.so.5.4.0 is not an ELF file - it has the wrong magic bytes at the start.
Reinstall the parent package libqmi-glib5:
apt-get update
apt-get reinstall libqmi-glib5
If you see this output:
libIL.so.1 is not a symbolic link
Install the missing parent package libdevil1c2:
apt-get install libdevil1c2If you see this output:
ldconfig: /usr/lib/aarch64-linux-gnu/libOpenVG.so is not a symbolic link
Suppress this error by renaming the file. I chose not to remove it just in case something creeps up as a need or alternate fix:
mv /usr/lib/aarch64-linux-gnu/libOpenVG.so /usr/lib/aarch64-linux-gnu/libOpenVG.so.OLDYou should now be able to install any packages you need using apt (but remember, memory is limited to the size of your SD card, so don't go too crazy!)
5. CONFIGURE WIFI
5.a Configure WIFI from the terminal
nmcli r wifi on
nmcli dev wifi
Choose the SSID you would like to connect to:
nmcli dev wifi con "Embest-WiFi " password "12345678" ifname wlan0If the connection succeeds, it will print the following info: Device 'wlan0' successfully activated with '12551227-ee19-4054-9f43-0c9b83b75995'.
You can also check it by typing:
ifconfig wlan0Now that this is set up, next time you boot your board can just connect by typing:
nmcli device con wlan0And disconnect by typing:
nmcli device dis wlan0NOTE: If you see this error:
Error - secrets were required but not provided.
It's likely that you are on a dual-band or tri-band router that combines 2.5 and 5gHZ into a single SSID. The fix is to split the SSIDs apart (most routers have a button to split bands). Once you have split the bands, try deleting and reconnecting to a single band:
nmcli con delete <SSID>
nmcli r wifi off
nmcli r wifi on
MaaXBoard works with either 2.5 or 5gHZ WIFI.
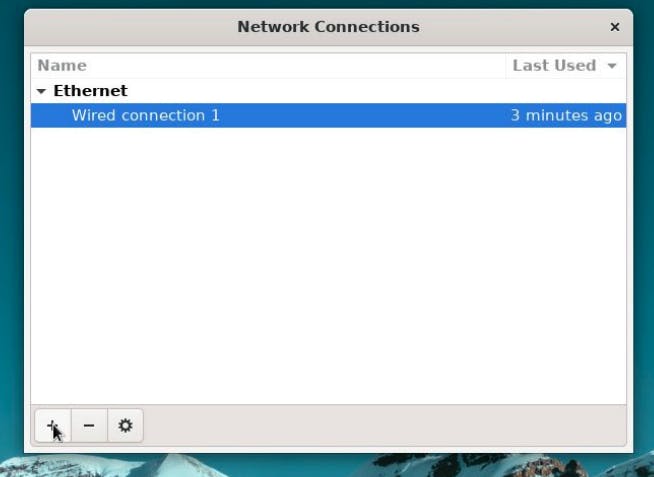
5.b Configure WIFI in the GUI
You can also use the GUI wifi manager on Wayland to manage WIFI connections:
6. SETUP WIFI HOTSPOT
MaaXBoard makes it easy to set up a WIFI hotspot (the password must be 8 characters minimum):
nmcli dev wifi hotspot ifname wlan0 con-name MyHostspot ssid MyHostspotSSID password 12345678Once you're done using it, you can disconnect it by disconnecting wifi:
nmcli device dis wlan0Or if you'd like to permanently get rid of it, it's simple to delete the hotspot:
nmcli con del MyHostspot7. SETUP BLUETOOTH
MaaXBoard comes with Bluetooth 4.2.
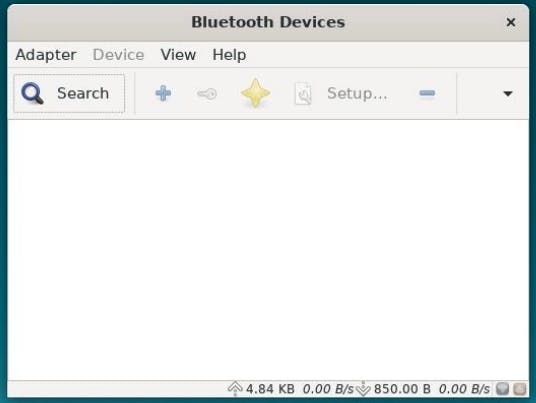
7.a Setup Bluetooth in the GUI
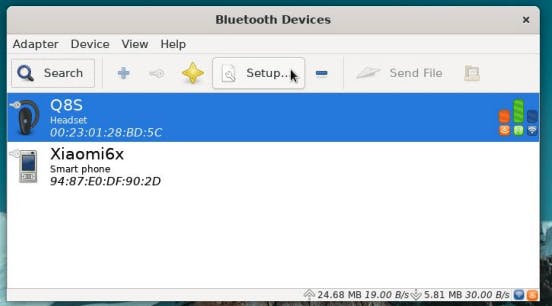
You can use the GUI to setup bluetooth by clicking the bluetooth icon.
- In the bluetooth setup, Press "Search" to search for available Bluetooth devices.
- Select the device to connect to, then click Pair button (it's shaped like a key for some reason)
- Sometimes the device will ask to confirm the pairing request (Note: if you're trying to connect to an Apple device you'll have to confirm the connection from that device as an extra security step. You also won't be able to send or receive files from apple devices)
- To remove the paired device, select the device, then click the - button.
- NOTE: In Adapter -> preferences, you can modify the device name of MaaXBoard's Bluetooth adapter
7.b Sending and Receiving files over Bluetooth
Send a file:
On Windows, open bluetooth and select "receive a file."
On your MaaXBoard, right click on your bluetooth device and select "send a file." Select the file that you wish to send.

Receive a file:
On Windows, select the MaaXBoard under bluetooth devices, and select "send file." Select the file you want to send.
On the MaaXBoard, select "accept" when you see the notification "incoming file over bluetooth."

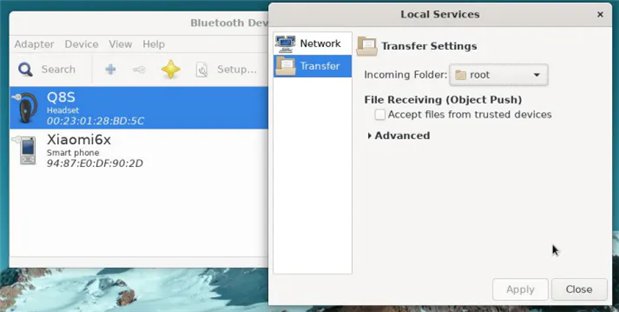
By going to "View">"Local Services, " you can select the incoming folder for receiving files.
7.c Connect Bluetooth Audio
MaaXBoard supports connecting to a Bluetooth audio device, such as a Bluetooth headset, to play audio files.
- Pair the device first:
- Right click and choose “Connect to: Audio Sink”

NOTE: I got the error "Connection Failed: blueman.bluez.errors.DBusFailedError: Protocol not available, " when I tried to connect to audio the first time, but after restarting the board I was able to connect to my paired device.
8. USE THE CAMERA
MaaXBoard supports both USB Camera and MIPI-CSI Camera. Attach a MIPI-CSI camera by lifting up the back part of the black MIPI camera connector on the board. Insert the camera's DSI ribbon cable. The blue side should face the Ethernet and USB ports. Gently press the MIPI camera connector down so that it grasps the ribbon cable firmly.

Open the camera application and select "mx6s-csi." On the next screen press "Camera." Select "capture." If it doesn't, double check that the ribbon cable is all the way in.
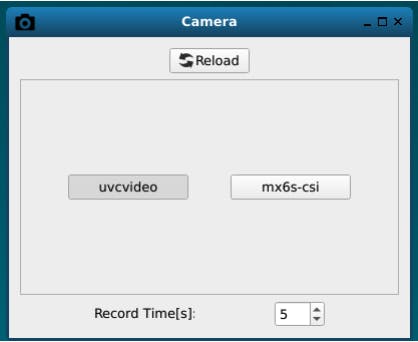

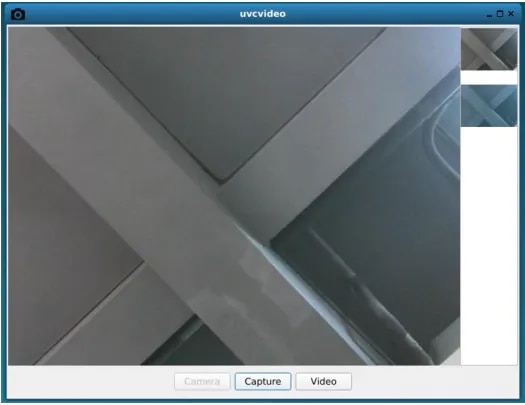
If you insert a USB camera, click "reload" and you will see a "uvcvideo" button that you can use to take photos from the USB camera.
If your input device supports video, you can also take a brief video (20 seconds or less). Change the length of the video by selecting the "Record time." Videos are saved as.yuv files. Weston comes with a video player, Totem, but it's not able to play.yuv files. To replay them you'll need a video player like mplayer. Install it:
apt install mplayerYou can then play your video:
mplayer <videofile>Photos and videos are saved in /root/Pictures.
9. GPIO
As you may have noticed, MaaXBoard has the same header pinout as a Raspberry Pi, and is Pi hat compatible:
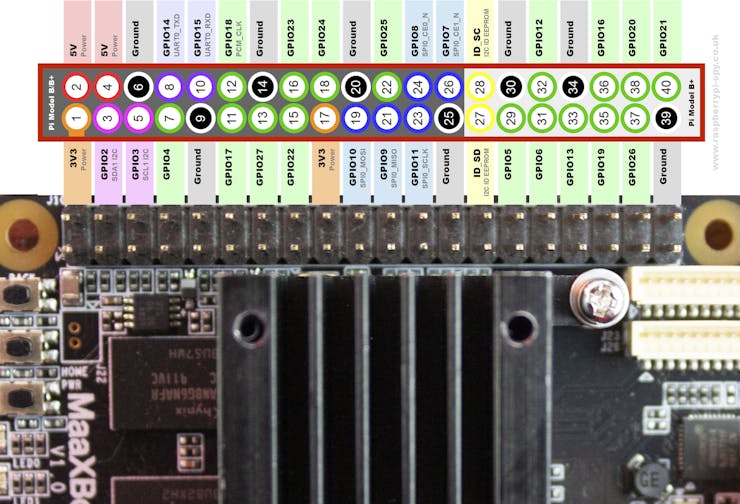
Maxboard pinout
9.a LEDs
The board comes with 2 onboard LEDs, sys_led and usr_led.
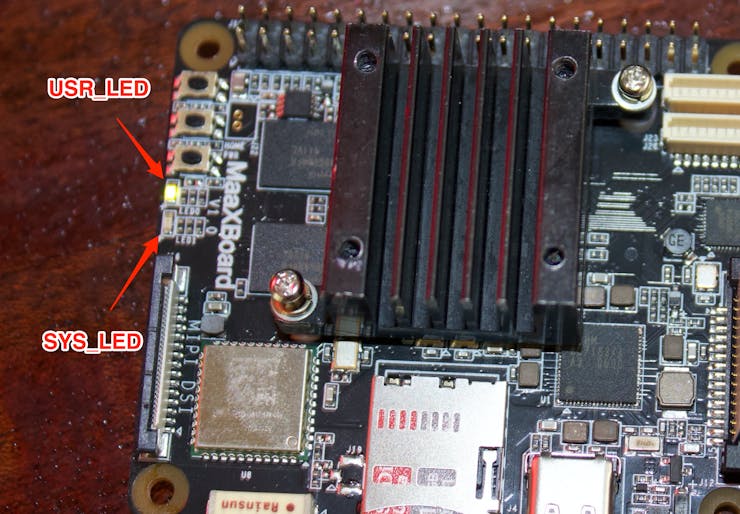
You can toggle them via bash.
Toggle usr_led:
echo 1 | tee /sys/class/leds/usr_led/brightness
echo 0 | tee /sys/class/leds/usr_led/brightness
Toggle sys_led:
echo 1 | tee /sys/class/leds/sys_led/brightness
echo 0 | tee /sys/class/leds/sys_led/brightness
9.b Buttons
MaaXBoard supports 3 buttons: S3-BACK, S4-HOME and S2-PWR.
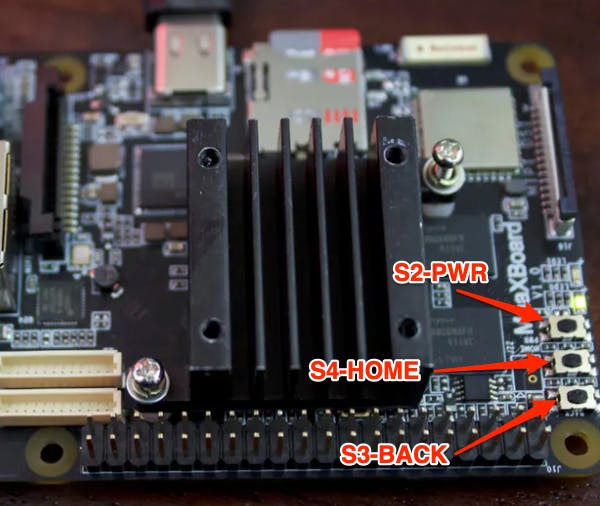
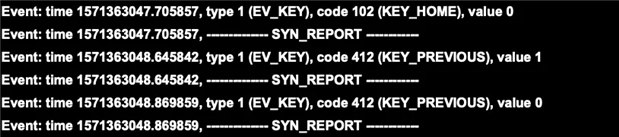
Remember we installed evtest earlier? Run it in bash now:
evtestIt prompts you to "choose the device event number [0-2]." (there may be more than two possible choices -you should see a list of input devices in the bash output)
If you select whichever number is gpio_keys, it will see all of the available button event codes, including those of your keyboard. Test S3-Back and S4-Home.
Press S2-PWR and the system will enter suspend mode; press PWR again for 1 second and the system will reboot.
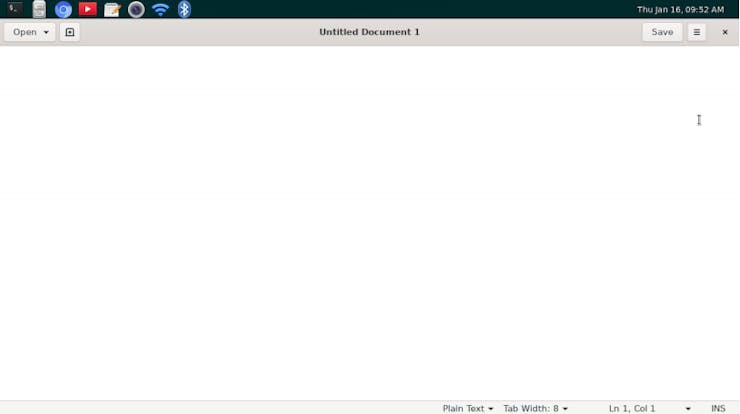
10. USE GEDIT TO CREATE A PROJECT
The Debian image comes with the Gedit text editor preinstalled. If you're familiar with Raspberry Pi, you've probably used Gedit before. You an open Gedit by clicking the notepad icon at the top of the screen, or by typing
geditThat opens a new document:
Hopefully this getting started guide was enough to get you up and running on your first project. Let me know what you create!

