element14 Community
element14 Community
    Register Log In
  • Site
  • Search
  • Log In Register
  • Members
    Members
    • Benefits of Membership
    • Achievement Levels
    • Members Area
    • Personal Blogs
    • Feedback and Support
    • What's New on element14
  • Learn
    Learn
    • Learning Center
    • eBooks
    • STEM Academy
    • Webinars, Training and Events
    • Learning Groups
  • Technologies
    Technologies
    • 3D Printing
    • FPGA
    • Industrial Automation
    • Internet of Things
    • Power & Energy
    • Sensors
    • Technology Groups
  • Challenges & Projects
    Challenges & Projects
    • Design Challenges
    • element14 presents
    • Project14
    • Arduino Projects
    • Raspberry Pi Projects
    • Project Groups
  • Products
    Products
    • Arduino
    • Dev Tools
    • Manufacturers
    • Raspberry Pi
    • RoadTests & Reviews
    • Avnet Boards Community
    • Product Groups
  • Store
    Store
    • Visit Your Store
    • Choose Another Store
      • Europe
      •  Austria (German)
      •  Belgium (Dutch, French)
      •  Bulgaria (Bulgarian)
      •  Czech Republic (Czech)
      •  Denmark (Danish)
      •  Estonia (Estonian)
      •  Finland (Finnish)
      •  France (French)
      •  Germany (German)
      •  Hungary (Hungarian)
      •  Ireland
      •  Israel
      •  Italy (Italian)
      •  Latvia (Latvian)
      •  
      •  Lithuania (Lithuanian)
      •  Netherlands (Dutch)
      •  Norway (Norwegian)
      •  Poland (Polish)
      •  Portugal (Portuguese)
      •  Romania (Romanian)
      •  Russia (Russian)
      •  Slovakia (Slovak)
      •  Slovenia (Slovenian)
      •  Spain (Spanish)
      •  Sweden (Swedish)
      •  Switzerland(German, French)
      •  Turkey (Turkish)
      •  United Kingdom
      • Asia Pacific
      •  Australia
      •  China
      •  Hong Kong
      •  India
      •  Korea (Korean)
      •  Malaysia
      •  New Zealand
      •  Philippines
      •  Singapore
      •  Taiwan
      •  Thailand (Thai)
      • Americas
      •  Brazil (Portuguese)
      •  Canada
      •  Mexico (Spanish)
      •  United States
      Can't find the country/region you're looking for? Visit our export site or find a local distributor.
  • Translate
  • Profile
Single-Board Computers
  • Products
  • Dev Tools
  • Single-Board Computers
  • More
  • Cancel
Single-Board Computers
Blog Remote Programming Connection to OLinuXino A13
  • Blog
  • Forum
  • Documents
  • Members
  • Mentions
  • Sub-Groups
  • Tags
  • More
  • Cancel
  • New
Single-Board Computers requires membership for participation - click to join
Blog Post Actions
  • Subscribe by email
  • More
  • Cancel
  • Share
  • Subscribe by email
  • More
  • Cancel
Group Actions
  • Group RSS
  • More
  • Cancel
Engagement
  • Author Author: oneleggedredcow
  • Date Created: 30 Jun 2014 3:21 AM Date Created
  • Views 202 views
  • Likes 0 likes
  • Comments 0 comments
Related
Recommended

Remote Programming Connection to OLinuXino A13

oneleggedredcow
oneleggedredcow
30 Jun 2014

In this article, I’m going to show you how to set up the Aptana Studio 3 IDE to remotely sync your code with the OLinuXino.  This allows you to program on your desktop in a nice IDE, automatically transfer the files, and run the code on your OLinuXino all without effort.  I’m going to show you how to set this up with the OLinuXino, but the same idea would work for any other single board computer (e.g. Raspberry Pi).


The reasons for doing this include:

  1. 1) IDE: This way you can use a powerful IDE on your desktop.  I don’t know about you, but I’m much more productive with an IDE than just a text editor.
  2. 2) Dual Monitors: I have grown so accustomed to having my code on one monitor and a reference on the other that it is difficult to program without it.
  3. 3) Faster Execution: If your code is very computationally expensive, it will run much faster on your desktop than on the OLinuXino.  Faster execution means faster debugging, which means that it takes you less time overall to create your program.


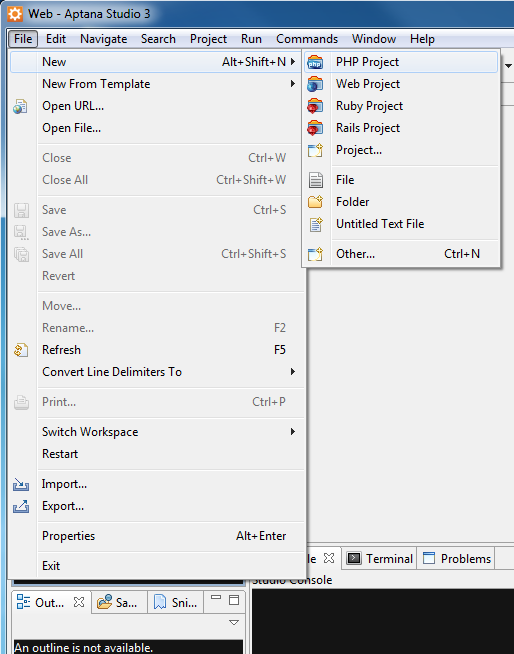
The first thing to do is to create a new PHP project to store the code in.  For this example, I’m going to create a project to store my OLinuXino Sous Vide project code in.  To do this, click on File -> New -> PHP Project…:

image

This will bring up a create project dialog, where you can fill in details about your project:

image

Note, this is where the project will be stored on your desktop.  We’ll get to the synchronization with the OLinuXino in a second.


Once the project is created, in the project explorer, right click on the connections node under newly created project to add a new connection:

image

This will bring up a window to fill out some initial information about the connection.

image

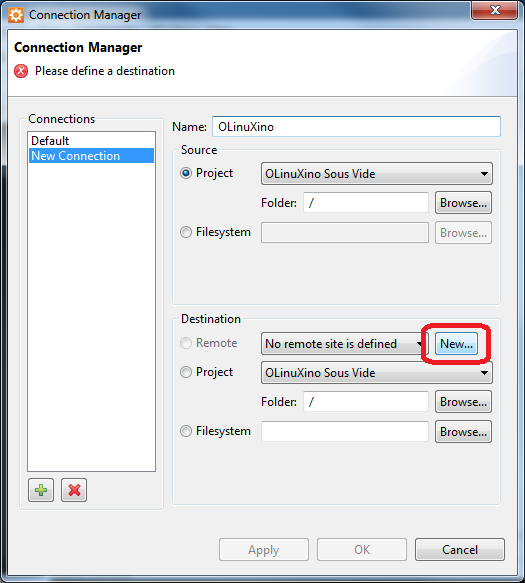
Since we haven’t defined any remote connections yet, we want to click the new button and fill in the information about our connection:

image

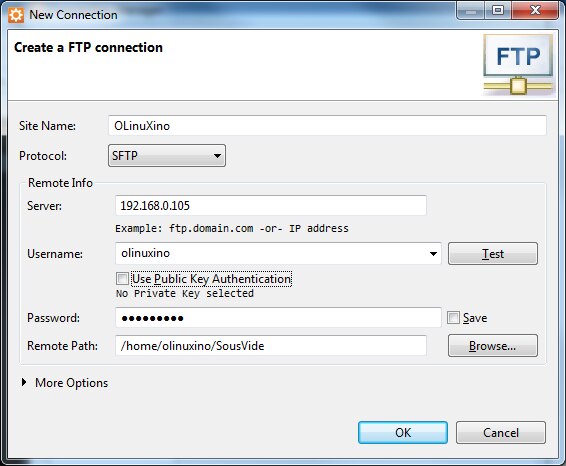
Once that is filled out, hit OK and you will be back at the previous form:

image

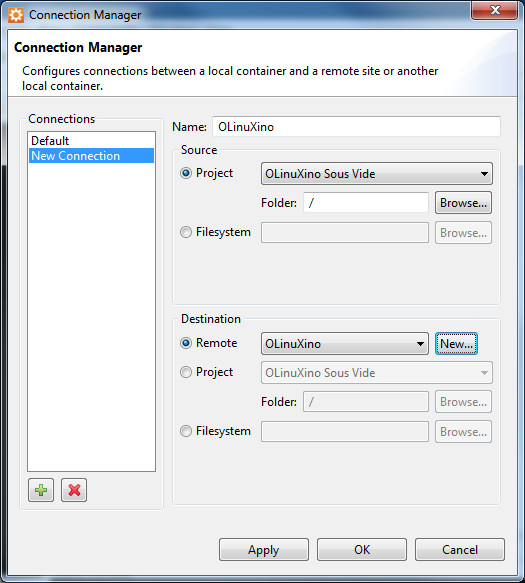
Click OK here as well.


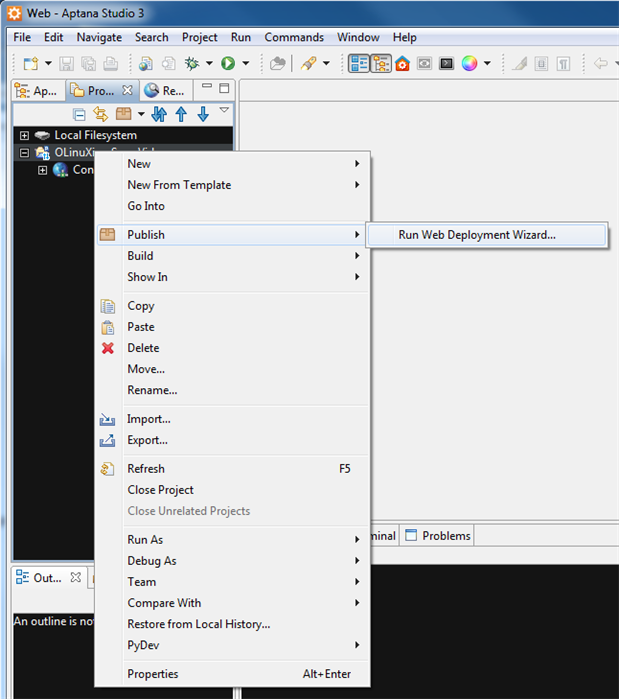
Now the connection between the desktop and the OLinuXino has been established.  However, we have one more thing to do to set up automatic synchronization between the two.  To do this, right click on the project node in the project explorer:

image

That will bring up a form that looks like this:

image

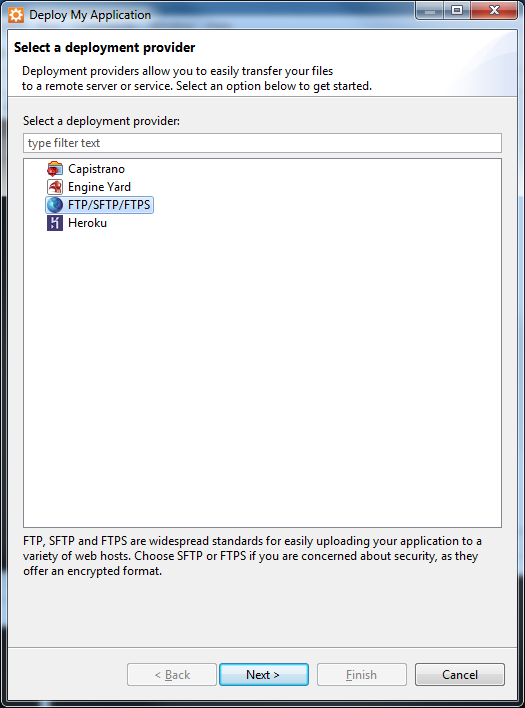
Since we created an SFTP connection earlier, we want to use that type of a deployment provider.

image

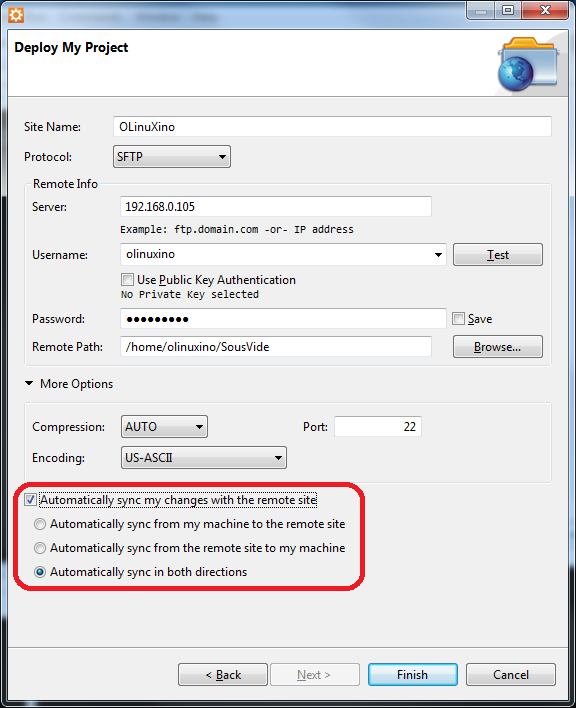
This will bring up a form that looks very similar to the one before, but with some more options at the bottom.  Check the box to automatically synchronize the changes and click finish.


This will bring up a screen that looks like this:

image

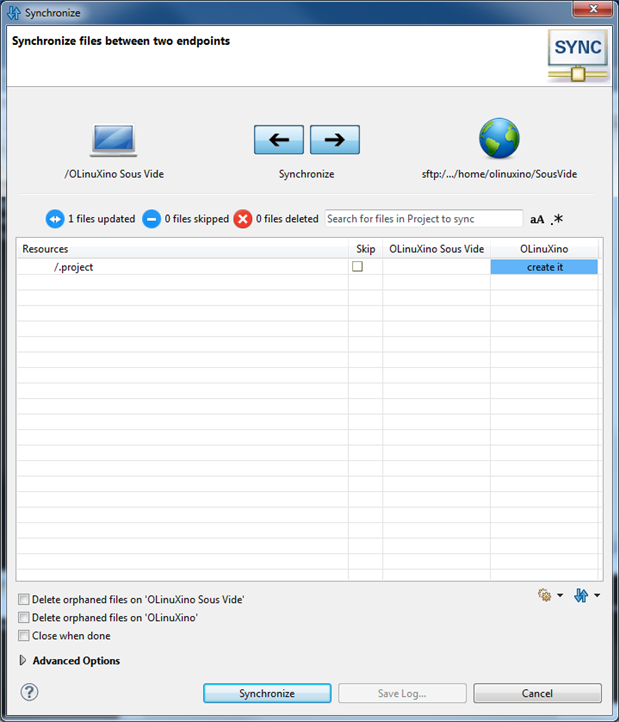
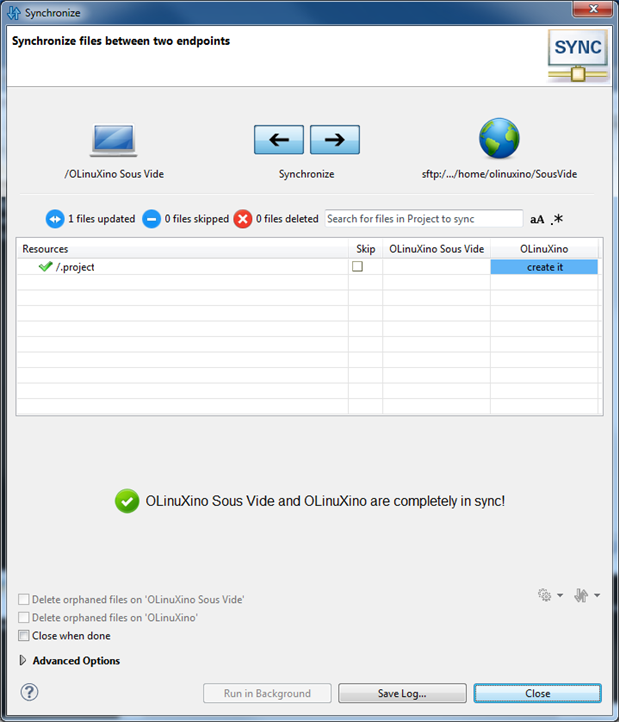
Hitting synchronize will synchronize the files and change the window to look like this:

image

Now, when you go to save your files for the first time there will be a window that pops up saying that it is connecting to the remote computer and uploading the changes.  I just checked the button to perform it in the background and not notify me.


Next a window came up telling me that the changes were successful.  I would suggest hiding this one in the future as well.


Now that our code is remotely synchronized, we can go one step further.  We can open up a terminal connection to the OLinuXino and run our code. To do this, open up the terminal tab at the bottom and create an ssh connection to the OLinuXino:


ssh -l olinuxino 192.168.0.105

image


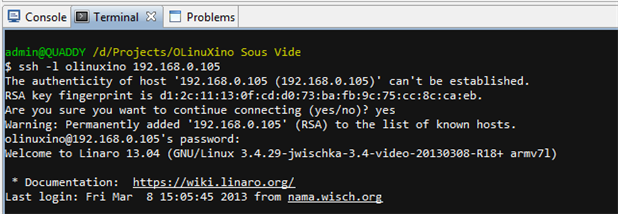
Excellent, once you have done that you have a remote connection to the machine.  From this you can run the code that was automatically transferred!

  • Sign in to reply
element14 Community

element14 is the first online community specifically for engineers. Connect with your peers and get expert answers to your questions.

  • Members
  • Learn
  • Technologies
  • Challenges & Projects
  • Products
  • Store
  • About Us
  • Feedback & Support
  • FAQs
  • Terms of Use
  • Privacy Policy
  • Legal and Copyright Notices
  • Sitemap
  • Cookies

An Avnet Company © 2023 Premier Farnell Limited. All Rights Reserved.

Premier Farnell Ltd, registered in England and Wales (no 00876412), registered office: Farnell House, Forge Lane, Leeds LS12 2NE.

ICP 备案号 10220084.

Follow element14

  • Facebook
  • Twitter
  • linkedin
  • YouTube