I did a project recently to change my winding machine's old mechanical counter to a digital counter. I did this using the following main components:
- An Optical Encoder, 1024 counts per revolution with a Quadrature Output. This allows determination of both angle/revolutions and direction (forward or reverse).
- An Arduino to capture the encoder pulses, and temporarily store the count.
- A Raspberry Pi for the higher-level Python code and to control the Touch Screen Display.
- A 3.5" Color Touch Screen Display to indicate the count in large numbers and for a RESET Function, On/Off Control of the Winding Machine's electromagnetic brake, and for a RESTORE LAST COUNT function.
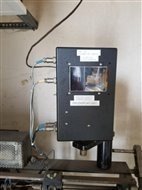
- A Black Plastic Box for Mounting.
The counter is continually updated and shows 3 integer digits, a decimal place, and 1 digit for tenths of a turn. One big advantage of this digital counter over the older mechanical one is that the resolution is 10X higher. With the mechanical counter, the resolution is to the nearest turn. This makes it hard to know whether the count is at X or X+1. As an example, if the counter reads 85 and is near the spindle angle where the count changes, it would be hard to know whether the count is 85 or 86 until the spindle angle rotates far past the angle where the count changes. This can easily lead to errors in the number of turns wound on a transformer coil, which is unacceptable. However, with the Digital Counter that reads to the nearest 1/10 of a turn, there is no doubt about the integer value of the turns count.
6-wire Control Cable was used to get the various signals from the encoder and brake to the counter box. For power to run the Arduino and Raspberry Pi, a 120VAC to 12VDC wall wart was used. The encoder needed +12 VDC, but the Arduino and Pi needed 5VDC & 3.3VDC. TO accomplish this, a small dc-dc converter (12VDC to 5VDC) was used. The Arduino had a 3.3VDC output which was used to pull-up the encoder's open-collector outputs. The Arduino's code was fairly simple and straightforward as it input the two quadrature pulse inputs and the code kept a running total of the turns count to include forward minus reverse. The reason for this is that if the winder rotated forward, the count incremented in a positive manner, but if stopped, then reversed, to add tape to the coil for example, the counter would subtract the amount of reverse turns, including fractional turns, so that the number of turns of wire would always be accurate. If this was not done or if a non-quadrature encoder was used, the count would increment up whether going forward or reverse. The true turns count would then be lost.
The constantly-updated turns count, plus the status of the spindle brake and digital output to turn the brake on/off was transferred from the Arduino to the Pi via USB. The Pi directly accepted the color touch screen display as the pins line-up for easy insertion. The harder part was mounting the display in the box along with the Raspberry Pi behind it, and the Arduino, On/Off Sw, 4-separate cables using DIN connectors, and the USB cables. Cutting the square hole in the box using my Dremel tool was especially hard in terms of keeping the lines straight. I wound up needing to do some manual filing to get the display to fit. I also had to make a couple of special brackets to bolt the display down to the box's plastic using tiny 4-40 screws. The photo below shows the black box with the touch screen display, electronics, and cabling on the left. I had a photo of the entire winding machine with the black box, but the element14 editor stopped working for inserting subsequent photos after I inserted the first photo.
The Raspberry Pi OS was Linnix and Python was used for control and display . The counter works great and we haven't had any problems with it. There's a RESET button on the touch screen and if it's pressed by mistake such that the count is zeroed on an unfinished coil, we added a RESTORE COUNT button to restore the previous count if the RESET was pressed by mistake. Finally, there's a touch screen button and indicator for the spindle brake. Normally, the brake is on when the foot speed control is not being pressed. However, in that case, the winding operator cannot rotate the spindle manually to reverse it for adding tape, etc. To overcome this problem the operator can press the brake on/off switch and the indicator tells if the brake is on or off at any given instant. The Pi's code is stored on a microSD card while the Arduino's code is flashed to its microprocessor chip.