element14 Community
element14 Community
    Register Log In
  • Site
  • Search
  • Log In Register
  • About Us
  • Community Hub
    Community Hub
    • What's New on element14
    • Feedback and Support
    • Benefits of Membership
    • Personal Blogs
    • Members Area
    • Achievement Levels
  • Learn
    Learn
    • Ask an Expert
    • eBooks
    • element14 presents
    • Learning Center
    • Tech Spotlight
    • STEM Academy
    • Webinars, Training and Events
    • Learning Groups
  • Technologies
    Technologies
    • 3D Printing
    • FPGA
    • Industrial Automation
    • Internet of Things
    • Power & Energy
    • Sensors
    • Technology Groups
  • Challenges & Projects
    Challenges & Projects
    • Design Challenges
    • element14 presents Projects
    • Project14
    • Arduino Projects
    • Raspberry Pi Projects
    • Project Groups
  • Products
    Products
    • Arduino
    • Avnet Boards Community
    • Dev Tools
    • Manufacturers
    • Multicomp Pro
    • Product Groups
    • Raspberry Pi
    • RoadTests & Reviews
  • Store
    Store
    • Visit Your Store
    • Choose another store...
      • Europe
      •  Austria (German)
      •  Belgium (Dutch, French)
      •  Bulgaria (Bulgarian)
      •  Czech Republic (Czech)
      •  Denmark (Danish)
      •  Estonia (Estonian)
      •  Finland (Finnish)
      •  France (French)
      •  Germany (German)
      •  Hungary (Hungarian)
      •  Ireland
      •  Israel
      •  Italy (Italian)
      •  Latvia (Latvian)
      •  
      •  Lithuania (Lithuanian)
      •  Netherlands (Dutch)
      •  Norway (Norwegian)
      •  Poland (Polish)
      •  Portugal (Portuguese)
      •  Romania (Romanian)
      •  Russia (Russian)
      •  Slovakia (Slovak)
      •  Slovenia (Slovenian)
      •  Spain (Spanish)
      •  Sweden (Swedish)
      •  Switzerland(German, French)
      •  Turkey (Turkish)
      •  United Kingdom
      • Asia Pacific
      •  Australia
      •  China
      •  Hong Kong
      •  India
      •  Korea (Korean)
      •  Malaysia
      •  New Zealand
      •  Philippines
      •  Singapore
      •  Taiwan
      •  Thailand (Thai)
      • Americas
      •  Brazil (Portuguese)
      •  Canada
      •  Mexico (Spanish)
      •  United States
      Can't find the country/region you're looking for? Visit our export site or find a local distributor.
  • Translate
  • Profile
  • Settings
GIZMO 2
  • Products
  • Dev Tools
  • Single-Board Computers
  • GIZMO 2
  • More
  • Cancel
GIZMO 2
Forum Gimzo 2 custom On/Off button?
  • Blog
  • Forum
  • Documents
  • Files
  • Members
  • Mentions
  • Sub-Groups
  • Tags
  • More
  • Cancel
  • New
Join GIZMO 2 to participate - click to join for free!
Actions
  • Share
  • More
  • Cancel
Forum Thread Details
  • State Suggested Answer
  • Replies 51 replies
  • Answers 2 answers
  • Subscribers 13 subscribers
  • Views 6147 views
  • Users 0 members are here
Related

Gimzo 2 custom On/Off button?

Former Member
Former Member over 10 years ago

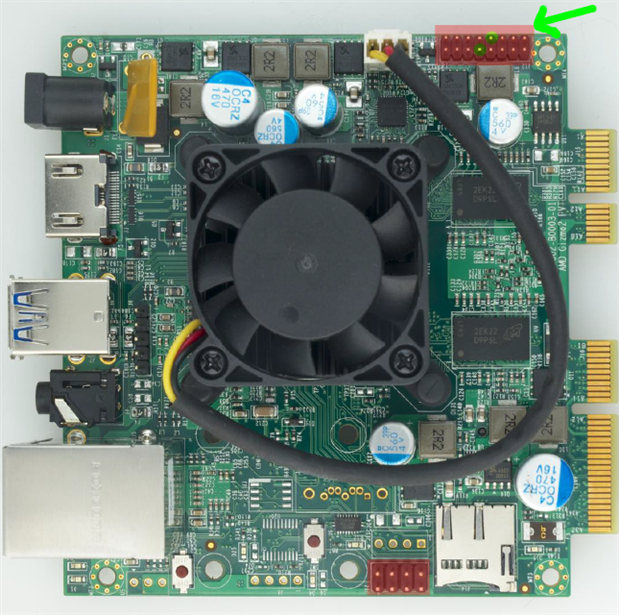
Ideally I'd want to modify the BIOS to autostart without pressing any button. But if nobody ends up knowing how to do that, I'd like to at least have a custom proper button on my device's case for turning the Gizmo on. I've read one of the pin pairs can be used, but which ones?


mCPawjq.png

  • Sign in to reply
  • Cancel

Top Replies

  • shabaz
    shabaz over 10 years ago +1 suggested
    Hi Mark, The information is in this thread: http://www.element14.com/community/community/designcenter/single-board-computers/gizmo2/blog/2015/07/30/gizmo2--flash-bios-to-autostart-on-power-up . In summary…
  • shabaz
    shabaz over 10 years ago in reply to Former Member +1
    Hi Mark, Enrico is suggesting try it with a resistor, see if it works for you. If you observe some behavior that is undesirable (e.g. having to hold the button pressed for a long time) then it can be considered…
Parents
  • fvan
    0 fvan over 10 years ago

    Check out this post where I added an external power and reset button: http://www.element14.com/community/community/designcenter/single-board-computers/gizmo2/blog/2015/01/28/gizmo2-adding-external-pwr-and-rst-buttons

    • Cancel
    • Vote Up 0 Vote Down
    • Sign in to reply
    • Verify Answer
    • Reject Answer
    • Cancel
  • Former Member
    0 Former Member over 10 years ago in reply to fvan

    Oh wow, so much great tutorials I'm having hard time finding image


    So you didn't use a resistor?

    Is there any requirement for what button can be used. All I know is buttons have a maximum current rating, this shows how little my electronics knowledge is. But it's going to be fun programming the Gizmo after I get this figured out.


    PS. Is that a 3d printed enclosure? That's another hobby of mine.

    • Cancel
    • Vote Up 0 Vote Down
    • Sign in to reply
    • Verify Answer
    • Cancel
  • balearicdynamics
    0 balearicdynamics over 10 years ago in reply to Former Member

    Frankly I suppose this can represent a problem but to be sure in this particular case (it is the first time I do this on a Gizmo2) I should test it. My suggestion is to add the resistor and ignore the debouncing circuit. This can be done in minutes with a breadboard. It is probable that this works as I suppose.


    The debouncing effect is almost common with push buttons and can be solved - as shown in the page I got you before - via software or hardware. In this case it is not possible to solve it by software so a small circuit should be done. For more detail on how the debouncing should be implemented and why this occur, take a look to the following pdf: http://www.eng.utah.edu/~cs5780/debouncing.pdf

    • Cancel
    • Vote Up 0 Vote Down
    • Sign in to reply
    • Verify Answer
    • Cancel
  • Former Member
    0 Former Member over 10 years ago in reply to balearicdynamics

    So im confused, you think debouncing will be an issue here, or the opposite?

    • Cancel
    • Vote Up 0 Vote Down
    • Sign in to reply
    • Verify Answer
    • Cancel
  • shabaz
    0 shabaz over 10 years ago in reply to Former Member

    Hi Mark,


    Enrico is suggesting try it with a resistor, see if it works for you.

    If you observe some behavior that is undesirable (e.g. having to hold the button pressed for a long time) then it can be considered further and you then may need a more complex circuit.

    His linked article is extensive, and provides much detail on how different debouncing circuitry works.

    Whether you actually need delays, debouncing, etc., can be answered in detail either by Gizmosphere (since they designed the board), or a detailed examination of the circuit and the power management IC user guide (which would require some time to investigate). An alternative approach (as suggested by Enrico) is to just try it, observe the results and see if it fits your required button-press behavior.

    • Cancel
    • Vote Up +1 Vote Down
    • Sign in to reply
    • Verify Answer
    • Cancel
  • balearicdynamics
    0 balearicdynamics over 10 years ago in reply to shabaz

    Thanks shabaz image

    • Cancel
    • Vote Up 0 Vote Down
    • Sign in to reply
    • Verify Answer
    • Cancel
  • Former Member
    0 Former Member over 10 years ago in reply to balearicdynamics

    Sorry that I didn't get what you meant the first time. Thanks.


    EDIT: Oh wow, I confused the original post by Frederick Vandenbosch with Enrico Miglino because both of you had similar minions avatar, thats why I felt I was getting contradicting info from you.

    • Cancel
    • Vote Up 0 Vote Down
    • Sign in to reply
    • Verify Answer
    • Cancel
  • Former Member
    0 Former Member over 10 years ago in reply to Former Member

    Sorry for being a bit too cautious.

    The power on/off pins are these, right (highlighted in green)?:

    image


    And does the size of the switch matter? (different current from different resistance or something?)


    And hopefully last question: if I want Gizmo to autostart, just use a simple jumper with resistor for these two pins?

    • Cancel
    • Vote Up 0 Vote Down
    • Sign in to reply
    • Verify Answer
    • Cancel
  • balearicdynamics
    0 balearicdynamics over 10 years ago in reply to Former Member

    The first answer is yes.


    The second answer is no. The pin simply send a signal based on the pull down as it is pressed and connects the high signal to ground then this input signal tells to the boot firmware to start the boot process, load the bios etc.


    To have the system autostart you should know how and modify this internal part of the firmware. In theory it is possible, just with the programmer and the sources of this part of the Gizmo2 project. As the entire device is open source you should not have difficult to find the information and software that is needed. But what is the reason you need the system autostart? And autostart what does ti means for you? Something should happen to make the system to start, correct? What event ?


    Enrico

    • Cancel
    • Vote Up 0 Vote Down
    • Sign in to reply
    • Verify Answer
    • Cancel
  • Former Member
    0 Former Member over 10 years ago in reply to balearicdynamics

    Was the first answer also the answer to "does the size of the switch matter"?


    Okay, here's the reason I was thinking of having autostart for the Gizmo:


    1) The device is something like a light fixture consisting of 3 individual devices in one case:

    1. a tiny video projector

    2. Gizmo 2, which generates graphics and sends to the video projector

    3. an Arduino (Nano), for having buttons to choose between media files stored in a USB stick and read by a program running on the Gizmo 2 and communicating with the Arduino via serial, as well as controlling a tiny shutter motor to block video projector beam in some instances.


    So I need to turn on 3 individual devices, but want to have 1 button for that. It might be simple to create a circuit board for most of you to do this, but I don't have the skills.

    Arduino boots and starts executing when Gizmo 2 does, if connected via USB. So no problem there.

    Video projector is more complicated, it has a button you need to press and hold for 4 seconds for it to turn on. Sadly it can't autostart like the Arduino when power is applied.


    Now, if Gizmo autostarted as well when I connected the (not stock) power supply, I could still have what I want ( 1 button for turning on (visibly on) the light fixture ) and pressing the turn on button would start the video projector, and everything else (Arduino and Gizmo) would be ready already.


    But if autostarting Gizmo is not easy, I need some simple solution for powering both the Gizmo and video projector with one button.


    One solution I have in my mind is having the power on button just start the Gizmo, and then emulate the 4 second button press by a DC-DC relay and the Arduino (soldering cables around the video projector's start button).

    • Cancel
    • Vote Up 0 Vote Down
    • Sign in to reply
    • Verify Answer
    • Cancel
  • balearicdynamics
    0 balearicdynamics over 10 years ago in reply to Former Member

    In my opinion you have the solution in your hands but you don't see it image


    Power on - Arduino starts


    Then the first thing that Arduino should do one is power the projector, then power the Gizmo2 then Gizmo2 starts communication etc. etc.


    How to? In both cases you need to connect the button that should be pulled to GND to one of the Arduino I/O and with a simple circuit based - for example - on a PN2222 transistor it is Arduino that do the job of powering on and off the systems.


    To manage the long press on the projector, short press on the Gizmo2, long press on Gizmo2 for power-off all can be done (and must be) by the Arduino, that is just the board that - as it is a Micro Controller - has this role in your architecture.


    The following link explain you very clear (with circuit) how to use and I/O digital pin on Arduino to simulate a push button switch using a PN2222 transistor: https://teachmetomake.wordpress.com/how-to-use-a-transistor-as-a-switch/


    Enrico

    • Cancel
    • Vote Up 0 Vote Down
    • Sign in to reply
    • Verify Answer
    • Cancel
  • Former Member
    0 Former Member over 10 years ago in reply to balearicdynamics

    If I dont find a right transistor on time, are there DC-DC relays which could be used for this?

    • Cancel
    • Vote Up 0 Vote Down
    • Sign in to reply
    • Verify Answer
    • Cancel
Reply
  • Former Member
    0 Former Member over 10 years ago in reply to balearicdynamics

    If I dont find a right transistor on time, are there DC-DC relays which could be used for this?

    • Cancel
    • Vote Up 0 Vote Down
    • Sign in to reply
    • Verify Answer
    • Cancel
Children
No Data
element14 Community

element14 is the first online community specifically for engineers. Connect with your peers and get expert answers to your questions.

  • Members
  • Learn
  • Technologies
  • Challenges & Projects
  • Products
  • Store
  • About Us
  • Feedback & Support
  • FAQs
  • Terms of Use
  • Privacy Policy
  • Legal and Copyright Notices
  • Sitemap
  • Cookies

An Avnet Company © 2025 Premier Farnell Limited. All Rights Reserved.

Premier Farnell Ltd, registered in England and Wales (no 00876412), registered office: Farnell House, Forge Lane, Leeds LS12 2NE.

ICP 备案号 10220084.

Follow element14

  • X
  • Facebook
  • linkedin
  • YouTube