


Introduction
In the previous article, we set up the BeagleBone to be a webserver running Lighttpd and PHP.
In this article, we are going to build upon that foundation. We are going to create a web site that lets the user turn on and off an LED on the BeagleBone. This is a good example of how to create a simple web page that interacts with the BeagleBone and is a step towards our final goal of creating a website to show historical temperature information.
Turning a LED On/Off
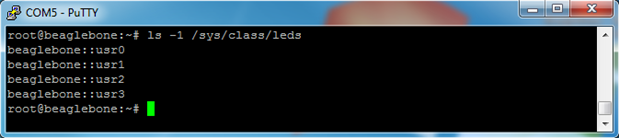
BeagleBone LEDs can be turned on/off through command line, but in order to do this, we need to figure out what they are named. The names can be found like this:
ls -1 /sys/class/leds
So, turning the usr2 LED on/off would look something like this:

1 will turn the LED on, and 0 will turn the LED off.
By default, some of the LEDs are used to display information to us about what is going on. So, if you change the state of one of those LEDs, it will be quickly overwritten. We can see this by looking at the trigger:
cat /sys/class/leds/beaglebone::usr0/trigger

To modify this so that the LED only changes when we tell it to, we can change the trigger to none:
echo none > /sys/class/leds/beaglebone::usr0/trigger

C Program
Now that we know how to turn on/off the LEDs, we can write a small C program to make it easier for us. The program will take in the number of the LED to change (0-4) and the state to change it to (off = 0, on = 1). Here’s the code:
#include <stdio.h>
#include <stdlib.h>
#include <fcntl.h>
#include <unistd.h>
int main(int argc, const char *argv[])
{
if (argc != 3)
{
printf("Usage:\n");
printf("\tledCtl <led> <on/off>\n");
printf("\n");
printf("<led> : Number between 0-3\n");
printf("<on/off>: 1 = on, 0 = off\n");
return 1;
}
int ledNum = atoi(argv[1]);
if (ledNum < 0 || ledNum > 3)
{
printf("<led> : Number between 0-3\n");
return 1;
}
char ledPath[1024];
sprintf(ledPath, "/sys/class/leds/beaglebone::usr%d/brightness", ledNum);
int fid = open(ledPath, O_WRONLY);
int onOff = atoi(argv[2]);
switch (onOff)
{
case 0:
write(fid, "0", 1);
break;
case 1:
write(fid, "1", 1);
break;
default:
printf("<on/off>: 1 = on, 0 = off\n");
return 1;
}
close(fid);
return 0;
}
Remember to change the path of the LED to the path that we found earlier.
For a simple task like this, we could have just used the command line to turn the LEDs on/off. However, I wanted to put it into a C program so that we set ourselves up better for the future. When we take temperature measurements and put them into a MySQL database, it will require more logic that is better suited for a small program rather than the command line.
The code should be fairly clear. It is mostly just checking the inputs that the user gave us to make sure that they are reasonable.
Before we compile it, we need to create a directory to store the scripts that we are going to be running on our web site:
mkdir /www/cgi-bin
To compile the code, type:
g++ ledctl.cpp -o /www/cgi-bin/ledctl

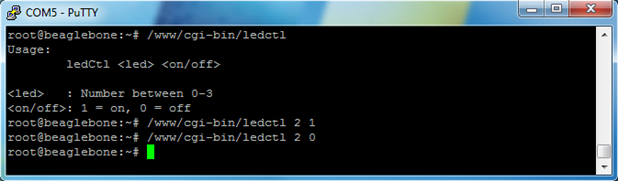
Then we can run some examples and make sure that it works:
/www/cgi-bin/ledCtl
/www/cgi-bin/ledCtl 2 1
/www/cgi-bin/ledCtl 2 0
Creating a Web Page
Awesome, now that we have a program to control the LEDs on the BeagleBone, let’s create a web page so that we can control the LEDs over the Internet. Let’s call the web page ledCtl.php and place the following code in it:
<html>
<head>
<title>BeagleBone LED Changer</title>
<style type="text/css">
p { display: table-cell; }
button { width: 75px; margin: 2px auto; }
</style>
<?php
if (isset($_GET['led']) && isset($_GET['onOff']))
{
$led = $_GET['led'];
$onOff = $_GET['onOff'];
exec( "/www/cgi-bin/ledctl $led $onOff" );
}
?>
</head>
<body>
<div style="width: 200px; margin: 0px auto;">
<div style="width: 100px; float: left;">
<p>LED #2:</p>
<button type="button" onclick="location.href='ledCtl.php?led=2&onOff=1'">ON</button>
<button type="button" onclick="location.href='ledCtl.php?led=2&onOff=0'">OFF</button>
</div>
<div sytle="width: 100px; margin-left: 100px;">
<p>LED #3:</p>
<button type="button" onclick="location.href='ledCtl.php?led=3&onOff=1'">ON</button>
<button type="button" onclick="location.href='ledCtl.php?led=3&onOff=0'">OFF</button>
</div>
</div>
</body>
</html>
Note: We used LEDs #2 and #3 because LED #0 and #1 occasionally blink and override our on/off settings.
Then we can test our web page by going to a browser and using our new web page:
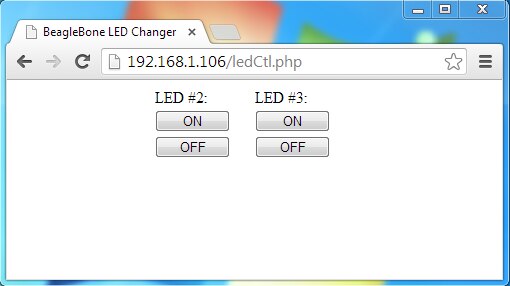
Pressing the buttons on the page should change the state of the LEDs on the BeagleBone!
Next Article
In the next article, we are going to get MySQL up and running on the BeagleBone. We will use MySQL as a convenient place to store the temperature measurements that we take. This will also make it easy to retrieve the data when the user requests historical temperature information through our web page.

