


Introduction
In the previous articles, we set up the BeagleBone to have a MySQL database and a web server. We also wrote a simple web site to control the LEDs on the BeagleBone.
In this article, we are going to tie all of the pieces together and create a web site that displays the temperature of the room that the BeagleBone is in. We are going to do this by taking temperature measurements using the analog input on the BeagleBone and storing the measured values in the database. We will then create a PHP page that will query the data out of the database and display it to the user in a google chart.
Preparing the Database
The first step is to create a new MySQL database:
CREATE DATABASE TempDB;
Next, we should probably create a new user to log into the database with. This isn’t strictly necessary, but it is a good idea to not log in as root every time. Here’s how to create a new user:
CREATE USER bone@localhost IDENTIFIED BY ‘bone’;
Then we need to give the new user (bone) permissions on the newly created database:
GRANT ALL ON TempDB.* to bone@localhost;

I usually prefer to create my tables in code rather than through the MySQL prompt. The reason is that if I ever want to make any changes or start over, I can just drop the table and then rerun my code and it will take care of it. I find that this makes it faster and easier to make changes to my table.
Interfacing with the Database
So, now that the database and user are set up, we can shift over to C++ to create the table and take temperature measurements. We’ll start by creating a program that just inserts in any old data into the table and then we’ll incorporate a temperature sensor. Here’s the first cut at the program:
#include <mysql.h>
#include <stdlib.h>
#include <stdio.h>
#include <string.h>
/// Prints out a MySQL error message and exits
///
/// This function should be called after a MySQL error has been encountered. This function will then
/// notify the user of the error that has occurred, clean up the existing MySQL connection, and then
/// exit the program.
///
/// @param The MySQL connection to clean up before exiting
void error_exit(MYSQL *con)
{
fprintf(stderr, "%s\n", mysql_error(con));
if (con != NULL)
{
mysql_close(con);
}
exit(1);
}
int main(int argc, const char *argv[])
{
// Initialize a connection to MySQL
MYSQL *con = mysql_init(NULL);
if(con == NULL)
{
error_exit(con);
}
// Connect to MySQL
// Here we pass in:
// host name => localhost
// user name => bone
// password => bone
// database name => TempDB
if (mysql_real_connect(con, "localhost", "bone", "bone", "TempDB", 0, NULL, 0) == NULL)
{
error_exit(con);
}
// Create the TempMeas database (if it doesn't already exist)
if (mysql_query(con, "CREATE TABLE IF NOT EXISTS TempMeas(MeasTime DATETIME, Temp DOUBLE)"))
{
error_exit(con);
}
// Initialize a MySQL statement
MYSQL_STMT *stmt = mysql_stmt_init(con);
if (stmt == NULL)
{
error_exit(con);
}
// Set out insert query as the MySQL statement
const char *query = "INSERT INTO TempMeas(MeasTime, Temp) VALUES(NOW(), ?)";
if (mysql_stmt_prepare(stmt, query, strlen(query)))
{
error_exit(con);
}
// Create the MySQL bind structure to store the data that we are going to insert
double temp = 0.0;
MYSQL_BIND bind;
memset(&bind, 0, sizeof(bind));
bind.buffer_type = MYSQL_TYPE_DOUBLE;
bind.buffer = (char *)&temp;
bind.buffer_length = sizeof(double);
// Bind the data structure to the MySQL statement
if (mysql_stmt_bind_param(stmt, &bind))
{
error_exit(con);
}
// Insert multiple records into the database,
// with different data each time
for (int i = 0; i < 10; i++)
{
temp = (float)i;
mysql_stmt_execute(stmt);
}
// Close the MySQL connection
mysql_close(con);
return 0;
}
The code is surprisingly straight-forward. We start by creating the table if it does not exist. Then we create a parameterized query. Note that we don’t need to recreate the query or rebind the parameters. This is because we pass a pointer to the bind structure. So, all we need to do is execute the statement every time a new measurement is taken.
To build the code, use the following command:
g++ tempmeas_initial.cpp -o tempmeas_initial -I/usr/include/mysql –lmysqlclient
Then you can run it using:
./tempmeas_initial
After running the program, we can go over to MySQL and make sure that everything worked like we expected:
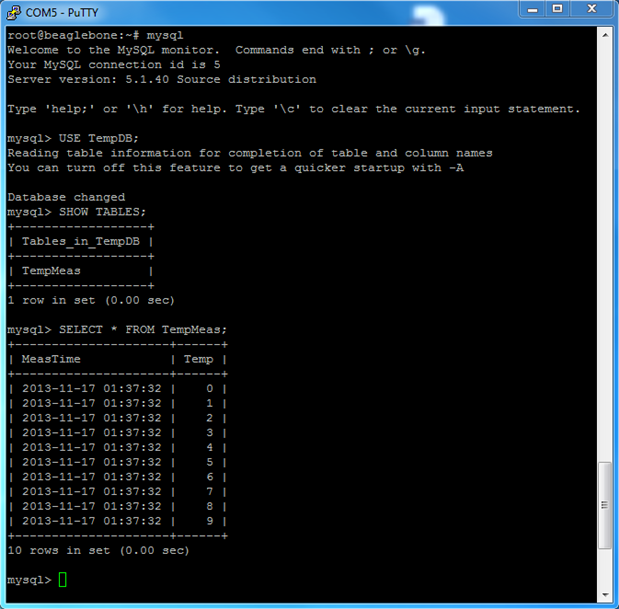
That looks good, so let’s move on to incorporating a temperature sensor.
Temperature Sensor
Now that we know that we can put data into the database, let’s set up a circuit to gather that data:
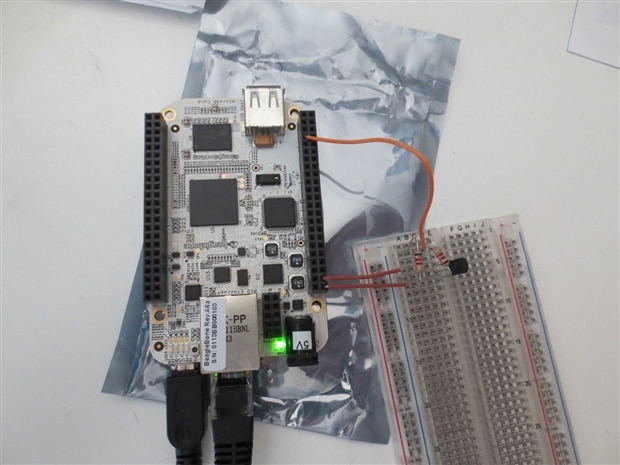
Here we have a MCP9701E temperature sensor connected to analog input #1. I also did a simple voltage divider to cut the voltage in half since the input voltage is 3.3V and the analog input pins can only handle a maximum of 1.8V. The sensor output will never be that high (unless it gets really hot), so it is probably unnecessary, but better safe than sorry.
Now we can test to make sure that the circuit is working properly by reading the value that it outputs at:
Older BeagleBone:
cat /sys/devices/platform/tsc/ain1
Newer BeagleBone:
cat /sys/devices/platform/omap/tsc/ain1
Reading the Temperature Sensor
The value that is returned is between 0 - 4096 and it is a measurement of the voltage that is connected to ain1. We need to convert that voltage into a temperature and to do that, we use the information from the datasheet. Here is the conversion in code:
Header:
#ifndef MCP9701E_H
#define MCP9701E_H
class MCP9701E
{
private:
int _input;
char _buffer[1024];
static const float Vdd;
static const int TempSensorMin;
static const int TempSensorMax;
static const float V0;
static const float Tc;
public:
MCP9701E(const char *pin);
float GetTemperature();
void Close();
};
#endif
Definition:
#include "MCP9701E.h"
#include <stdlib.h>
#include <fcntl.h>
#include <stdio.h>
#include <unistd.h>
/// Input voltage
const float MCP9701E::Vdd = 3.3;
/// Maximum and minimum values that can be measured
const int MCP9701E::TempSensorMin = 0;
const int MCP9701E::TempSensorMax = 4096;
/// Temperature sensor constants
const float MCP9701E::V0 = 0.3f;
const float MCP9701E::Tc = 0.0195f;
/// Handles a MCP9701E temperature sensor
///
/// @param Hardware device to read the temperature measurements from
MCP9701E::MCP9701E(const char *pin)
{
_input = open(pin, O_RDONLY);
}
/// Grabs a temperature measurement
float MCP9701E::GetTemperature()
{
// Read the sensor
int status = read(_input, _buffer, sizeof(_buffer));
if (status == -1)
{
fprintf(stderr, "ERROR: Could not get temperature measurement.");
return -999.0f;
}
// Reset the sensor
lseek(_input, 0, 0);
// Convert the string into an integer
_buffer[status] = '\0';
int value = atoi(_buffer);
// Convert the measurement into a temperature
float voltage = ((float) value) / (TempSensorMax - TempSensorMin + 1) * Vdd;
float temp = (voltage - V0) / Tc;
return temp;
}
/// Closes the temperature sensor
void MCP9701E::Close()
{
if(_input != -1)
{
close(_input);
_input = -1;
}
}
Then we can make a small modification to our code that imports numbers into the MySQL database, so that it now imports in actual temperature measurements. To do this, we replace the previous for loop with the code below:
// Initialize the temperature sensor
MCP9701E sensor("/sys/devices/platform/omap/tsc/ain2");
// Take a temperature measurement and insert it into the database
for (int i = 0; i < 10; i++)
{
temp = sensor.GetTemperature();
mysql_stmt_execute(stmt);
sleep(60);
}
// Close the temperature sensor
sensor.Close();
The full version of the code is attached below.
To build the code, use the following command:
g++ tempmeas.cpp MCP9701E.cpp -o tempmeas -I/usr/include/mysql –lmysqlclient
Then you can run it using:
./tempmeas
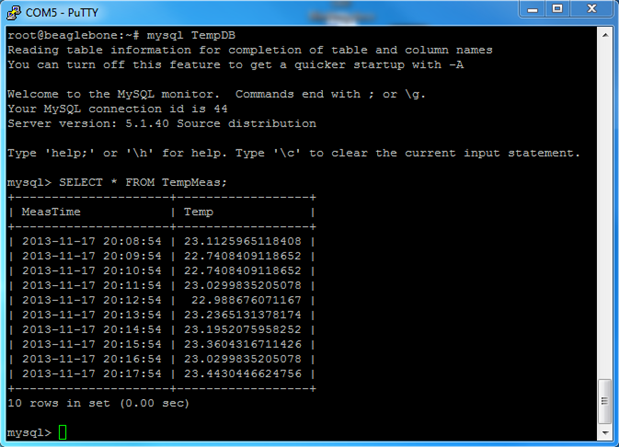
Next we can go over to MySQL and verify that actual temperature measurements are being populated in the database:
Creating a Web Page
The final piece of the puzzle is to create a web page to display the information in. To do this, we will use google charts, and slightly modify their line chart example. All we need to do is add some logic to query the data from the MySQL database:
<html>
<head>
<title>BeagleBone Temperature</title>
<script type="text/javascript" src="https://www.google.com/jsapi"></script>
<script type="text/javascript">
google.load("visualization", "1", {packages:["corechart"]});
google.setOnLoadCallback(drawChart);
function drawChart() {
var data = google.visualization.arrayToDataTable([
['Time', 'Temperature'],
<?php
$con = mysqli_connect("localhost", "bone", "bone", "TempDB");
$query = "SELECT * FROM TempMeas";
$result = mysqli_query($con, $query);
mysqli_close($con);
while ($row = mysqli_fetch_array($result))
{
$time = $row['MeasTime'];
$temp = $row['Temp'];
echo "['$time', $temp],";
}
?>
]);
var options = {
title: 'BeagleBone Measured Temperature',
vAxis: { title: "Degrees Celsius" }
};
var chart = new google.visualization.LineChart(document.getElementById('chart_div'));
chart.draw(data, options);
}
</script>
</head>
<body>
<div id="chart_div" style="width: 900px; height: 500px;"></div>
</body>
</html>
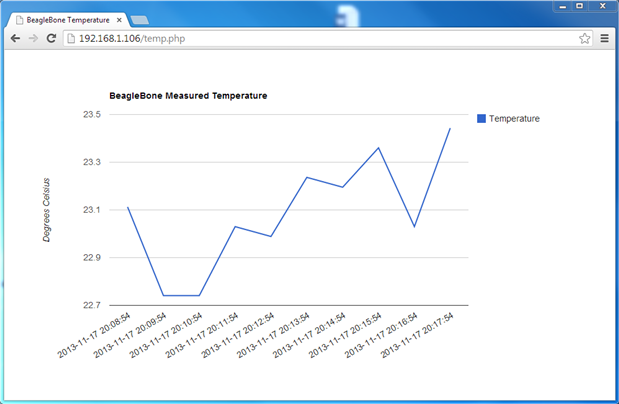
The change that we made to the google chart example is the addition of the PHP code. This code will query all of the data in the database and insert it into the web page that is returned to the user. If the sensor has been running for a long time, this could be a lot of data. An improvement would be to limit the measurements to the past hour or so. Even better would be to make it user configurable through the web page! Here we are just focused on a simple example.
Finally, we can visit our web page and check out our results!
Summary
In these articles, we have demonstrated how to turn your BeagleBone into a very powerful web server. MySQL, PHP, and JavaScript are the building blocks of most web sites. Using these tools, you can create some very exciting sites on your BeagleBone! And if you do, please post them to the comments, I’d love to see what projects you are working on.

