Introduction
This is the continuation of my previous blog ( BeagleY-AI Review - Part 1 ). In this blog we will look into the AI/ML inference performance of BeagleY-AI. As I was working with this board for the past few weeks, I have learnt a lot about the platform and the board. I think It's definitely worth sharing. For those who wanted to get started with the BeagleY-AI board, I think this will help a lot.
The Architecture

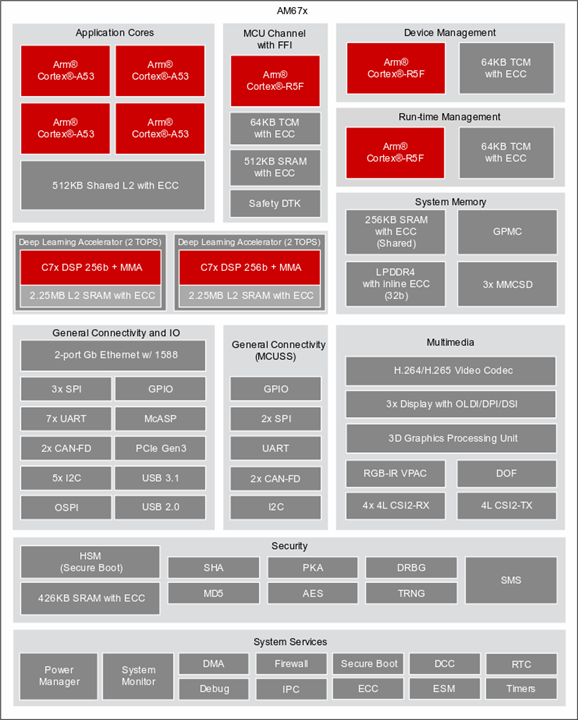
The heart of Beagley-AI is Texas Instruments AM67A. This quad core ARM Cortex A53 processors can clock upto a maximum speed of 1400MHz. This is not a fancy looking processor compared to what we get in the latest Raspberry Pis. But the real difference comes into picture when you look into the co-processors.
- 2x C7x DSPs. Each can produce 2TOPS
- ARM Cortex R5F MCU for meeting any realtime requirements
- 3D graphics processing unit
- Video and Vision accelerators
So it's very clear that this processor was meant for performing AI/ML inference on edge. Let's dive deep into this use case in this blog.
Example given in the getting started guide
TensorFlow Lite Object Detection
This is a sample project given in the getting started guide. Very simple example which deploys coco-ssd-mobilenet pretrained model for object detection. The example make use of TensorFlow Lite APIs for inference on edge.
Note : The steps involved to get this running on the board is very well documented in the above given link. So I am not including it in this blog.
Let's look at the result what I got.

Interesting!! I am hardly getting 3 FPS performance. It's really bad!
In comparison, I ran the same example on my Raspberry Pi 5 (8GB variant) and I am getting 15 FPS! 5 times better performance on RPi5!

Hmmm... Something is really wrong. What can that be. With the dual DSP Co-processors which can produce 4TOPS, It's not producing a satisfactory result?? Answer to this question is in the way how TensorFlow Lite works.
AI/ML Inference on Edge
TensorFlow Lite is google's high performance runtime for AI models on edge devices. BeagleY-AI has two C7x DSP processors to boost the inference performance. But how does the TFLite runtime know there is such a co-processor present and how to access it ?

LiteRT Delegates address this issue. Delegates enable hardware acceleration of TFLite models leveraging the underlying GPUs or DSPs. By default TFLite models are optimized for ARM Neon architecture. But CPUs are not optimized for performing large scale matrix multiplication or convolutions.
Read more on LiteRT Delegates here : https://ai.google.dev/edge/litert/performance/delegates
Now the question is from where do I get the delegates for C7x DSPs, So that I can accelerate the inference performance on edge.
TI's Edge AI
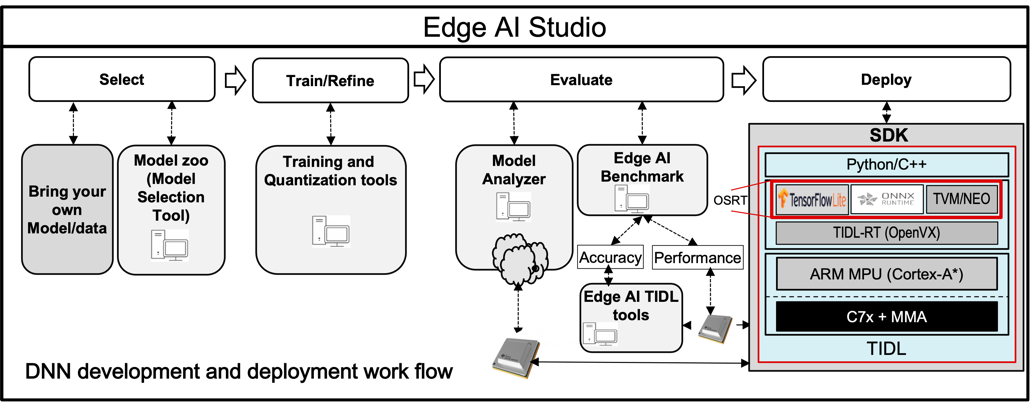
TIDL Texas Instruments Deep Learning product is the fundamental part of TI's Edge AI. This software product is used for acceleration of deep neural networks (DNN) in TI's Processors. It supports TI’s latest generation C7x DSP and TI's DNN accelerator (MMA).

TIDL not only supports TensorFlow Lite runtimes but also ONNX RunTime as well as TVM/Neo-AI RunTime. All of them uses heterogeneous execution on cortex-A** + C7x-MMA.
Heterogeneous execution enables the following benefits.
- OSRT as the top level inference for user applications
- Offloading subgraphs to C7x/MMA for accelerated execution with TIDL
- Runs optimized code on ARM core for layers that are not supported by TIDL
Getting started with TIDL
This is a two parted installation.
1) On the host PC (x86) - [ model compilation and artifacts generation]
2) On the target BeagleY-AI [ inference ]
Before we install TIDL tools, we need to install the processor SDK for working with AM67 series processors. This includes all the cross buildtools required to train compile and test the models given in TIDL.
Download the latest SDK from https://www.ti.com/tool/PROCESSOR-SDK-AM67
sudo apt-get install libyaml-cpp-dev libglib2.0-dev
wget https://dr-download.ti.com/software-development/software-development-kit-sdk/MD-f73Ky6d9aZ/10.00.08.06/ti-processor-sdk-linux-am67-sk-10_00_08_06-Linux-x86-Install.bin
chmod +x ti-processor-sdk-linux-j722s-evm-09_02_00_04-Linux-x86-Install.bin
./ti-processor-sdk-linux-j722s-evm-09_02_00_04-Linux-x86-Install.bin


Once we have successfully installed the SDK we can clone the latest TIDL repo.
git clone https://github.com/TexasInstruments/edgeai-tidl-tools.git
Since we are using the latest SDK we don't need to checkout to the version TAG. We can continue with the master branch
cd edgeai-tidl-tools
export SOC=am67a
source ./setup.sh
export TIDL_TOOLS_PATH=$(pwd)/tidl_tools
export LD_LIBRARY_PATH=$LD_LIBRARY_PATH:$TIDL_TOOLS_PATH
export ARM64_GCC_PATH=$(pwd)/gcc-arm-9.2-2019.12-x86_64-aarch64-none-linux-gnu
Compile and validate on the host PC (x86)
mkdir build && cd build
cmake ../examples && make -j && cd ..
source ./scripts/run_python_examples.sh
python3 ./scripts/gen_test_report.py


The build was successful and we can see the models and model_artifacts are successfully generated. Sample outputs are stored in output_images


So far so good!

Now we have successfully generated the artifacts we can use them for inference on edge. These artifacts are optimized to perform the best out of am67a chipset. For example mobilenet tflite model trained on coco dataset is available in the model directory. The model_artifact contains all the metadata and configuration files.
These files needs to be copied to the TIDL directory of the our target board.
On the target beagleY-AI:
git clone https://github.com/TexasInstruments/edgeai-tidl-tools.git
cd edgeai-tidl-tools
export SOC=am67a
export TIDL_TOOLS_PATH=$(pwd)
# scp -r <pc>/edgeai-tidl-tools/model-artifacts/  <dev board>/edgeai-tidl-tool/
# scp -r <pc>/edgeai-tidl-tools/models/  <dev board>/edgeai-tidl-tool/
mkdir build && cd build
cmake ../examples && make -j && cd ..
python3 ./scripts/gen_test_report.py
Sad end!
Unfortunately the Debian OS doesn't meet the dependencies to run the TIDL Example models on edge. I spent the whole weekend and last two days, for getting it to work ( By manually installing the dependencies). At this point I have to let it rest for sometime. I will continue work on this in the coming days. More updates will be covered in Part3 of this review blog series.
