


BeagleBoneBlack is one of the most loved hacking platform among kernel hackers and newbies. It's still one of the cheapest platform for learning embedded Linux. Even though the board is available in different flavors (like Beagle Board, BeagleBone AI, BeagleBone Blue, BeagleBone wireless, BeagleBone Industrial) BeagleBoneBlack still reigns.
BeagleBoneBlack is based on TI's AM335x series of OMAP processors . It embeds 1x 1GHz Cortex A8 processor with 2x 200MHz Programmable Real-time units (PRUs). The board has 512MB DDR3 RAM and 4GB onboard eMMC. ( More info: https://www.beagleboard.org/boards/beaglebone-black )
BOOT FLOW
BeagleBoneBlack(BBB) boot process starts from the internal ROM Code ( First stage bootloader). This loads MLO ( Memory loader ) and MLO loads u-boot( second stage bootloader ). U-Boot then loads the kernel and pass the device tree information.
SETTING-UP THE ENVIRONMENT
Download the latest GCC cross-compiler toolchain for arm-none-linux-gnueabihf
https://developer.arm.com/downloads/-/arm-gnu-toolchain-downloads

Once downloaded and extracted the toolchain add it to the PATH variable.
export PATH=/home/aswin/beagleboneblack/toolchain/arm-gnu-toolchain-13.2.rel1-x86_64-arm-none-linux-gnueabihf/arm-gnu-toolchain-13.2.Rel1-x86_64-arm-none-linux-gnueabihf/bin:$PATH
Note: Path of the toolchain should be changed according to where you have extracted the toolchain
Create an alias with make command with the ARCH and CROSS_COMPILER
alias armmake='make ARCH=arm CROSS_COMPILE=arm-none-linux-gnueabihf-'
PREPARING THE SD CARD
BeagleBoneBlack SD card requires two partitions
- boot (Bootable and FAT32)
- rootfs (EXT3)
Use fdisk utility to create two partitions
sudo fdisk /dev/sda
Note : Make sure you have un-mounted the partitions on the SD Card before proceeding.
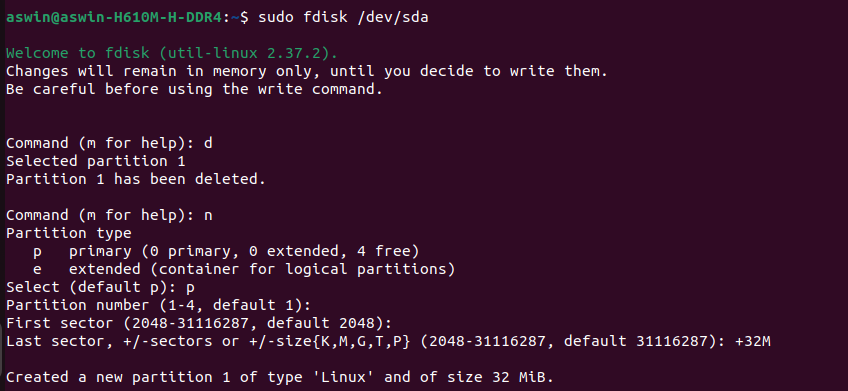
Delete all the existing partitions and create a new partition
Change the type to W95 FAT32 (LBA) and enable the boot flag

Now create the second partition for rootfs
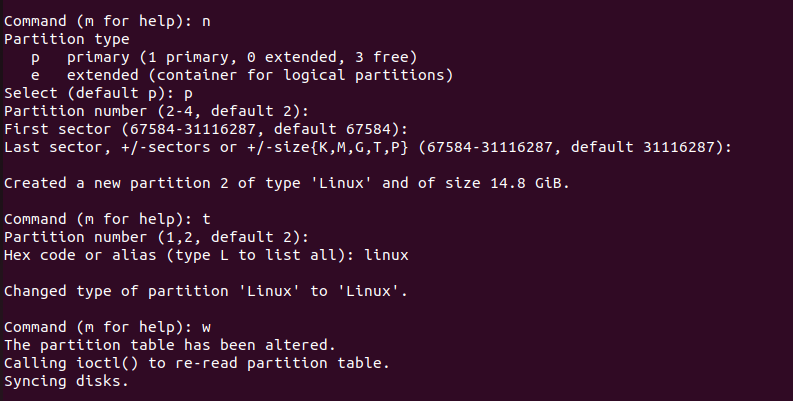
Format the partitions and add labels
sudo mkfs.vfat -a -F 16 -n boot /dev/sda1
sudo mkfs.ext4 -L rootfs /dev/sda2

BUILDING U-BOOT
Download the latest version of u-boot
git clone git://git.denx.de/u-boot.git
build u-boot
cd u-boot
armmake distclean
armmake am335x_evm_defconfig
armmake DEVICE_TREE=am335x-boneblack
On successful build process, Both MLO ( Memory loader ) and u-boot.bin files will get generated
.

Copy both MLO and u-boot.img to the boot partition.
mount /dev/sdb1 to /mnt/boot
cp MLO /mnt/boot
cp u-boot.img /mnt/boot
BUILDING THE LINUX KERNEL
Download the latest stable version of Linux kernel from kernel.org
wget https://cdn.kernel.org/pub/linux/kernel/v6.x/linux-6.8.1.tar.xz
extract the kernel source files
tar xvf linux-6.8.1.tar.xz
Note : If you are using the latest version of Ubuntu for building the kernel, Then you are very likely to encounter compilation error due to unmatched dependencies of libgmp and libmpc so install it before you proceed with the kernel build.
sudo apt install libgmp-dev
sudo apt install libmpc-dev
Now lets build the linux kernel
cd linux-linux-6.8.1
armmake distclean
armmake omap2plus_defconfig
armmake
armmake dtbs
armmake modules_install INSTALL_MOD_PATH=/mnt/rootfs
Now copy the zImage and dtb files to the boot partition
cp arch/arm/boot/zImage /mnt/boot
cp arch/arm/boot/dts/ti/omap/am335x-boneblack.dtb /mnt/boot
Now let's create the bootscript for the u-boot.
mkdir /mnt/boot/extlinux
vim /mnt/boot/extlinux/extlinux.conf
now copy the below content inside
label Linux microSD
    kernel /zImage
    devicetree /am335x-boneblack.dtb
    append console=ttyS0,115200n8 root=/dev/mmcblk0p2 rw rootfstype=ext4 rootwait earlyprintk mem=512M
With the new distro-boot support in u-boot, it looks for extlinux.conf. In its absence a U-Boot specific script called boot.scr or boot.scr.uimg. scanned in the following order SD Card Internal flash External USB storage External server whose local ip frpm DHCP request at the address provided by the ${serverip} environment variable
BUILDING THE ROOTFS
I am using BusyBox for creating the rootfs and init process.
Download the latest version of the BusyBox
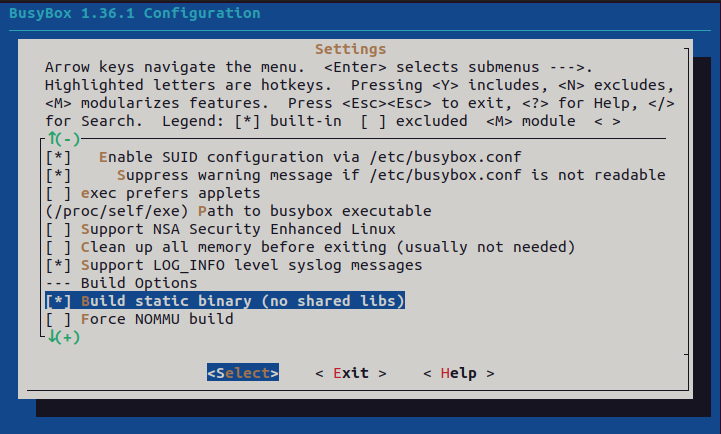
wget https://busybox.net/downloads/busybox-1.36.1.tar.bz2
tar xvf busybox-1.36.1.tar.bz2
cd busybox-1.36.1/
armmake defconfig
armmake CONFIG_PREFIX=/mnt/rootfs install
Note: Make sure that you select Build static binary (no shared libs for this build) option from the settings.
Now Create directories with the name etc, proc, sys, dev, etc/init.d, usr/lib
cd /mnt/rootfs
mkdir etc proc sys dev etc/init.d usr/lib
mkdir home home/root
Creating the init file
vim etc/init.d/rcS
add the following content
#!bin/sh
mount -t proc none /proc
mount -t sysfs none /sys
mount -t tmpfs none /var
mount -t tmpfs none /dev
echo "/sbin/mdev" > /proc/sys/kernel/hotplug
/sbin/mdev -s
mount -a
Change the permissions to make it executable.
chmod +x etc/init.d/rcS
Create a new file etc/fstab and add the following contents to it.
proc    /proc    proc   defaults  0 0
sysfs   /sys     sysfs  defaults  0 0
BOOTING
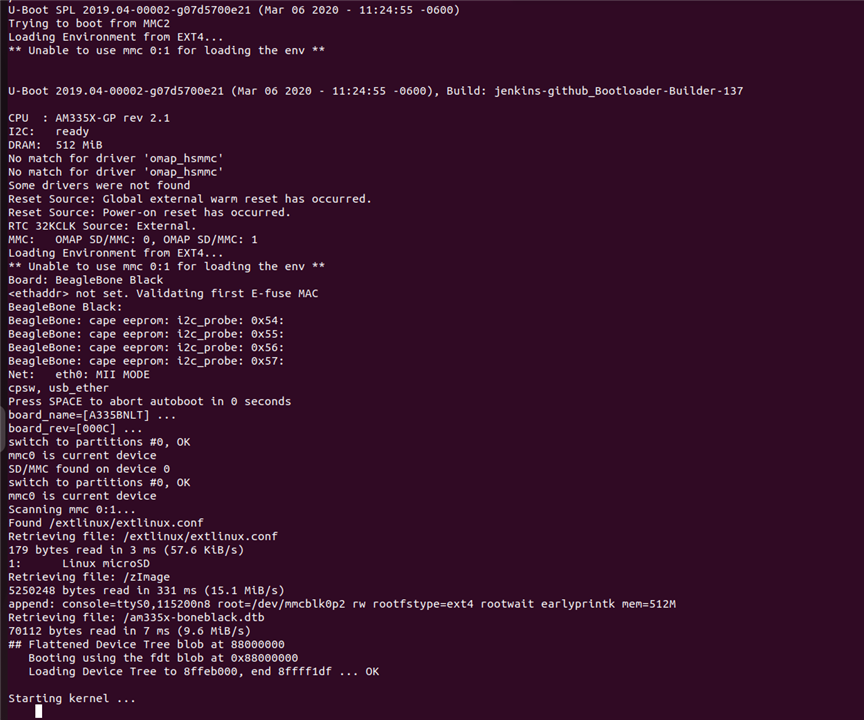
Now we have successfully booted BeagleBoneBlack with the mainline u-boot and the linux kernel.
Thank you!
