element14 Community
element14 Community
    Register Log In
  • Site
  • Search
  • Log In Register
  • About Us
  • Community Hub
    Community Hub
    • What's New on element14
    • Feedback and Support
    • Benefits of Membership
    • Personal Blogs
    • Members Area
    • Achievement Levels
  • Learn
    Learn
    • Ask an Expert
    • eBooks
    • element14 presents
    • Learning Center
    • Tech Spotlight
    • STEM Academy
    • Webinars, Training and Events
    • Learning Groups
  • Technologies
    Technologies
    • 3D Printing
    • FPGA
    • Industrial Automation
    • Internet of Things
    • Power & Energy
    • Sensors
    • Technology Groups
  • Challenges & Projects
    Challenges & Projects
    • Design Challenges
    • element14 presents Projects
    • Project14
    • Arduino Projects
    • Raspberry Pi Projects
    • Project Groups
  • Products
    Products
    • Arduino
    • Avnet Boards Community
    • Dev Tools
    • Manufacturers
    • Multicomp Pro
    • Product Groups
    • Raspberry Pi
    • RoadTests & Reviews
  • Store
    Store
    • Visit Your Store
    • Choose another store...
      • Europe
      •  Austria (German)
      •  Belgium (Dutch, French)
      •  Bulgaria (Bulgarian)
      •  Czech Republic (Czech)
      •  Denmark (Danish)
      •  Estonia (Estonian)
      •  Finland (Finnish)
      •  France (French)
      •  Germany (German)
      •  Hungary (Hungarian)
      •  Ireland
      •  Israel
      •  Italy (Italian)
      •  Latvia (Latvian)
      •  
      •  Lithuania (Lithuanian)
      •  Netherlands (Dutch)
      •  Norway (Norwegian)
      •  Poland (Polish)
      •  Portugal (Portuguese)
      •  Romania (Romanian)
      •  Russia (Russian)
      •  Slovakia (Slovak)
      •  Slovenia (Slovenian)
      •  Spain (Spanish)
      •  Sweden (Swedish)
      •  Switzerland(German, French)
      •  Turkey (Turkish)
      •  United Kingdom
      • Asia Pacific
      •  Australia
      •  China
      •  Hong Kong
      •  India
      •  Korea (Korean)
      •  Malaysia
      •  New Zealand
      •  Philippines
      •  Singapore
      •  Taiwan
      •  Thailand (Thai)
      • Americas
      •  Brazil (Portuguese)
      •  Canada
      •  Mexico (Spanish)
      •  United States
      Can't find the country/region you're looking for? Visit our export site or find a local distributor.
  • Translate
  • Profile
  • Settings
BeagleBoard
  • Products
  • Dev Tools
  • Single-Board Computers
  • BeagleBoard
  • More
  • Cancel
BeagleBoard
Blog Restoring the Espruino bootloader using a Beaglebone Black's serial UART
  • Blog
  • Forum
  • Documents
  • Quiz
  • Polls
  • Files
  • Members
  • Mentions
  • Sub-Groups
  • Tags
  • More
  • Cancel
  • New
Join BeagleBoard to participate - click to join for free!
  • Share
  • More
  • Cancel
Group Actions
  • Group RSS
  • More
  • Cancel
Engagement
  • Author Author: Former Member
  • Date Created: 20 Mar 2015 2:01 PM Date Created
  • Views 1627 views
  • Likes 3 likes
  • Comments 12 comments
  • beagleboneblack
  • stm32
  • bbb
  • beaglebone-black
  • espruino
Related
Recommended

Restoring the Espruino bootloader using a Beaglebone Black's serial UART

Former Member
Former Member
20 Mar 2015

Restoring the Espruino bootloader using a Beaglebone Black's serial UART


I recently damaged the firmware and the USB bootloader on my Espruino, remembering that the STM32 which is at the core of the Espruino has a hardcoded bootloader that can be used to restore the firmware by uploading it through 3v TTL serial transfer.


  Heading over to the Espruino website, I found this guide http://www.espruino.com/Serial+Bootloader

which has instructions for programming the Espruino using a USB-TTL converter. Not having one of those and exhausting a few other methods I gave up for the time being until I had a new idea.


The BBB has 6 serial UART's on board that run at 3v TTL, however only one of them is enabled as default and that is already in use being linked to the serial console.


The other UART's must be enabled by modifying the uEnv.txt file. An easy way to modify this is to connect the BBB to your computer using a USB cable so it appears as a flash drive. The uEnv.txt file should be located in that drive and can be modified with any standard text editor. (the precise location differs with each variant of Linux, with the standard Debian version, it should appear in the files when you first open the drive).


If you are modifying it from within the BBB's file system then it will be in the /boot/ folder or a child folder within that.


Once it's open, just add the following line:-


cape_enable=capemgr.enable_partno=BB-UART4


I'm not sure that it matters where it goes but I added it straight below the line that says:


##BeagleBone Cape Overrides


Again, there's a likelihood that other variants of Linux may have a different format to the uEnv.txt file, so you will need to use your judgement as to where best modify it.


Once you reset your BBB, UART 4 should be enabled and we can check by connecting to the BBB in a terminal and typing


ls /dev/ttyO*


there should be 2 items returned in the list: /dev/ttyO0  /dev/ttyO4


/dev/ttyO4 is the serial UART we just enabled


It's a good idea from this point to head over to http://www.espruino.com/Serial+Bootloader and follow the guide in order to understand how to put the STM32 into serial bootloader mode.


Download the stm32loader.py script and the latest Espruino binary from the link above and transfer these over to your BBB. I used the scp command from a terminal, but you could even just put them on a micro-sd card and put them onto your BBB like that.


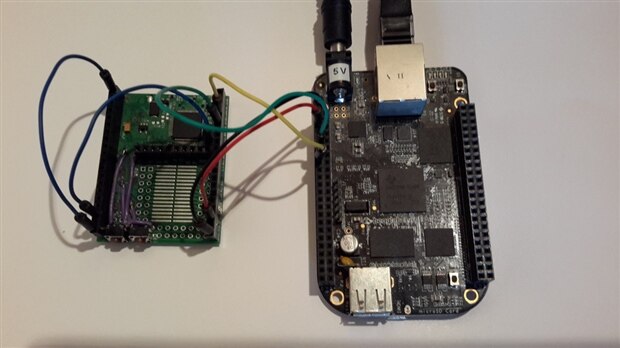
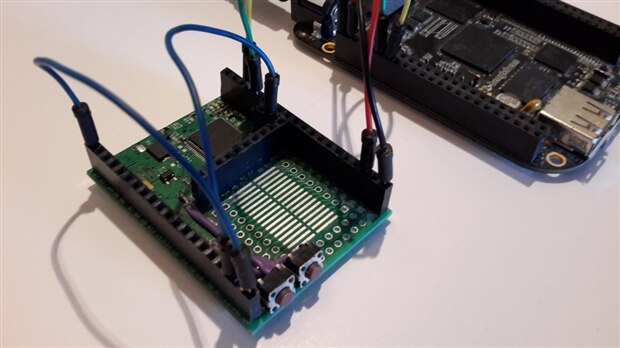
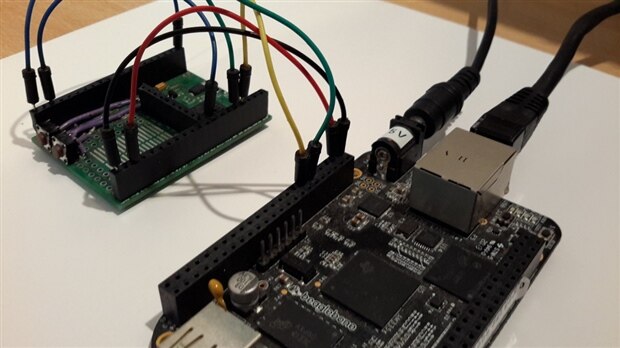
The next step is to connect the Espruino to the BBB, and make sure the Espruino is wired up to enable the serial bootloader as follows:-


Espruino BOOT0        >    Espruino 3.3v

Espruino BOOT1(PB2)    >    Espruino GND

Espruino PA9(tx)        >    BBB P9 – 11 (rx)

Espruino PA10(rx)        >    BBB P9 – 13 (tx)

Espruino GND         >    BBB GND

Espruino 3.3v            >    BBB 3.3v

*the BOOT0 pin is labelled BOOT0 and is near the STM32 device.

It's probably best to leave connecting the 3.3v supplies until just before you start programming in case the bootloader times out.


Log onto the BBB using a terminal as normal, navigate to the folder where you have your stm32loader.py and espruino binary and enter the following line:

(it's the same as the guide in the link above only we're using a specific serial port)


python stm32loader.py -p /dev/ttyO4 -evw espruino_for_your_device.bin


remember to change the 'espruino_for_your_device.bin' to the specific file that you downloaded, in my case it was:


python stm32loader.py -p /dev/ttyO4 -evw espruino_1v75_espruino_1r3.bin


I waited until just before I pressed enter to make the 3.3v connection between the BBB and the Espruino and as it says on the serial bootloader page on the Espruino website:


Note: The flasher may give you an error message such as Chip replied with a NACK. If so, just try running it again without resetting your board.


This happened with me and the trick really is to not reset your board, just run the command again and it will start programming the Espruino software.


Once finished, disconnect the power to the Espruino, disconnect the BOOT0 and BOOT1 pins and re-apply power, the Espruino should boot up as normal with the new firmware.


(You can use this method to transfer your own binaries if you wanted to use the Espruino board without the Javascript interpreter).


image


image


image

  • Sign in to reply

Top Comments

  • Former Member
    Former Member over 10 years ago in reply to shabaz +2
    Hey Thanks, I agree I love my BBB. A project that i'm hoping to get going is to repurpose one of these PDA's (Psion revo) and fit it with a BBB. Im looking at putting the Espruino in there too, Using the…
  • Problemchild
    Problemchild over 10 years ago in reply to Problemchild +2
    This for example: http://cpc.farnell.com/duratool/d00672/desoldering-station-uk-eu-plug/dp/SD01384?MER=e-bb45-00001001
  • shabaz
    shabaz over 10 years ago +1
    Hi Lucie, Great to read your post! People have sometimes commented on element 14 that the BBB makes the perfect all-round test tool, and you've clearly shown how easy it is to use it as a programmer for…
  • Former Member
    Former Member over 10 years ago in reply to mcb1

    so im sat here wondering why i never thought of just cutting the header off...  It's totally my kind of solution! thx for adding to the mull!

    • Cancel
    • Vote Up +1 Vote Down
    • Sign in to reply
    • More
    • Cancel
  • mcb1
    mcb1 over 10 years ago in reply to Problemchild

    They don't look too bad.

    I had a Denon self contained version (an earlier version to these)

    http://www.howardelectronics.com/den-on/sc7000.html


    The control boards (in our model) had a nasty habit of letting out magic smoke, which then took out some other bits.

    In this case it's killed a resistor, and I haven't figured out what value it is, or been able to obtain a circuit.


    Great tool as the slight vibration from the motor helped remove the solder from the item you were attempting to remove.


    Mark

    • Cancel
    • Vote Up 0 Vote Down
    • Sign in to reply
    • More
    • Cancel
  • mcb1
    mcb1 over 10 years ago in reply to Former Member

    The other option is cut the header off, then remove the individual pins.


    I think I saw lucie weilding a cut off tool in one of her blogs.


    mark

    • Cancel
    • Vote Up 0 Vote Down
    • Sign in to reply
    • More
    • Cancel
  • Former Member
    Former Member over 10 years ago in reply to fustini

    I've managed to get hold of one of the small Psion organisers, I'm not sure if the BBB will be the best thing to use internally for it. I'm looking for a small but relatively powerful Linux based device to act as the main controller. Im thinking the BBB might work better as something that can plug onto the side giving better access to the GPIO headers in the right enclosure. Otherwise the Psion case will end up needing lots of work to access them.


    It's a project that I'm definitely intending to do. The ideas are just mulling at the minute!! I'm imagining a very small(but physically well designed development computer - the keyboard is small but is easy for me to use and really well constructed with a good tactile feel). I want to be able to take it about with me to give a quick way of gpio logic output or input using python or javascript (maybe even perl).


    The perfect tool!!

    • Cancel
    • Vote Up 0 Vote Down
    • Sign in to reply
    • More
    • Cancel
  • fustini
    fustini over 10 years ago in reply to Former Member

    Cool, it reminds me of my Nokia N900!  That was the best Linux phone ever image


    I love the BBB and that would be quite handy to have a nice all in portable package.  I don't I've seen a project that does all of that including a keyboard.  Typically folks will use a mini wireless keyboard like: http://www.amazon.com/Rii-Wireless-Keyboard-Touch-pad-Back-light/dp/B00GI69A9C


    It does remind me of Pocket C.H.I.P. from this Kickstarter:

    https://www.kickstarter.com/projects/1598272670/chip-the-worlds-first-9-computer


    cheers,

    drew

    • Cancel
    • Vote Up 0 Vote Down
    • Sign in to reply
    • More
    • Cancel
>
element14 Community

element14 is the first online community specifically for engineers. Connect with your peers and get expert answers to your questions.

  • Members
  • Learn
  • Technologies
  • Challenges & Projects
  • Products
  • Store
  • About Us
  • Feedback & Support
  • FAQs
  • Terms of Use
  • Privacy Policy
  • Legal and Copyright Notices
  • Sitemap
  • Cookies

An Avnet Company © 2025 Premier Farnell Limited. All Rights Reserved.

Premier Farnell Ltd, registered in England and Wales (no 00876412), registered office: Farnell House, Forge Lane, Leeds LS12 2NE.

ICP 备案号 10220084.

Follow element14

  • X
  • Facebook
  • linkedin
  • YouTube