

RIoTboard and Xtrinsic Sensor Webserver Temperature Logging Demo for IoT Application
This is a summary of both Tushar's RIoTboard webserver blog and my single webpage project that extends Tushar's webpage project. For more information and a detailed walk through of both projects please follow the links above.
Okay so the link to the SD card image of the finished project is at the bottom of the page, but before I just hand it over I am going to tell you roughly everything that has been done to get this demo working. This will be a very brief overview of both projects literally just highlighting the changes. I will not be going into any specific details.
Getting Started with RIoTboard:
Okay so the first thing we need to do is to get the Ubuntu image that element14 has provided onto the board.
We then need to install the packages needed for the web server and for the code for the Xtrinsic board
- apache2

- mysql-server
- mysql-client
- php5
- php5-mysql
- libapache2-mod-php5
- php5-cli
- php5-gd
- libmysqlclient-dev
These can all be very easily installed using the "apt-get install " command as they are all in the package repository.
The webserver now runs and can be accessed by entering the boards I.P. address in a web browser (i.p can be found by typing "ifconfig" into the terminal). But this is the default apache page, we need to change that.
Getting Started with Xtrinsic Sensor Board:
So to get the Xtrinsic sensor up and running there is quite a bit of C code which we then need to compile and run ("xtrinsic_temp.c" and "xtrinsic_mysql.c"). We used gcc compiler for everything.
We also need to set up the SQL server for our sensor data by adding a new database and table.
More C code ("current_temp.c") is then run to populate the SQL table with some data from the Xtrinsic sensor board.
This is the c code that needs to be run every time we boot the RIoT board in order to keep live data coming from the xtrinsic sensor board
The Xtrinsic sensor is now running.
Getting the Web Pages Running:
Now we need to get the basic web pages up and running, this includes 3 php pages to display "current temperature", "temperature graph", and "control the LED". This is just a matter of copying them into the "/var/www" folder.
Next we need to link them into one webpage.
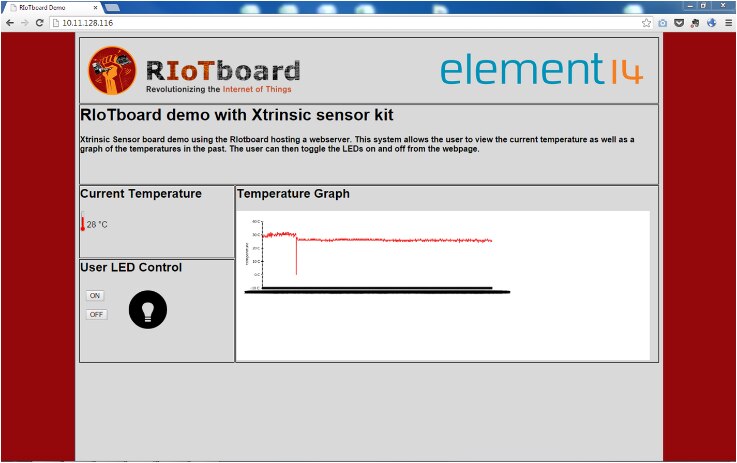
To do this we are going to use an HTML page which has "iframes" showing the php pages in a table layout to make it a bit more attractive.
This HTML page will be called "index.html" so it is auto loaded by apache whenever someone accesses the server, and it will display all the php pages through "iframes".
Fine Tuning the Web Pages:
Now we are going to fine tune the web pages to give them a more professional look and to make them more user friendly.
To do this I have changed all of the php files ever so slightly, this gives them better control and integration into the HTML page.
I have removed all the text from the php files, got the led control file to load the appropriate bulb picture depending on whether the LED is on or off, got the current temp php file to display a °C sign, and got the graph to delete any data in the sql database that is older than 15 mins, this speeds load time and reduces excessive data.
Add Some Graphics:
Every web page needs some pictures and this is no different, we are going to add a RIoTboard logo and an element14 logo at the top of the page, and a background behind everything.
We are also going to add two LED pictures so the "led_blink.php" file can load the appropriate one; depending on if the led is ON or OFF.
Running Everything on Boot:
We now need to get everything to run automatically on boot so that we can run the server headless every time.
To do this we are going to write a script that will run the necessary C code ("current_temp.c") at boot up and set the permission of the www folder (to read and execute only, and the bulb images and the led control file to full access) so that they are set correctly and so we wont need to do anything.
The custom boot script is in the "/etc/init.d" folder, then it is made executable, then we tell linux to include the script in its boot process at the end using the command "sudo update-rc.d script_name.sh defaults 99".
If you are going to use the image below you will need to enable the start.sh script before you use it using the command:
sudo update-rc.d script_name.sh defaults 99
In the script we run the C code and set the permissions for all the images and the led control file to full access, and everything else in the "www" folder to read and execute access.
Reboot and you're off:
The header says it all really.
To download the complete SD card image click the button below, extract the image file, flash onto an SD card, and boot your board, you can download it HERE

You will need to enable the start.sh script before the web server will work. To do this use the command "sudo update-rc.d script_name.sh defaults 99". Then reboot the board.
The static I.P of RIoTboard for my image is 10.11.128.116 . Just type that into your web browser once you have your board up and running and connected to the internet and it should load the web server.
THE DOWNLOAD BELOW CONTAINS THE FILES USED FOR THE SERVER, THESE ARE NOT NEEDED IF YOU ARE USING THE IMAGE ABOVE AS THEY ARE ALREADY INCLUDED.
THE DOWNLOAD BELOW IS IN CASE YOU WANT TO LOOK AT THE FILES USED WITHOUT DOWNLOADING THE IMAGE AND FLASHING AN SD CARD.