element14 Community
element14 Community
    Register Log In
  • Site
  • Search
  • Log In Register
  • Members
    Members
    • Benefits of Membership
    • Achievement Levels
    • Members Area
    • Personal Blogs
    • Feedback and Support
    • What's New on element14
  • Learn
    Learn
    • Learning Center
    • eBooks
    • STEM Academy
    • Webinars, Training and Events
    • Learning Groups
  • Technologies
    Technologies
    • 3D Printing
    • FPGA
    • Industrial Automation
    • Internet of Things
    • Power & Energy
    • Sensors
    • Technology Groups
  • Challenges & Projects
    Challenges & Projects
    • Design Challenges
    • element14 presents
    • Project14
    • Arduino Projects
    • Raspberry Pi Projects
    • Project Groups
  • Products
    Products
    • Arduino
    • Dev Tools
    • Manufacturers
    • Raspberry Pi
    • RoadTests & Reviews
    • Avnet Boards Community
    • Product Groups
  • Store
    Store
    • Visit Your Store
    • Choose Another Store
      • Europe
      •  Austria (German)
      •  Belgium (Dutch, French)
      •  Bulgaria (Bulgarian)
      •  Czech Republic (Czech)
      •  Denmark (Danish)
      •  Estonia (Estonian)
      •  Finland (Finnish)
      •  France (French)
      •  Germany (German)
      •  Hungary (Hungarian)
      •  Ireland
      •  Israel
      •  Italy (Italian)
      •  Latvia (Latvian)
      •  
      •  Lithuania (Lithuanian)
      •  Netherlands (Dutch)
      •  Norway (Norwegian)
      •  Poland (Polish)
      •  Portugal (Portuguese)
      •  Romania (Romanian)
      •  Russia (Russian)
      •  Slovakia (Slovak)
      •  Slovenia (Slovenian)
      •  Spain (Spanish)
      •  Sweden (Swedish)
      •  Switzerland(German, French)
      •  Turkey (Turkish)
      •  United Kingdom
      • Asia Pacific
      •  Australia
      •  China
      •  Hong Kong
      •  India
      •  Korea (Korean)
      •  Malaysia
      •  New Zealand
      •  Philippines
      •  Singapore
      •  Taiwan
      •  Thailand (Thai)
      • Americas
      •  Brazil (Portuguese)
      •  Canada
      •  Mexico (Spanish)
      •  United States
      Can't find the country/region you're looking for? Visit our export site or find a local distributor.
  • Translate
  • Profile
Dev Tools
  • Products
  • More
Dev Tools
Documents Add-On Board for Raspberry Pi.
  • Forum
  • Documents
  • Files
  • Members
  • Mentions
  • Sub-Groups
  • Tags
  • More
  • Cancel
  • New
Dev Tools requires membership for participation - click to join
Actions
  • Share
  • More
  • Cancel
Engagement
  • Author Author: atomar
  • Date Created: 1 Nov 2013 5:48 AM Date Created
  • Last Updated Last Updated: 13 Oct 2021 11:07 AM
  • Views 2861 views
  • Likes 1 like
  • Comments 9 comments
Related
Recommended

Add-On Board for Raspberry Pi.

  • Add-On Board for Raspberry Pi.
  • Add-On Board for Raspberry Pi.
  • Add-On Board for Raspberry Pi.
  • Add-On Board for Raspberry Pi.
Features
Ships With
Required Tools
FAQs
Accessories
Other Tools
Blog Posts
Discussions
Technical Docs
Data Sheet
Datasheet for ATmega48A/PA/88A/PA/168A/PA/328/P 8-bit Microcontroller (pdf)
Datasheet for ATmega48A/PA/88A/PA/168A/PA/328/P 8-bit Microcontroller (Summary ) (pdf)
User Manual/Guide
User Guide for the GertDuino board - add on Board for Raspberry Pi (pdf)

Overview

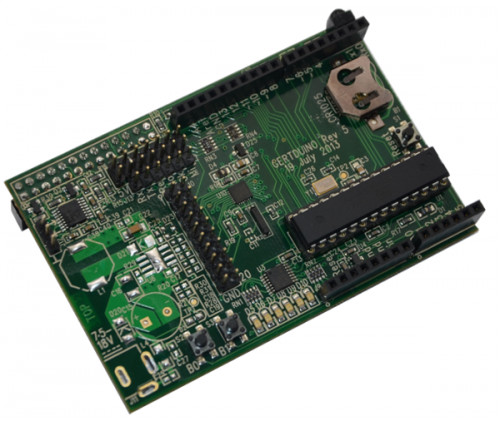
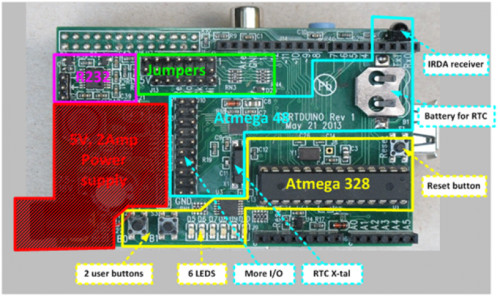
The Gertduino is a Raspberry-Pi add-on which offers the same functionality as an Arduino-Uno but with some extra features thrown in. The Gertduino board features an Atmega328 microcontroller, runs of 5V, has the 16MHz oscillator and has connectors which are 100 percent Arduino-Uno compatible. It also contains the reset switch, 2 user push buttons, and 6 LEDs. The Gerduino board also has a RS232 level converter which will convert the signals form a UART to the RS232 standard voltages (And invert them as per that same standard).

The Gertduino board also features an Atmega48 MCU, which is intended to be used as Real Time Clock (RTC) and/or as IRDA front end. However it is also freely programmable by the user and thus can be used for any other application, giving the user the power of not one but TWO Atmega devices to play with. The I2C interface of the Atmega-48 is connected permanently to the Raspberry-Pi I2C interface. The BCM2835 does not have a native IRDA interface. The protocol can be implemented using a standard GPIO pin but that puts a very heavy burden on the CPU. To support IRDA the Atmega-48 has a TSSOP4038 IRD device connected to pin D3. This device supports the most common IRDA protocol: 38 KHz IR signal.

You can program Atmega328 or Atmega48 from the Raspberry Pi. All connections between the board and the Raspberry-Pi are protected against 5V signals. The Atmega328 and the Atemege-48 have exactly the same pins with the same functionality. The devices only differ in the size of their various memories. So what was written about the Atmega328 also is valid for the Atmega48. But if you make programming errors with the Atmege328 the device can easily be replaced. However, this is not the case with the Atmega48. It is therefore strongly recommended that you are extra careful and not damage any of the I/O ports. Also you can remove the board from the Raspberry Pi and use it standalone.

Features

  • RS232 level converter can be used by:
    • Raspberry-Pi
    • Atmega-328
    • Atmega-48
  • Atmega 328 (Arduino-UnoRegistered compatible) with:
    • Arduino-UnoRegistered compatible connectors
    • Reset button
    • 2 user push buttons
    • 6 LEDs.
  • Atmega 48 with:
    • I/O connector with 20 pins.
    • High precision RTC crystal
    • Battery backup power supply
    • IRDA interface

Ships With

  • The GertDuino board

Required Tools

FAQs

+
-
Does GertDuino board support RS232/UART level converter?
The Gerduino board has a RS232 level converter which will convert the signals form a UART to the RS232 standard voltages (And invert them as per that same standard). The RS232 signals come from J12. Pin 3 is the receive, Pin 2 is the transmit, Pin 1 is the ground.
+
-
Does both raspberry pi and gertduino needs separate 5 V input?
The Gertduino and the Raspberry Pi all feed from the same 5V supply. if we use two power supplies the stronger supply starts to 'back-feed' into the weaker supply and that energy will dissipate as Heat.
+
-
Can I make a Infra-red receiver/remote control receiver, with the help of Raspberry Pi board only?
The Raspberry board does not have a native IRDA interface and also the protocol implemention using a standard GPIO pin but that puts a very heavy burden on the CPU(BCM2835). Hence we can use Gertduino which has a second microcontroller (a surface mounted ATmega48) which gives an IrDA interface to the board (infrared receiver). To support IRDA the Atmega-48 has a TSSOP4038 IRD device connected to pin D3. This device supports the most common IRDA protocol: 38KHz IR signal.
+
-
Can IRDA Transmit occasional remote control signals on battery?
No, the IRDA power consumes too much current (~450μA), so you need the 5V present for it to operate.
+
-
What is the time deviation of the Real-Time-Clock (RTC) under normal conditions?
The Atmege-48 device has a 32768Hz crystal connected to operate as a Real-Time-Clock (RTC). The Crystal is a high quality type and under normal conditions a deviation is less than 1 sec/3 days.

Accessories

Other Tools

Blog Posts

Discussions

  • gertduino
  • arduino-uno
  • Share
  • History
  • More
  • Cancel
  • Sign in to reply
  • cweiss@stickyc.com
    cweiss@stickyc.com over 1 year ago

    It looks like the board is designed to support a 7.5v to 18v power supply with some additional parts. Is this possible and is there a BOM for the required parts somewhere?

    • Cancel
    • Vote Up 0 Vote Down
    • Sign in to reply
    • More
    • Cancel
  • jemartel
    jemartel over 8 years ago

    I'm still waiting on response in regards to How to setup of the Arduino IDE environment. The Video shows that when compiling sketches the available boards are Gertduino ATmega328(GPIO), and 7 others with (GPIO)etc. and the Programmer used is the Raspberry Pi (GPIO) . My question is how are these boards and programmer enabled? they are not listed on any of my systems--Pi's or PC's in either the Arduino IDE 1.01 or 1.05 or 1.5 environments. Where is the document or download that shows how those are enabled? I don't want to purchase another Raspberry Pi / Arduino add-on that i "thought i needed" but can't figure out how to upload/program it to work. I would also like to see and read how you can program it unconnected to the Pi.


    Well, I be a fool! After further reading ALL these posts and their user comments/replies:


    "Getting up and running with the Gertduino

    Posted by Charles Gantt in GertDuino on Jan 14, 2014 3:35:00 PM"


    and "https://projects.drogon.net/raspberry-pi/gertboard/arduino-ide-installation-isp/"

    I discovered that : (an excerpt) will add the missing boards and programmers...


    Add Gertboard definitions into the Arduino IDE:

    The next thing we need to do is tell the Arduino IDE about the processor on the Gertboard.

    This is a bit more complicated, so it’s probably easier to simply fetch my files and use them directly, however if you have added your own board into an Arduino IDE before, then fetch my file and merge the changes in.

    cd /tmp
    wget project-downloads.drogon.net/.../boards.txt
    wget project-downloads.drogon.net/.../programmers.txt
    cd /usr/share/arduino/hardware/arduino
    sudo mv boards.txt board.txt.bak
    sudo mv /tmp/boards.txt .
    sudo mv programmers.txt programmers.txt.bak
    sudo mv /tmp/programmers.txt .
    • Cancel
    • Vote Up 0 Vote Down
    • Sign in to reply
    • More
    • Cancel
  • Smelter
    Smelter over 8 years ago

    The most up to date manual can be found here :-

    http://www.farnell.com/datasheets/1778121.pdf?COM=GertDuino

    • Cancel
    • Vote Up 0 Vote Down
    • Sign in to reply
    • More
    • Cancel
  • Smelter
    Smelter over 8 years ago in reply to farrellts

    Simple solution Tom, paint the edges with nail varnish. It seals the edges and rounds off the sharp bits and corners and you even get to choose the colour!

    • Cancel
    • Vote Up 0 Vote Down
    • Sign in to reply
    • More
    • Cancel
  • Former Member
    Former Member over 9 years ago in reply to yorkshiretyke

    Thanks for the helpful link. I really am disappointed so far. The pdf manual is corrupt in some way. Even the online viewer chokes on page 5. None on my offline PDF tools will even try. I hope that is fixed soon. Till then I'll try the article you linked.

    • Cancel
    • Vote Up 0 Vote Down
    • Sign in to reply
    • More
    • Cancel
  • yorkshiretyke
    yorkshiretyke over 9 years ago

    Since I have a Raspberry Pi going spare and I have worked my way through the projects in the "Arduino Starter Kit" (so needless to say I'm very new to micro electronics), I thought I would get one of these to combine the two. So far it's been a struggle to get the GertDuino to work, so I suggest potential buyers at least read the blog of Ed Kalin about his All-Sky Camera Blog (see http://www.element14.com/community/people/doorknob/blog/2014/04/07/getting-started-with-gertduino--the-backstory) if only to show the problems to be overcome to get this board to work (be sure to follow the links in the article). As I too hit the same problems and sorry to say I can't read GertDuino Schematics. I did however get the forth project from the Arduino Starter Kit (Colour Mixing Lamp) to work with this board, but I couldn't upload the sketch to this GertDuino board when it was wired up my breadboard (avrdude initialization failed error messages).


    I very much like the idea of combining an Arduino with a the Raspberry Pi via the GPIO pins, but I feel the Supplied documentation and software required to get this baby to work leaves a lot to be desired.

    • Cancel
    • Vote Up 0 Vote Down
    • Sign in to reply
    • More
    • Cancel
  • Former Member
    Former Member over 9 years ago in reply to farrellts

    The manual PDF file seems to be corrupt.

    • Cancel
    • Vote Up 0 Vote Down
    • Sign in to reply
    • More
    • Cancel
  • farrellts
    farrellts over 9 years ago

    I am excited to have received my Gertduino board via Amazon.com, but was concerned about the sharp edges where the circuit board material was cut to the proper side.  And I actually got a very tiny yet certainly painful and difficult to remove splinter in my index finger while feeling along the sides of the board.  I could certainly use some fine-grained sandpaper to alleviate the problem, or else a pumice stone perhaps.  But I am concerned about static discharge harming the Atmel ICs.  Actually, I encountered the same problem with machine-cut circuit board in the microSD-to-SD converter (designed to fit the profile of the Raspberry Pi board) which I purchased from Adafruit, though I don't think static discharge would harm that component.


    I believe there are semi-liquid grouts which might be used to clean off such sharp boards without static discharge, but have no experience with such things and no idea where to obtain?


    I guess I am just wondering why these specialty boards cannot have been hand-sanded after they were cut and before static discharge-prone components were added to them?  The Raspberry Pi board seems to have very nicely-finished edges.


    I really hate that I will likely always have to be careful not to injure my fingers every time I have to mount/dismount the Gertduino onto the Raspberry Pi.  I could leave it in place, I suppose, but then I would need to find an appropriate enclosure for both.  And then also for any additional Arduino shields as well.  I did see an interesting fold-out kind of project case which can both lay flat for while you are working on it and then fold into a cube for when you are not working on it -- but I can no longer find the article I was reading when I spotted that case.

    • Cancel
    • Vote Up 0 Vote Down
    • Sign in to reply
    • More
    • Cancel
  • tszakacs
    tszakacs over 9 years ago

    It's a great product, thanks for the idea! But what about the ICSP header?

    • Cancel
    • Vote Up 0 Vote Down
    • Sign in to reply
    • More
    • Cancel
element14 Community

element14 is the first online community specifically for engineers. Connect with your peers and get expert answers to your questions.

  • Members
  • Learn
  • Technologies
  • Challenges & Projects
  • Products
  • Store
  • About Us
  • Feedback & Support
  • FAQs
  • Terms of Use
  • Privacy Policy
  • Legal and Copyright Notices
  • Sitemap
  • Cookies

An Avnet Company © 2023 Premier Farnell Limited. All Rights Reserved.

Premier Farnell Ltd, registered in England and Wales (no 00876412), registered office: Farnell House, Forge Lane, Leeds LS12 2NE.

ICP 备案号 10220084.

Follow element14

  • Facebook
  • Twitter
  • linkedin
  • YouTube