element14 Community
element14 Community
    Register Log In
  • Site
  • Search
  • Log In Register
  • Members
    Members
    • Benefits of Membership
    • Achievement Levels
    • Members Area
    • Personal Blogs
    • Feedback and Support
    • What's New on element14
  • Learn
    Learn
    • Learning Center
    • eBooks
    • STEM Academy
    • Webinars, Training and Events
    • Learning Groups
  • Technologies
    Technologies
    • 3D Printing
    • FPGA
    • Industrial Automation
    • Internet of Things
    • Power & Energy
    • Sensors
    • Technology Groups
  • Challenges & Projects
    Challenges & Projects
    • Design Challenges
    • element14 presents
    • Project14
    • Arduino Projects
    • Raspberry Pi Projects
    • Project Groups
  • Products
    Products
    • Arduino
    • Dev Tools
    • Manufacturers
    • Raspberry Pi
    • RoadTests & Reviews
    • Avnet Boards Community
    • Product Groups
  • Store
    Store
    • Visit Your Store
    • Choose Another Store
      • Europe
      •  Austria (German)
      •  Belgium (Dutch, French)
      •  Bulgaria (Bulgarian)
      •  Czech Republic (Czech)
      •  Denmark (Danish)
      •  Estonia (Estonian)
      •  Finland (Finnish)
      •  France (French)
      •  Germany (German)
      •  Hungary (Hungarian)
      •  Ireland
      •  Israel
      •  Italy (Italian)
      •  Latvia (Latvian)
      •  
      •  Lithuania (Lithuanian)
      •  Netherlands (Dutch)
      •  Norway (Norwegian)
      •  Poland (Polish)
      •  Portugal (Portuguese)
      •  Romania (Romanian)
      •  Russia (Russian)
      •  Slovakia (Slovak)
      •  Slovenia (Slovenian)
      •  Spain (Spanish)
      •  Sweden (Swedish)
      •  Switzerland(German, French)
      •  Turkey (Turkish)
      •  United Kingdom
      • Asia Pacific
      •  Australia
      •  China
      •  Hong Kong
      •  India
      •  Korea (Korean)
      •  Malaysia
      •  New Zealand
      •  Philippines
      •  Singapore
      •  Taiwan
      •  Thailand (Thai)
      • Americas
      •  Brazil (Portuguese)
      •  Canada
      •  Mexico (Spanish)
      •  United States
      Can't find the country/region you're looking for? Visit our export site or find a local distributor.
  • Translate
  • Profile
Autodesk EAGLE
  • Products
  • More
Autodesk EAGLE
Blog EAGLE Autorouter Exploration
  • Blog
  • Forum
  • Documents
  • Events
  • Members
  • Mentions
  • Sub-Groups
  • Tags
  • More
  • Cancel
  • New
Autodesk EAGLE requires membership for participation - click to join
Blog Post Actions
  • Subscribe by email
  • More
  • Cancel
  • Share
  • Subscribe by email
  • More
  • Cancel
Group Actions
  • Group RSS
  • More
  • Cancel
Engagement
  • Author Author: DaveYoung
  • Date Created: 30 Sep 2013 9:25 PM Date Created
  • Views 448 views
  • Likes 3 likes
  • Comments 5 comments
  • eagle
  • cadsoft_tutorial
  • autorouter
  • dyoung
Related
Recommended

EAGLE Autorouter Exploration

DaveYoung
DaveYoung
30 Sep 2013

imageMost people who get into PCB design will automatically be intrigued by the concept of an autorouter.  It would make sense to the outside observer that an algorithm would be able to process millions of iterations of routings that finds the best balance of short traces, few vias, and well-organized traces. Similar to cracking a random password – it is only a question of time before the 'correct' layout solution is found.


According to the reviews of some experienced CAD junkies, most autorouters are very seldom helpful.  What's more, the cases that autorouters are recognized as useful belong only to those who have laid out countless boards and are able to amplify that expertise via the tool.  These reviews would make an autorouter seem like a specialized space drill: It can be used by novices on earth, but its not the best tool for a 'normal' job.


But to hell with reviews. It is true that an autorouter will totally ruin circuits like switchers, high-speed or high-current busses, sensitive analog circuits, etc...  However there is a lot of value in trying tools out first-hand.  This article will help readers to tinker with EAGLE's autorouter and decide for themselves if it is a useless tool or not.  Cadsoft includes it with the free version of EAGLE, so there's no reason not to take a swing or two!


Step 1: Start with a board on which part placement is complete.

Note that part placement is much more important than the routing so doing a stellar job here will pay dividends.  Shame on anyone who throws parts down and thinks, 'Ah, the autorouter can figure it out.'  If there are critical routes like switchers, sensistive analog paths, or high speed sections it might be a good idea to route those by hand now to make sure they are done correctly.

image

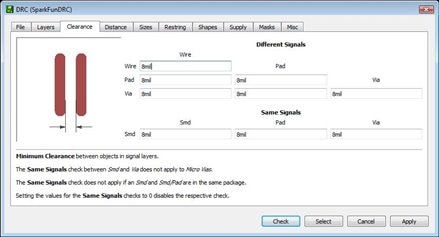
Step 2: Set the Design Rule Check (DRC) rules.

Generally, DRC rules should be based on those set by the specs of the board house (example) and assembly house(example).  It is best to add a buffer if possible to limit the chance of errors, for instance specifying 8 mil route and 8 mil space for a board house that is capable of 6 mil route/space is good practice.  EAGLE helps users understand each specification by showing an image of the dimension being edited in the window.

image

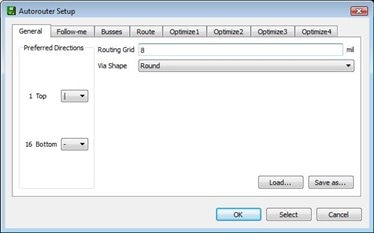
Step 3:  Setup the Autorouter.

When a user presses the 'Autoroute' button, a multi-tab window appears.  For the first pass, only the 'General' tab need considered.  The preffered routing direction must be set; note that '*' indicates no preference while selecting N/A will result in that layer not being routed at all.  The routing grid is also a significant consideration. It needs to be set small enough so all component pads can be resolved, but setting it too low drastically increases the required routing time  (and computer hardware requirements).  All other tabs should be left as default for this first autorouting experiment. image

image

Step 4: Watch it run!

Feel free to laugh at the crazy routes it thinks up.  Sometimes it changes it's mind!


Step 5: Finish the job and double check

There will undoubtedly be silly things that the autorouter does, or one may notice some corrections are required (fattening a trace, preventing an unnecessarily long trace, etc...).   Remember, it isn't electronic design logic that laid this board out; a standard algorithm is what decided how to run the routes. Sometimes the autorouter cannot complete all traces, perhaps because of the routing grid setting mentioned earlier.  It is generally easiest to make the completions and corrections by hand instead of attempting to teach the autorouter to do it.

image

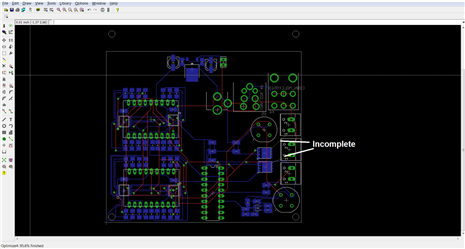
Here there are a couple incomplete routes that were not completed by the autorouter.


The board should be completed!  How is the quality of the layout?  Including setup, troubleshooting, and manual checking, was there a significant time savings?  Was it an overall better solution for the design?  For users that have experience with other autorouters, what have you noticed? Any favorite tools and/or features? Let the community know in the comments!


Obviously, this is only an introduction to the autorouter.  For those that want to have a complete picture of the tool, EAGLE's user manual has some excellent information on page 187, including the settings that were not discussed here.

  • Sign in to reply
  • DaveYoung
    DaveYoung over 9 years ago in reply to jmsaltzman

    Excellent points Jeff!  You really highlight the autorouter's shortcomings and methods that can be used to optimize.  Love the money-wrangling comparison as well.

    • Cancel
    • Vote Up 0 Vote Down
    • Sign in to reply
    • More
    • Cancel
  • jmsaltzman
    jmsaltzman over 9 years ago

    Interesting post, DRC rule adjustment is definitely the key to getting usable results.  This autorouted example shows a typically odd result: unevenly-spaced traces, vias where they shouldn't be, and a nonsensical mix of 45- and 90-degree corners.


    I've found EAGLE's autorouter useful for guiding component placement: if it can autoroute, then I can route by hand easily.  But its results remind me of monkeys mashing on typewriters: you might get an OK result sometimes, but do you want to develop monkey-wrangling skills or board-routing skills?!


    For usable results, I'd recommend preparing more than just component placement before autorouting:

    • Add power polygons,
    • Hand-route short/obvious/important traces,
    • Set up net classes (eg. power vs. signal),
    • SAVE before autorouting so you don't rip up hand-routed prep with the autorouter results.
    • Cancel
    • Vote Up 0 Vote Down
    • Sign in to reply
    • More
    • Cancel
  • DAB
    DAB over 9 years ago

    Hi Dave,


    Good post.  As I recall, most of the algorithms used for auto-routing have their origines in early AI research.

    There are many ways to help the router out by learning how to plan your component layout so that there are clear short routes for your circuit lines.

    There were many good layout artists in my day who could take a design and set it up to make the routing, done by hand in my day, so that the board layout was very clean.


    I suspect that if you dig into the autorouting software you can find some "prefferences" tables where you can help the router in its decision process.


    It is like any other good piece of software, you need to learn how to use it properly to get the most benefit from it.

    If you let the defaults loose on your design, you will end up with some very creative solutions.


    Makes good art though.

    DAB

    • Cancel
    • Vote Up 0 Vote Down
    • Sign in to reply
    • More
    • Cancel
  • DaveYoung
    DaveYoung over 9 years ago in reply to shabaz

    Thanks!  You bring up excellent points, and not just for autorouters.  More surface area is more surface area, and the benefit from going to SMT components is multiplied by the number of layers available.

    • Cancel
    • Vote Up 0 Vote Down
    • Sign in to reply
    • More
    • Cancel
  • shabaz
    shabaz over 9 years ago

    Hi Dave,


    Great article. Another suggestion for complex boards would be to use as few through-hole parts as possible, particularly dense connectors, because it is so much easier to route when the  planes  do not have component lead holes, so that traces can run under components too (assuming that is ok from a circuit design point of view).

    • Cancel
    • Vote Up 0 Vote Down
    • Sign in to reply
    • More
    • Cancel
element14 Community

element14 is the first online community specifically for engineers. Connect with your peers and get expert answers to your questions.

  • Members
  • Learn
  • Technologies
  • Challenges & Projects
  • Products
  • Store
  • About Us
  • Feedback & Support
  • FAQs
  • Terms of Use
  • Privacy Policy
  • Legal and Copyright Notices
  • Sitemap
  • Cookies

An Avnet Company © 2023 Premier Farnell Limited. All Rights Reserved.

Premier Farnell Ltd, registered in England and Wales (no 00876412), registered office: Farnell House, Forge Lane, Leeds LS12 2NE.

ICP 备案号 10220084.

Follow element14

  • Facebook
  • Twitter
  • linkedin
  • YouTube