element14 Community
element14 Community
    Register Log In
  • Site
  • Search
  • Log In Register
  • About Us
  • Community Hub
    Community Hub
    • What's New on element14
    • Feedback and Support
    • Benefits of Membership
    • Personal Blogs
    • Members Area
    • Achievement Levels
  • Learn
    Learn
    • Ask an Expert
    • eBooks
    • element14 presents
    • Learning Center
    • Tech Spotlight
    • STEM Academy
    • Webinars, Training and Events
    • Learning Groups
  • Technologies
    Technologies
    • 3D Printing
    • FPGA
    • Industrial Automation
    • Internet of Things
    • Power & Energy
    • Sensors
    • Technology Groups
  • Challenges & Projects
    Challenges & Projects
    • Design Challenges
    • element14 presents Projects
    • Project14
    • Arduino Projects
    • Raspberry Pi Projects
    • Project Groups
  • Products
    Products
    • Arduino
    • Avnet Boards Community
    • Dev Tools
    • Manufacturers
    • Multicomp Pro
    • Product Groups
    • Raspberry Pi
    • RoadTests & Reviews
  • Store
    Store
    • Visit Your Store
    • Choose another store...
      • Europe
      •  Austria (German)
      •  Belgium (Dutch, French)
      •  Bulgaria (Bulgarian)
      •  Czech Republic (Czech)
      •  Denmark (Danish)
      •  Estonia (Estonian)
      •  Finland (Finnish)
      •  France (French)
      •  Germany (German)
      •  Hungary (Hungarian)
      •  Ireland
      •  Israel
      •  Italy (Italian)
      •  Latvia (Latvian)
      •  
      •  Lithuania (Lithuanian)
      •  Netherlands (Dutch)
      •  Norway (Norwegian)
      •  Poland (Polish)
      •  Portugal (Portuguese)
      •  Romania (Romanian)
      •  Russia (Russian)
      •  Slovakia (Slovak)
      •  Slovenia (Slovenian)
      •  Spain (Spanish)
      •  Sweden (Swedish)
      •  Switzerland(German, French)
      •  Turkey (Turkish)
      •  United Kingdom
      • Asia Pacific
      •  Australia
      •  China
      •  Hong Kong
      •  India
      •  Korea (Korean)
      •  Malaysia
      •  New Zealand
      •  Philippines
      •  Singapore
      •  Taiwan
      •  Thailand (Thai)
      • Americas
      •  Brazil (Portuguese)
      •  Canada
      •  Mexico (Spanish)
      •  United States
      Can't find the country/region you're looking for? Visit our export site or find a local distributor.
  • Translate
  • Profile
  • Settings
PCB Design, Prototyping and Production
  • Products
  • More
PCB Design, Prototyping and Production
PCB Forum Lyrebird Recreation Project
  • Blog
  • Forum
  • Documents
  • Leaderboard
  • Files
  • Members
  • Mentions
  • Sub-Groups
  • Tags
  • More
  • Cancel
  • New
Join PCB Design, Prototyping and Production to participate - click to join for free!
Actions
  • Share
  • More
  • Cancel
Forum Thread Details
  • Replies 27 replies
  • Subscribers 118 subscribers
  • Views 2583 views
  • Users 0 members are here
  • electronics australia
  • piano
  • analogue
  • synth
  • music
Related

Lyrebird Recreation Project

celcius1
celcius1 over 1 year ago

Hi Guys,

It's Paul from Paul's Engineering space, and I'm adding another project to the variety I am working on.  As you can tell from the title I am recreating a project from Electronics Australia 1981 October through 1982 January issues.  Alot of this work has involved finding modern equivalents of the chips used in the project, I have been able to either find modern versions, or in the sense of the tone generator, I have recreated it as an oscillator board, as the original chip is no longer made, and the purpose of this project is to recreate it using currently available hardware.

Departing from the original piano's design, I have designed a mainboard, utilising PCI-e connectors, so various parts of the piano can be on daughterboards, I'm only using PCI-e connectors as they are readily available and cheap!  But will also permit changes to design in a way that once I have fully completed the initial project and have defined the projects standard.  The purpose of going down this path, it will give other individuals, the opprtunity to make there own wave shaping boards, and get different sounds out of the piano.

This project has been a huge undertaking and is just as big as my extruder project.

So feel free to discuss with me my efforts so far, I'll have video published once I have finished designing the new mainboard.

Talk Soon

Paul

  • Sign in to reply
  • Cancel

Top Replies

  • javagoza
    javagoza over 1 year ago in reply to genebren +4
    I have found several issues from those years in the Internet Archive: 01 A 73-note piano for home or stage LYREBIRD: Internet Archive 02 A 73-note piano for home or stage LYREBIRD: Internet Archive…
  • shabaz
    shabaz over 1 year ago +2
    Hi Paul, Just an idea (feel free to ignore), this project is very large and may be hard for many people to dedicate time to. How about a cheaper, smaller option too; a couple of octaves max, and just…
  • shabaz
    shabaz over 1 year ago in reply to celcius1 +2
    I cannot tell what is incomplete and what is a mistake, so all I can do is identify and report anything I see that looks odd. I'll wait until you're ready for a review, if you want it (but please use…
  • dougw
    dougw over 1 year ago

    Looking forward to see what this design looks like.

    • Cancel
    • Vote Up 0 Vote Down
    • Sign in to reply
    • Cancel
  • DAB
    DAB over 1 year ago

    Sounds interesting.

    I look forward to your posts.

    • Cancel
    • Vote Up 0 Vote Down
    • Sign in to reply
    • Cancel
  • genebren
    genebren over 1 year ago

    Interesting project.  I have long been fascinated with synthesizer design and construction.  My interest started with articles in Popular Electronics, the "Psych-tone" (Feb 1971) and Radio Electronics, "Build a Modular Electronic Music Synthesizer" (May 1973+).  I built (or at least attempted to build) both of these devices.  The Synthesizer underwent several updates through the years, until it finally got left behind.  I recently built a multi-voice synthesizer (Multi-Voice Synthesizer - Initial Design and various similar blogs) where I constructed a system made up of multiple modules, each containing a digital oscillator, VCA, ADSR and VCF.  I am still thinking about further enhancements, but for the time the project is on hold.

    I attempted to find schematics on the original project that you are working on, but so far, I only have found a few text only articles (likely only the first page) of the magazine articles you have referenced.  I would be interested in learning more about this system and you plans for updating it

    • Cancel
    • Vote Up +1 Vote Down
    • Sign in to reply
    • Cancel
  • javagoza
    javagoza over 1 year ago in reply to genebren

    I have found several issues from those years in the Internet Archive:

    • 01 A  73-note piano for home or stage LYREBIRD: Internet Archive
    • 02 A  73-note piano for home or stage LYREBIRD: Internet Archive
    • 03 A  73-note piano for home or stage LYREBIRD: Internet Archive
    • 04 A  73-note piano for home or stage LYREBIRD: Internet Archive

    Electronics Australia Year 1981

    • Electronics Australia 1981 : Free Download, Borrow, and Streaming : Internet Archive

    Electronics Australia Year 1982

    • Electronics Australia 1982 : Free Download, Borrow, and Streaming : Internet Archive

    It is very gratifying to read magazines from those years.

    • Cancel
    • Vote Up +4 Vote Down
    • Sign in to reply
    • Cancel
  • celcius1
    celcius1 over 1 year ago

    Hey Guys,

    I'm considering putting a website together to put a lot of the main updates on, even make available the source documentation the project is based on.  Including a link to the GitHub - Celcius1/Old-Projects-become-New: Electronics Projects from the 60's to 90's redone for the modern era.  But this is the first in a series of projects where I will go through, and modernise old projects.  I have a few projects in there already in progress, but I thought I'd make the Lyrebird Project the inaugural project in the series.

    So to summarise, I'm about 80% complete on the mainboard for the Lyrebird, it utilises 4 x PCI-E slots (98 pin) & 4 x PCI-E slots (164 pin).  The 98 pin slots, are specifically for the tone source boards, and have 7 control lines between them if people want to use more than one board working together for the tone source.  The 164 pin slots, are where the wave shaper boards go, 73 pins are for the source tones from the tone generator boards, and another 73 are connection to the piano keys, so to keep all the wave shaping circuitry on the daughter boards for maximum, customisation, only downside due to sheer number of connections, there is only 3 control lines between these four slots for combining wave shaping board capabilities.  Instrument selection as a result will be limited to soft touch selection via a header off of the daughter board. As the original Lyrebird had about 4 to 5 instrument selections, so being that the instrument creation is limited to the wave shaping board, I'd made the design decision to limit it the daughter board, but unlike in the original design where it is physical switches, I'll use digital electronic control and soft touch buttons instead.

    Also departing from the original design, the main board will house the main power regulation circuitry and I have also put a Class D amp in for the audio, original design provided a headphone out, and line out, I'm implementing a Class D Amp to drive a speaker and one to drive a sub, to give the bass notes, that extra needed punch for sound and clarity.  I'm considering also replacing the volume control with a rotary encoder, instead of a traditional potentiometer.

    Keep an eye out on my channel for the video regarding this project as I will do one once I have completed the main board.

    Talk Soon

    Paul

    • Cancel
    • Vote Up +1 Vote Down
    • Sign in to reply
    • Cancel
  • shabaz
    shabaz over 1 year ago

    Hi Paul,

    Just an idea (feel free to ignore), this project is very large and may be hard for many people to dedicate time to.

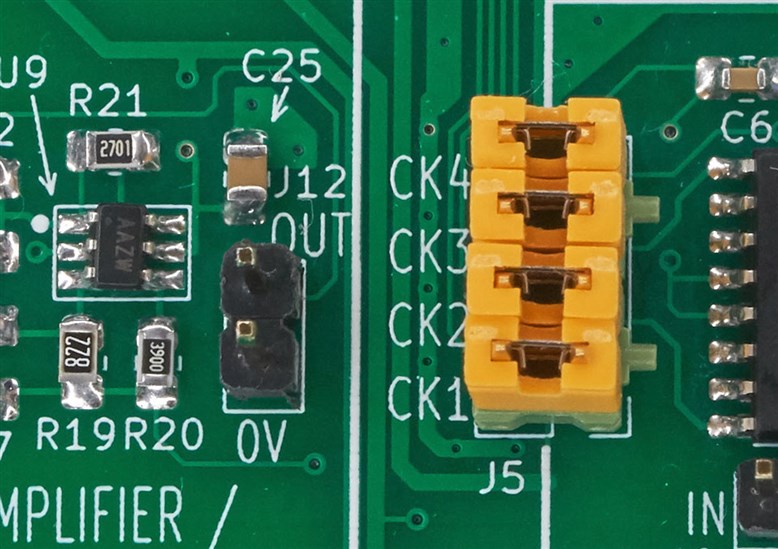
    How about a cheaper, smaller option too; a couple of octaves max, and just a single board, and just a single-chip 1-2W amplifier or so, and just plain 5V or 12V DC in, let the user figure out what external supply they need. You could still make it adaptable, by using header pins and jumpers, to isolate circuitry (jumpers are low-cost). That way, if a user wished to patch in their own circuit, or replace bits of functionality, they could do it with a plug-on board using those standard 2.54mm pin headers, by simply unplugging the jumpers first. If you don't like the jumpers idea then DIP switches are a possibility but they cost a lot more. Dual-in-line header pins and jumpers could be better as a result.

    Here's an example of what I mean, where in normal use the four jumpers connect the left side to the right side sub-circuits on the same PCB. If a user wishes to patch out, or replace functionality, they can unplug these, and plug on their own board onto the pins (or could use jumper wires, but it would be a lot). It will still be fiddly with jumpers, so it doesn't scale to very large instruments, but perhaps for a couple of octaves, it is manageable (flat flex could be used for the areas of the design where lots of parallel connections are required, or even a small PCB with a dual-in-line socket that is effectively shorted on that PCB. so all the connections can be made at once).

    image

    This will also allow people to test your implementation at a lower cost, before building a full-size version. 

    Also, unlike the separation of functionality that the original project had, it could be good to add a lot more jumpers at every sub-circuit, so that users can test and insert and modify a whole lot more than with the original. I think a single-board compact version would be very attractive.

    • Cancel
    • Vote Up +2 Vote Down
    • Sign in to reply
    • Cancel
  • shabaz
    shabaz over 1 year ago in reply to shabaz

    Also, I've not checked the wave shaping functionality, but you mention limiting it; probably that's the part of the design that you really don't want to limit if you can, and perhaps a smaller version of the project would have less complication for keeping more of the wave shaping features intact.

    • Cancel
    • Vote Up +1 Vote Down
    • Sign in to reply
    • Cancel
  • celcius1
    celcius1 over 1 year ago in reply to shabaz

    What I meant by that, on the old project part of the wave shaping was actually on the boards that had the keys connected to it, I shifted all that circuitry to the wave shaping board, to free up expansion of the keyboards ability, also the keys are velocity sensitive as well.

    Even though I posted about it now I have been working on this for the last 2 months.

    • Cancel
    • Vote Up 0 Vote Down
    • Sign in to reply
    • Cancel
  • celcius1
    celcius1 over 1 year ago in reply to genebren

    Interesting project you have there, I'll check it out later, if you need some tips check out this website https://musicfromouterspace.com/ the creator of this site has posted a lot of open source analogue synth circuits and diagrams.  I'm considering doing something from this site in the future.  What attracted me to the lyrebird is that it used a square wave source, to create a sinewave output.  Which I found left it open to expansion.

    As described in one of the articles, it uses a square wave with a "mark space ratio of 25%" as the source tone, that gets treated into the final note.

    • Cancel
    • Vote Up 0 Vote Down
    • Sign in to reply
    • Cancel
  • shabaz
    shabaz over 1 year ago

    I took a look at the schematic, but I'm having real trouble following it. It will benefit you greatly to use conventional symbols for op-amps etc., because otherwise there's a risk of errors. Also, it's not easy for users to follow so a review of the circuit is difficult.

    image

    Also, circuit conventions are needed, e.g. ground or 0V connections should be using the correct symbol, and going downward. On a huge circuit as you're creating, it's even more important.

    I couldn't follow the above to comment one way or another. I took a look at the following part:

    image

    The above could be greatly simplified by replacing with a single amplifier chip. I can't see that it will work anyway. The top MOSFET appears to be permanently switched on (because the 'HIN' pin on the chip is connected to logic high, so the speaker will fry, or both MOSFETs. I'm guessing you were planning to use Q1 to provide an inverted and a non-inverted signal, but I still can't see how that would have worked. All this is solved by using any off-the-shelf amplifier chip.

    • Cancel
    • Vote Up 0 Vote Down
    • Sign in to reply
    • Cancel
>
element14 Community

element14 is the first online community specifically for engineers. Connect with your peers and get expert answers to your questions.

  • Members
  • Learn
  • Technologies
  • Challenges & Projects
  • Products
  • Store
  • About Us
  • Feedback & Support
  • FAQs
  • Terms of Use
  • Privacy Policy
  • Legal and Copyright Notices
  • Sitemap
  • Cookies

An Avnet Company © 2025 Premier Farnell Limited. All Rights Reserved.

Premier Farnell Ltd, registered in England and Wales (no 00876412), registered office: Farnell House, Forge Lane, Leeds LS12 2NE.

ICP 备案号 10220084.

Follow element14

  • X
  • Facebook
  • linkedin
  • YouTube