element14 Community
element14 Community
    Register Log In
  • Site
  • Search
  • Log In Register
  • Community Hub
    Community Hub
    • What's New on element14
    • Feedback and Support
    • Benefits of Membership
    • Personal Blogs
    • Members Area
    • Achievement Levels
  • Learn
    Learn
    • Ask an Expert
    • eBooks
    • element14 presents
    • Learning Center
    • Tech Spotlight
    • STEM Academy
    • Webinars, Training and Events
    • Learning Groups
  • Technologies
    Technologies
    • 3D Printing
    • FPGA
    • Industrial Automation
    • Internet of Things
    • Power & Energy
    • Sensors
    • Technology Groups
  • Challenges & Projects
    Challenges & Projects
    • Design Challenges
    • element14 presents Projects
    • Project14
    • Arduino Projects
    • Raspberry Pi Projects
    • Project Groups
  • Products
    Products
    • Arduino
    • Avnet & Tria Boards Community
    • Dev Tools
    • Manufacturers
    • Multicomp Pro
    • Product Groups
    • Raspberry Pi
    • RoadTests & Reviews
  • About Us
  • Store
    Store
    • Visit Your Store
    • Choose another store...
      • Europe
      •  Austria (German)
      •  Belgium (Dutch, French)
      •  Bulgaria (Bulgarian)
      •  Czech Republic (Czech)
      •  Denmark (Danish)
      •  Estonia (Estonian)
      •  Finland (Finnish)
      •  France (French)
      •  Germany (German)
      •  Hungary (Hungarian)
      •  Ireland
      •  Israel
      •  Italy (Italian)
      •  Latvia (Latvian)
      •  
      •  Lithuania (Lithuanian)
      •  Netherlands (Dutch)
      •  Norway (Norwegian)
      •  Poland (Polish)
      •  Portugal (Portuguese)
      •  Romania (Romanian)
      •  Russia (Russian)
      •  Slovakia (Slovak)
      •  Slovenia (Slovenian)
      •  Spain (Spanish)
      •  Sweden (Swedish)
      •  Switzerland(German, French)
      •  Turkey (Turkish)
      •  United Kingdom
      • Asia Pacific
      •  Australia
      •  China
      •  Hong Kong
      •  India
      • Japan
      •  Korea (Korean)
      •  Malaysia
      •  New Zealand
      •  Philippines
      •  Singapore
      •  Taiwan
      •  Thailand (Thai)
      • Vietnam
      • Americas
      •  Brazil (Portuguese)
      •  Canada
      •  Mexico (Spanish)
      •  United States
      Can't find the country/region you're looking for? Visit our export site or find a local distributor.
  • Translate
  • Profile
  • Settings
Raspberry Pi
  • Products
  • More
Raspberry Pi
Blog Pico C/C++ Development with Visual Studio Code (VS Code): A Development Container Approach!
  • Blog
  • Forum
  • Documents
  • Quiz
  • Events
  • Polls
  • Files
  • Members
  • Mentions
  • Sub-Groups
  • Tags
  • More
  • Cancel
  • New
Join Raspberry Pi to participate - click to join for free!
Featured Articles
Announcing Pi
Technical Specifications
Raspberry Pi FAQs
Win a Pi
GPIO Pinout
Raspberry Pi Wishlist
Comparison Chart
Quiz
  • Share
  • More
  • Cancel
Group Actions
  • Group RSS
  • More
  • Cancel
Engagement
  • Author Author: shabaz
  • Date Created: 13 Jan 2024 12:27 AM Date Created
  • Views 6724 views
  • Likes 11 likes
  • Comments 20 comments
Related
Recommended
  • rpiintermediate
  • pico
  • rp2040
  • pico c sdk
  • raspberry-pi-projects
  • pi pico
  • docker
  • sdk

Pico C/C++ Development with Visual Studio Code (VS Code): A Development Container Approach!

shabaz
shabaz
13 Jan 2024

Table of Contents

  • Introduction
  • Software Installation
  • Configure Visual Studio Code
  • Open a Dev Containers Project
  • Building a Dev Containers Project
  • Examining Project Code
  • Revisiting the Project
  • Running the Pi Pico project
  • Opening Projects in a Container
  • Summary

Introduction

Sometimes, one wants to get started with a microcontroller project without a lot of setup overhead. If you’ve seen Pi Pico C or C++ projects on GitHub that you wish to work with, or if you wish to write your own Pi Pico projects but do not wish to go through the effort of setting up the development environment for the Pi Pico, then this blog post may be of use.

This blog post provides just one example approach; there are many others. The approach I've decided to write about involves Visual Studio Code (VS Code), and Docker Desktop.

Visual Studio Code provides the code editing functionality and a button to click on to build (i.e., compile) the code. You end up with a .uf2 suffix firmware binary file all ready for uploading into the Pi Pico (it is done via USB file drag-and-drop).

Docker Desktop is a piece of software that, once installed and run, does not need much interaction. Docker Desktop in the background provides a ‘container’ environment that stores the code and compiler. A container is a bit like a virtual machine.

For following this blog post, no previous knowledge is required about VS Code or Docker Desktop, and, as you’ll see, the learning curve will be pretty much restricted to just navigating VS Code graphical menus.

Software Installation

On your PC (I tested this on Windows, but it should work fine on Mac and Linux too, although some steps may differ very lightly) install two things; Docker Desktop, and (if you don’t already have it installed) Visual Studio Code.

Start up Docker Desktop (it must be running for the rest of the steps to work), and start up Visual Studio Code, and that’s where we will begin.

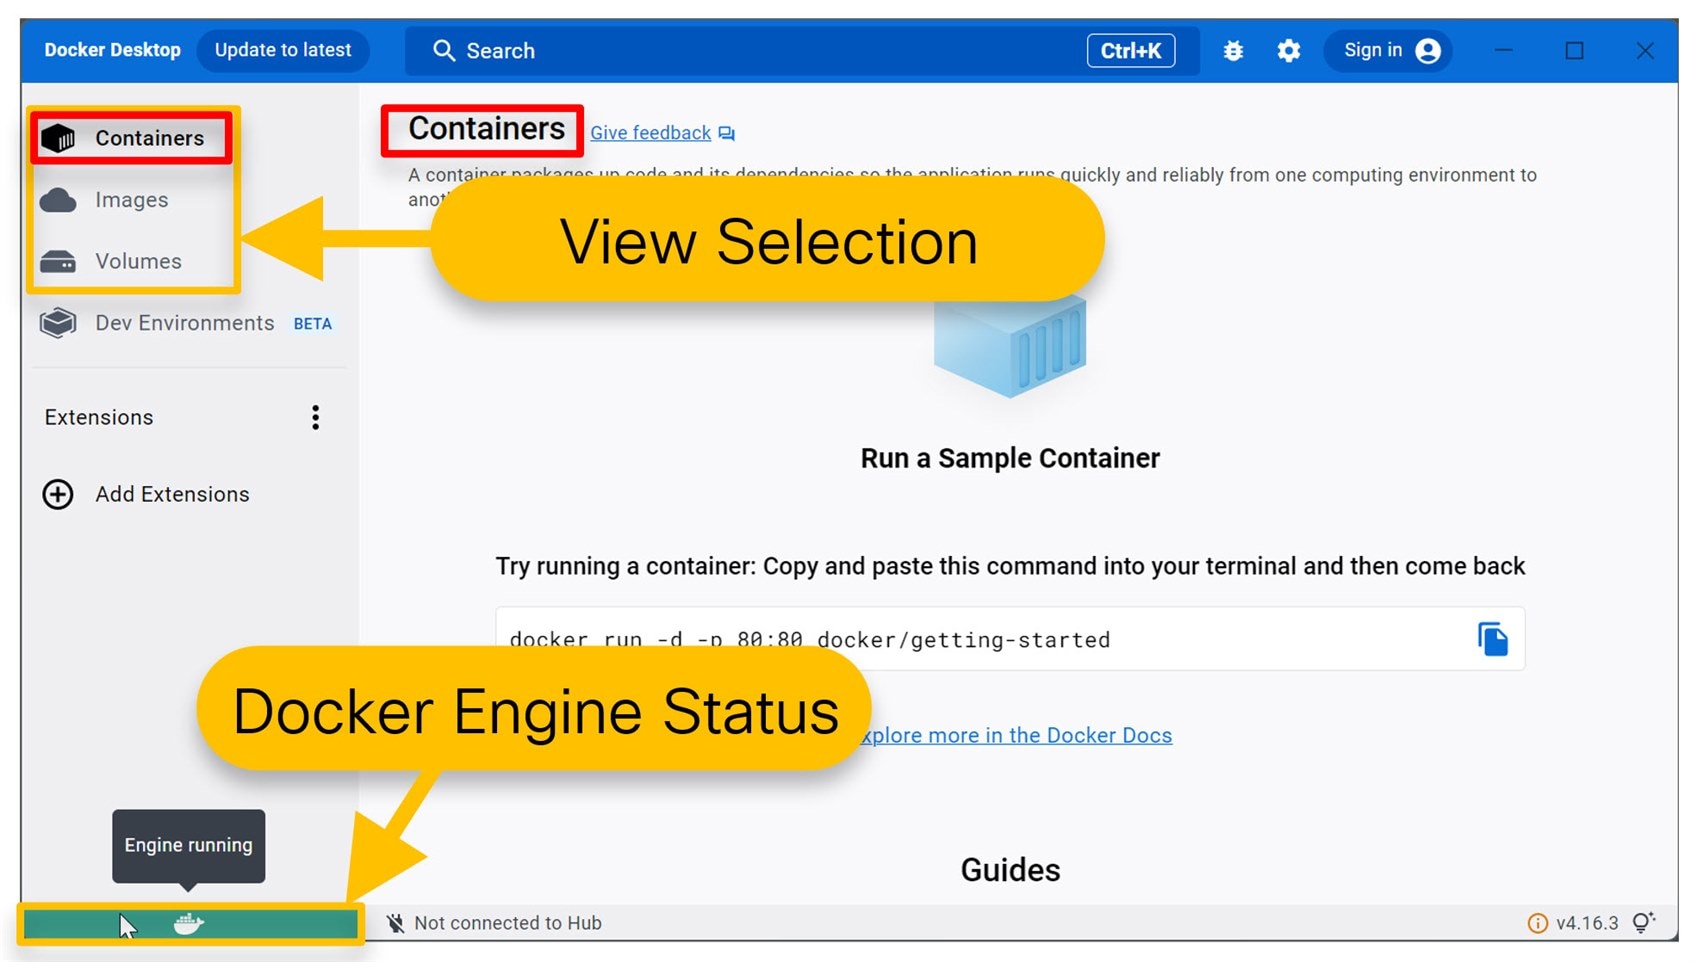
As mentioned in the introduction, you won’t need to interact much with Docker Desktop usually. It does its thing in the background; however, just in case you’re curious, the screenshot below shows some of the interesting features. The lower-left green block indicates that the Docker Engine is running (if it is stopped, it needs to be started!). The left side allows the user to select different views for the main pane. You’ll be mainly interested in container status; in the screenshot below, no container is running.

image

Configure Visual Studio Code

The left side of VS Code has a palette of icons known as the Activity Bar. Two of the most popular icons that will be used are the Extensions and Explorer views. Extensions are add-on features that can be installed, and the Explorer usually shows the files list in the project.

image

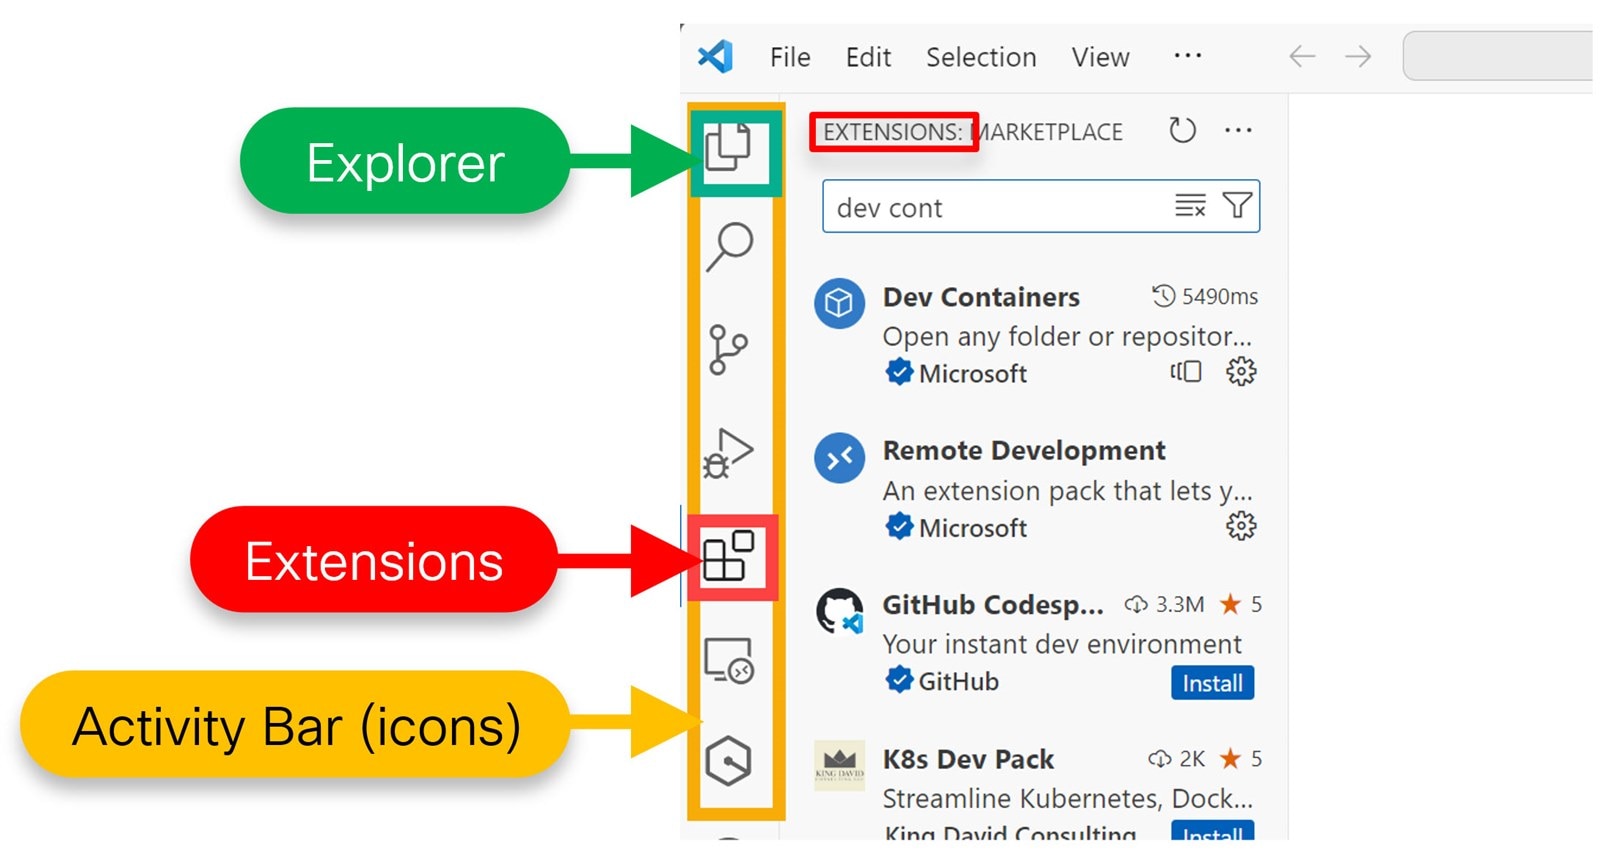
Click on the Extensions icon, which looks like blocks, and you’ll see a list of add-on features with a search box at the top. In that search box, type Dev Containers to find that extension and then click its Install button. Later, you’ll need to use the Extensions pane again, so make a mental note about how to navigate to it : )

Open a Dev Containers Project

The lower-left corner of VS Code (it will be colored blue or green) has a connection icon, and it is used to make remote connections. If you click there, a menu pops up. Click on Clone Repository in Container Volume.

image

In the box that appears, paste in the following URL and then press Enter:

https://github.com/shabaz123/project1.git

That URL is to a pre-prepared repository set up for a Pi Pico project inside a Development Container.

image

Now, VS Code will go off and prepare a container. It will take several minutes. Click on show log as shown in the screenshot below, to see what’s going on if you’re interested!

image

Once it is complete, you’ll see the project files (such as main.c) listed on the left side. Click on the Explorer icon on the left side if you can’t see the project files.

The screenshot below shows what everything should look like at this stage:

image

Out of interest, if you look at Docker Desktop, you’ll see that a container was created with a random name, such as stupefied_lama. If you wanted to, you could start or stop the container by clicking on the icon in the Actions column, or you could perform other actions (such as going into a command line shell inside the container) by clicking on the three-dots icon in the Actions column.

image

Although the project is now open in VS Code, one more thing needs to be done, and that is to enable a CMake Tools extension inside the container.

Click on Extensions on the left palette of icons as before, and type CMake Tools, and then install it as shown in the screenshot below.

image

After 30 seconds or so, it will be installed. Ignore any pop-ups referring to configuring the project. VS Code tends to produce a lot of pop-ups.

Once installed, you can close the informational page by clicking on the X at the top, and then go back to the Explorer view for the left pane, since that’s most useful when coding.

image

Building a Dev Containers Project

If you look at the bottom bar of the VS Code window, you’ll see text labeled Build. Click it : )

You may be prompted to select a configure preset in which case click on Custom configure preset.

If all goes well, you’ll see the messages Build completed and Build finished with exit code 0. The final built .uf2 file can be seen by expanding the out folder in the files pane.

image

Right-click on the .uf2 file, and click on Download, and save it to your PC.

Examining Project Code

This first project doesn’t do a lot; it just blinks the green LED on the Pi Pico at a rate of about two blinks per second.

Some of the code is in main.c, and some happens to be in a file called extrafunc.c. If you click on the function name led_setup, and then press F12, VS Code will open up the file that contains that function so you can easily follow the code.

Note that VS Code can do a lot more, although some of it will need to be configured, which is not in the scope of this blog post.

image

Revisiting the Project

If you’ve finished with your project, you can close it within Visual Studio Code, by clicking on the lower-left remote connections Dev Container blue box and in the list of options, scroll down and select Close Remote Connection.

If you come back to it later and wish to reconnect, first go into Docker Desktop, and, if it is stopped, then start the container using the triangular start button in the Action column for the listed containers. Then, click on the lower-left remote connection icon in VS Code, select Attach to Running Container, and then choose the container name from the list that will be presented. In the Explorer view, click on Open Folder, and type /workspaces/project1 and click on OK.

image

You’ll now be able to work with the project, and build the code, as before.

Running the Pi Pico project

You can transfer the .uf2 file to the Pi Pico, by holding down the BOOTSEL button on the unpowered Pi Pico, plugging in the USB connection to the PC, and a USB drive letter will appear. Drag the .uf2 file to the drive letter, and it will transfer and start running.

Opening Projects in a Container

If you want to, you can open up additional projects, since the previous one is minimal just for demo purposes.

Lets say you wish to open a project on GitHub, and it’s repo URL is:

https://github.com/shabaz123/sound_fx_mixer.git

In VS Code, provided you already have attached to the container (for instance, if you’ve been working with the earlier project or if you click on the lower-left Remote Connection icon and selected Attach to Running Container), close any open folder by going to File->Close Folder, and then in the Explorer pane on the left side, instead of clicking on Open Folder, click on Clone Repository.

In the popup that appears, type the repo URL. You will be prompted to choose a folder to clone the project into. Type /workspaces and press Enter. You should now see the project contents, and you can edit the code as usual.

image

Now go to View->Terminal->New Terminal.

You’ll see a command prompt with the path set to the project folder, which is /workspaces/sound_fx_mixer in this example.

Type the following (the dot at the end is important!):

cp -r ../project1/.vscode/ .
cp ../project1/CMakePresets.json .

What the above two lines are doing, is copying some files from the earlier project1 folder, into the current project. This is needed, to allow the development container to successfully build the project.

image

For this specific project, a pico-extras repository also needs to be downloaded and configured. This wouldn’t be the case for many other projects.

Using the screenshot below as a reference, from the left side, select CMakePresets.json, and then add the path as shown below, i.e, append a comma to the PICO_SDK_PATH line, and then add a line:

"PICO_EXTRAS_PATH": "/workspaces/pico-extras"

Save the file.

In the terminal, go to the \workspaces folder (for instance by typing cd .. to go back one folder), and then type:

git clone https://github.com/raspberrypi/pico-extras.git

image

Now click where it says Build at the bottom of the VS Code window. You may be prompted to select a configure preset in which case simply click on Custom configure preset. After a minute or so, the code will be built!

Now you can download the .uf2 file from the container in the same way as before, by clicking on the out folder in the left side Explorer view, and then right-clicking on the .uf2 file there and select Download.

Summary

The Development Container technique allows for quickly developing Pi Pico projects without needing to set up the local PC with an SDK and toolchain. This blog post discussed how to create a container based on content from GitHub, and then use that container for obtaining additional projects from the Internet, and building the code into the .uf2 file which can be uploaded into the Pi Pico for execution.

Everything discussed in this blog post is quite flexible, and if you come up with changes to the workflow that better suit your needs, please share them, in case they help others too.

Thanks for reading!

  • Sign in to reply
  • shabaz
    shabaz over 2 years ago in reply to Andrew J

    It's really neat, I worked with Docker a bit in the past, and when done right, you can "hand" someone a complete "appliance" (e.g. a computer running a specific application) with just a single command line that they need to type in Linux. As soon as they type that one-liner, Docker will dutifully fetch the recipe, assemble the virtual system with the application, and start it up!

    The way I see it with Docker containers is this:

    The thing you're creating is composed of layers, where one will be Linux. The layers are the ingredients, and they get formed into an image. A second image could reuse some layers, this is something Docker will do in the background by itself.

    When run, it's called a container, and you can run multiple containers off an image.

    Any modifications you do inside the container, are isolated from other containers, even containers of the same image. The containers run as ships in the night, just like VMs. The isolated modifications are magically handled by Docker (it has its own file system for storing them). However, it is perfectly possible to mount a file system to be shared by containers. That's actually what happens in the blog post, where the folder for the projects is mounted. Therefore, if the container is shut down, or even deleted, the code is still there for future containers of the same image to see, but any corruption of files anywhere else are gone, since the image is still pristine and can create more working containers.

    This is also why it's so quick to create new containers rapidly even if previous ones are destroyed, because the layers (which assembled the images) are already downloaded. But the images (and any then unused layers) can be easily deleted anytime from Docker Desktop, so there's no unnecessary disk space usage.

    • Cancel
    • Vote Up 0 Vote Down
    • Sign in to reply
    • More
    • Cancel
  • Andrew J
    Andrew J over 2 years ago in reply to shabaz

    Thanks - I haven't really investigated Docker so it's not something I'm very familiar with.  From what you say, my mental image is: Docker acts like a (non-segregated) Hypervisor layer and the container is a set of instructions that pull together files to launch a running "thing" - I hesitate to give the latter a specific name as I guess it could be anything I suppose.

    From a VM viewpoint: if I had a base image for Linux then installed Xilinx tools I'd no longer have that base image unless I captured the change as a snapshot.  I'd now have a base image plus snapshot.  I could then launch the base image again, from before the snapshot, and install, say, LabVIEW tools and save that as a second snapshot.  On disk I have three files (Base, Xilinx and LabVIEW.)  I could merge them back together to have a non-base image or a base image plus Xilinx/LabVIEW snapshot.  However I launched - from the base image or a snapshot - there is no runtime resource sharing between the VMs so machine resources could get tight.

    In a Docker world, the Container creates the "snapshot" situation following instructions when launched for the first time.  Presumably the container is saved each time so it isn't doing it wholly from scratch every time it is launched.  Also presumably if the recipe is changed, the container is rebuilt as needed.  It's obvious there's a  lot more going on than I'm describing here - for example, in a VM world each instance is wholly contained and consumes its own resources, whereas it sounds like these are shared (as needed) and managed by Docker.  Do applications need to be designed to be containerisable - I'm thinking something along the lines of non-attended installs?

    I always knew it was clever stuff, just never investigated. 

    • Cancel
    • Vote Up 0 Vote Down
    • Sign in to reply
    • More
    • Cancel
  • shabaz
    shabaz over 2 years ago in reply to dougw

    Hi Doug, 

    Thanks!

    • Cancel
    • Vote Up 0 Vote Down
    • Sign in to reply
    • More
    • Cancel
  • shabaz
    shabaz over 2 years ago in reply to Andrew J

    Thanks! And no prob, glad you asked the questions! : )

    • Cancel
    • Vote Up 0 Vote Down
    • Sign in to reply
    • More
    • Cancel
  • shabaz
    shabaz over 2 years ago in reply to Andrew J

    Hi Andrew,

    Good questions. The container acts like a VM, which houses the source code, the SDK, and build tools. The difference between VM and container is so slight that it's unnoticeable in normal use*, it contains everything and runs things inside like a VM.

    The VS Code, which for this blog is run on the PC in the normal way (outside of the container) isn't actually needed because it is possible to go directly into the container shell, build and edit files there, and transfer files in/out of the container (the container that was created happens to have no desktop environment) if desired, but using VS Code is an IDE-style way for people who would prefer that.

    For this blog, VS Code was used to set up the container initially (if VS Code is not installed, there are other ways to do that). After that, the container is accessed using a VS Code remote connection capability (VS Code can be used for working with remote files, whether they are on a separate physical machine, a real VM, or a container).

    The VS Code remote connection then allows the user to open folders as usual, but the folders will be inside the container (or any other remote connection).

    As with a VM, you could delete the container afterward** (I did this multiple times during the blog writing, and currently, I don't have any container on my PC because I can quickly create a new one by using the remote connection button at the bottom-left of the VS Code window.

    Nothing special was done or configured with VS Code (aside from adding the Dev Containers extension to allow it the ability to create and connect to the container). All VS Code specific tweaks are actually inside the container project (there is a .vscode folder there), so if the container is deleted, it doesn't mess with the VS Code normal settings. Normally I use CLion instead of VS Code for Pi Pico development, but it has a bug, so I switched to VS Code for this blog.

    ---

    * Some of the differences/benefits of the container are that disk space is saved (it reuses things where it can, so you can have dozens of containers on a PC, still wholly independent when you log into them), and [a key benefit] rather than shipping around huge VM files, it's possible to ship a much smaller recipe-like file that describes where to download all the bits that will assemble into a container; this file can be seen here: https://github.com/shabaz123/project1/blob/main/Dockerfile - the first line there requests Docker to assemble a container with a particular version of Linux as a sort of base layer, and then the rest of the lines specify what else that container needs (Linux packages, SDK, compiler, etc).


    ** Unlike a normal VM, to fully delete your PC of everything, you'd go into the Docker Desktop and delete the containers, and optionally the Images and Volumes too. That's a neat feature of containers that you could have dozens of containers created, and if they all happen to be using the same version of Linux as a base, then there is just one image file for Linux, and all the containers will share it (but will still be completely independent when you log into the containers and view the files there and run programs etc). So, with very little disk space, you can store a whole load of containers.

    • Cancel
    • Vote Up 0 Vote Down
    • Sign in to reply
    • More
    • Cancel
<>
element14 Community

element14 is the first online community specifically for engineers. Connect with your peers and get expert answers to your questions.

  • Members
  • Learn
  • Technologies
  • Challenges & Projects
  • Products
  • Store
  • About Us
  • Feedback & Support
  • FAQs
  • Terms of Use
  • Privacy Policy
  • Legal and Copyright Notices
  • Sitemap
  • Cookies

An Avnet Company © 2026 Premier Farnell Limited. All Rights Reserved.

Premier Farnell Ltd, registered in England and Wales (no 00876412), registered office: Farnell House, Forge Lane, Leeds LS12 2NE.

ICP 备案号 10220084.

Follow element14

  • X
  • Facebook
  • linkedin
  • YouTube