element14 Community
element14 Community
    Register Log In
  • Site
  • Search
  • Log In Register
  • Community Hub
    Community Hub
    • What's New on element14
    • Feedback and Support
    • Benefits of Membership
    • Personal Blogs
    • Members Area
    • Achievement Levels
  • Learn
    Learn
    • Ask an Expert
    • eBooks
    • element14 presents
    • Learning Center
    • Tech Spotlight
    • STEM Academy
    • Webinars, Training and Events
    • Learning Groups
  • Technologies
    Technologies
    • 3D Printing
    • FPGA
    • Industrial Automation
    • Internet of Things
    • Power & Energy
    • Sensors
    • Technology Groups
  • Challenges & Projects
    Challenges & Projects
    • Design Challenges
    • element14 presents Projects
    • Project14
    • Arduino Projects
    • Raspberry Pi Projects
    • Project Groups
  • Products
    Products
    • Arduino
    • Avnet & Tria Boards Community
    • Dev Tools
    • Manufacturers
    • Multicomp Pro
    • Product Groups
    • Raspberry Pi
    • RoadTests & Reviews
  • About Us
    About the element14 Community
  • Store
    Store
    • Visit Your Store
    • Choose another store...
      • Europe
      •  Austria (German)
      •  Belgium (Dutch, French)
      •  Bulgaria (Bulgarian)
      •  Czech Republic (Czech)
      •  Denmark (Danish)
      •  Estonia (Estonian)
      •  Finland (Finnish)
      •  France (French)
      •  Germany (German)
      •  Hungary (Hungarian)
      •  Ireland
      •  Israel
      •  Italy (Italian)
      •  Latvia (Latvian)
      •  
      •  Lithuania (Lithuanian)
      •  Netherlands (Dutch)
      •  Norway (Norwegian)
      •  Poland (Polish)
      •  Portugal (Portuguese)
      •  Romania (Romanian)
      •  Russia (Russian)
      •  Slovakia (Slovak)
      •  Slovenia (Slovenian)
      •  Spain (Spanish)
      •  Sweden (Swedish)
      •  Switzerland(German, French)
      •  Turkey (Turkish)
      •  United Kingdom
      • Asia Pacific
      •  Australia
      •  China
      •  Hong Kong
      •  India
      •  Japan
      •  Korea (Korean)
      •  Malaysia
      •  New Zealand
      •  Philippines
      •  Singapore
      •  Taiwan
      •  Thailand (Thai)
      •  Vietnam
      • Americas
      •  Brazil (Portuguese)
      •  Canada
      •  Mexico (Spanish)
      •  United States
      Can't find the country/region you're looking for? Visit our export site or find a local distributor.
  • Translate
  • Profile
  • Settings
Raspberry Pi
  • Products
  • More
Raspberry Pi
Blog Raspberry Pi laptop
  • Blog
  • Forum
  • Documents
  • Quiz
  • Events
  • Polls
  • Files
  • Members
  • Mentions
  • Sub-Groups
  • Tags
  • More
  • Cancel
  • New
Join Raspberry Pi to participate - click to join for free!
Featured Articles
Announcing Pi
Technical Specifications
Raspberry Pi FAQs
Win a Pi
GPIO Pinout
Raspberry Pi Wishlist
Comparison Chart
Quiz
  • Share
  • More
  • Cancel
Group Actions
  • Group RSS
  • More
  • Cancel
Engagement
  • Author Author: fustini
  • Date Created: 7 Sep 2012 10:48 PM Date Created
  • Views 17965 views
  • Likes 6 likes
  • Comments 48 comments
Related
Recommended
  • rpibeginner
  • motorola
  • raspberry_pi
  • lapdock
  • rpi
  • atrix

Raspberry Pi laptop

fustini
fustini
7 Sep 2012
imageWant to build this project?
View Parts


My last post showed how I assembled a portable Pi using a 3.5" composite LCD.  Well, I've got a better option this time around, the Motorola Atrix lapdock!
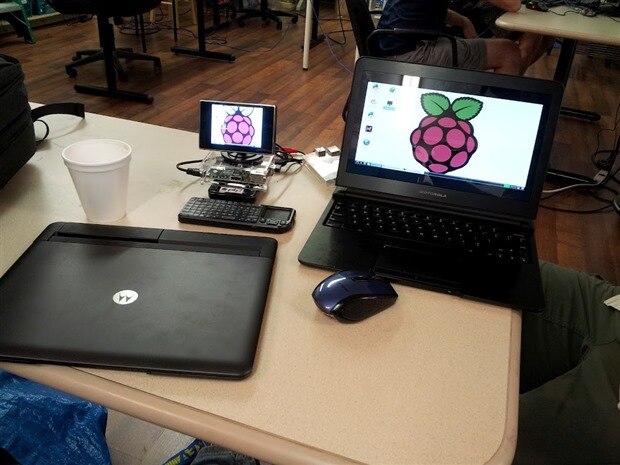
image

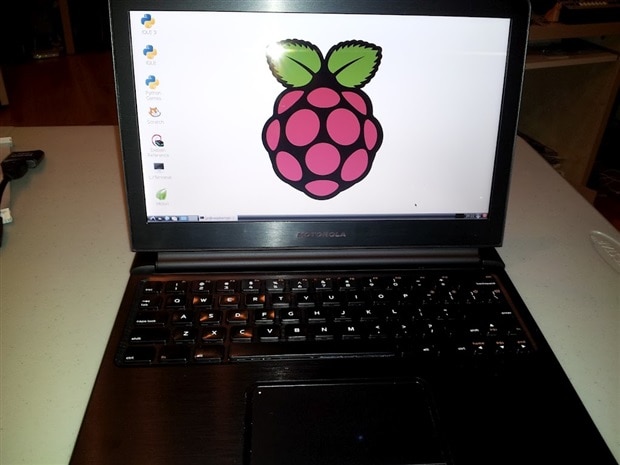
The Atrix lapdock was originally intended for Motorola's Atrix Android smartphone.  It didn't sell very well for it's original purpose, so you can pick one up for around to $50 to $100 on eBay and Amazon.  I ordered mine from eBay for $50 (shockingly my seller is now listing at $199).  It was listed as refurbished but is in great condition.  The beauty of its 11.6" HD display is a stark constrast to my 3.5" composite LCD:
image

I recommend checking out this insightful blog which details how to use it with the Pi: Raspberry Pi and Atrix Lapdock.  Adafruit also has a helpful video from Becky Stern on how to hack together an appropriate USB cable:


You don't have permission to edit metadata of this video.
Edit media
x
image
Upload Preview
image


However, the USB cabling described in the above blog and video is only needed for Raspberry Pi's that have F1/F2 polyfuses.  "Fresher" Pi's now have either 0-ohm resistors on F1/F2 (Model B Revision 1.0 + ECN0001) or no F1/F2 pads at all (Model B Revision 2.0).  More info on the board revisions is on the Foundation's blog.  I got a Pi from MCM Electronics last week, and it has 0-ohm resistors (labelled "000" in the upper right corner of the board):
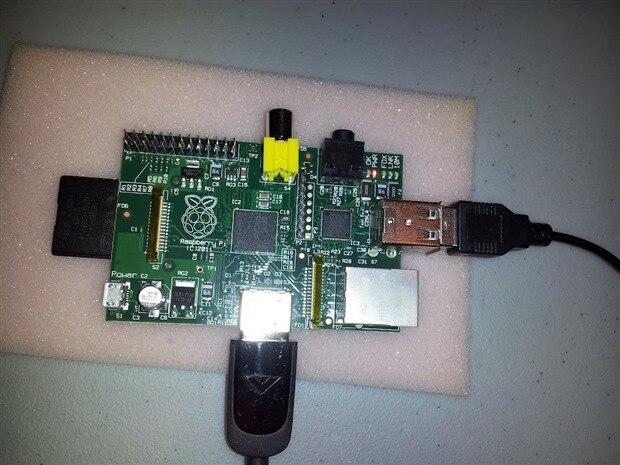
image

With those polyfuses gone, the Pi can be powered via it's USB host ports as an alternative to the micro USB jack.  This is great for the Atrix lapdock as it was designed to both power the Atrix phone and connect it to USB devices over the same connected.  This means that no USB cable modifications are needed at all.  Here's my setup:
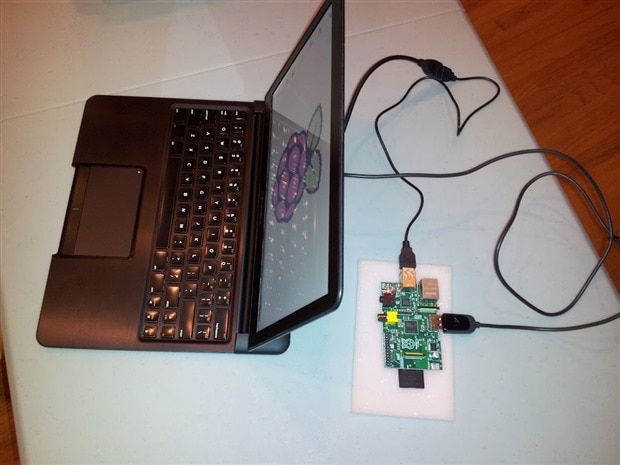
image

A close-up of the back of the lapdock with micro HDMI on the right and micro USB on the left:
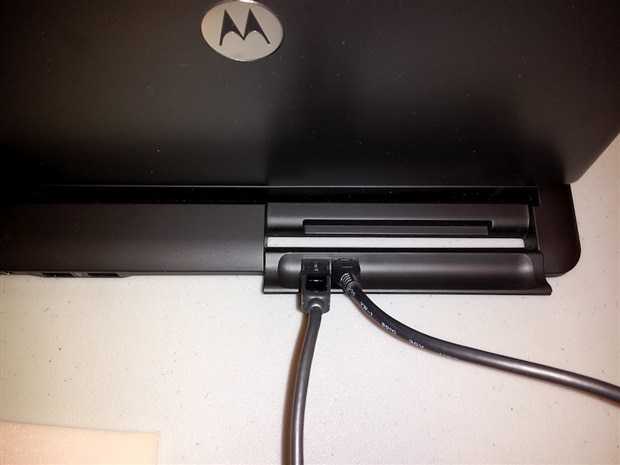
image

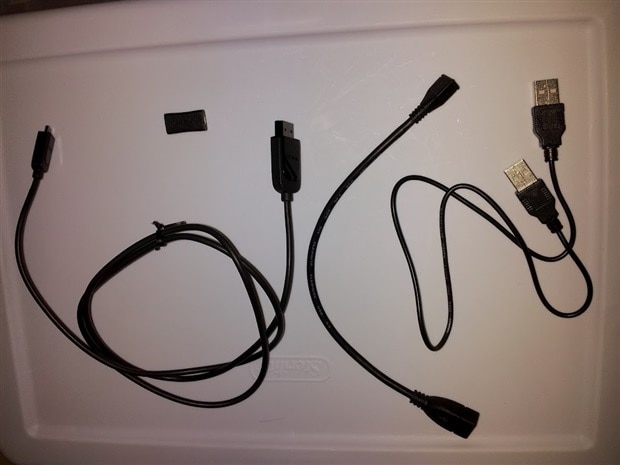
My cables and connectors (from left to right):

  • male micro to full-size male HDMI cable
  • female to female micro HDMI coupler (little black rectangle at top)
  • female micro type B to female USB type A USB cable
  • male Type A to male Type A USB cable

image

I highly recommend buying an Atrix lapdock while they are still available for cheap.  Beyond the Pi, it can be used as a HDMI display for an array of other devices, too.


[UPDATE: check out Raspberry Pi lapdock tricks]


[UPDATE: I received a male Type A to male Type A adapter from Amazon and a HDMI Male to Micro HDMI Female Adapter from DealExtreme.  Along with the micro HDMI extension cable that came with my lapdock, the result is a more compact setup without long HDMI or USB cabling:
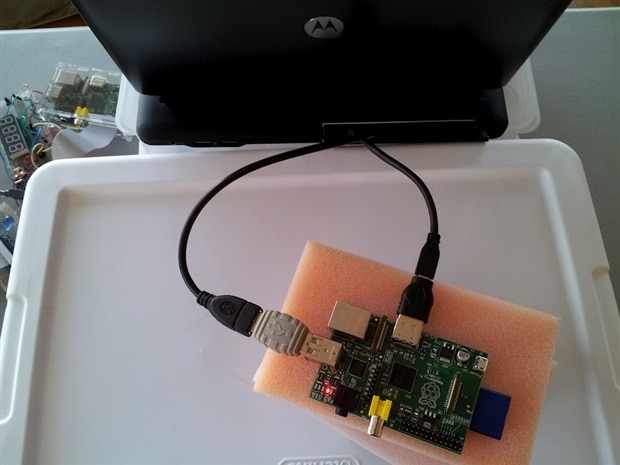
image


image


Cheers,

Drew

http://twitter.com/pdp7


Product Name*DescriptionSupplier
Raspberry Pi Model B Raspberry Pi model BRaspberry Pi
Buy Now
Pre-Programmed 4GB SD Card 4GB Class 4 SD card preloaded with Debian 6 LinuxSamsung
Buy Now
Motorola Atrix Lapdock w/included cablesSelf contained battery powered unit with display, keyboard and trackpadMotorola
HDMI Male to Micro HDMI Female AdapterMale standard HDMI to female micro HDMI adapterImported
USB A to A Male CouplerUSB type A to A male couplerDistributed By MCM
Buy Now


*Products and resources listed are listed to help members build their own Pi Projects. They are suggestions and listed for educational purposes. For substitutions of any parts, please post a question asking the original author.

  • Sign in to reply

Top Comments

  • e14 Contributor
    e14 Contributor over 13 years ago +2
    Earlier I posted a note about mounting a Pi on the back of a Lapdock with magnetic sheet. After that I set about making a much smaller and neater Pi. You can see the current result at http://www.kappa…
  • e14 Contributor
    e14 Contributor over 13 years ago +2
    Here's one of the images:
  • e14 Contributor
    e14 Contributor over 11 years ago +2
    I have got to thank you big time. I read the information you provided and it was very helpful! I had an Atrix 4G for quite some time and tried different methods of getting the Pi to work with it. When…
  • e14 Contributor
    e14 Contributor over 13 years ago in reply to GeekTinker

    First off, if you have the Photon, and you can get the lapdock for the Bionic, this mod is not needed.  At the time I purchased my Atrix lapdock, it was about $30 cheaper, thus the mod.  I have yet to try the lapdock 100 or 500.  Searching the Internet is how I learned about this mod.


    I opened the connection port of the of lapdock, and if you look closely you will see two round stickers.

    I used a box cutter to carefully remove the round stickers that cover the screws, and was able to pry it open.  I remember there was an extra piece of plastic that I discarded.  Once opened, I removed the metal bracket holding the connectors.  I then removed the connectors.  To reverse and reinsert the connectors, I used a drill.  I don't remember which size bit I used, but it was just a little "bit" bigger than the opening for the connector.  I drilled in the opening (moving from side to side of the opening) to make it larger.  It didn't take much of this, before I was able to push the connector through the opening.  In fact I didn't think I was finished, but the connector went through.  So on to the next one.  Now this part was a little tricky for me, but I took my time and positioned the connectors and the "spacer" in place.  Replaced the metal bracket, reinserted the housing.  Using the box cutter was able to pick up and replace the stickers. 


    Have fun, and I hope this has helped some.

    • Cancel
    • Vote Up 0 Vote Down
    • Sign in to reply
    • More
    • Cancel
  • GeekTinker
    GeekTinker over 13 years ago in reply to e14 Contributor

    "I modded the connectors to face the other way so I could plug in my Motorola Photon 4G Android phone."


    I would be interested to hear how you accomplished this.  I too, own a Photon and it would be great to use it with the Lapdock along with the Raspberry Pi.


    Several members of the Makerspace, Arch Reactor, in St. Louis, Missouri are currently working on this mod.  I know two other members besides myself that have already purchased Lapdocks online.  We appreciate all the information that has been shared in this forum. 


    Thanks! We are putting the information to good use!

    • Cancel
    • Vote Up 0 Vote Down
    • Sign in to reply
    • More
    • Cancel
  • fustini
    fustini over 13 years ago in reply to e14 Contributor

    Interesting to hear your feedback on shaving the sides of: http://www.ebay.com/itm/170875544143?ssPageName=STRK:MEWNX:IT&_trksid=p3984.m1439.l2649


    I ordered a similar item from Deal Extreme to cut down on the HDMI cabling clutter of my current setup but wasn't sure if it would fit (http://www.dealextreme.com/p/hdmi-male-to-micro-hdmi-female-adapter-66079?item=4)

    • Cancel
    • Vote Up 0 Vote Down
    • Sign in to reply
    • More
    • Cancel
  • e14 Contributor
    e14 Contributor over 13 years ago

    After further review, I realised that I didn't need this cable.


    http://www.dealextreme.com/p/micro-usb-female-to-micro-male-female-adapter-cable-for-blackberry-9900-black-30cm-107901#open


    but, instead your cable


    female micro type B to female USB type A USB cable


    and a male to male usb cable with the red power cord clipped.


    For power, I used a usb male to micro usb plugged in the back of the lapdock.

    Now when I close the lapdock, the power is completely shut off.  In my previous configuration the power would remain on (but not do anything), and it would reboot when I reopened the lapdock.


    Thank you for your posts, as I enjoy learning all I can about this setup, As well as the RPi itself.


    Cheers

    Rich

    • Cancel
    • Vote Up 0 Vote Down
    • Sign in to reply
    • More
    • Cancel
  • e14 Contributor
    e14 Contributor over 13 years ago

    Nice blog.

    I am doing just about the same as you.

    This lapdock is working great for my use. I ordered one about a month ago, but had to wait for all the cables. In the meantime I modded the connectors to face the other way so I could plug in my Motorola Photon 4G Android phone.

    Overall I am very pleased, it charges my phone while using it.

    Has Firefox browser built in, although you cannot update it or install plugins.

    I can use it at home with WiFi, or on the road with 3G. (no 4G in my area yet).

    I think part of it's demise was that some cellphone carriers were charging a monthly fee as if it were a real laptop. Fortunately for me, mine doesn't. So even if I didn't have a RPi it would have been a good deal for me.

    But alas, I do have a RPi, and this is what I've done with mine so far.


    For HDMI I used theese


    http://www.ebay.com/itm/170875544143?ssPageName=STRK:MEWNX:IT&_trksid=p3984.m1439.l2649

    Had to shave one of the sides for it to fit.


    For my USB connections I'm using this


    http://www.dealextreme.com/p/micro-usb-female-to-micro-male-female-adapter-cable-for-blackberry-9900-black-30cm-107901#open


    and the two usb connectors you are using. Unfortunately, I have an old version of the Pi. So I cut the red power cord on the male to male usb cable. I can power the Pi from the lapdock, or as you demonstrated, another power source. It all seems to work pretty well, but I still have bugs to work out.


    I just ordered a powered usb hub, as one avilable usb port isn't going to cut it. I tried connecting a usb mouse to the back of the lapdock, but it didn't work for me.

    I'm also trying to get this WiFi dongle to work, but so far without success.


    http://www.amazon.com/Esky-150Mbps-WIRELESS-ADAPTER-802-11/dp/B0058XSZGU/ref=sr_1_5?ie=UTF8&qid=1347428977&sr=8-5&keywords=wifi+dongle


    I was impressed with the quality of the HD videos with Raspbmc displayed on this lapdock, and haven't even overclocked it yet.


    Thank you for sharing your experiences with this, and best wishes to all that try this project.

    • Cancel
    • Vote Up +1 Vote Down
    • Sign in to reply
    • More
    • Cancel
<>
element14 Community

element14 is the first online community specifically for engineers. Connect with your peers and get expert answers to your questions.

  • Members
  • Learn
  • Technologies
  • Challenges & Projects
  • Products
  • Store
  • About Us
  • Feedback & Support
  • FAQs
  • Terms of Use
  • Privacy Policy
  • Legal and Copyright Notices
  • Sitemap
  • Cookies

An Avnet Company © 2026 Premier Farnell Limited. All Rights Reserved.

Premier Farnell Ltd, registered in England and Wales (no 00876412), registered office: Farnell House, Forge Lane, Leeds LS12 2NE.

Follow element14

  • X
  • Facebook
  • linkedin
  • YouTube