


Hi, I’m Kim Mansfield.
I have been working with microcontrollers for over 30 years. I hold degrees in computer engineering from the University of Utah and Utah State University. I have gone through the typical corporate jobs working for Sperry Univac (Unisys), Novell, and other company's you probably haven't heard of. I'm now a contract engineer and work on a lot of different things.
I have been watching the Arduino grow and develop. I have done a little work with the Arduino and have found that the development environment is easy to learn especially for me. I program almost exclusively in C. The Arduino IDE's language is very close C. As you know I'm a Microchip Design partner and know a fair amount about the processors Microchip produces. I thought it would be great to have a similar ease of development for the Microchip product line. I then found the chipKIT boards. I really liked the idea. I jumped in very early in the development of the chipKIT IDE. There were problems and some incompatibility between the Arduino and the chipKIT. Software written on an Arduino come close to running on the chipKIT without modification but usually there needs to be some changes. The biggest difference between the Arduino and the chipKIT boards is the chipKIT boards are 3.3 volt based and the Arduino is 5 volt based. But, the people at Digilent have done an excellent job with the chipKIT IDE.
I have designed several products using chipKIT boards. I designed a system that interfaced to a WiFi network to report status on a remote irrigation pump. This included a screen to show the status locally. With my introduction to the Raspberry Pi, I might have used that instead of the chipKIT. The Linux operating system has a little better support for the network portion.
When I was contacted by Lauren at element14 about helping out here I had never heard of the chipKIT Pi. I knew what a Raspberry Pi was and what a chipKIT was but the combination? I found out that they have designed a board that plugs right into a Raspberry Pi. It sounded interesting. I received my Raspberry Pi and chipKIT Pi about a month ago and have found it to be a great combination. I received a case for the Raspberry Pi as I wanted to protect the board. But, I found that I couldn't use the case that was sent as it didn't expose the I/O connector of the Raspberry Pi. I went online and found a case called a Pi Tin. It comes in many colors including clear which is the one I opted for. The Pi Tin has a cut out for the I/O connector allowing the chipKIT Pi to be plugged into the Raspberry Pi and still protects the Raspberry Pi. It works well.
Pi. I knew what a Raspberry Pi was and what a chipKIT was but the combination? I found out that they have designed a board that plugs right into a Raspberry Pi. It sounded interesting. I received my Raspberry Pi and chipKIT Pi about a month ago and have found it to be a great combination. I received a case for the Raspberry Pi as I wanted to protect the board. But, I found that I couldn't use the case that was sent as it didn't expose the I/O connector of the Raspberry Pi. I went online and found a case called a Pi Tin. It comes in many colors including clear which is the one I opted for. The Pi Tin has a cut out for the I/O connector allowing the chipKIT Pi to be plugged into the Raspberry Pi and still protects the Raspberry Pi. It works well.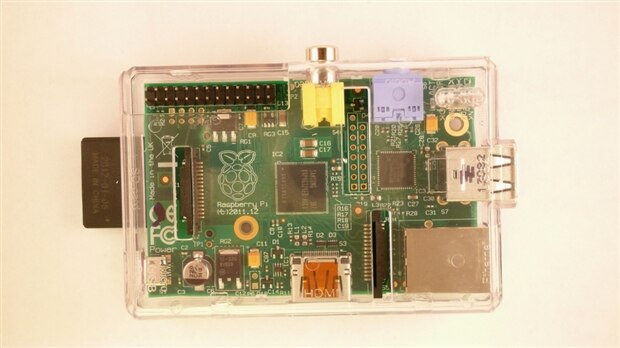
This is a picture of the Pi Tin with a Raspberry Pi in it. You can see the I/O connector in the upper left which is exposed.
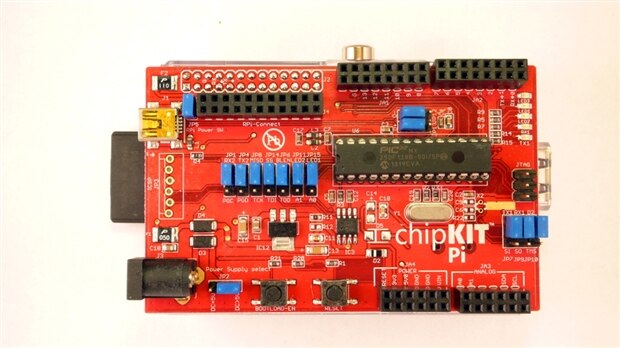
This picture shows the chipKIT Pi plugged into the Raspberry Pi.
Pi plugged into the Raspberry Pi.I went through the getting started document on Element 14. After I finished with that my Raspberry Pi booted and had the chipKIT IDE on the desktop. I opened the IDE and wrote an LED blink program, programmed the chipKIT Pi and it worked. I was impressed at how easy the chipKIT Pi was to get to work. The board seems to be well made and integrates with the Raspberry Pi well. The 28 pin Microchip chosen is nice as it allows you to take the part out of the board and plug it into a bread board to experiment with the chipKIT Pi without the Raspberry Pi. This 28 pin part also has a down side. The lack of I/O pins. It is very limited in the number of pins you have access to.
Pi and it worked. I was impressed at how easy the chipKIT Pi was to get to work. The board seems to be well made and integrates with the Raspberry Pi well. The 28 pin Microchip chosen is nice as it allows you to take the part out of the board and plug it into a bread board to experiment with the chipKIT Pi without the Raspberry Pi. This 28 pin part also has a down side. The lack of I/O pins. It is very limited in the number of pins you have access to.I suggest that if you are interested in interfacing to your Raspberry Pi this is a great way to do it. Buy a board and dive in.
You can find some of my other projects at http://www.theengineertutor.com/
I welcome hearing any questions, comments or experiences you have about working with the chipKIT Pi and its technology. Ask (or tell) away!
Pi and its technology. Ask (or tell) away!Kim