


Introduction
This project attaches a large, low-cost 3.5 digit multi-meter style LCD screen to a Pi!
Plain glass liquid crystal displays (with no in-built driver) do not seem to get much love in hobbyist projects, since ready-made modules with built-in driver chips are low cost. Furthermore alphanumeric or graphic LCD modules are a better option most of the time, due to the flexibility in what can be displayed. However, if very low power consumption is needed, then this project could be useful. Also, the large screen is visible from quite a distance.

Despite the availability of off-the-shelf display modules, it is still fun sometimes going back to basics and making your own stuff. Several years ago, I built a very tiny 3-digit LCD module, documented here: Building a Low Power Compact LCD Display . It had extremely low power consumption at 80 microwatts, and was I2C controlled. It worked well, but had the limitation that often 3 digits is not enough. And the screen was tiny.
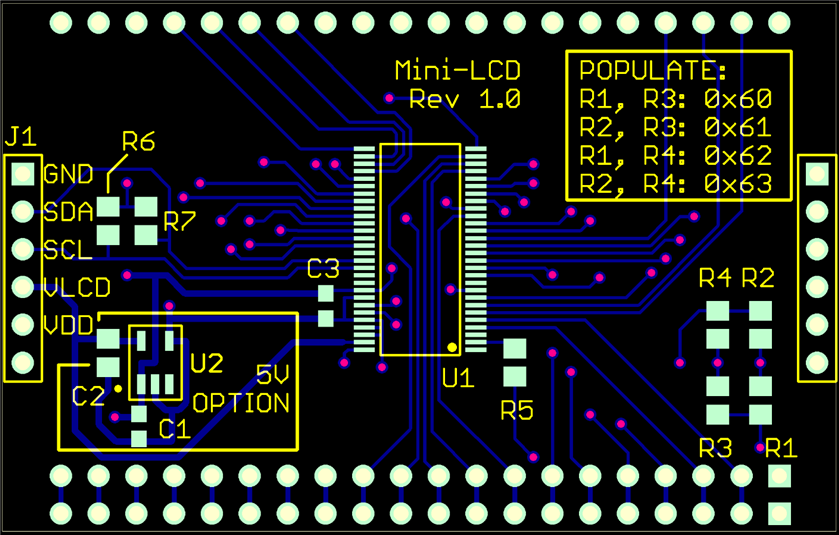
This revamp of that project swaps out the 24-pin LCD glass for a larger 40-pin LCD. There are several versions that will fit, covering 3.5 digits to 4 digits. Some versions have a plus/minus indicator, and low battery and overload indications. They have more decimal place positions, and have a colon indicator (ideal for making a clock). This expands the possibilities a lot. The LCD glass that fits is originally intended for 3.5 digit multi-meters or basic panel meters, and is available from several manufacturers. Some of the versions have the two rows of pins located a few millimetres further apart, and so I wanted to design the PCB to accommodate these too. The final design has been tested with one version of the LCD screen glass, but I expect it to work with the other versions too.
The module can be operated from 3.3V (or 5V with some additional components soldered to the PCB). This makes it easy-to-use with any single board computer (e.g. Pi or BeagleBone Black) or microcontroller board (such as Arduino). Example code for operating with a Pi is available on github.
This project uses a statically-driven LCD screen (meaning that the drive waveform is an unchanging AC signal) which produces high contrast, and is easy-to-view outdoors too, and has large digits. However there is no backlight (it could be front-lit if desired).
Here's a 30-second video showing the demo code in operation:
Building It
The files attached to this blog post can be sent to a PCB factory (such as Elecrow or JLC PCB), ten boards cost about $10 or less. For the parts, the order codes (apart from the LCD glass) are identical to the ones in the Parts List section of the earlier blog post Building a Low Power Compact LCD Display
For the LCD glass, several options are possible. I used an aliexpress screen. However, I believe this project will also work with this Lumex LCD screenthis Lumex LCD screen too. The aliexpress one is missing an 'overload' indicator but otherwise it looks quite similar. If you need 4 digits (instead of 3.5 digits with plus/minus indicator) then I think this AND Displays LCD screenthis AND Displays LCD screen should fit.
The parts are surface mount but it can be soldered with a normal manual soldering iron. There are tips/techniques on element14 on how to do this using basic tools. Thin solder (0.38mm or less, but ideally 0.274mm or less), a syringe of flux, solder wick (also known as desoldering braid) and good tweezers will help loads. For the soldering iron, I used a 1mm flat (slice off conical) tip but that's personal preference, as long as the size is small.

Note that if you're using it with the Pi, then you don't need to purchase or solder the voltage regulator and its two associated capacitors (basically everything in the lower-left box marked 5V OPTION in the PCB render below). That is only needed for 5V operation. With the Pi, 3.3V operation should be used. Also, the two 2.7k resistors on the left (R6 and R7)should be omitted too, they are only needed for use with microcontrollers that do not have pull-ups on the I2C bus. The Pi has its own pull-up resistors.
For the four resistor spaces on the right (R1-R4), only two resistors need to be soldered, to set the I2C address. There are four options, i.e. this allows for up to four of these boards to be attached to the same I2C bus, which could be handy for (say) a quiz or game project where each screen shows the score for each player. I'm going to use it to display the temperature from sensors attached to the Pi.
The circuit is shown here, click to enlarge:

Closeup of the soldered board. The LCD was soldered in place (very quickly with the iron, to reduce any shock to the glass) and then the leads were trimmed (after soldering not before, again to reduce shock to the glass):

Attaching It
There are only four wires needed to be attached to the pi.
| Pi pin | LCD module pin | Description |
|---|---|---|
| 1 | 4, 5 | +3.3V connected to VLCD and VDD |
| 3 | 2 | SDA |
| 5 | 3 | SCL |
| 9 | 1 | Ground |
Using It
I've not written much code yet, but to try it out with some very basic software, on your pi, type:
mkdir development
cd development
git clone https://github.com/shabaz123/lcd35.git
cd lcd35
make
and then to run the demo (see the earlier video) type:
./lcd35-test
Summary
Although it is more effort to build and use this compared to (say) a ready-made 16x2 character display module, there are still occasionally benefits to using such a 3.5 digit LCD screen. It can be lower-cost, and the simpler display looks nicer sometimes. With a microcontroller, the combined solution can be very low power, for battery operation for years.
If you do build this and try it out, it would be great to hear about it. Thanks for reading!
Top Comments