element14 Community
element14 Community
    Register Log In
  • Site
  • Search
  • Log In Register
  • About Us
  • Community Hub
    Community Hub
    • What's New on element14
    • Feedback and Support
    • Benefits of Membership
    • Personal Blogs
    • Members Area
    • Achievement Levels
  • Learn
    Learn
    • Ask an Expert
    • eBooks
    • element14 presents
    • Learning Center
    • Tech Spotlight
    • STEM Academy
    • Webinars, Training and Events
    • Learning Groups
  • Technologies
    Technologies
    • 3D Printing
    • FPGA
    • Industrial Automation
    • Internet of Things
    • Power & Energy
    • Sensors
    • Technology Groups
  • Challenges & Projects
    Challenges & Projects
    • Design Challenges
    • element14 presents Projects
    • Project14
    • Arduino Projects
    • Raspberry Pi Projects
    • Project Groups
  • Products
    Products
    • Arduino
    • Avnet Boards Community
    • Dev Tools
    • Manufacturers
    • Multicomp Pro
    • Product Groups
    • Raspberry Pi
    • RoadTests & Reviews
  • Store
    Store
    • Visit Your Store
    • Choose another store...
      • Europe
      •  Austria (German)
      •  Belgium (Dutch, French)
      •  Bulgaria (Bulgarian)
      •  Czech Republic (Czech)
      •  Denmark (Danish)
      •  Estonia (Estonian)
      •  Finland (Finnish)
      •  France (French)
      •  Germany (German)
      •  Hungary (Hungarian)
      •  Ireland
      •  Israel
      •  Italy (Italian)
      •  Latvia (Latvian)
      •  
      •  Lithuania (Lithuanian)
      •  Netherlands (Dutch)
      •  Norway (Norwegian)
      •  Poland (Polish)
      •  Portugal (Portuguese)
      •  Romania (Romanian)
      •  Russia (Russian)
      •  Slovakia (Slovak)
      •  Slovenia (Slovenian)
      •  Spain (Spanish)
      •  Sweden (Swedish)
      •  Switzerland(German, French)
      •  Turkey (Turkish)
      •  United Kingdom
      • Asia Pacific
      •  Australia
      •  China
      •  Hong Kong
      •  India
      •  Korea (Korean)
      •  Malaysia
      •  New Zealand
      •  Philippines
      •  Singapore
      •  Taiwan
      •  Thailand (Thai)
      • Americas
      •  Brazil (Portuguese)
      •  Canada
      •  Mexico (Spanish)
      •  United States
      Can't find the country/region you're looking for? Visit our export site or find a local distributor.
  • Translate
  • Profile
  • Settings
Raspberry Pi Projects
  • Products
  • Raspberry Pi
  • Raspberry Pi Projects
  • More
  • Cancel
Raspberry Pi Projects
Blog Miniature Solar Cells and Improving Real-Time GPIO Performance
  • Blog
  • Documents
  • Events
  • Polls
  • Members
  • Mentions
  • Sub-Groups
  • Tags
  • More
  • Cancel
  • New
Join Raspberry Pi Projects to participate - click to join for free!
  • Share
  • More
  • Cancel
Group Actions
  • Group RSS
  • More
  • Cancel
Engagement
  • Author Author: shabaz
  • Date Created: 10 Sep 2015 6:59 PM Date Created
  • Views 2959 views
  • Likes 11 likes
  • Comments 9 comments
  • educational
  • real-time
  • stem
  • rpiintermediate
  • education
  • photodiode
  • scheduler
  • raspberry-pi
  • raspberrypi
  • rpiexpert
  • realtime
  • raspberry_pi_projects
  • adc
  • solar
  • raspbian
  • linux
Related
Recommended

Miniature Solar Cells and Improving Real-Time GPIO Performance

shabaz
shabaz
10 Sep 2015

Introduction

There is plenty of jitter on signals generated using GPIO on the Raspberry Pi and many other computers, and this is due to the fact that Linux can context-switch user processes at any desired point in time dependant on its scheduler (for more information on this, see the Raspberry Pi GPIO Explained guide).


One solution is to use custom driver code, but this is a non-trivial exercise.


Another typical workaround is to offload time-sensitive I/O to external hardware such as an Arduino or (say) a hardware PWM generator for controlling servos or dimming lights more smoothly.


However, what about GPIO configured for input? I was curious if there was any way to improve it.


This short, experiment-based blog post very briefly discusses what can be done, and uses an example of building a voltmeter with the Raspberry Pi. It can be seen that with a few code-level methods it is possible to greatly improve GPIO input timing based measurements.

This is the experiment topology, it is described further below. The device on the left is a photodiode (with the usual anode and cathode connections like any diode) and it generates a small voltage whenever light falls on it.

image

Here is the experiment in 30 seconds:

You don't have permission to edit metadata of this video.
Edit media
x
image
Upload Preview
image


Measuring Solar Cell Voltage

The Raspberry Pi GPIO Explained Guide shows examples for configuring inputs on the Raspberry Pi and using them to connect up switches. Code examples are provided in several languages. There is also a voltmeter project in that guide, which measures the frequency of pulses from a voltage-to-frequency converter integrated circuit. The integrated circuit generates a frequency proportional to the applied voltage.

The code relies on averaging to provide a more accurate result. It functions well, with very consistent measurements within a few percentage points of the expected value – not bad for a super-simple circuit.

I got my bread board ready, and connected up the input to a photodiodephotodiode. Photodiodes are small silicon devices that can be used as very miniature solar cells! Here it is in comparison to an LED:

image


Here is the breadboard layout:

image


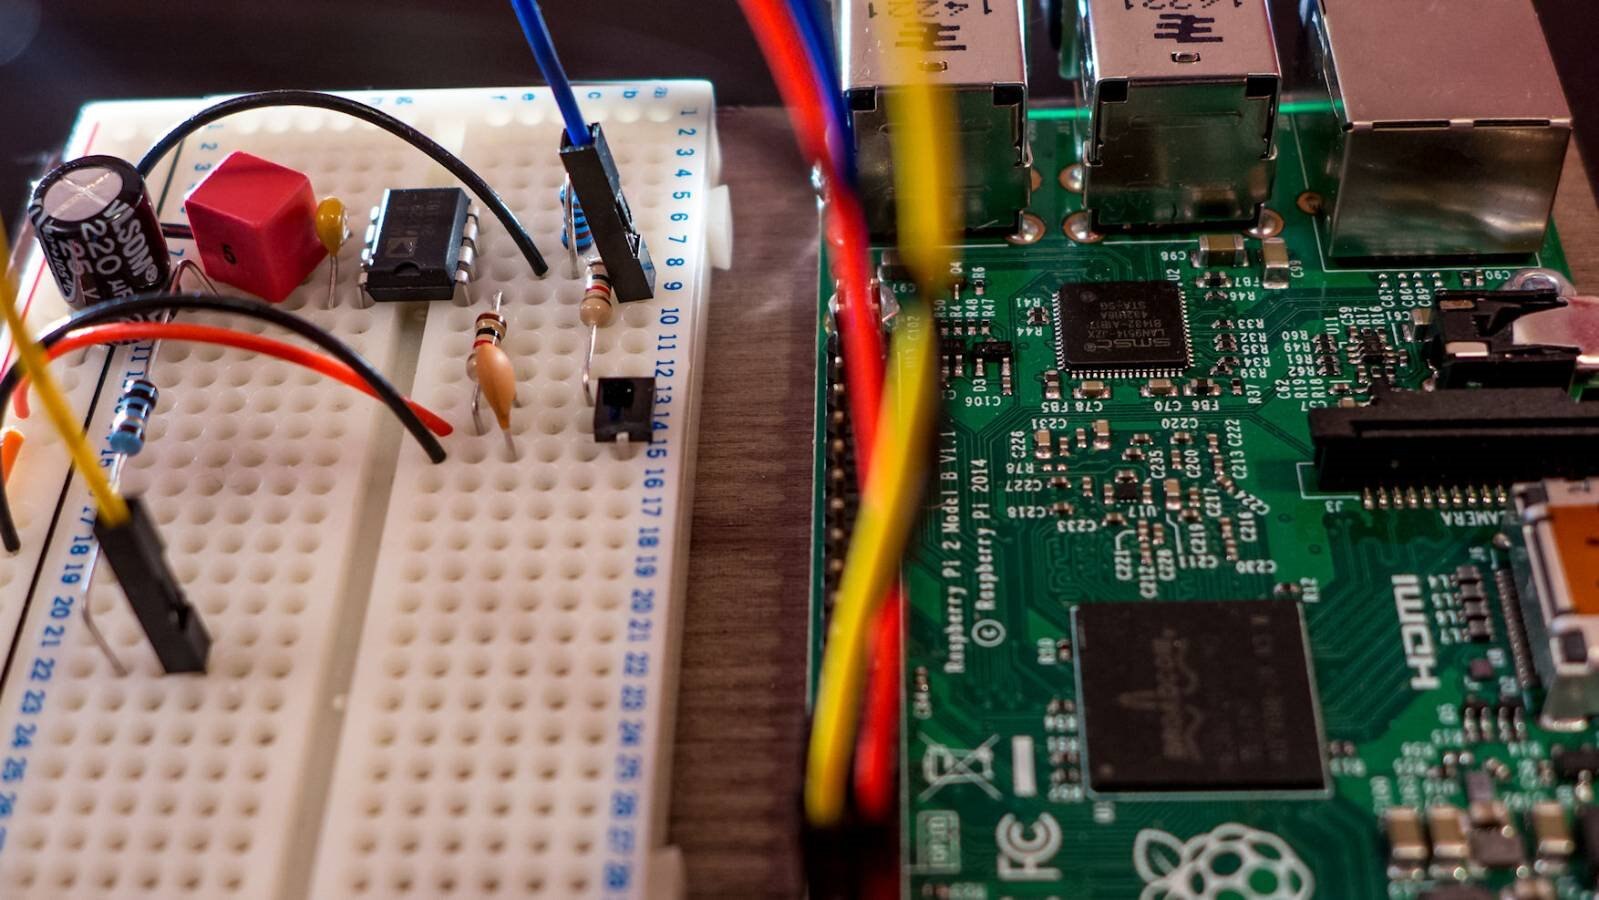
For the full circuit diagram and details, see the GPIO Explained guide. The only difference is that I’ve added the photodiode anode connection to the circuit input, with the cathode connected to 0V. You could also optionally add a small 47nF capacitor across it, in case the room lighting has any flicker. The black square-shaped photodiode can be seen plugged in on the right side of the breadboard, close to the row marked 15. A clear photodiode (rather than a visible-blocking, infra-red pass filter version which is what you can see in the photo) would have been better for room lighting measurement, but it was all I had and it still worked.


I was expecting a voltage of around 250-350mV to be generated by this tiny photodiode/solar cell in normal room light (and this would cause the voltmeter circuit to generate a frequency of 2.5-3.5kHz), and I wanted to measure it using the Raspberry Pi. I could then log the voltage generated during the day, or see if someone switches a lamp on in the room, or place a couple of the photodiodes in series, and so on., as mini science experiments. But then I got curious about how to improve it.


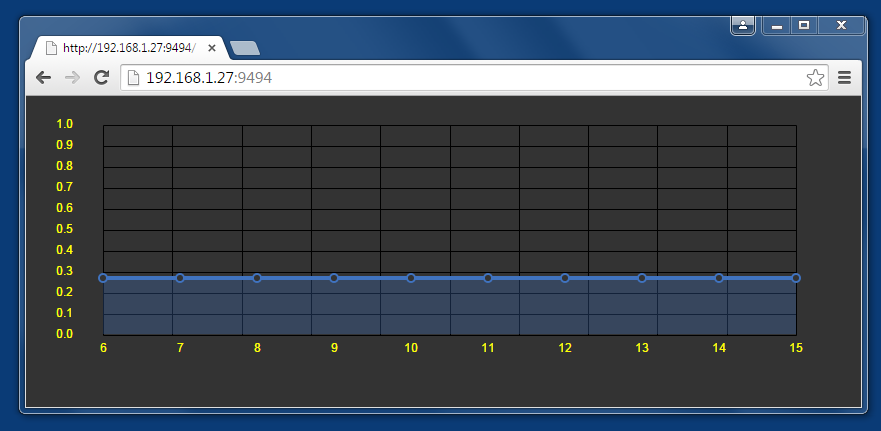
The first addition was to write some code (which will be published in a few days after some tidying) to plot the measured voltage every second. Basically the code runs a small web server on the Raspberry Pi, and draws a graph if anyone types the IP address of it into their web browser. I can view it on any web browser running on the Raspberry Pi, or my laptop, or mobile phone. The x-axis shows in seconds how long the experiment has been running, and the y-axis shows the measured voltage. This was the result in normal home lighting conditions:

image


Stressed Out

There is also a nice stress test program that can be installed (type sudo apt-get install stress ), and you can use it to provide the cores on the Raspberry Pi with useless time-consuming things to do. You can see the CPU consumption shoot up to close to 100% on any number of its cores, or all four cores if you wish.


To use it, this command stresses out all 4 available cores, for 60 seconds. Press Ctrl-C at any time to quit:

stress --cpu 4 --timeout 60


If you type top –d 1 in a command window, you’ll see a list of processes and their current CPU usage. Press ‘q’ to quit at any time.

image


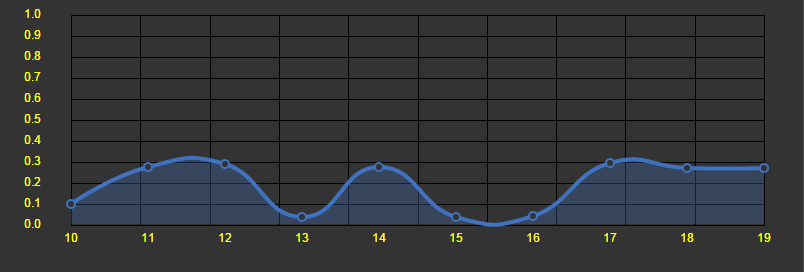
Try running the stress program while the voltmeter is running, and the calculated voltage becomes very inaccurate because now the scheduler needs to make CPU time available for the stress program’s tasks (processes). Here is what occurs:

image


Sleeping, Averaging, Voting, Scheduling!

I experimented with a few tricks to try to get more consistent measurements.


One trick was to force a sleep before computing the frequency. The theory was that the scheduler might be unlikely to context-switch immediately after the sleep function, provided the sleep was long enough to allow the scheduler to enable some other process run. The theory failed - I didn’t get good results with this method; it seemed to have no useful effect.


Another trick was to still use averaging, but now also implement a ‘voting’ method. The plan of attack was that for slow-changing voltages, the code would calculate three sets of averaged values in quick succession, and then ‘average the averages’ by using two of the averaged values out of the set of three, and discard one out of the three.


But which two to choose? The chosen two would be the ones that are most agreeable, i.e. are numerically closest to each other. I figured I was in good company because this is approximately how the space shuttle computers worked. This voting method improved results somewhat!

image


Note that mathematically it would have been very useful to plot a probability density function from multiple results and see what the distribution reveals about scheduler impact to the measurements, but I didn’t explore this in the very short amount of time I had. It would be an interesting experiment though.


The next method was to attempt to influence the scheduler; it is possible to dynamically influence the priority and scheduling algorithm on-the-fly with Linux. I selected a policy called SCHED_FIFO and set the priority to the highest value. Here is the C code that can perform this:


#include 
#include 
#include 
#include 


int
main(void)
{
  struct sched_param sp;
  int ret;
  sp.sched_priority=99; // (0..99) highest priority is 99
  ret=sched_setscheduler (getpid(), SCHED_FIFO, &sp);
  if (ret!=0)
  {
    printf("Error setting scheduling policy\n");
  }
  // rest of your program
  
  return(0);
}


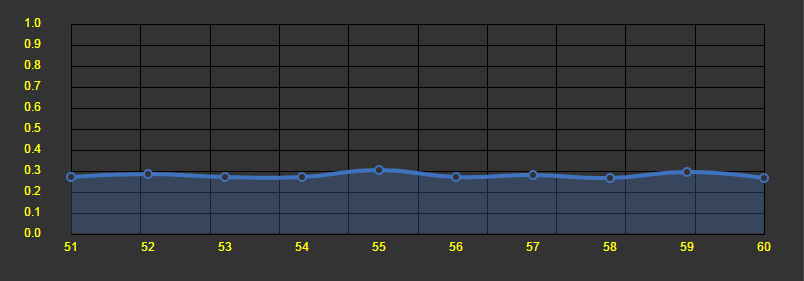
The results were much improved (see screenshot below). With great power comes great responsibility, and it is strongly advised that code runs to completion quickly (or changes the priority again dynamically) and that code should be simple enough that there is low risk of it hanging for a long time.

image


Summary

No high-end instrumentation would do this, but if you want to use Raspberry Pi inputs for home-science-experiment-grade timing applications, consider scheduler, averaging and voting techniques! It was a lot of fun to measure the small solar cell voltage with such a simple circuit connected up to the Pi, logging away.

  • Sign in to reply

Top Comments

  • DAB
    DAB over 10 years ago +2
    Nice demonstration for possible measurements using the RPi. Depending upon your application you might need to do more in depth timing analysis, but your simple test give us a good idea on where to start…
  • jw0752
    jw0752 over 10 years ago +1
    Hi Shabaz, I love this type of electronics experiment where you set a goal and then work you way towards a solution by a series of simple probing experiments. Thanks for sharing your experiment with us…
  • balearicdynamics
    balearicdynamics over 10 years ago +1
    Hi Shabaz, this isa very useful experiment and the concept is very well explained. A meaningful detail to take in account when doing measures, I am thinking to the Meditech approach to the probes. As a…
  • DAB
    DAB over 10 years ago

    Nice demonstration for possible measurements using the RPi.


    Depending upon your application you might need to do more in depth timing analysis, but your simple test give us a good idea on where to start.


    Thanks


    DAB

    • Cancel
    • Vote Up +2 Vote Down
    • Sign in to reply
    • More
    • Cancel
  • shabaz
    shabaz over 10 years ago in reply to screamingtiger

    Hi Joey,


    I'm afraid I'm no expert on safe limits to the scheduler priorities for the various supported algorithms, although it would be good if

    someone researched and wrote up a summary.


    As mentioned in the post, there are risks but I had (perhaps mistakenly) believed the risks were predominantly user-level code impacting -

    as I understand the highest limits still allow for pre-emption for I/O (e.g. writing to disk) - but certainly for a commercial scenario it ought to

    be investigated further. Certainly it would be wise to restrict usage at the modified setting for short periods and keep the code simple

    (as mentioned in the blog post), but I couldn't state the real impact, and it likely varies from release to release.


    The wiringPi library also influences the scheduler, but with different parameters, and I'm not aware of it causing OS crashes.


    Certainly it could cause user level programs to crash, this is to be expected - the 'stress' application was deprived of CPU as an

    example, but 'stress' could equally have been a user app.


    A piece of software I was involved with was once sold to a very large customer who (although they should have known better)

    installed additional software on the same platform without verifying with the developers that this was a good or bad idea.


    As a result, the user software did crash! You can write the best software in the world but you can't (easily) test everything

    unfortunately, so for critical apps (such as the one sold to that customer) it would have been wise of them to discuss with developers

    to ensure that apps can co-exist on the same platform.


    Back to the issue at hand, I agree it's not the right solution in general, but for simple home science experiments it worked well (but I only

    tested for 24 hours, a more sustained test would be a good idea).


    I personally like the external microcontroller attachment option (e.g. Arduino), or the BeagleBone Black's built-in dual PRU which can

    sample external inputs at a sustained 100MHz (until you run out of storage space), with any standard Linux kernel.

    • Cancel
    • Vote Up +1 Vote Down
    • Sign in to reply
    • More
    • Cancel
  • balearicdynamics
    balearicdynamics over 10 years ago in reply to shabaz

    Hi Shabaz,


    ... anyway I take this as a good suggestion for my project image ...


    My opinion respect the IoT is that the general approach, that involves redundancy and security together should be almost the same of a multi stellar network, just like how Internet works. Then if people like to make ONE thing and apply to real world ... This is no IoT it is simply one thing applied to the real world.


    Enrico

    • Cancel
    • Vote Up +1 Vote Down
    • Sign in to reply
    • More
    • Cancel
  • shabaz
    shabaz over 10 years ago in reply to balearicdynamics

    Hi Enrico,


    No, was not a suggestion for your current project, I was actually thinking of IoT in general and the chances of failures in nodes. For a single device, I did design in two temperature sensors (actually three, the last one for a board-level cut-out if all else including the microcontroller failed) for my reflow oven controller for safety reasons, but I've not built it yet.

    • Cancel
    • Vote Up 0 Vote Down
    • Sign in to reply
    • More
    • Cancel
  • screamingtiger
    screamingtiger over 10 years ago

    There are real-time options for raspian which would have a better effect:

    http://www.bing.com/search?q=real+time+raspian&src=IE-TopResult&FORM=IETR02&conversationid=&adlt=strict


    Messing with thread scheduler can be destructive to the OS and it will crash eventually.  I am still a firm believer that a real time component is needed for this type of work.

    • Cancel
    • Vote Up +1 Vote Down
    • Sign in to reply
    • More
    • Cancel
>
element14 Community

element14 is the first online community specifically for engineers. Connect with your peers and get expert answers to your questions.

  • Members
  • Learn
  • Technologies
  • Challenges & Projects
  • Products
  • Store
  • About Us
  • Feedback & Support
  • FAQs
  • Terms of Use
  • Privacy Policy
  • Legal and Copyright Notices
  • Sitemap
  • Cookies

An Avnet Company © 2025 Premier Farnell Limited. All Rights Reserved.

Premier Farnell Ltd, registered in England and Wales (no 00876412), registered office: Farnell House, Forge Lane, Leeds LS12 2NE.

ICP 备案号 10220084.

Follow element14

  • X
  • Facebook
  • linkedin
  • YouTube