element14 Community
element14 Community
    Register Log In
  • Site
  • Search
  • Log In Register
  • Community Hub
    Community Hub
    • What's New on element14
    • Feedback and Support
    • Benefits of Membership
    • Personal Blogs
    • Members Area
    • Achievement Levels
  • Learn
    Learn
    • Ask an Expert
    • eBooks
    • element14 presents
    • Learning Center
    • Tech Spotlight
    • STEM Academy
    • Webinars, Training and Events
    • Learning Groups
  • Technologies
    Technologies
    • 3D Printing
    • FPGA
    • Industrial Automation
    • Internet of Things
    • Power & Energy
    • Sensors
    • Technology Groups
  • Challenges & Projects
    Challenges & Projects
    • Design Challenges
    • element14 presents Projects
    • Project14
    • Arduino Projects
    • Raspberry Pi Projects
    • Project Groups
  • Products
    Products
    • Arduino
    • Avnet & Tria Boards Community
    • Dev Tools
    • Manufacturers
    • Multicomp Pro
    • Product Groups
    • Raspberry Pi
    • RoadTests & Reviews
  • About Us
  • Store
    Store
    • Visit Your Store
    • Choose another store...
      • Europe
      •  Austria (German)
      •  Belgium (Dutch, French)
      •  Bulgaria (Bulgarian)
      •  Czech Republic (Czech)
      •  Denmark (Danish)
      •  Estonia (Estonian)
      •  Finland (Finnish)
      •  France (French)
      •  Germany (German)
      •  Hungary (Hungarian)
      •  Ireland
      •  Israel
      •  Italy (Italian)
      •  Latvia (Latvian)
      •  
      •  Lithuania (Lithuanian)
      •  Netherlands (Dutch)
      •  Norway (Norwegian)
      •  Poland (Polish)
      •  Portugal (Portuguese)
      •  Romania (Romanian)
      •  Russia (Russian)
      •  Slovakia (Slovak)
      •  Slovenia (Slovenian)
      •  Spain (Spanish)
      •  Sweden (Swedish)
      •  Switzerland(German, French)
      •  Turkey (Turkish)
      •  United Kingdom
      • Asia Pacific
      •  Australia
      •  China
      •  Hong Kong
      •  India
      • Japan
      •  Korea (Korean)
      •  Malaysia
      •  New Zealand
      •  Philippines
      •  Singapore
      •  Taiwan
      •  Thailand (Thai)
      • Vietnam
      • Americas
      •  Brazil (Portuguese)
      •  Canada
      •  Mexico (Spanish)
      •  United States
      Can't find the country/region you're looking for? Visit our export site or find a local distributor.
  • Translate
  • Profile
  • Settings
Raspberry Pi Projects
  • Products
  • Raspberry Pi
  • Raspberry Pi Projects
  • More
  • Cancel
Raspberry Pi Projects
Blog PIK3A Retro Gaming Table Mk II
  • Blog
  • Documents
  • Events
  • Polls
  • Members
  • Mentions
  • Sub-Groups
  • Tags
  • More
  • Cancel
  • New
Join Raspberry Pi Projects to participate - click to join for free!
  • Share
  • More
  • Cancel
Group Actions
  • Group RSS
  • More
  • Cancel
Engagement
  • Author Author: spannerspencer
  • Date Created: 22 Mar 2016 10:45 AM Date Created
  • Views 17045 views
  • Likes 12 likes
  • Comments 44 comments
  • retro gaming
  • rpibeginner
  • retro
  • pi3
  • pik3a
  • raspberry pi
  • raspberry_pi_projects
Related
Recommended

PIK3A Retro Gaming Table Mk II

spannerspencer
spannerspencer
22 Mar 2016

I'm not a fan of Ikea. In fact, it's a place I usually try to avoid, until I discovered that you can hack it's ultra-cheap tables into retro video game systems! You know the one I mean: PIK3A: The Raspberry Pi 3 IKEA Retro Gaming Table.


You guys have been busy making your own versions, which I'm thrilled to be reading about. Keep those photos and top tips coming.


But in the meantime, meet PIK3A Mark II.

image

Hackin' the LACK

This is, in many respects, the same build as the PIK3A Mk I. The idea came about when I initially bought the square LACK tables that we mounted a monitor in, and added controls to. I was casually keeping an eye out for a table that'd accommodate two players, with six buttons each. You know. A Street Fighter II machine!image


There were definitely options, but the table size makes them prohibitively intrusive for the average living room. So I needed a way to reduce it, while maintaining the full control set.


The answer presented itself in the LACK TV stand; a narrow, 90cm by 26cm table that boasts a shelf and a table top deep enough to accept the joysticks and buttons. By dispensing with the monitor and going straight into the TV, the unit is easily accommodated in your average (well, as average as us element14 types ever really are) front room.


There isn't much to explain about the build that isn't already covered in the PIK3A Mk I. I cut two access holes in the bottom so I could get to the joystick and buttons for each player, and drilled start and coin buttons into the edge as before.

image

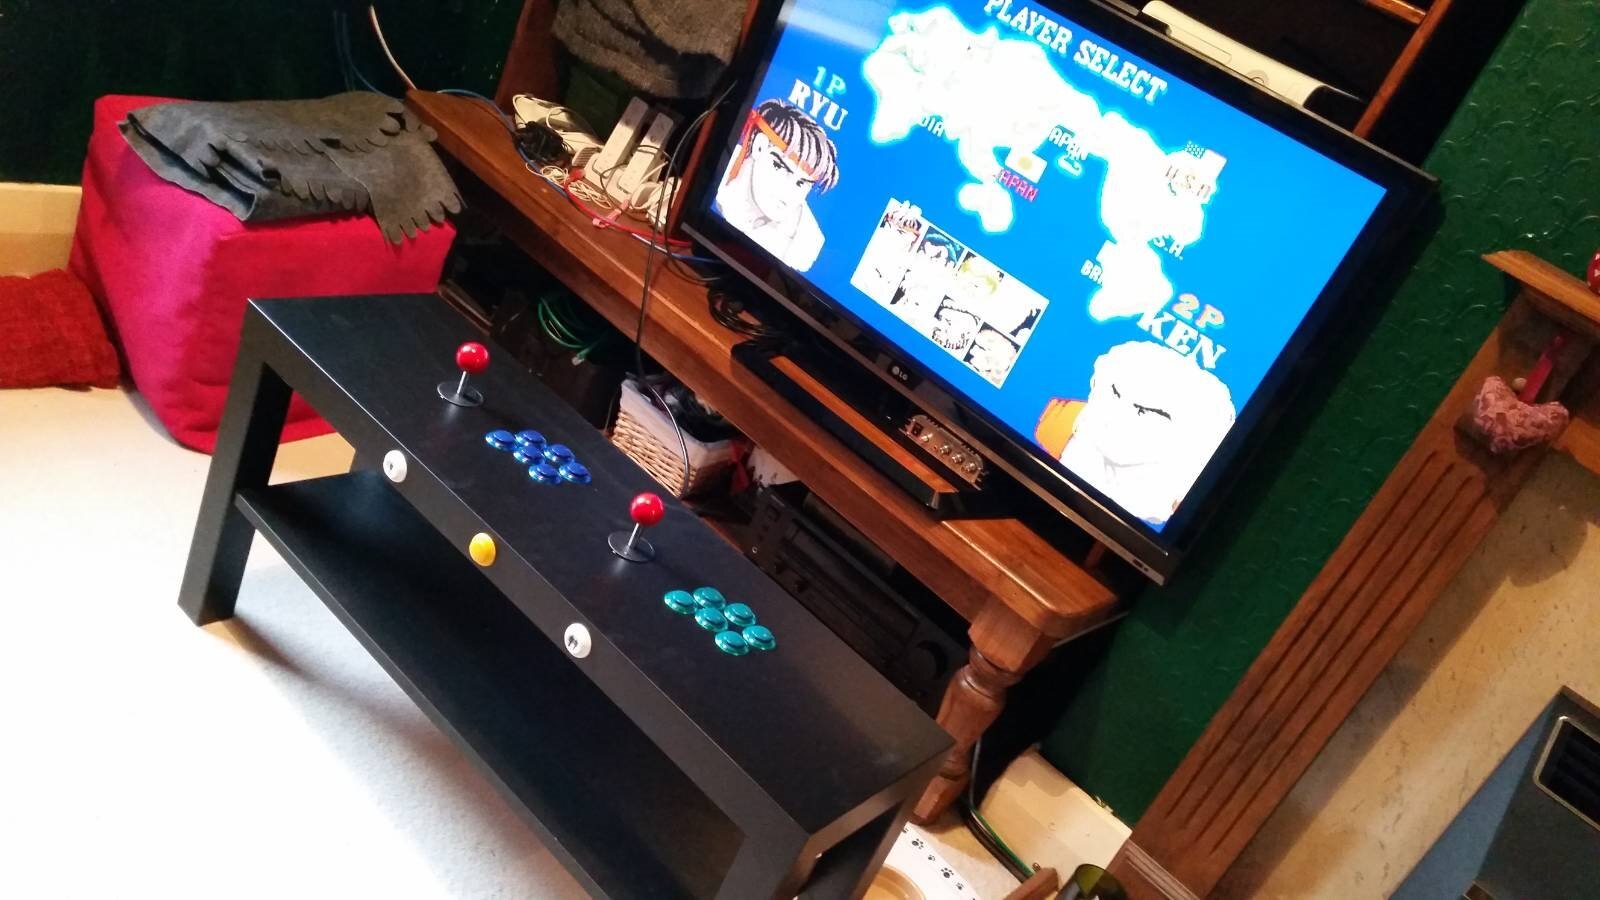
I kept the Raspberry Pi 3 external, mounting it in a case underneath the table top, in the centre. It's still nicely hidden, and there's only a short length of USB cable from the controls into the RPi. The benefits of this are that you don't need any extensions or panel mount connectors for the micro USB input or HDMI output. It also makes it easy to get to the SD card, should you need to.


There's no need for any acrylic or polycarbonate sheeting over the top either, given that there's no screen, making this a quick, simple yet highly effective variation on the PIK3A.


That said, one nice tweak might be coming up with a way to eliminate the HDMI cable and send the video to the TV wirelessly. Any thoughts on that?

You don't have permission to edit metadata of this video.
Edit media
x
image
Upload Preview
image

  • Sign in to reply

Top Comments

  • bwelsby
    bwelsby over 9 years ago in reply to shabaz +2
    Hm yes 12 inputs may not be enough, how about another hack... as in hack a genuine bluetooth keyboard
  • Former Member
    Former Member over 9 years ago +2
    You can hack a LG an-wl100 to wireless transmit HDMI and you can buy them for around 15 bucks on eBay. Directions for hacking Hacking the LG Wireless Media Kit AN-WL100W . Not a compact solution but it…
  • ipv1
    ipv1 over 9 years ago +1
    Awesome man!
  • Former Member
    Former Member over 9 years ago in reply to spannerspencer

    Okay, thanks for the help.

    • Cancel
    • Vote Up 0 Vote Down
    • Sign in to reply
    • More
    • Cancel
  • Former Member
    Former Member over 9 years ago in reply to spannerspencer

    Hi,


    so I had a look at your file for the Leaonardo, at the original Pik3a I you only have configured 4 buttons right?


    Do you have the corrected file for 6 buttons please?


    Thanks

    • Cancel
    • Vote Up 0 Vote Down
    • Sign in to reply
    • More
    • Cancel
  • spannerspencer
    spannerspencer over 9 years ago in reply to Former Member

    No worries! That's what we're here for image  Okay...


    A) One Leonardo per player, as there aren't enough inputs, especially if you're going for six buttons per player (and I recommend that you do!).

    B) Just use the same code for each player. The Pi will think you have two keyboards connected, and RetroPie (the emulator) will simply assign a "keyboard" for player one, and another for player two.

    C) That's done in the MAME settings: MAME Settings on PIK3A Gaming Table Just give player one start and player two start their own input on the Leonardo, and assign that button in the MAME settings.

    D) On the smaller tables, I used this one as I liked that it uses a round mounting hole (easier to cut, since you just drill it) and has a dust cap for when it's not being used: MULTICOMP - 2UB3001-W05101 - ADAPTER, USB TYPE A, JACK - PLUG

    E) There's a grey area here, legally speaking, so I'm going to have to let you hunt for game ROMs on your own  image

    F) Well, essentially they're still start buttons -- it's just that they tell the game whether you're starting a single player game, or a two player game.

    G) I suppose if you had a VGA splitter, you could have a separate input to the monitor that you could use independently of the Pi. The splitter port would probably want to be panel mounted, much like the USB port linked to above.

    H) I don't think the Uno would work. We used a Leonardo because it identifies itself to the Pi as a keyboard, which the Uno doesn't do. That said, there are a variety of USB adapters that you can use instead of a Leonardo, too.

    • Cancel
    • Vote Up 0 Vote Down
    • Sign in to reply
    • More
    • Cancel
  • Former Member
    Former Member over 9 years ago

    I have a few questions about this, as I'm planning to make a two player version with embedded monitor and external access for monitor usage separate to the Pi for use as effectively a games console centre too.


    a) Do you connect all of the controls to the same Arduino Leonardo, or one each?

    b) How do you code for the additional controls?

    c) How do you sort out the buttons for one and two player modes?

    d) What USB mount would you recommend for external mouse/keyboard use?

    e) Where do you source the playable games, are they available on the raspberry pi store on RetroPi ?

    f) Do the One and Two player buttons replace the start button?

    g) Is there a way I'd be able to have an additional input for the monitor if I wanted to use a games v=console occasionally, bypassing the Pi and the controls to use the monitor like a normal screen? Would a two input HDMI monitor work for this so that I could have an external access port without unplugging the Pi every time?

    h)Does it have to be the Arduino Leonardo used or would a Arduino Uno work?


    Apologies for the HUGE amount of questions, I think that's it for now.

    Thanks for sharing the idea.

    • Cancel
    • Vote Up 0 Vote Down
    • Sign in to reply
    • More
    • Cancel
  • Former Member
    Former Member over 9 years ago

    Great stuff..so I assume you have to use two Leonardos right? Do you guys have an .ino file for this?


    Thanks

    • Cancel
    • Vote Up 0 Vote Down
    • Sign in to reply
    • More
    • Cancel
<>
element14 Community

element14 is the first online community specifically for engineers. Connect with your peers and get expert answers to your questions.

  • Members
  • Learn
  • Technologies
  • Challenges & Projects
  • Products
  • Store
  • About Us
  • Feedback & Support
  • FAQs
  • Terms of Use
  • Privacy Policy
  • Legal and Copyright Notices
  • Sitemap
  • Cookies

An Avnet Company © 2026 Premier Farnell Limited. All Rights Reserved.

Premier Farnell Ltd, registered in England and Wales (no 00876412), registered office: Farnell House, Forge Lane, Leeds LS12 2NE.

ICP 备案号 10220084.

Follow element14

  • X
  • Facebook
  • linkedin
  • YouTube