


So, What Have You Got?
If you missed the introduction to this series, you will be needing the Raspberry Pi 2 GPS Kit unless you are sufficiently equipped with similar parts or hardware. Ten skilful people were chosen from just over four hundred to receive one of the kits from us at element14 and they may well have other ideas for the kit than for Geocaching, which is great! I look forward to seeing what you build - but there may be some, including those whom have bought the kit, that want to use it for Geocaching and it's those people whom this build-along is for.
I want your input, feedback and comments. If you have any problems while building along I want to know about it and we shall work on a solution. It is also possible that I am not doing this build in the best way or you have an idea! Great, I would love to hear about it, so please add a comment below the blog. Throughout this blog there may be times where I have not gone into detail, but if you look carefully I have embedded hyperlinks into the words or phrases. Usually you can click these for more detailed information about what I am talking about.
So have you got the kit yet, or an equivalent? Yes? Good.
Pre-Flight Checks
Preliminary to using the hardware, there is a certain environment to set-up and a few pieces for connectivity that you are going to need to be able to set-up the Raspberry Pi 2, these are as follows:
- A means of connecting to the global internet (a connection that does not restrict access to GIT (9418), FTP (21/22) or HTTP (80) protocols at least)
- Either via a Cat 5 Ethernet cable to your home gateway/router or
- A supported WiFi USBWiFi USB dongle connected to a WiFi access point/gateway/router
- Optional: A cable to connect from the Pi to a monitor or television, this could be:
- A male to male HDMI cablemale to male HDMI cable (mainly for televisions) or
- A male HDMI to male DVImale HDMI to male DVI cable (mainly for monitors) or
- A PiViewPiView HDMI to VGA adaptor and then a male VGA to male VGAmale VGA to male VGA cable (mainly for monitors) or
- 4 pole 3.5mm jack breakout cable to composite video3.5mm jack breakout cable to composite video and audio, with a male RCA to male RCA cable (mainly for televisions)
- Optional: A USB keyboard and mouseUSB keyboard and mouse
- Optional: A computer or laptop with an (micro)SDCard reader/writer
A few of these items are optional, but it can be beneficial to you if you are able to have all of them together. In particular I would suggest that having a secondary computer or a laptop with an SDCard/microSD Card reader (or at least a microSD to SDCard adaptor for equivalent reader) is almost compulsory. This is because it is far easier to be able to recover from any problems that you may encounter and rebuild or backup your SDCard for the Raspberry Pi to/from a system that you know works which is connected to the internet.
The reason why I state that connecting to the screen and using a keyboard and mouse is optional, is because if you have a laptop or a computer connected to the same local network (before connecting to the global internet) it is possible to connect over the network to the Raspberry Pi using SSH.
For the matter of simplicity I am going to assume that you are connecting the Raspberry Pi 2Raspberry Pi 2 to a screen with a keyboard and mouse and that you have a secondary computer or laptop with the ability to read the microSD card.
Connect it up!
When connecting together any hardware, make sure that it is turned off and not connected to a power source. This may come across as condescending but you would be surprised just at how many times I have with an absent mind dis/connected or un/plugged something in/out only to realise that I have fried the components because there was power going through the circuit.
You can go ahead and connect together all of the accessories with the Raspberry Pi 2, here is a simple step by step which might cover anything you may trip up with:
- Un-box and unwrap the Pi 2 and its accessories, the microSD card, etc from their packaging
- Slide the Pi 2 Shim onto the Raspberry Pi 2 GPIO (General Purpose Input/Output) pins with the pins of the shim sticking out from the Pi, making sure it has a snug fit connecting with the pins.
- This should be such that the pins of the shim are coming up and out of the shim add-on board and bending outwards away from the Pi. Rather than down and outwards.
- Plug the GPS add-on into the microstack board, then connect the microstack board to the Pi
- If you read the silkscreen (white writing) on the PCB (printed circuit board) of the shim and compare it with the microstack board, you can work out the orientation to connect it up. You can also cross-reference this with the Pi 2 pinout.
- The microstack board connects to the Pi with the microstack board orientated vertically, and towards the end of the Pi where the microSD card is to be pushed in.
- Sit the PiFace Control & Display 2 on top of the GPIO pins, feel free to use it to push the shim further down the Pi 2 GPIO pins
- You can connect the U.FL to SMA adaptor cable onto the the GPS add-on board and the adaptor pigtail cable to the GPS antenna.
- The antenna is for boosting the signal strength of the GPS, you can unfurl the cable and the end should be magnetic, it works best out or next to a window. Or outside entirely
- If you are outside, you may not need the external antenna, but it does help
- Push in the microSD card
- It should already be setup with NOOBS, we will need to choose an operating system
- Connect the USB mouse and keyboard (if you are using them, else happily use SSH, if you want to know how then let me know in the comments)
- Connect a cable to let you use a monitor or television (as outlined in the extra parts above, but feel free to ignore if you are connecting via SSH)
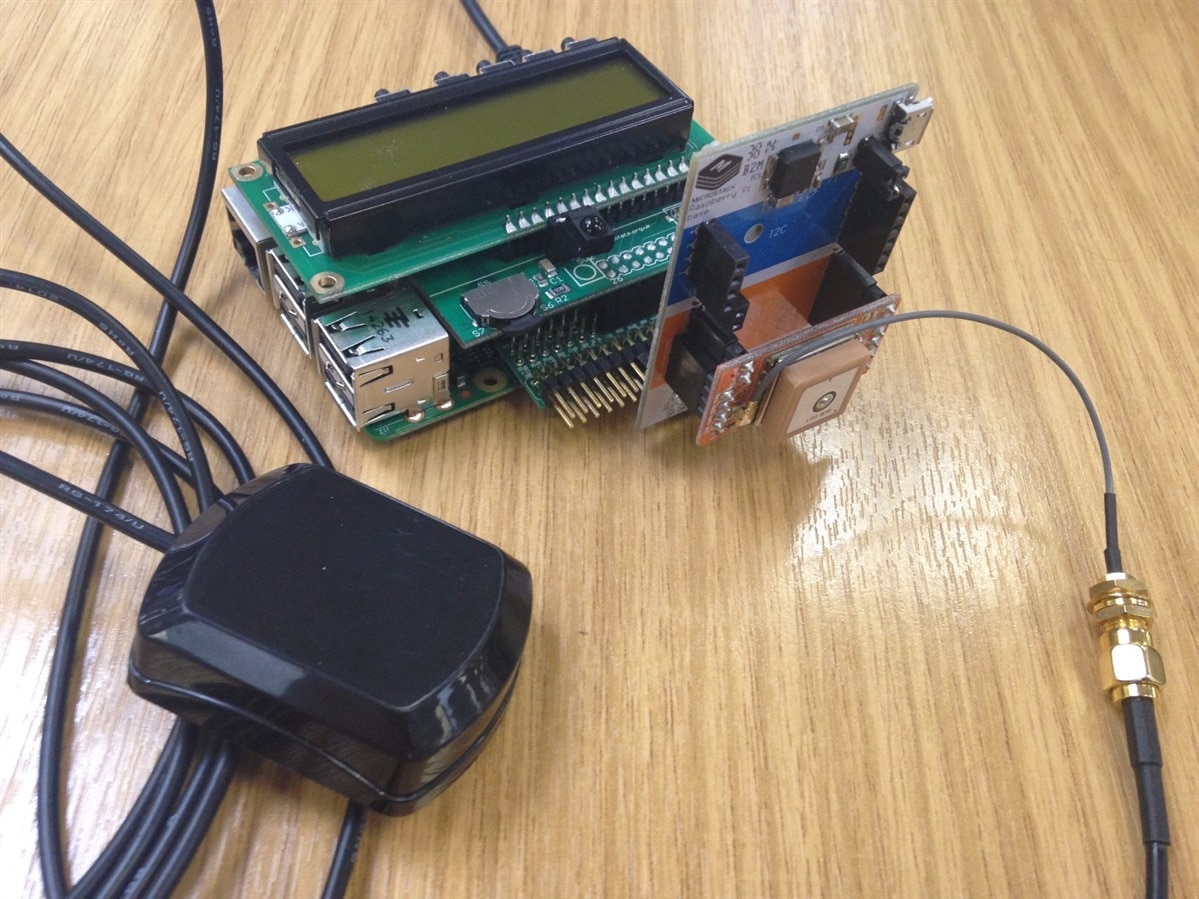
Lastly, after making sure that everything is securely connected, plug in the 5 volt 2 ampere power supply to the Raspberry Pi 2 (not the microstack board) and ensure everything is switched on and to the correct input/channel and you should be good to go. It should look a little like this when connected together:
Configuring the Operating System
Your microSD card is already setup for you with NOOBS. When you first power on your Raspberry Pi a window will appear with a list of different Operating Systems (OSs) that you can install. If you know what you are doing and there is a particular one that you wish to use then go ahead, however for the purpose of what we are doing you should use Raspbian which is a version of Linux, tick the box next to where it says Raspbian and click on Install. It will then run through its installation process.
When the installation has completed, the Raspberry Pi configuration menu will load (this is raspi-config). Here you are able to set the time/date for your region, enable add-ons such as the Raspberry Pi camera board, etc. There are a few steps which you should do:
- Select '1' and 'Expand Filesystem'
- If you want to, select '2' and change the user password. The default password is 'raspberry'
- Choose '3' and select to boot to the 'Desktop', though later we may want to change this to 'command line' to save resources.
- Choose 8 and then go through the following options:
- A4 and enable SSH
- Choose A6 and A7 to enable SPI and I2C (SPI is important to be able to use the PiFace Control & Display 2)
- A8 disable shell and kernel messages on the serial connection
Personally I also choose '7' and overclock my Pi 2 to 1000Mhz 'Pi 2' option but this is not crucially necessary.
When you are done, choose 'Finish'. Your Pi should now ask if you want to restart, and yes, you do.
Updating the Operating System (and a bit about Linux)
If you have not already done so, log in to the terminal on your Raspberry Pi (or open a terminal window, from here on I may assume that your pi starts into a terminal, just substitute to opening the terminal application when you're in the desktop) using the username 'pi' and the password 'raspberry' (unless you changed the password in the previous step, or know what you are doing with Linux and created your own username, etc.).
Making sure that your Pi is connected to the internet via the Ethernet cable (if you are using WiFi I am going to assume that you know what you are doing and have configured it and that it works for you) you should run the following commands, pressing 'enter' after each line (it is case sensitive):
sudo apt-get update
sudo apt-get upgrade -y
sudo apt-get dist-upgrade -y
sudo rpi-update
sudo reboot
So what we are doing here, is updating the software and firmware currently installed in Raspbian on the Raspberry Pi by elevating our permissions (from userspace) to the privileged super user, administrator, root space. Then we are running an application called 'apt-get' and then passing it a command with the next word. If you want to learn more about apt-get then you can run:
man apt-get
It will tell you all about it, typically you can type 'man' before most commands and it will tell you all about it. I should also add, that if you want to quit out of most things that are running, you can use usually use one or more of the following combinations (I warned you this may seem a bit condescending):
type 'q'
Key combination: ctrl and z
Key combination: ctrl and q
Key combination: ctrl and c
Installing and Configuring the Software we Need
Once the Pi has rebooted, you will need to log in again. Upon doing so, we can now install the software that we need to get information from the GPS device, which if you have had powered up and connected all of this time, you may or may not have noticed a flashing red LED on it. Enter the following commands to install the required software for the microstack, GPS and the Control & Display add-on board, along with ensuring we have Python3:
sudo apt-get install python3-microstacknode gpsd gpsd-clients python-gps python3-pifacecad python3 unzip
You may get some warnings about the software already being installed, you can ignore them. There is a great deal of Linux software available for viewing your position with a GPS device, what we are installing here is the ability to code our own software to receive information from the GPS device and interface with the buttons and display on the add-on board. If you are really enthusiastic you can find the microstack source code on github.
Now we should configure gpsd and we will restart the Pi again. So run:
sudo dpkg-reconfigure gpsd
Which will then bring up some prompts:
- Choose 'yes' to start gpsd automatically
- Choose 'no' to handling USB gps receivers automatically (unless you are playing around with one, obviously, but we are not here)
- When asked 'Device the GPS receiver is attached to' enter (case sensitive):
/dev/ttyAMA0
- You can accept the defaults for other options.
- You may need to restart the Pi with 'sudo reboot' at this point (or you could restart the gpsd service)
Now we should check to see if the GPS device is working, remember when you used raspi-config to disable the output on the serial port? That was important, because the microstack GPS add-on uses that to communicate its co-ordinate data which is handled in Linux as /dev/ttyAMA0. Even though the GPS add-on is in the SPI section of the microstack board, it does not even use SPI. This is a little frustrating because it stops us from using SPI add-ons in the microstack when we should really be able to use them, but the way the GPS add-on operates means that we can use it in conjunction with an SPI add-on such as the PiFace Control & Display 2.
Testing the GPS Add-on
How we check if the GPS add-on is working will depend greatly on whether you have a signal lock or not. Hopefully by now you will have had the Pi connected to power with the add-ons all plugged in. If the GPS has a lock then you should have a flashing red LED, this is synchronised with the clock of the timing signal received from the satellites. Now we can run a command to check what information we have.
If gpsd has been configured correctly, then we can run:
cgps -s
Which will produce an output that looks like this:

Though your output might have the correct characters as a border. What we have here is a '3D Fix' along with the details we would expect such as longitude and latitude. However, what can we do if it says "NO FIX" ? How do we know if the GPS add on is working at all?
The simplest way is to check if /dev/ttyAMA0 is receiving any data at all. There is a command in Linux called 'cat' which we can use to view the contents of files, I shall not go into detail of why, but we can also use cat on devices. So when we run:
cat /dev/ttyAMA0
You should see the serial output from the microstack add-on which looks like this (press CTRL and C to stop the scrolling data):
$GPGGA,225204.000,5346.7246,N,00137.6337,W,1,8,1.03,128.2,M,47.8,M,,*42
$GPGSA,A,3,17,32,02,23,09,03,31,06,,,,,1.73,1.03,1.38*05,M,47.8,M,,*42
$GPGSV,3,1,12,23,72,110,18,09,55,200,44,06,52,293,43,03,47,089,28*7B42
$GPRMC,225205.000,A,5346.7246,N,00137.6337,W,0.02,198.38,200715,,,A*71
$GPVTG,198.38,T,,M,0.02,N,0.04,K,A*30
$GPGGA,225205.000,5346.7246,N,00137.6337,W,1,8,1.03,128.2,M,47.8,M,,*43
$GPGSA,A,3,17,32,02,23,09,03,31,06,,,,,1.73,1.03,1.38*05
$GPGSV,3,1,12,23,72,110,18,09,55,200,44,06,52,293,43,03,47,089,28*7B
$GPGSV,3,2,12,17,27,230,31,02,16,310,30,31,16,033,31,01,10,143,18*77
$GPGSV,3,3,12,32,07,087,16,25,05,349,17,40,05,110,,12,02,315,17*7F
$GPGLL,5346.7246,N,00137.6337,W,225205.000,A,A*4E
$GPTXT,01,01,02,ANTSTATUS=OK*3B
Your output would be different if you do not have a GPS fix. There is detailed information in this feed which we can digest if we want to, what I am interested in is where it says 'ANTSTATUS=OK' means that we have the external antenna attached and it is working (pretty neat) else it would say 'ANTSTATUS=OPEN'. The rest I can ignore for now.
Testing the PiFace CAD add-on
The PiFace add-on comes with example Python scripts which we can just run to see if it is capable of outputting anything to its screen. The GPS add-on also has example python scripts, but I felt that the commands I suggested are more useful to work out how it operates.
To run the example script for the PiFace just enter the following at the terminal:
python3 /usr/share/doc/python3-pifacecad/examples/sysinfo.py
You should now see the IP address of the Pi on the screen along with the temperature and processor usage. Pretty straightforward. The buttons do not currently do anything as they are not programmed to. You can find more examples if you type:
ls
/usr/share/doc/python3-pifacecad/examples/
Though they are compressed by default (I will give you a hint, you may need gunzip to extract them). For the enthusiastic, up to date code is stored on the github for the project.
Whoops! Hang On..
If you are having any problems at this point then there are some simple diagnostic checks you should make first:
- Start from the beginning and make sure everything is disconnected
- Push in just the microSD card and the cable for the screen/monitor then connect power with nothing else. Does the Pi boot?
- If it does not, or the red and green LEDs on your Pi are constantly lit. You need to re-image your SD Card to Raspbian
- If it boots, but it does not get you to a login prompt
- Re-image your SDCard to Raspbian, there is probably a recoverable problem with Linux, but we will just keep it simple
- Push in just the microSD card and the cable for the screen/monitor then connect power with nothing else. Does the Pi boot?
- If you receive errors when trying to apt-get update, upgrade, or install then check with another device/laptop/your phone that your internet connection is working. That your network cable is OK and if you have setup WiFi that it is connected and works.
- A simple check is to run 'ping www.google.com' at the terminal and see if you get a response
- Running 'sudo ifconfig' can also check if your adapter (eth0 or wlan0 typically) has an IP address
- Make sure you are not behind a proxy, if you are setting it up at work, university or school.
- If the GPS add-on is not getting a fix, or you are not getting anything from the commands I suggested
- Check to make sure that the metal circles on the shim are making a connection around the pins, it does get a bit wobbly.
- Make sure you have installed the correct packages
- Go outside, or put the external antenna out of the window (making sure it is secure)
- Or just leave the Pi on for a long time, it will get a fix eventually.
- If the PiFace add-on does not display anything
- Make sure that it is correctly aligned on the GPIO pins
- Try connecting it to the Pi without the shim and see if it works then, ensure that the PiFace is fully pressed down onto the pins
If you are still having problems, post a comment below giving as much detail as you can!
Can we go Geocaching Yet?
To start this project we are going to use code from 's work (he has some other neat blogs you should really check out that introduces other hardware we have on the Community). The full blog post is available here if you would like to read it, it gives good insight into the decisions for the code we are about to use and what I intend on developing upon further. For now though, all we are going to do is download the file attached to this blog post, extract them and run the code.
On the Raspberry Pi, in the desktop environment open a web browser and download the .zip file. Using 'File Manager' in the 'Accessories' menu, copy the file from the downloads folder into the the /home/pi folder (by default it may download to /home/pi/downloads).
Now open up a terminal (unless you are already in one) and run the following commands:
cd ~/
unzip gps-files.zip
sudo cp ./start.sh /etc/init.d/
sudo chmod +x /etc/init.d/start.sh
sudo update-rc.d start.sh defaults 99
Callum's Geocaching software looks at a text file for a list of co-ordinates as longitude and latitude. You will need to edit this file with a text editor and input your own co-ordinates to the geocaches you want to find or locations you want to be pointed towards. Now to edit geocaches.txt, either use your terminal text editor of choice (I prefer to use vim), or open 'Text Editor' from the 'Accessories' menu and navigate to /home/pi/microstack_geocache
Just to test the co-ordinates, which are listed in longitude and latitude, I picked some locations at random on Google Maps and saved them into geocaches.txt:
-1.552677,53.779964
-1.384277,53.32103
-0.049438,52.629729
That should be everything, when you restart your Raspberry Pi the code should automatically run and you will be told the distance towards the caches listed in geocaches.txt in /home/pi/microstack_geocache ! You can use the 'flick' or 'nav' switch to choose between the different caches in your text list.
In Memoriam
There is still work to be done on this project. So far we have identified that we are able to get GPS data, compare it against a destination and estimate the distance between the two. However, this is not entirely ideal but it is a start with a prototype.
I have attached to this blog post, reference documentation for the protocol that the GPS add on uses along with the pin-out of the board itself. Attached is also the quick reference guide for the PiFace Control & Display 2 board. From these we can see that it should be possible to advance this project further with greater intuition, and it just raises questions:
- So we currently have our destination plotted out, but is the display really suitable for it?
- Is there more we can do with it to determine our heading to find our geocaches?
- Can we put more intelligence into the code so we are not looking at a static file, but rather from an API or similar?
- How could we enhance the project with internet connectivity?
- The code needs work
- The mathematics does not account for the curvature of the earth
- It relies heavily on text files, which often need to be cleared manually before the code works
These are just a few of the questions that I hope to address in further blog posts, do let me know your thoughts by commenting on the blog!1
| l80_gps_protocol_specification_v1.0.pdf | |
| microstack-gps-addon.pdf | |
| Quectel_L80_GPS_Presentation_V1.1.pdf | |
| piface-cad-2.pdf | |


Top Comments