element14 Community
element14 Community
    Register Log In
  • Site
  • Search
  • Log In Register
  • Community Hub
    Community Hub
    • What's New on element14
    • Feedback and Support
    • Benefits of Membership
    • Personal Blogs
    • Members Area
    • Achievement Levels
  • Learn
    Learn
    • Ask an Expert
    • eBooks
    • element14 presents
    • Learning Center
    • Tech Spotlight
    • STEM Academy
    • Webinars, Training and Events
    • Learning Groups
  • Technologies
    Technologies
    • 3D Printing
    • FPGA
    • Industrial Automation
    • Internet of Things
    • Power & Energy
    • Sensors
    • Technology Groups
  • Challenges & Projects
    Challenges & Projects
    • Design Challenges
    • element14 presents Projects
    • Project14
    • Arduino Projects
    • Raspberry Pi Projects
    • Project Groups
  • Products
    Products
    • Arduino
    • Avnet Boards Community
    • Dev Tools
    • Manufacturers
    • Multicomp Pro
    • Product Groups
    • Raspberry Pi
    • RoadTests & Reviews
  • About Us
  • Store
    Store
    • Visit Your Store
    • Choose another store...
      • Europe
      •  Austria (German)
      •  Belgium (Dutch, French)
      •  Bulgaria (Bulgarian)
      •  Czech Republic (Czech)
      •  Denmark (Danish)
      •  Estonia (Estonian)
      •  Finland (Finnish)
      •  France (French)
      •  Germany (German)
      •  Hungary (Hungarian)
      •  Ireland
      •  Israel
      •  Italy (Italian)
      •  Latvia (Latvian)
      •  
      •  Lithuania (Lithuanian)
      •  Netherlands (Dutch)
      •  Norway (Norwegian)
      •  Poland (Polish)
      •  Portugal (Portuguese)
      •  Romania (Romanian)
      •  Russia (Russian)
      •  Slovakia (Slovak)
      •  Slovenia (Slovenian)
      •  Spain (Spanish)
      •  Sweden (Swedish)
      •  Switzerland(German, French)
      •  Turkey (Turkish)
      •  United Kingdom
      • Asia Pacific
      •  Australia
      •  China
      •  Hong Kong
      •  India
      •  Korea (Korean)
      •  Malaysia
      •  New Zealand
      •  Philippines
      •  Singapore
      •  Taiwan
      •  Thailand (Thai)
      • Americas
      •  Brazil (Portuguese)
      •  Canada
      •  Mexico (Spanish)
      •  United States
      Can't find the country/region you're looking for? Visit our export site or find a local distributor.
  • Translate
  • Profile
  • Settings
Raspberry Pi Projects
  • Products
  • Raspberry Pi
  • Raspberry Pi Projects
  • More
  • Cancel
Raspberry Pi Projects
Blog Raspberry Pi temperature and cooling testing Part 1 initial tests.
  • Blog
  • Documents
  • Events
  • Polls
  • Members
  • Mentions
  • Sub-Groups
  • Tags
  • More
  • Cancel
  • New
Join Raspberry Pi Projects to participate - click to join for free!
  • Share
  • More
  • Cancel
Group Actions
  • Group RSS
  • More
  • Cancel
Engagement
  • Author Author: bwelsby
  • Date Created: 9 Mar 2016 1:29 PM Date Created
  • Views 4410 views
  • Likes 6 likes
  • Comments 24 comments
  • rpi cooling
  • heatsink
  • pi hat
  • heat_sink
  • rpi3
  • rpi
  • raspberry_pi_projects
Related
Recommended

Raspberry Pi temperature and cooling testing Part 1 initial tests.

bwelsby
bwelsby
9 Mar 2016

Raspberry Pi 3 temperature and cooling testing :


Part 1 Inital tests

Part 2 with a HAT tests.

Part 3 with Fan Speed Control. (Still to come)


This experiment started out after discussions following a post by shabaz   here Raspberry Pi 3 Cooling / Heat Sink Ideas

The tests were carried out with the new RPi 3 as it was found to get hot under heavy load, I may repeat the tests at a later date with the RPi 2 for comparisons.

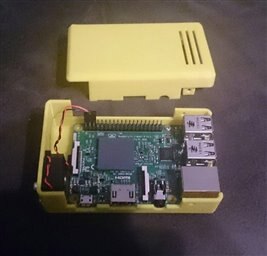
For the tests I created a simple 3D printed enclosure and also 3D printed dummy HATs the OpenScad files are attached, feel free do do with these as you wish.


imageimage

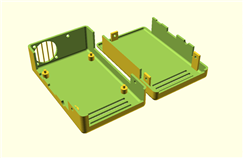
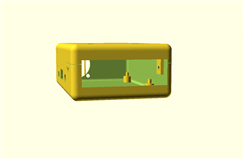
The OpenScad image of the test enclosure and the final printed case with RPi 3 installed

image


A total of eight tests were carried out to the following plan where 0 = option not installed,  x = option installed

The test plan:-


Test#  Fan   Cover    Heatsink   Graph Colour

1         0        0           0               Brown

2         x        0           0               Red

3         0        x           0               Orange

4         x        x           0               Yellow

5         0        0           x               Green

6         x        0           x               Blue

7         0        x           x               Violet

8         x        x           x               Grey


The heatsink used is a ceramic part  MPC222225T - AMEC THERMASOL - Heat Sink, Square, Micro Porous, 10.21 °C/W, 2.5 mm, 22 mm, 22 mm | Farnell element14

chosen because it is only 2.5mm thick and would fit easily between RPi and an installed HAT. If no HATs are being used and height above the RPi is not an issue then there may be larger more efficient heatsinks available that would provide better cooling but these tests were specifically an experiment to see if there was a solution for HAT use.

The fan used was MC25100V2-0000-A99 - SUNON - Axial Fan, MAGLevimage Motor, Medium Speed, Vapo, MC Series, 5 VDC, 25 mm, 10 mm, 3.002 cu.ft/m…


To run the tests I first installed the latest NOOBS and configured Raspbian as the operating system, and to make sure everything was up to date this was then followed by


sudo apt-get update
sudo apt-get upgrade
sudo rpi-update


The Test Script

I used the following shell script I called temptest for the tests which outputs the data in a csv format it includes both temperature and also CPU frequency which showed that the CPU was being throttled when the temperature reached 80'C


#!/bin/bash

I=0;
stress --cpu 4 --timeout 600 &
while [ $I -lt 600 ]; do
    echo -n "$I,"
    vcgencmd measure_temp | sed -e 's/temp=//g' | tr -d "'C\n"
    echo -n ","
    vcgencmd measure_clock arm | sed -e "s/frequency(45)=//g"
    let I=I+1
    sleep 1
done


I ran the RPi without monitor, keyboard or mouse just an ethernet connection to my local network then I SSH'd from my linux desktop computer for windows you could use PuTTY: a free SSH and Telnet client  or something similar the IP address on my system was 192.168.0.26


ssh pi@192.168.0.26


Then I ran the tests as root privilage


sudo -s


Each test was run piping the output to a testx.csv where x is the test number. time between tests allowed the RPi co cool back to idle operating temperature and the ambient temperature in the room was 22'C


./temptest > test1.csv


On completion I had eight csv files, I then used Gnumeric  (a spreadsheet program) on my linux desktop to import just the temperature data and produce the following graph. The numbers along the bottom are approximate seconds and the numbers on the left are CPU temperature. The colours are as listed above for each test. If you click on the image you should get a larger view.

image

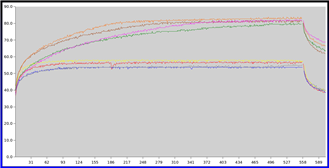
As I said in the other blog I will leave it for you to draw your own conclusions and I will give mine when I have done further tests image


One thing observed was that the fan on full speed is quite powerful and a little noisy so reducing it's speed with a suitable PWM control would reduce the noise and could still provide sufficient airflow. This is for further testing.


Edit: 10-March-2016

A word of caution for the inexperienced

The heatsinks we have been discussing are held in place by a thermally conductive adhesive pad. In essence they are glued to the processor chip.

I would recommend that you DO NOT attempt to remove them as any twisting,pulling or prising is likely to damage the chip or its many extremely tiny soldered connection to the PCB


The Raspberry Pi may be an inexpensive single board computer but it could easily become a very expensive piece of scrap.

Attachments:
openscad_files.zip
  • Sign in to reply

Top Comments

  • cstanton
    cstanton over 9 years ago in reply to shabaz +4
    Well, the diamond heatsink and diamond thermal compound arrived, now I just need a way to 3D print the case (I already had the fan).
  • cstanton
    cstanton over 9 years ago +3
    I've picked up some diamond heatsinks and thermal compound, as soon as I find a 3D Printer I want to try it out in this setup with the fan
  • cstanton
    cstanton over 9 years ago +3
    Finally got the 3D printer working at the hackspace, however it had some build quality issues, gaps are temporarily plugged with blu-tac
  • tinderbox(uk)
    tinderbox(uk) over 9 years ago in reply to bwelsby

    I have Raspberry Pi 3 Model B and a third-party case arriving tomorrow.


    I was looking for the 22 x 22 x 2.5mm ceramic heatsink, When i found the one in the photo below it`s 25 x 25 x 5mm  from an UK ebay seller so i ordered one.


    I still have to find a fan for my case, it comes with a mounting holes, A 20x20x10mm should be fine but i need to measure the distance between the top of the heatsink and the top of the case before ordering one.


    Thanks


    John.


    Amec Thermasol - FCH25255T


    heatsink

    • Cancel
    • Vote Up 0 Vote Down
    • Sign in to reply
    • More
    • Cancel
  • bwelsby
    bwelsby over 9 years ago in reply to tinderbox(uk)

    Thank you for your comments, the idea behind having the fan at the side was to see how well cooling would be when an expansion board (HAT) is fitted which would block a fan on top.. I do have a Pi3 currently built into my 3D printer with the same ceramic heatsink and a 40mm fan above the SOC as you suggest. Under normal operation it is running at around 45 - 50 degC  with the fan off  and 30 - 35 degC with the fan on.  it is running  Repetier-server, VNC server and Firefox web browser and is nowhere near fully loaded.

    • Cancel
    • Vote Up 0 Vote Down
    • Sign in to reply
    • More
    • Cancel
  • tinderbox(uk)
    tinderbox(uk) over 9 years ago

    Thankyou for your effort, I would have placed the fan above the SOC so that the air could blow directly down on the heatsink and see what happened to the temps then.


    Looks like if you want the cover on you need the heatsink and fan number 8 grey, though number 4 yellow, cover on and fan with no heatsink is not far behind on 2-3c difference.


    Number 5 green is a shock, it has a heatsink, but no cover and no fan at around 76-78c the heatsink is only making a 5-6c difference from no fan, no cover and no heatsink.


    Nice work on the case, I would like a 3D printer but i am no good at CAD.


    John.


    temp

    • Cancel
    • Vote Up 0 Vote Down
    • Sign in to reply
    • More
    • Cancel
  • cstanton
    cstanton over 9 years ago in reply to bwelsby

    Running your script, I've only done the following, I haven't measured the ambient temperature at present, though. Interesting how different the graphics are, though.


    With the diamond thermal paste/heatsink, with 5v fan but the case off:

    image


    With the diamond thermal paste/heatsink, with 5v fan but the case on:

    image


    And mapped on the same chart:


    image

    • Cancel
    • Vote Up +2 Vote Down
    • Sign in to reply
    • More
    • Cancel
  • bwelsby
    bwelsby over 9 years ago in reply to cstanton

    Interesting, something else to play around with image   As for the 3v - 5v level conversion I have a small bag full of BSS138 FETs, one of them and a couple of 10K resistors should do the job nicely.

    • Cancel
    • Vote Up +1 Vote Down
    • Sign in to reply
    • More
    • Cancel
>
element14 Community

element14 is the first online community specifically for engineers. Connect with your peers and get expert answers to your questions.

  • Members
  • Learn
  • Technologies
  • Challenges & Projects
  • Products
  • Store
  • About Us
  • Feedback & Support
  • FAQs
  • Terms of Use
  • Privacy Policy
  • Legal and Copyright Notices
  • Sitemap
  • Cookies

An Avnet Company © 2025 Premier Farnell Limited. All Rights Reserved.

Premier Farnell Ltd, registered in England and Wales (no 00876412), registered office: Farnell House, Forge Lane, Leeds LS12 2NE.

ICP 备案号 10220084.

Follow element14

  • X
  • Facebook
  • linkedin
  • YouTube