Hi all.
This is an updated version of my previous blog post - Use a Raspberry PI Zero W as a Wireless Print Server
One problem of old printers is that they don't have network connectivity and or can't be shares with more users - unless the computer where they are connected shares them.
This way, we can add the printer to any Operating System using the 9100 port - just like jet direct.
It uses the xinetd super-server daemon to open the 9100 port
Hardware
There's only a few requirements needed with a Raspberry PI Zero W (or Zero 2 W or any other model)
- USB OTG cable - to connect the printer
- Printer with USB interface (so, not to old printers)
- Power the RPI W with a power adapter, not a computer USB port
- If the printer has a USB port, you can power it from that
STEPS
There are the steps we're going to take - simple and few
- We're going to install Raspbian OS Lite
- Configure CUPS and install a printer
Each step is easy and the configurations are very straightforward and fast.
Raspberry PI
First, let's install the Raspberry PI Zero W .
A 8GB SD CARD is enough. I use the Raspberry PI Imager. It's fast and there's no need to download the img file. Also, it downloads the latest version available.
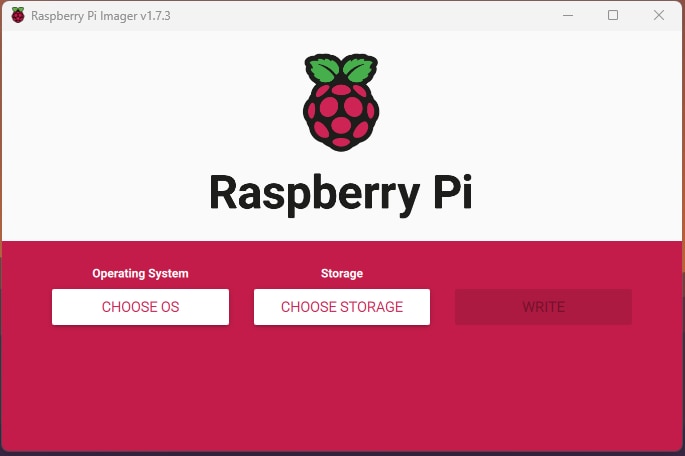
For this, the Raspberry PI OS Lite is enough. We don't need a graphical environment.
Let's choose it. Choose "Raspberry Pi OS (other)" and then "Raspberry PI OS Lite".
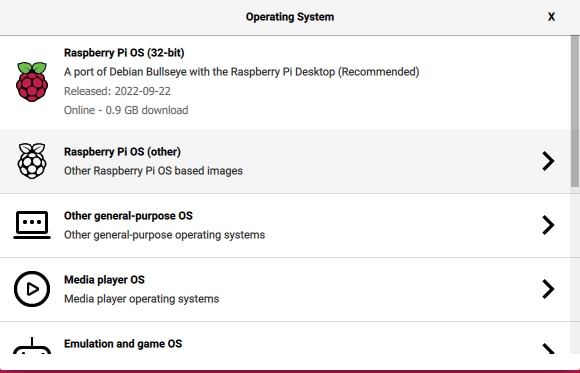
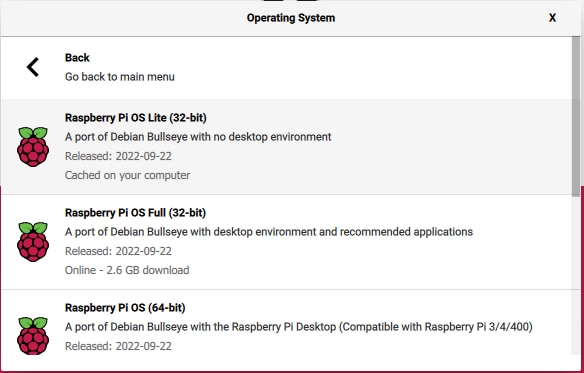
Choose the SD CARD

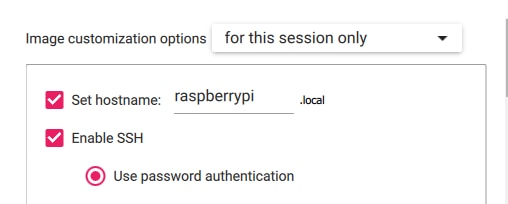
Before Write, press the little cogwheel . We'll customize the installation. If we don't do this now, latter we need to connect the Raspberry PI to a monitor and keyboard to personalize the installation. The OS won't fully boot until some information is filled in . Better to do this now.
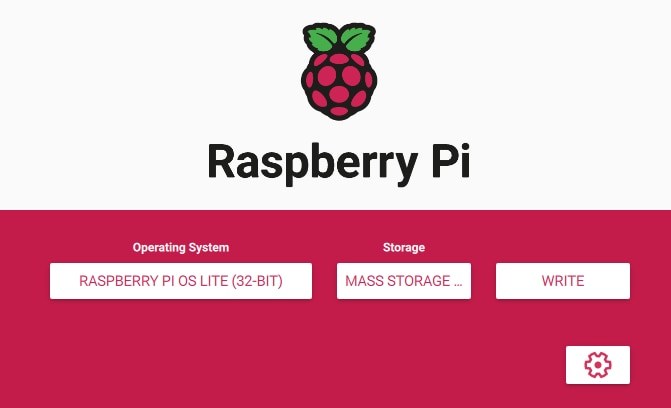
Set the hostname and importantly enable SSH or you'll still need to connect a monitor and keyboard (or just create an empty file named ssh on the boot partition).
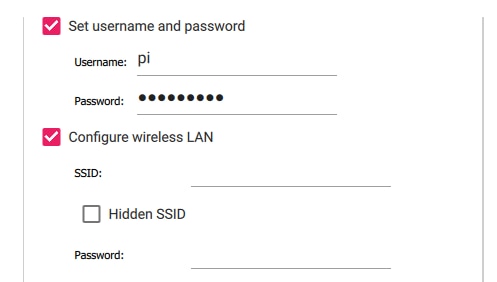
Set the username and password, along with the WiFi details - if you're going to use WiFi
Finally, set the WiFi country (if you configured WiFi) and locale.
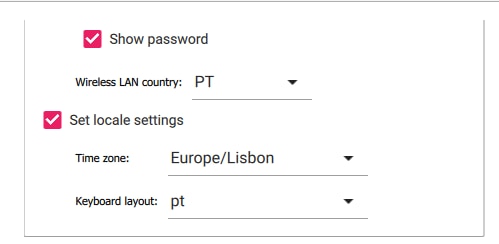
Save and press Write.
Software
After the PI boots and you know it's IP address, lets access it using ssh and update the software
Update
Let's update the software
sudo apt updatesudo apt upgrade -y
Reboot
After the reboot, let's install cups and xinetd
Install and Configure CUPS
Let's install cups
sudo apt install cups
First, let's configure CUPS to allow us to access the Web Interface and use the DNS name instead of just the IP address.
Note: Make a backup of the file first, just in case
sudo vi /etc/cups/cupsd.conf
We just need to comment two lines and add 3 new ones
Comment the following lines (just add a # at the beginning of the line):
#Listen localhost:631#Listen /run/cups/cups.sock
and add
Listen 631
This will allow us to access CUPS web Interface from another computer.
Next, just before the first <Location /> tag, , add the following line:
ServerAlias *
This will allow us to also use DNS instead of just the IP address
Now, inside the <Location /> and <Location /admin> blocks, add the following line, just after Order allow, deny
Allow <your_computer_ip_address>
Or, if you want to loosen up a bit, you can use a network range or just all:
Allow 172.100.0.0/24
or
Allow All
This will stay like:
<Location /> Order allow,deny Allow 10.11.23.1</Location>
<Location /admin> Order allow,deny Allow 10.11.23.1</Location>
where 10.11.23.1 is my IP address
lpadmin group
Let's add the PI user to the lpadmin group
sudo gpasswd -a pi lpadmin
Although gpasswd will require to login again for the changes to take effect, we don't need it because it will be the cups service that will get restarted and thus, we don't need the group in the current session . But feel free .
This will allow the pi user to add, remove and configure printers
Now, let's enable cups and start it (or restart it)
sudo systemctl enable cupsSynchronizing state of cups.service with SysV service script with /lib/systemd/systemd-sysv-install.Executing: /lib/systemd/systemd-sysv-install enable cupssudo systemctl start cups
Add a printer to cups
This is the normal procedure - add a printer to cups on any Linux, using the CUPS Web Interface.
Open your browser of choice and head to:
https://<your_pi_address/name>:631 and you will land at CUPS web
On CUPS Administration, press the "Add Printer" button
On the Printers list, we want the Local Printers - connected to USB. Choose the one you're connecting. In my case, a HP LajserJet 1022 - old, I know.
Fill in all the details. The name is specially important, since it's by it we will reach the printer. My advice is DO NOT USE SPACES.
Don't forget to tick the "Share This Printer" box.
Xinetd super-daemon
Let's now configure the xinetd to create a 9100 port and print anything that gets to it.
First edit the services file in /etc to add the 9100 port.
sudo vi /etc/services
This file contains "all" the network services and ports used.
add the following line to the end of the file
jetdirect <tab> <tab until aligned> 9100/tcp
save and quit
xinetd will look for any configuration files that are present at /etc/xinetd.d/ directory and load them .
Create a file in that directory. I'm going to call it jetdirect - the same name of the service above
sudo vi /etc/xinetd.d/jetdirect
Add the following lines:
# Jetdirect emulationservice jetdirect{ socket_type = stream protocol = tcp wait = no user = root # server = /usr/bin/lpr server = /usr/bin/lp server_args = -d HPLaserJet1022 -o raw groups = yes disable = no}
Now, two lines you need to edit server and server_args
server can be lpr or lp . I have lp, so the argument to specify the printer name (in server_args) is -d . If you choose lpr, the argument is -P . Just change it according your preferences. Don't forget to change HPLaserJet1022 to your printer name.
server_args are the arguments you would normally pass to the lp command.
I also have -o raw . Just play with that option. If you're trying to print and see nothing or code, remove the -o raw argument and try again. Just play with it.
Let's enable the xinetd service and start it.
systemctl enable xinetd
It may give a warning saying it's not a native service.

After that, just restart it (it may already be started).
systemctl restart xinetd
That's it. Now we have a 9100 print queue on the Raspberry PI and can be added to a computer like a networked printer using RAW 9100.


A nmap command:

References
https://tzlee.com/blog/2017/11/raspberry-pi-print-server-with-no-server-side-driver/


