element14 Community
element14 Community
    Register Log In
  • Site
  • Search
  • Log In Register
  • Community Hub
    Community Hub
    • What's New on element14
    • Feedback and Support
    • Benefits of Membership
    • Personal Blogs
    • Members Area
    • Achievement Levels
  • Learn
    Learn
    • Ask an Expert
    • eBooks
    • element14 presents
    • Learning Center
    • Tech Spotlight
    • STEM Academy
    • Webinars, Training and Events
    • Learning Groups
  • Technologies
    Technologies
    • 3D Printing
    • FPGA
    • Industrial Automation
    • Internet of Things
    • Power & Energy
    • Sensors
    • Technology Groups
  • Challenges & Projects
    Challenges & Projects
    • Design Challenges
    • element14 presents Projects
    • Project14
    • Arduino Projects
    • Raspberry Pi Projects
    • Project Groups
  • Products
    Products
    • Arduino
    • Avnet Boards Community
    • Dev Tools
    • Manufacturers
    • Multicomp Pro
    • Product Groups
    • Raspberry Pi
    • RoadTests & Reviews
  • About Us
  • Store
    Store
    • Visit Your Store
    • Choose another store...
      • Europe
      •  Austria (German)
      •  Belgium (Dutch, French)
      •  Bulgaria (Bulgarian)
      •  Czech Republic (Czech)
      •  Denmark (Danish)
      •  Estonia (Estonian)
      •  Finland (Finnish)
      •  France (French)
      •  Germany (German)
      •  Hungary (Hungarian)
      •  Ireland
      •  Israel
      •  Italy (Italian)
      •  Latvia (Latvian)
      •  
      •  Lithuania (Lithuanian)
      •  Netherlands (Dutch)
      •  Norway (Norwegian)
      •  Poland (Polish)
      •  Portugal (Portuguese)
      •  Romania (Romanian)
      •  Russia (Russian)
      •  Slovakia (Slovak)
      •  Slovenia (Slovenian)
      •  Spain (Spanish)
      •  Sweden (Swedish)
      •  Switzerland(German, French)
      •  Turkey (Turkish)
      •  United Kingdom
      • Asia Pacific
      •  Australia
      •  China
      •  Hong Kong
      •  India
      •  Korea (Korean)
      •  Malaysia
      •  New Zealand
      •  Philippines
      •  Singapore
      •  Taiwan
      •  Thailand (Thai)
      • Americas
      •  Brazil (Portuguese)
      •  Canada
      •  Mexico (Spanish)
      •  United States
      Can't find the country/region you're looking for? Visit our export site or find a local distributor.
  • Translate
  • Profile
  • Settings
Raspberry Pi Projects
  • Products
  • Raspberry Pi
  • Raspberry Pi Projects
  • More
  • Cancel
Raspberry Pi Projects
Documents Raspberry Pi Weather Station Project
  • Blog
  • Documents
  • Events
  • Polls
  • Members
  • Mentions
  • Sub-Groups
  • Tags
  • More
  • Cancel
  • New
Join Raspberry Pi Projects to participate - click to join for free!
Actions
  • Share
  • More
  • Cancel
Engagement
  • Author Author: jcasiello
  • Date Created: 1 Jun 2016 4:00 PM Date Created
  • Last Updated Last Updated: 10 May 2021 6:52 PM
  • Views 8436 views
  • Likes 20 likes
  • Comments 20 comments
Related
Recommended

Raspberry Pi Weather Station Project

image

Using SenseHAT, InitialState Cloud Service and your Raspberry Pi, create a working Weather Station


Overview:

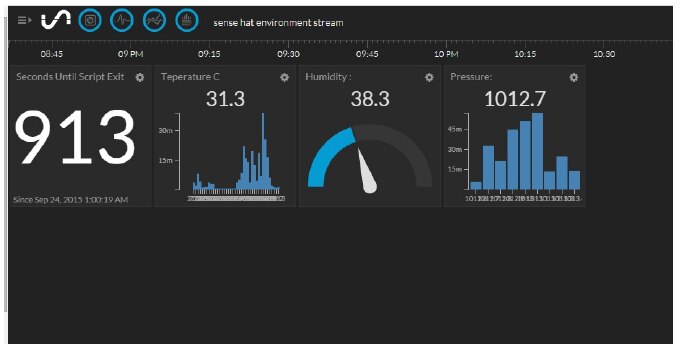
This kit helps to build your own local weather dashboard, capturing the weather inside and outside your house or office over time. This super-fun and easy project will leverage the Internet of Things (IoT), using the new Raspberry Pi 3 with built-in WiFi, a Sense HAT, and the Initial State cloud platform. Raspberry Pi will capture all the sensor data from SenseHAT and stream it directly to the cloud and this stream of data/information can be monitored or displayed in a professional graphical fashion which can be accessed from your smartphone or computer from anywhere in the world with just a few button clicks.


  • Project level: Beginner
  • Approximate time to complete: 20 minutes


Get the kit:

SenseHAT Weather StationSenseHAT Weather Station

(you can remove individual item(s) at the cart )


Project requires:


1. Raspberry Pi3Raspberry Pi3

2. Translucent EnclosureTranslucent Enclosure

3. 16GB MicroSD card preloaded with NOOBS16GB MicroSD card preloaded with NOOBS

4. Raspberry Pi Sense HATRaspberry Pi Sense HAT

5. Pi3 Power Supply 5V, 2Pi3 Power Supply 5V, 2A

6. 7" Pi Display7" Pi Display or HDMI monitor with HDMI cable

7. Keyboard & Mouse (for HDMI monitor)

image


Option 1: Follow the instruction if you have downloaded the full Raspberry Pi project images from element14 community.


Instructions:

1.  Download the full Raspberry Pi image with demo code from here

2.  Insert the uSD card into your computer SD card reader and write the downloaded imaged into uSD card using image writing software like “Win32DiskImager”, wait for the write to complete. Exit the imager and eject the SD card.

3.  Insert the uSD card into Raspberry Pi and boot the system. Now connect your Raspberry Pi to the internet using WiFi setup utility and make sure you are connected to the internet.

4.  Go to the www.InitialState.com and signup for a free account.

5.  Now login to your InitialState account, click on your username in the top right, then go to “my account”. At the bottom of the page click on “Create a New Key” to generate your unique key to stream the data. Make a note of this Access Key.

6.  On the Pi Desktop you will find a Python project file named “pi_weather.py” which we need to edit and update with the Initial State unique Access Key.

7.  Now before we move further we need to install Initialstate ISStreamer. Open the LX terminal and execute below command:


$ cd /home/pi/

$ \curl -sSL https://get.initialstate.com/python -o - | sudo bash


While installing it ll ask your Initialstate account credential created under step 4.


8.  Now we need to edit the demo file using editor of your choice, here given example using Nano editor:


sudo nano pi_weather.py


    a. Replace the text “ENTER YOUR KEY” with your Access Key “XXXX”

    b. Save the file with the same name by pressing Ctrl + X (to exit), y (to save the changes in the file, ENTER (to save with the same name).


9. Now run the modified Python file to start the weather station:


sudo python pi_weather.py


10. Go to the browser from your computer or mobile device and login to your initial state account and start monitoring the data.

image


Option 2: Please follow below instruction if you want to build this project from scratch on you existing RPi Image.


Preparations:

1. Download the Python project filehere

2. Copy the downloaded file into a USB drive

3. Go to the www.InitialState.com and signup for a free account.

4. Now login to your InitialState account, click on your username in the top right, then go to “my account”. At the bottom of the page click on “Create a New Key” to generate your unique key to stream the data. Make a note of this Access Key.

5. Connect the hardware and USB drive


Hardware & Software Setup:

1. Connect all the provided hardware and boot the Raspberry Pi 3 as a standard setup. Now connect your Raspberry Pi to the internet using WiFi setup utility and make sure you are connected to the internet.

2. Setting up SenseHAT and Initial State streamer on Raspberry Pi to stream sensor data to the cloud;


a. Installing SenseHAT. Open the LX terminal and execute below commands:


sudo apt-get update

sudo apt-get install sense-hat


b. Initial State: Open the LX terminal and execute below command:


\curl -sSL https://get.initialstate.com/python -o - | sudo bash


c. Above two steps will install SenseHAT drivers and Initialstate ISStreamer on to the Pi, it might ask for your Initialstate account credential password to proceed.


3. Now insert the USB drive and copy the downloaded Python file from the USB drive into Raspberry Pi working directly or directory of your choice.

4. Now we need to edit the Python file to enter you unique Access Key. You can use

any editor of your choice, here given example using Nano editor:


sudo nano pi_weather.py


a. replace the text “ENTER YOUR KEY” with your Access Key “XXXX”

b. Save the file with the same name by pressing Ctrl + X (to exit), y (to save the changes in the file, ENTER (to save with the same name).


5. Now run the modified Python file to start the weather station:


sudo python pi_weather.py


6. Go to the browser from your computer or mobile device and login to your initial state account and start monitoring the data.

image

  • sense hat
  • design_projects
  • rpibeginner
  • projects
  • pi weather station kit
  • raspberry_pi_project
  • raspberry pi
  • weather station
  • raspberry_pi_projects
  • Share
  • History
  • More
  • Cancel
  • Sign in to reply

Top Comments

  • DAB
    DAB over 9 years ago +3
    Nice post. I hope you go into more detail on the sensors and how you handle them using Python. I like the idea of displaying temperature and pressure over time. Both sensors give you a lot of information…
  • balearicdynamics
    balearicdynamics over 9 years ago +2
    Very good post. Inspiring for something I have in mind. Really, good. Enrico
  • sufham
    sufham over 9 years ago +2
    Please, tell me if it is possible to include a more comprehensive sensors like wind speed and direction plus the pyrano-meter and perhelio-meter sensors as well. Thanks. Sufi.
  • kiphansen
    kiphansen over 7 years ago

    I want to add real-time  WIND DIRECTION to this project.


    Can use one of the commercial blue-tooth weather stations, but need graphic display of direction, not just NNW or SW


    Anyone have a clue?.

    • Cancel
    • Vote Up 0 Vote Down
    • Sign in to reply
    • More
    • Cancel
  • mp2100
    mp2100 over 7 years ago in reply to saw1989

    This example was done using the Raspberry Pi Sense Hat.  It has several sensors on it, but it's not really expandable.  The Raspberry Pi can of course add more sensors.  You can add them yourself with a breadboard.  Another idea that is most similar to this tutorial is to use the Pimoroni Enviro-Phat:

    http://www.newark.com/pimoroni/pim181/enviro-phat-for-40-pin-raspberry/dp/31AC5287?st=pimoroni


    More information here:

    https://shop.pimoroni.com/products/enviro-phat


    This hat has similar sensors, but in addition it has four 3.3 VDC inputs you can wire to it.


    Of course, the specific Python code used for the Enviro Phat will be different from this Sense Hat tutorial, but the concepts are all the same.

    • Cancel
    • Vote Up 0 Vote Down
    • Sign in to reply
    • More
    • Cancel
  • saw1989
    saw1989 over 7 years ago

    Is it possible to add other sensors? (= DHT22; windsensor;...)

    • Cancel
    • Vote Up 0 Vote Down
    • Sign in to reply
    • More
    • Cancel
  • lkornel
    lkornel over 8 years ago

    Is working like charm.

    • Cancel
    • Vote Up 0 Vote Down
    • Sign in to reply
    • More
    • Cancel
  • rgv250
    rgv250 over 8 years ago

    Hi,

    I am new to the Raspberry Pi and have a couple of Pi 2's so I am wondering if this will work on a Pi 2 with a USB WiFi or wired network connection rather than the 3.


    Regards,

    Bob

    • Cancel
    • Vote Up 0 Vote Down
    • Sign in to reply
    • More
    • Cancel
  • danielrb
    danielrb over 8 years ago in reply to pbnet

    Andrei,


    Assuming the image is built from the standard, the initial user is pi and the password is raspberry.


    Dan

    • Cancel
    • Vote Up 0 Vote Down
    • Sign in to reply
    • More
    • Cancel
  • pbnet
    pbnet over 8 years ago

    Hello again,


    Any idea what's the SSH password for this project ?

    I found that the user is pi, but what about the password.


    Thanks.

    • Cancel
    • Vote Up 0 Vote Down
    • Sign in to reply
    • More
    • Cancel
  • pbnet
    pbnet over 8 years ago

    Hello everybody,


    I've modified the default script on the desktop of the RPI to make an infinite loop (hope I did the right thing).

    Now my problem is that the Data View gets created, but no data appears.

    Could you please help me with an idea or tell me if my script is wrong ?


    Thanks a lot


    from sense_hat import SenseHat

    from ISStreamer.Streamer import Streamer

    logger = Streamer(bucket_name="Sense Hat Environment Stream", access_key="mykey")

    import time

    import sys

    import datetime


    sense = SenseHat()

    sense.clear()


    while True:

      now = datetime.datetime.now()

      print now.strftime("%Y-%m-%d %H:%M:%S")

      temp = sense.get_temperature()

      temp = round(temp, 1)

      print("Temperature: %s C" % temp)

      sense.show_message(str("{0:.2f}".format(round(temp,2))),0.10, text_colour=[0,255,255])

      logger.log("Temperature C",temp)

      humidity = sense.get_humidity()

      humidity = round(humidity, 1)

      print("Humidity: %s" % humidity)

      sense.show_message(str("{0:.2f}".format(round(humidity,2))),0.10, text_colour=[255,100,255])

      logger.log("Humidity :",humidity)

      pressure = sense.get_pressure()

      mmhg = pressure * 0.750062

      mmhg = round(mmhg, 1)

      print("Pressure: %s mmHg" % mmhg)

      sense.show_message(str("{0:.2f}".format(round(mmhg,2))),0.10,text_colour=[255,255,0])

      logger.log("Pressure:",mmhg)

      #var = var -1

      time.sleep(600)


    • Cancel
    • Vote Up 0 Vote Down
    • Sign in to reply
    • More
    • Cancel
  • gkyates
    gkyates over 8 years ago

    WE solved the nano issue, so that is good,. Now, we can't get actual temp, pressure, etcc. reading to do to Initialstate. We are getting simple data, which is useless for our project. Is there a mod needed to the language in this download from this web site to make the actual reading happen?

    • Cancel
    • Vote Up 0 Vote Down
    • Sign in to reply
    • More
    • Cancel
  • gkyates
    gkyates over 8 years ago

    WE are using the nano command to attempt to edit the pi_weather.py to put our initialstate key in. When it opens in nano we are getting a blank screen, as if nothing is there. Has anyone else seen this? Any suggestions? I think the instruction on this web page are missing a few steps..

    • Cancel
    • Vote Up 0 Vote Down
    • Sign in to reply
    • More
    • Cancel
>
element14 Community

element14 is the first online community specifically for engineers. Connect with your peers and get expert answers to your questions.

  • Members
  • Learn
  • Technologies
  • Challenges & Projects
  • Products
  • Store
  • About Us
  • Feedback & Support
  • FAQs
  • Terms of Use
  • Privacy Policy
  • Legal and Copyright Notices
  • Sitemap
  • Cookies

An Avnet Company © 2025 Premier Farnell Limited. All Rights Reserved.

Premier Farnell Ltd, registered in England and Wales (no 00876412), registered office: Farnell House, Forge Lane, Leeds LS12 2NE.

ICP 备案号 10220084.

Follow element14

  • X
  • Facebook
  • linkedin
  • YouTube