element14 Community
element14 Community
    Register Log In
  • Site
  • Search
  • Log In Register
  • Community Hub
    Community Hub
    • What's New on element14
    • Feedback and Support
    • Benefits of Membership
    • Personal Blogs
    • Members Area
    • Achievement Levels
  • Learn
    Learn
    • Ask an Expert
    • eBooks
    • element14 presents
    • Learning Center
    • Tech Spotlight
    • STEM Academy
    • Webinars, Training and Events
    • Learning Groups
  • Technologies
    Technologies
    • 3D Printing
    • FPGA
    • Industrial Automation
    • Internet of Things
    • Power & Energy
    • Sensors
    • Technology Groups
  • Challenges & Projects
    Challenges & Projects
    • Design Challenges
    • element14 presents Projects
    • Project14
    • Arduino Projects
    • Raspberry Pi Projects
    • Project Groups
  • Products
    Products
    • Arduino
    • Avnet & Tria Boards Community
    • Dev Tools
    • Manufacturers
    • Multicomp Pro
    • Product Groups
    • Raspberry Pi
    • RoadTests & Reviews
  • About Us
    About the element14 Community
  • Store
    Store
    • Visit Your Store
    • Choose another store...
      • Europe
      •  Austria (German)
      •  Belgium (Dutch, French)
      •  Bulgaria (Bulgarian)
      •  Czech Republic (Czech)
      •  Denmark (Danish)
      •  Estonia (Estonian)
      •  Finland (Finnish)
      •  France (French)
      •  Germany (German)
      •  Hungary (Hungarian)
      •  Ireland
      •  Israel
      •  Italy (Italian)
      •  Latvia (Latvian)
      •  
      •  Lithuania (Lithuanian)
      •  Netherlands (Dutch)
      •  Norway (Norwegian)
      •  Poland (Polish)
      •  Portugal (Portuguese)
      •  Romania (Romanian)
      •  Russia (Russian)
      •  Slovakia (Slovak)
      •  Slovenia (Slovenian)
      •  Spain (Spanish)
      •  Sweden (Swedish)
      •  Switzerland(German, French)
      •  Turkey (Turkish)
      •  United Kingdom
      • Asia Pacific
      •  Australia
      •  China
      •  Hong Kong
      •  India
      •  Japan
      •  Korea (Korean)
      •  Malaysia
      •  New Zealand
      •  Philippines
      •  Singapore
      •  Taiwan
      •  Thailand (Thai)
      •  Vietnam
      • Americas
      •  Brazil (Portuguese)
      •  Canada
      •  Mexico (Spanish)
      •  United States
      Can't find the country/region you're looking for? Visit our export site or find a local distributor.
  • Translate
  • Profile
  • Settings
Raspberry Pi
  • Products
  • More
Raspberry Pi
Documents Pi Desktop: Booting from the SSD (aka booting from USB devices on a Pi 3)
  • Blog
  • Forum
  • Documents
  • Quiz
  • Events
  • Polls
  • Files
  • Members
  • Mentions
  • Sub-Groups
  • Tags
  • More
  • Cancel
  • New
Join Raspberry Pi to participate - click to join for free!
Actions
  • Share
  • More
  • Cancel
Engagement
  • Author Author: cstanton
  • Date Created: 3 Jul 2017 2:38 PM Date Created
  • Last Updated Last Updated: 10 May 2021 8:50 PM
  • Views 13632 views
  • Likes 8 likes
  • Comments 66 comments
Related
Recommended

Pi Desktop: Booting from the SSD (aka booting from USB devices on a Pi 3)

Amazingly, the Raspberry Pi booting from a USB device is a huge point of controversy. A great deal many people believe that you still require the SDCard to be able to do it. This is definitely no longer the case, especially with the Raspberry Pi 3. So even though with the Pi Desktop you're going to be connecting a Solid State Drive via a SATA to USB 2.0 interface, where you're going to lose some speed, overall, it's still an improvement. If for nothing else, the capacity of what you can store on it. The add-on HAT board will take an mSATA SSD up to 1 Terabyte in size, and for that to be faster to boot and access than an SDCard and for some USB 'sticks' or 'drives' then that is a significant improvement in itself, and I know a lot of people out there want a dedicated Pi NAS box after all.


So why isn't this straight forward for a lot of people? Why can't you simply plug in your mSATA SSD, format it and get going? Well, I've identified are a few areas that people are mainly struggling with on this:


  • You have to enable the 'USB Boot bit' on the Raspberry Pi 3 first (this is permanent)
  • Your SSD has to be imaged in the 'right way'
  • Some have the impression that you still need the SDCard in, and that you need to mount the SSD (you can do this, though, you don't strictly have to use the SSD as a boot device)
  • The mSATA SSD has to be supported by the add-on HAT (I'm not actually sure of any that aren't and there's no reference list at the moment, this is mostly hypothetical).
  • There are/were problems with the PiDesktop debian file supplied by Embest (these are being worked on and there is an official github repo here).


On the SSD being imaged in 'the right way', you can end up encountering problems imaging your SSD card as you likely do with your SDCard, especially with Microsoft Windows. Windows has a terrible interface to the SDCard readers with the various software that's available. This is either because the software can only refer to the device via the 'drive letter' or by the 'hardware device ID'. Unfortunately most software (eg. Win32DiskImager, I'm looking at you) can only handle imaging drives when it has a drive letter. This totally fails if you haven't even partitioned your device yet and assigned it a drive letter, and some people feel forced to format it to FAT32, this can break things even further. You don't need to format or pre-partition your device, merely assign it a drive letter. There're two useful pieces of software I use to handle this, one is the free software 'Active Partition Manager' and the other is the Disk Management Snapin for Management Console.


Let's go through some steps on setting this up. By all means comment on this with your experiences or software you've used that has been successful. What you're about to read is my except from the user manual.


image


Connecting an mSATA SSD


Inside the Pi Desktop we can access the data stored onto the mSATA SSD in one of two ways. Either via USB from the add-on board and then into the attached Raspberry Pi (where we can also boot from it), or connect it to an external computer via USB without having to open up the Pi Desktop case (though you still need to 'turn on' the Pi Desktop for this to work).


If the mSATA SSD that you have connected is pre-formatted with a partition using a FAT32 file system (FS), then this FS is typically accessible by all known modern operating systems (OS), and easily accessible. Though if it uses a typical Linux FS such as ext2/3/4, this is trickier to access by all OSs.


Note: If you’re connecting the mSATA SSD add-on board to a computer other than the Raspberry Pi inside the Pi Desktop, then you will need the appropriate cable, and you will also have to power the add-on board/Pi Desktop and press the power-on switch. This will also power on the Raspberry Pi if it is still connected.


Imaging and Setting Up Partitions

An easy to use utility for managing the partitions on the drive is ‘gparted’ from the Raspbian (OS) (for example if you booted from the SDCard):


> http://gparted.org/


This is a graphical user interface (GUI) tool that can be used to manage the partitions on your drives, connected via USB or otherwise. It can be installed via the apt package manager from the command line interface (CLI) :


> sudo apt-get update

> sudo apt-get install gparted


Then you can either run it from the menu of your Raspbian OS, or from the CLI:


> sudo gparted


From here you can (re)partition your mSATA SSD if it’s running a supported file system. If you are using the CLI, then you will want to issue the following command:


> sudo fdisk /dev/<identifier>


Where <identifier> is the mount point for the mSATA SSD.


Alternatively, you can simply write an image to the mSATA SSD, just as you would write an image to an SDCard. The Raspberry Pi Foundation have instructions on how you write images here:


https://www.raspberrypi.org/documentation/installation/installing-images/


Note: if you write an image to your mSATA SSD then the data used and accessible from the OS will only be of the size of the image written, unless you resize the partitions.


Mounting the mSATA SSD to Access Files


Raspbian

The Raspbian OS is based upon Debian Linux, and as such supports the majority of commands and functions that you would use to mount drives within that OS (these typically involve fstab - https://wiki.debian.org/fstab, and pmount - https://wiki.debian.org/pmount ).


From the GUI

Depending on your version of Raspbian, and how you have it configured, when you boot your Raspberry Pi to the GUI and then connect the attached mSATA SSD, you will be prompted what to do with your “Removable media” that has been inserted, and the drive will be automatically mounted.


It is possible that the GUI will not behave in this way, and instead you will have a transparent icon representing the drive on your desktop, which you can then double-click with the left mouse button and Raspbian will attempt to mount it.


From the CLI

When mounting the drive from the GUI, you will have made the drive accessible from the CLI. Typically this is located within the following folder:


/media


However, sometimes we can’t use the GUI, or merely we don’t want to. To mount the drive we must first know how Linux is referring to it. Linux has the majority of its hardware listed under the ‘/dev’ folder structure, with connected devices typically using the format of ‘/dev/sd<x>’ where <x> is a letter. These can even extend further with ‘/dev/sd<x><y>’ where <y> is the number of the partition(s) on the device.


There are a few commands in which we can determine what the device is of a USB device we connect, first, connect the USB device, and then type the following:


> dmesg


This will tell you basically the contents of a system log which gives you information about the device you have just plugged in. You can also issue the following commands:


> lsusb


Which will tell you about the device identifiers, and also:


> lsblk


This command will tell you the /dev/ mount points.


Note: If you have problems running a command, try typing ‘sudo’ before it.


Now, you will need somewhere to mount the drive to. Let’s make a directory and set the permissions onto it:


> sudo mkdir /media/ssd

> sudo chmod 755 /media/ssd


Once you know the device mount point, you can then issue the following command:


> sudo mount /dev/sd<x><y> /media/ssd


Note: Mounting will only work if the mSATA SSD has a file system and partitions setup (see ‘Imaging and Setting Up Partitions’ in this document.), you will want to mount the relevant partition (which has a number, such as /dev/sdb1) as opposed to the device itself (/dev/sdb).


The Raspberry Pi Foundation’s official magazine, The Mag Pi has a good article on this:


https://www.raspberrypi.org/magpi/connecting-disks-with-the-command-line/


Microsoft Windows

Thanks to an open source project called Ext2Fsd (Ext2 File System Driver) it is now possible to very easily mount linux FS onto Microsoft Windows OS.


You can download and install the software from these websites:


http://www.ext2fsd.com/

https://sourceforge.net/projects/ext2fsd/


To install the software you will need to have administrative rights on the computer you’re installing it onto, and the ability to install the required system drivers. Afterwards you will likely have to reboot.


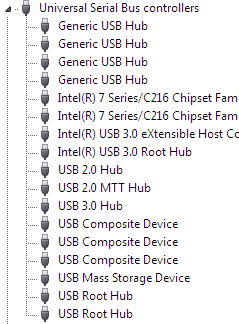
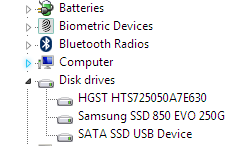
After you have connected the mSATA SSD HAT board to your computer, you will see it in Windows device manager as a USB Mass Storage Device and also as a drive:
 

imageimage


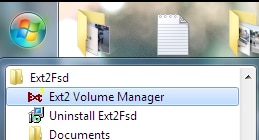
From the start menu, you will want to open the ‘Ext2Fsd’ folder and then ‘Ext2 Volume Manager’:
 

image


From the software we can then see the partitions of all of the drives listed, including the identified ext FS:


image


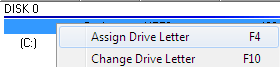
Since in this example, we have already imaged the mSATA SSD with Raspbian, a FAT32x partition is listed (drive E:). it is the EXT4, Linux FS we want below it:
 

image


image


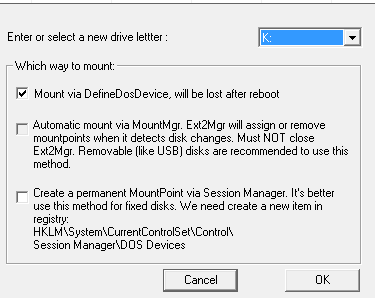
Make sure we want to give it a drive letter so we can access it, there are various mounting options you can choose from.

 

image


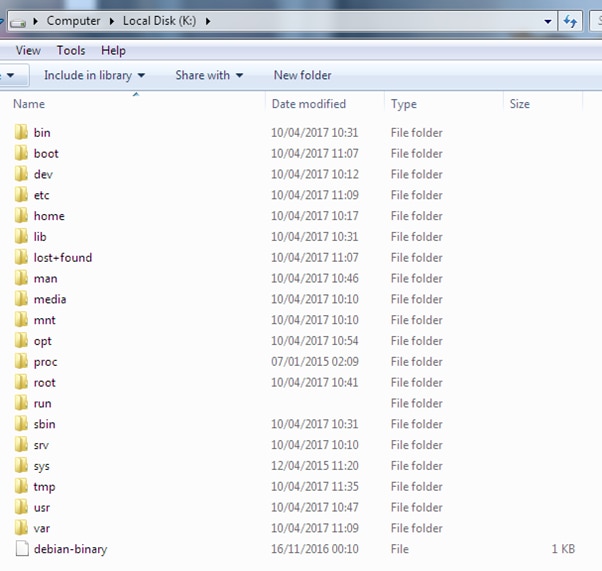
Windows Explorer then has the new drive listed, which we can then open and view the Linux EXT FS:
 

image


You can now alter the files and unmount them as necessary.


Boot from the mSATA SSD

Configuring your Raspberry Pi to boot from a USB device is a one-way setting. You are configuring a ‘flag’ or a ‘bit’ on your Raspberry Pi chip that you cannot revert.


The Raspberry Pi will always prioritise booting from the SDCard when one is present.


To set this up, you will need an SDCard in your Raspberry Pi that has the Raspbian OS on it. Inside the file located in:


/boot/config.txt


You need to set this option to the value ‘1’ :


program_usb_boot_mode=1


Then power on your Raspberry Pi with the SDCard inserted. That’s all there is to it. Once you’re in Raspbian, you can run the following command from the CLI:


> vcgencmd otp_dump | grep 17:


This should output the following:


17:3020000a


Now all you need to do is ensure your mSATA SSD has an OS on it, that it’s connected via USB and power up your Pi Desktop. If you’re unsure about these steps then you can read the following guide on the Raspberry Pi Foundation site:


https://www.raspberrypi.org/documentation/hardware/raspberrypi/bootmodes/msd.md


You can write the same Raspbian image to your mSATA SSD as you have done to your SDCard. You now no longer need the SDCard to boot your Raspberry Pi once this flag is set.


I've got a Pi Desktop sat on my desk here, if there's any further information you need, or believe I should elaborate on any part of this, then go ahead and ask by adding a comment and I'll do my best.

  • raspberry pi 3 ssd
  • rpiintermediate
  • ssd
  • raspberry pi 3 hard drive
  • raspberry_pi
  • setup ssd
  • pi desktop
  • raspberry pi 3
  • raspberry pi 3 setup
  • Share
  • History
  • More
  • Cancel
  • Sign in to reply

Top Comments

  • cstanton
    cstanton over 9 years ago in reply to DAB +3
    Both fortunately, and unfortunately, DAB, that's exactly what you have to do. Dive in. The hardware in its current state isn't going to change from needing the config file altering on the SDCard for that…
  • fvan
    fvan over 9 years ago in reply to DAB +2
    I agree with DAB, ease of use (or installation) is key. Look at the recurrent issues on Raspberry Pi, a lot of cases are about incorrectly flashed SD cards etc ... If that's already too difficult, this…
  • DAB
    DAB over 9 years ago +1
    Nice post, but what most of us want is to be able to just add the SSD and reboot. Until you can make it that easy, most of us are just too scared to dive in with our limited Linux skills. DAB
  • jpdowning1976
    jpdowning1976 over 9 years ago

    What size fan will work best with this?

    • Cancel
    • Vote Up 0 Vote Down
    • Sign in to reply
    • More
    • Cancel
  • cstanton
    cstanton over 9 years ago in reply to legoodwin50

    How the drive is mounted when the driver is loaded (/dev/sdx) doesn't imply or show that the Pi has booted from it (from power on).


    If you haven't set the boot bit on the Pi 3, then it's not booting from the SSD, also if you've left the SDCard in which is also setup to boot from, then the Pi 3 will boot from the SDCard first.


    Booting from the SDCard and then accessing the rootfs from the SSD, isn't booting from the SSD. You're booting from the SDCard and accessing the Raspbian applications from another drive, so in this case you're not taking advantage of any speed benefit of booting from the SSD.


    If that's what you want to do there's nothing wrong with that, particularly. By all means do so.

    • Cancel
    • Vote Up 0 Vote Down
    • Sign in to reply
    • More
    • Cancel
  • legoodwin50
    legoodwin50 over 9 years ago in reply to cstanton

    I am looking with GParted at /dev/sda and I see a /dev/sda6 labeled root0 which has a used size of 6.27 GiB.  Isn't that where Raspbian resides?  Looks to me like I AM booting from SSD even though I have not set the bit.

    • Cancel
    • Vote Up 0 Vote Down
    • Sign in to reply
    • More
    • Cancel
  • cstanton
    cstanton over 9 years ago in reply to legoodwin50

    tedvan The Pi 3 will default to booting from the SDCard first if you have the bit set and the SDCard left in it.


    If you haven't set the bit and you haven't redirected the rootfs to be ran from the SSD then you're not running Linux from it at all.

    • Cancel
    • Vote Up 0 Vote Down
    • Sign in to reply
    • More
    • Cancel
  • cstanton
    cstanton over 9 years ago in reply to tedvan

    Your SSD is behaving in a way which suggests the image hasn't been written to it properly. SDCards can behave similarly, or you haven't plugged in the microUSB to USB adapter into the side of the HAT to the Raspberry Pi. This is important because the SSD does not communicate to the Raspberry Pi over the GPIO pins.


    You don't need to partition your SSD to FAT/FAT32 before writing the image to it. I suggest using different software, or consider using 'dd' to write the image to the SSD if you're using a Mac or Linux operating system.

    • Cancel
    • Vote Up 0 Vote Down
    • Sign in to reply
    • More
    • Cancel
  • legoodwin50
    legoodwin50 over 9 years ago in reply to tedvan

    There is a procedure described elsewhere in this thread to allow booting without the SDcard but it is a non-reversible action and I'm not interested in making that modification as I might switch the pi with others in my collection.  Also, it is very difficult to get the SDcard out of the PiDesktop so I think it's okay to leave it in.

    • Cancel
    • Vote Up 0 Vote Down
    • Sign in to reply
    • More
    • Cancel
  • tedvan
    tedvan over 9 years ago in reply to legoodwin50

    Thanks Larry, I followed your suggestion and started with a NOOBS image on the SDcard. As you described I could select to install Raspbian on my Samsung mSata SSD which I did. After reboot it works fine, but I still can not boot without the SDcard. I guess it needs some boot info / settings from that SDcard before it switches to the SSD.

    (I also tried to flash a Jessie image to the SSD with Etcher from my Mac, but Etcher does not recognize it, even though Disk Utility formatted it first as FAT and the disk shows up in the Finder...)

    • Cancel
    • Vote Up 0 Vote Down
    • Sign in to reply
    • More
    • Cancel
  • legoodwin50
    legoodwin50 over 9 years ago

    My Experience:  Having difficulty following along with the instructions given, especially the gparted stuff, I started over and loaded up a fresh noobs image.  To my surprise, there was a choice of where to install Rasbian and my little mSATA drive was one of the choices!  So I chose that and let everything simmer, booted up and executed the pidesktop.deb file, rebooted and everything works as advertised.

    • Cancel
    • Vote Up +1 Vote Down
    • Sign in to reply
    • More
    • Cancel
  • tedvan
    tedvan over 9 years ago

    Hi, I just tot my PiDesktop and got most of it working. But I can not boot it without SDcard.

    I use a Pi3, formatted the Samsung 250 SSD as FAT using my Mac (with cable) and then connected it again with the USB adapter to the HAT is the Pi Desktop. With the built in SD card copier I copied the content of the SD card to the SSD and after a restart I can see (with gparted) that I have a /dev/mmcblk0 and a /dev/sda

    on the sda I have two partitions /dev/sda1 with mount point /media/pi/boot and /dev/sda2 with mount point /media/Pi/62ca0b.....e4a38

    I set the program_usb_boot_mode=1 and got the 17:3020000a result.


    However when I now try to startup without the SDcard it still won't boot.


    What did I miss? I have been searching earlier posts but I have no clue...

    Ted

    • Cancel
    • Vote Up 0 Vote Down
    • Sign in to reply
    • More
    • Cancel
  • DAB
    DAB over 9 years ago in reply to cstanton

    I agree.


    The RPI does a good job for its intended market, but like any computer, everyone gets delusions of grandeur and take it outside its intended domain.


    DAB

    • Cancel
    • Vote Up 0 Vote Down
    • Sign in to reply
    • More
    • Cancel
<>
element14 Community

element14 is the first online community specifically for engineers. Connect with your peers and get expert answers to your questions.

  • Members
  • Learn
  • Technologies
  • Challenges & Projects
  • Products
  • Store
  • About Us
  • Feedback & Support
  • FAQs
  • Terms of Use
  • Privacy Policy
  • Legal and Copyright Notices
  • Sitemap
  • Cookies

An Avnet Company © 2026 Premier Farnell Limited. All Rights Reserved.

Premier Farnell Ltd, registered in England and Wales (no 00876412), registered office: Farnell House, Forge Lane, Leeds LS12 2NE.

Follow element14

  • X
  • Facebook
  • linkedin
  • YouTube