element14 Community
element14 Community
    Register Log In
  • Site
  • Search
  • Log In Register
  • Community Hub
    Community Hub
    • What's New on element14
    • Feedback and Support
    • Benefits of Membership
    • Personal Blogs
    • Members Area
    • Achievement Levels
  • Learn
    Learn
    • Ask an Expert
    • eBooks
    • element14 presents
    • Learning Center
    • Tech Spotlight
    • STEM Academy
    • Webinars, Training and Events
    • Learning Groups
  • Technologies
    Technologies
    • 3D Printing
    • FPGA
    • Industrial Automation
    • Internet of Things
    • Power & Energy
    • Sensors
    • Technology Groups
  • Challenges & Projects
    Challenges & Projects
    • Design Challenges
    • element14 presents Projects
    • Project14
    • Arduino Projects
    • Raspberry Pi Projects
    • Project Groups
  • Products
    Products
    • Arduino
    • Avnet Boards Community
    • Dev Tools
    • Manufacturers
    • Multicomp Pro
    • Product Groups
    • Raspberry Pi
    • RoadTests & Reviews
  • Store
    Store
    • Visit Your Store
    • Choose another store...
      • Europe
      •  Austria (German)
      •  Belgium (Dutch, French)
      •  Bulgaria (Bulgarian)
      •  Czech Republic (Czech)
      •  Denmark (Danish)
      •  Estonia (Estonian)
      •  Finland (Finnish)
      •  France (French)
      •  Germany (German)
      •  Hungary (Hungarian)
      •  Ireland
      •  Israel
      •  Italy (Italian)
      •  Latvia (Latvian)
      •  
      •  Lithuania (Lithuanian)
      •  Netherlands (Dutch)
      •  Norway (Norwegian)
      •  Poland (Polish)
      •  Portugal (Portuguese)
      •  Romania (Romanian)
      •  Russia (Russian)
      •  Slovakia (Slovak)
      •  Slovenia (Slovenian)
      •  Spain (Spanish)
      •  Sweden (Swedish)
      •  Switzerland(German, French)
      •  Turkey (Turkish)
      •  United Kingdom
      • Asia Pacific
      •  Australia
      •  China
      •  Hong Kong
      •  India
      •  Korea (Korean)
      •  Malaysia
      •  New Zealand
      •  Philippines
      •  Singapore
      •  Taiwan
      •  Thailand (Thai)
      • Americas
      •  Brazil (Portuguese)
      •  Canada
      •  Mexico (Spanish)
      •  United States
      Can't find the country/region you're looking for? Visit our export site or find a local distributor.
  • Translate
  • Profile
  • Settings
RoadTests & Reviews
  • Products
  • More
RoadTests & Reviews
Blog Arm Education: Internet of Things Course - Digital Input/Output and GPIO
  • Blog
  • RoadTest Forum
  • Documents
  • RoadTests
  • Reviews
  • Polls
  • Files
  • Members
  • Mentions
  • Sub-Groups
  • Tags
  • More
  • Cancel
  • New
Join RoadTests & Reviews to participate - click to join for free!
  • Share
  • More
  • Cancel
  • Author Author: ralphjy
  • Date Created: 22 May 2019 4:37 AM Date Created
  • Views 736 views
  • Likes 4 likes
  • Comments 0 comments
Related
Recommended
  • RoadTest
  • arm education iot course

Arm Education: Internet of Things Course - Digital Input/Output and GPIO

ralphjy
ralphjy
22 May 2019

The fourth course module continues the examination of the Cortex-M4 architecture with a look at the memory mapping and processor instructions.  The lab for this module deals with programming digital input and outputs using the GPIO pins.


image

The Cortex-M4 has a 32 bit addressable memory space (4GB).  The memory is allocated into functional regions as shown below.

image


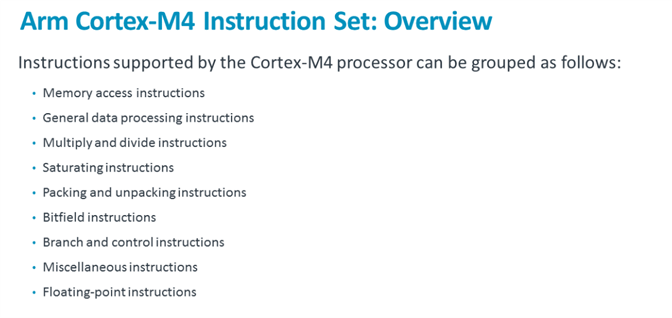
The Cortex-M4 Instruction Set has been optimized with 32 bit Thumb2 instructions that can execute in one instruction state.  Here's a list of the instruction types included:

image

Lab2 Exercise - Digital Input/Output and GPIO

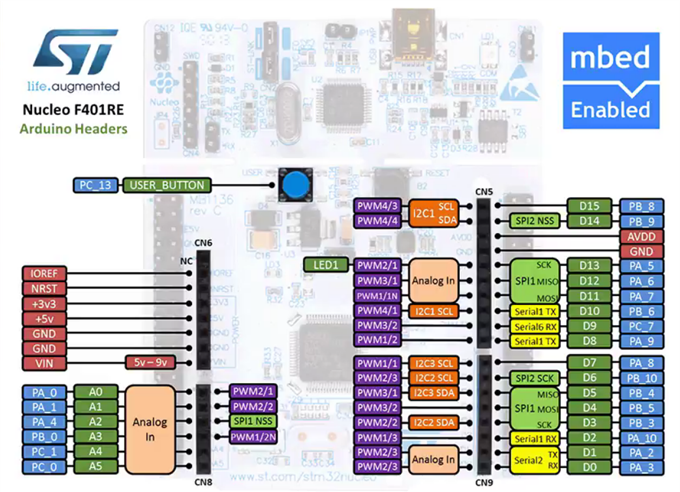
The Nucleo F401RE development board has a set of Arduino compatible headers.  It apparently can also be programmed using the Arduino IDE but that's something that I may try after this course.

image


When I tried loading the LED Blinky project for this lab, I got the following error:

image


Not sure why because I had loaded the device specific software packs when I installed the Keil MDK.  But I went back and installed the missing pack using the Pack Manager and the IDE was happy.


The purpose of this lab is to get you familiarized with the instruction syntax for controlling the GPIO and using the Reference Documentation to locate the register definitions.  The USER_BUTTON is on Bit 13 of GPIO Port C.  The first thing that must be done to use Port C is enable its clock.  It's common in power optimized devices for resources to initialize as disabled in order to conserve power.  Here is what that clock enable register definition looks like in the Reference:

image


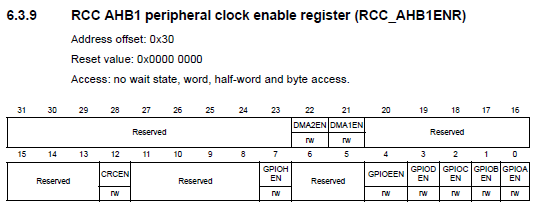
And here is the corresponding code to enable the port clock:


//Enable IO port C

RCC->AHB1ENR |= RCC_AHB1ENR_GPIOCEN;


The lab exercise is to create a program that turns the LED on when the USER_BUTTON is pressed and turns it off when the button is released.  It requires enabling of the GPIO ports and setting the direction (in or out) and pullup on the pins.  Here is a short video of the program operating.

You don't have permission to edit metadata of this video.
Edit media
x
image
Upload Preview
image

  • Sign in to reply
element14 Community

element14 is the first online community specifically for engineers. Connect with your peers and get expert answers to your questions.

  • Members
  • Learn
  • Technologies
  • Challenges & Projects
  • Products
  • Store
  • About Us
  • Feedback & Support
  • FAQs
  • Terms of Use
  • Privacy Policy
  • Legal and Copyright Notices
  • Sitemap
  • Cookies

An Avnet Company © 2025 Premier Farnell Limited. All Rights Reserved.

Premier Farnell Ltd, registered in England and Wales (no 00876412), registered office: Farnell House, Forge Lane, Leeds LS12 2NE.

ICP 备案号 10220084.

Follow element14

  • X
  • Facebook
  • linkedin
  • YouTube