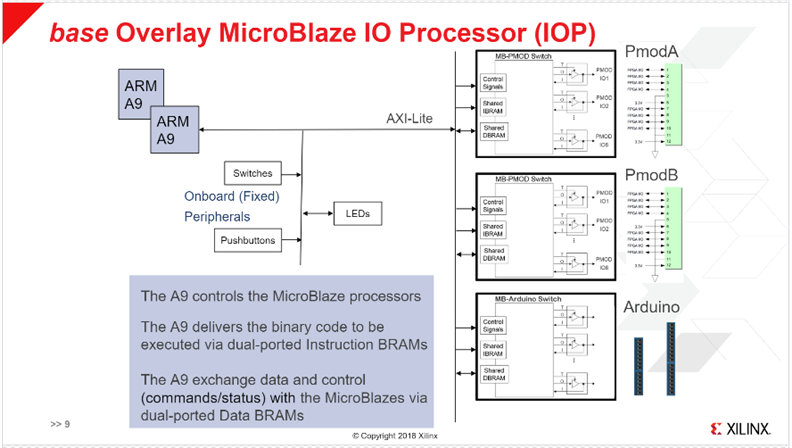
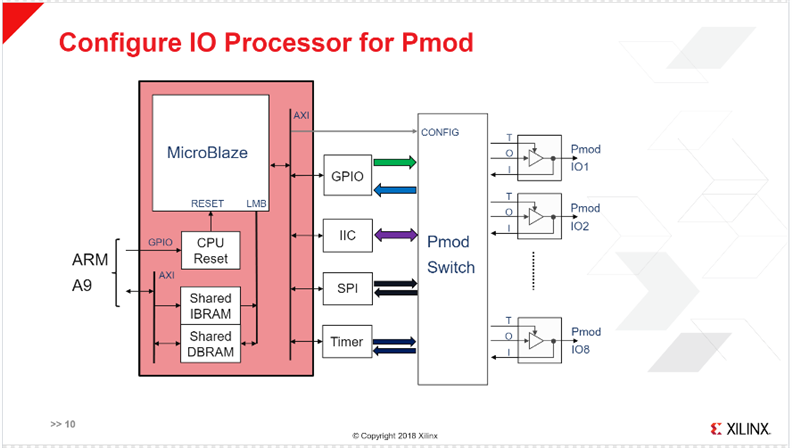
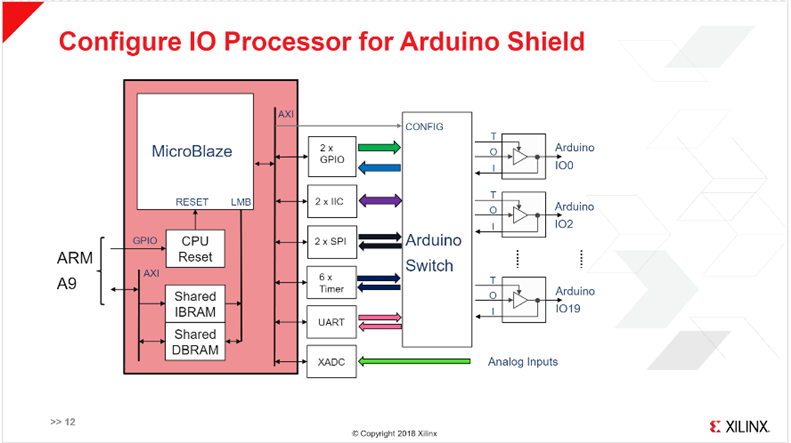
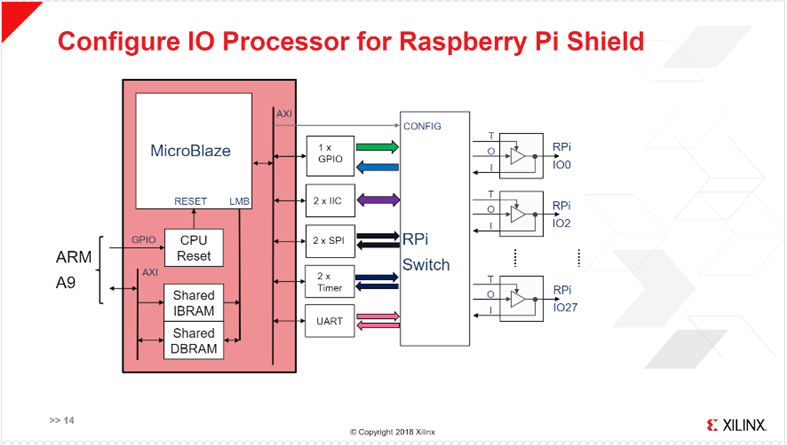
I'm continuing my exploration of the base overlay to control the external peripheral interfaces on the PYNQ-Z2. The 3 interfaces are the Pmod, Arduino, and Raspberry Pi which are each controlled through a separate soft-core Microblaze processor. The MicroBlaze instances are referred to as IO Processors (IOP) and there are actually 4 IOPs in the base overlay as there are 2 PMODs (A/B), the Arduino IO, and the Raspberry Pi IO. PmodA shares its 8 data pins with the RPi interface. The IOPs interface in the Programmable Logic (PL) with the Processor System (PS) through dual-ported instruction and data block RAMs. Each IOP is configured to implement the specific peripheral interface functions as illustrated below.
For my experimenting, I am using some of the components from the Xilinx PYNQ_Workshop:
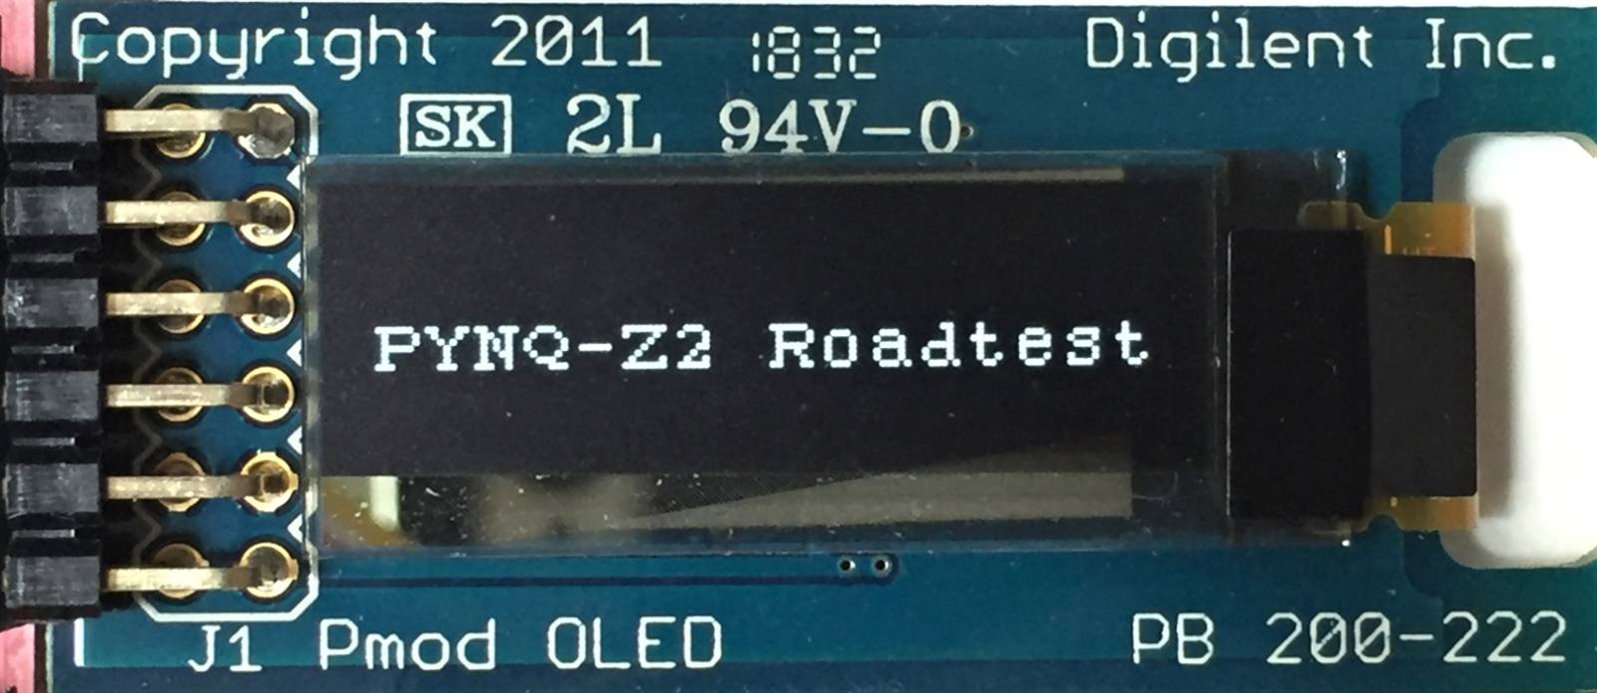
- Pmod 128x32 monochrome OLED
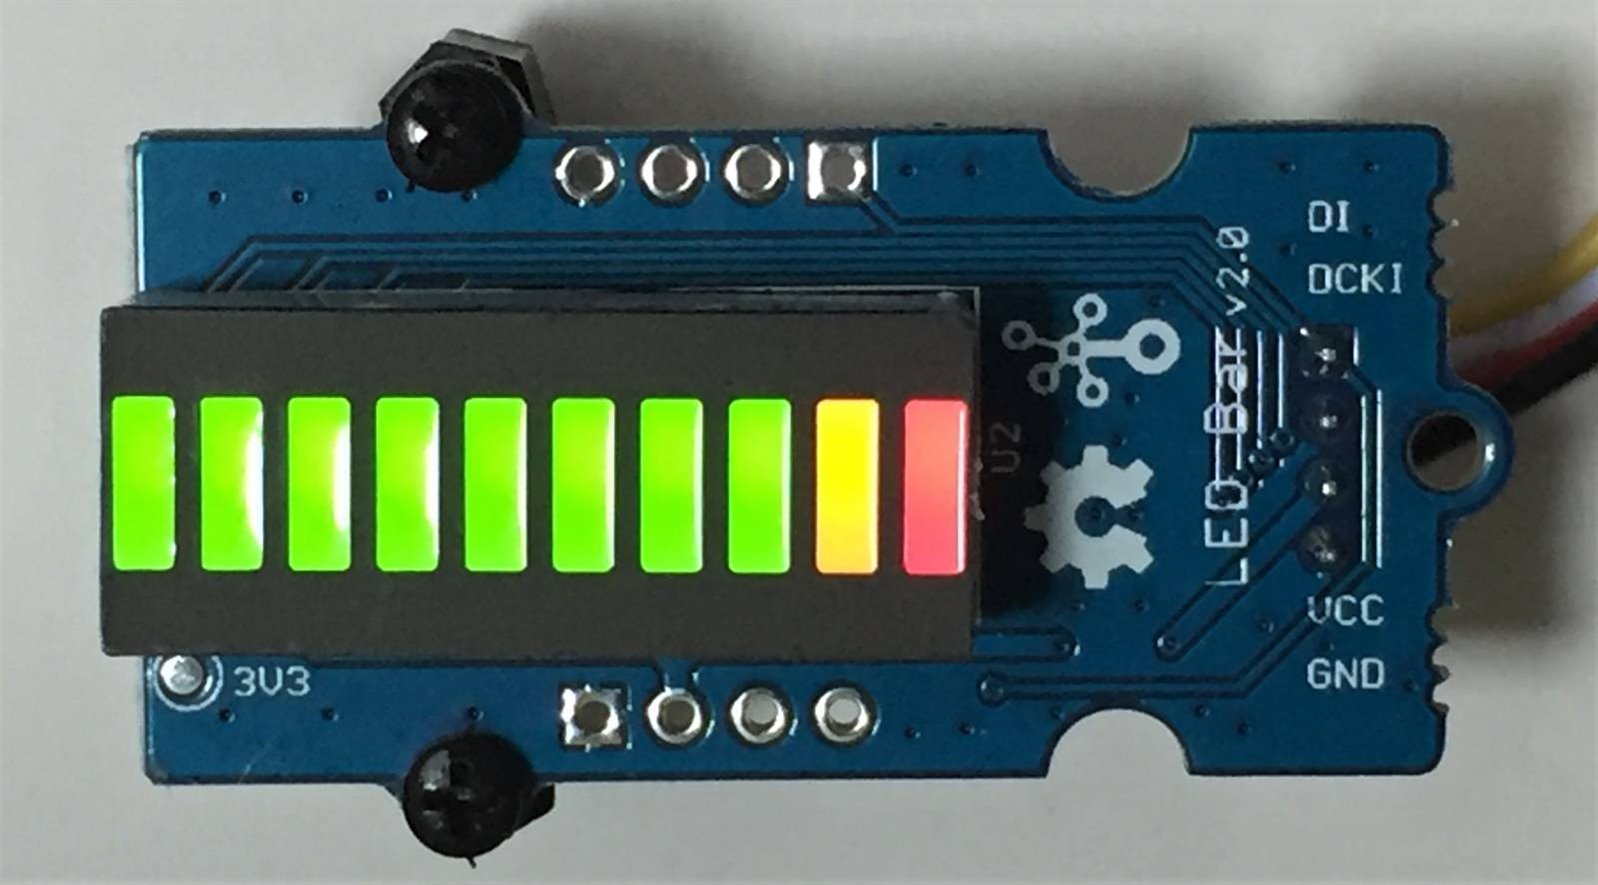
- Grove LEDbar
- Grove Temperature Sensor used with the Grove ADC
I had originally intended to use only the two Pmod IOPs. PmodA would be used for the OLED and the PmodB would be used for the Pmod Grove interface board which has 4 Grove connectors ( 2 I2C and 2 GPIO). The LEDbar uses GPIO and the ADC uses I2C (the Temperature sensor connects to the ADC). However, when I executed the code I got an interface busy error on the PmodB IOP. It turns out that the pre-compiled "drivers" (MicroBlaze applications) only support a single peripheral, so I couldn't run the LEDbar and the ADC on the same Pmod IOP. Of course, this is just an FPGA programming issue. I could write my own MicroBlaze application and compile it or I could also write some C code in the Jupyter notebook and implement multiple peripherals per IOP that way. But, that is further down on my list of things to learn. Luckily, I had also purchased an Arduino Grove shield so I just moved the LEDbar to it since it uses a different IOP.
I created a new Jupyter notebook (external_peripherals.ipynb) as a simple demo of functionality. Here is the code that I used. I'm using 2 libraries from the base overlay - pynq.lib.arduino and pynq.lib.pmod. And I'm using the corresponding classes for the peripherals (Grove_LEDbar, Grove_TMP, Pmod_OLED) and the IOP connections.
Import the base overlay and the libraries and instantiate the peripherals:
from pynq.overlays.base import BaseOverlay
base = BaseOverlay("base.bit")

from time import sleep

from pynq.lib.arduino import Grove_LEDbar
from pynq.lib.arduino import ARDUINO_GROVE_G4 # Import constants
# Instantiate Grove LED Bar on ArduinoGrove G4
# PMODA = 1, PMODB = 2, Arduino = 3
# Pynq Grove Adapter; G1 = [0,4], G2 = [1,5], G3 = [7,3], G4 = [6,2]
# The LED bar can be connected to G1-7 on the Pynq Arduino Shield:
# G1 = [2,3], G2 = [3,4], G3 = [4,5], G4 = [6,7], G5 = [8,9], G6 = [10,11], G7 = [12,13]
ledbar = Grove_LEDbar(base.ARDUINO,ARDUINO_GROVE_G4)
ledbar.reset()

from pynq.lib.pmod import Pmod_OLED
# Connect to PMODA
pmod_oled = Pmod_OLED(base.PMODA)

from pynq.lib.pmod import Grove_TMP
from pynq.lib.pmod import PMOD_GROVE_G4 # import constants
# Instantiate Grove temperature sensor on PMODB Grove G4
tmp = Grove_TMP(base.PMODB, PMOD_GROVE_G4)
Sweep the LEDs on the LEDbar:
# turn on lEDs in sequence from green to red
# equalize brightness
# Brightness 0-255
HIGH = 0xFF
MED  = 0xAA
LOW  = 0x01
OFF  = 0X00
GREEN = 0x1C
RED = 0x02
ORANGE = 0x03

brightness = [GREEN, GREEN, GREEN, GREEN, GREEN, GREEN, GREEN, GREEN, ORANGE, RED]

ledbar.write_brightness(0b1111111111,brightness)

for x in range (11):
    if x in (0,):
        ledbar.write_brightness(0b0000000000,brightness)
        sleep(0.3)
    elif x in (1,):
        ledbar.write_brightness(0b1000000000,brightness)
        sleep(0.3)
    elif x in (2,):
        ledbar.write_brightness(0b1100000000,brightness)
        sleep(0.3)
    elif x in (3,):
        ledbar.write_brightness(0b1110000000,brightness)
        sleep(0.3)
    elif x in (4,):
        ledbar.write_brightness(0b1111000000,brightness)
        sleep(0.3)
    elif x in (5,):
        ledbar.write_brightness(0b1111100000,brightness)
        sleep(0.3)
    elif x in (6,):
        ledbar.write_brightness(0b1111110000,brightness)
        sleep(0.3)
    elif x in (7,):
        ledbar.write_brightness(0b1111111000,brightness)
        sleep(0.3)
    elif x in (8,):
        ledbar.write_brightness(0b1111111100,brightness)
        sleep(0.3)
    elif x in (9,):
        ledbar.write_brightness(0b1111111110,brightness)
        sleep(0.3)
    else:
        ledbar.write_brightness(0b1111111111,brightness)
        sleep(0.3)
Write message to OLED:
pmod_oled.clear()
pmod_oled.write('\n\nPYNQ-Z2 Roadtest')
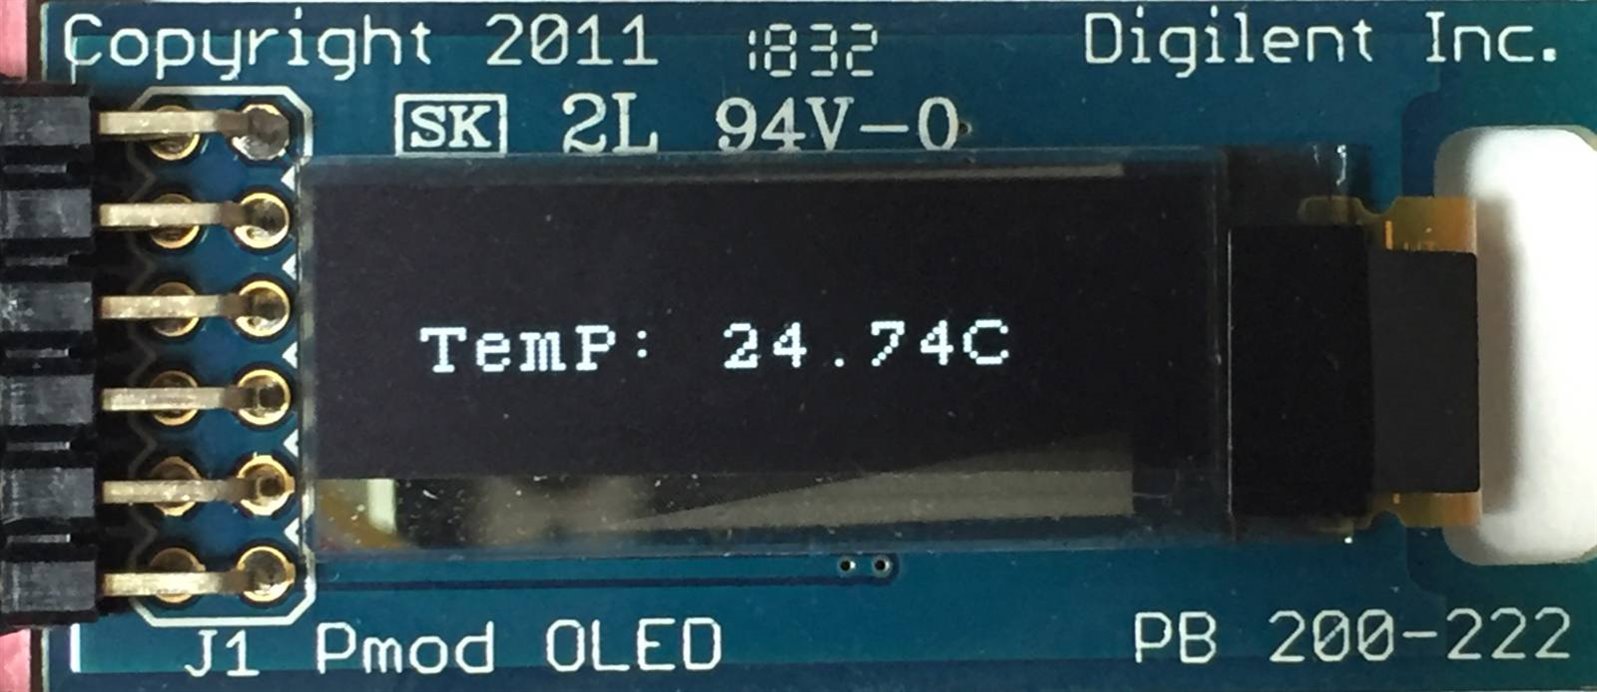
Read Temperature and write to OLED:
temperature = tmp.read() - 4.0  # tweak value to reflect actual ambient temp
print(float("{0:.2f}".format(temperature)),'degree Celsius')


pmod_oled.clear()
pmod_oled.write("\n\n Temp: " + str(temperature) + "C")
Reset peripherals:
ledbar.reset()
pmod_oled.clear()
A short video showing the notebook operation.
I haven't quite figured out how to get the correct exposure on my webcam or how to eliminate the OLED flicker, so I captured a few stills that show the results better.