


Introduction
After carrying out the roadtest of the AVR-IoT Cellular Mini Development Board,, I tried to create a simple project that used this versatile board from Microchip.

The project I want to carry out is that of a simple telemetry sent to a remote terminal for monitoring temperature and brightness. Obviously we will use the sensors on the board but, with the necessary changes, we will also be able to connect other types of sensors. The AVR-IoT Cellular Mini Development Board is in fact a very versatile board and allows to interface easily with external sensors.
For sending the data we will use the MQTT protocol, a simple but powerful protocol.
The Video
Telemetry project
Obviously, we will use the board manual.
First we realize the communication between the board and the PC using LTE-M. We will start from the "mqtt_polling" example provided in the Arduino IDE and we will modify it until our goal is achieved. At this stage we will not use encryption but obviously the user can encrypt the data traffic using the encryption module on the board.
Using a cellular board to communicate with a remote station might seem trivial but very often you have to deal with a big obstacle: frequently our connections do not have a public IP address or are natted. For this reason it is not possible to reach a WEB server or a local MQTT broker.
Often this situation is circumvented by using external sites as intermediaries for the transport and storage of data and as an MQTT broker.
However, if we want to have everything under our direct control, we could choose to use a service such as ngrok which will allow us to bring the telemetry obtained from the cellular board to the central data processing station without having to contact our ISP, use complex network solutions. or having to change the Firewall settings.
Ngrok works very simply.
First you need to enter the site https://ngrok.com/ and log in or create an account if you don't have one.
After logging in, you can enter the ngrok dashboard and find the authentication token that ngrok will assign to the user.
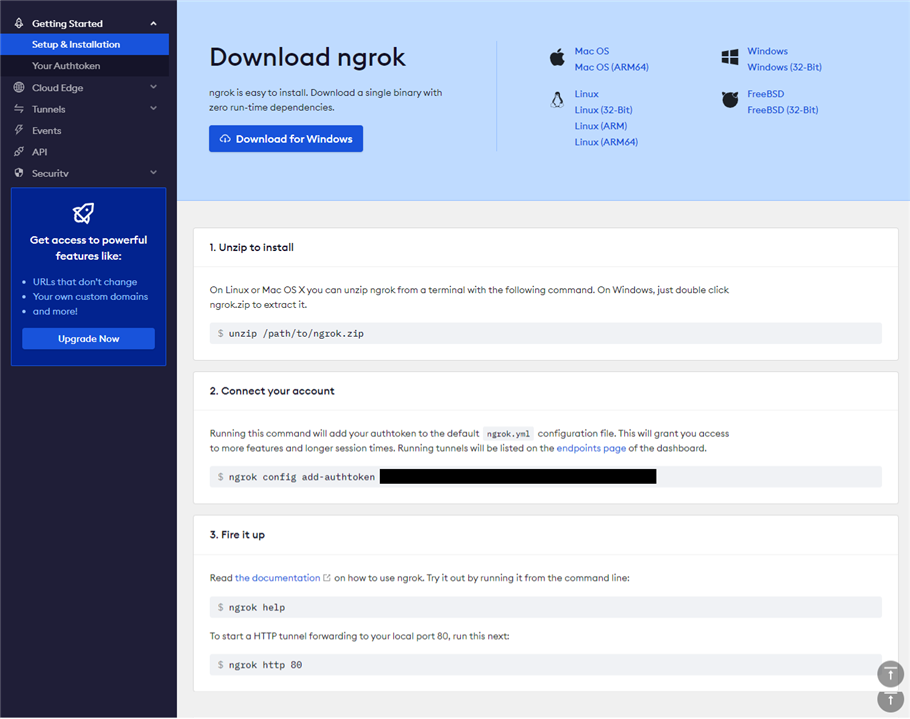
Following the instructions, the ngrok session will start which, obviously, must allow the communication of the MQTT protocol (tcp default port 1883) with our PC.
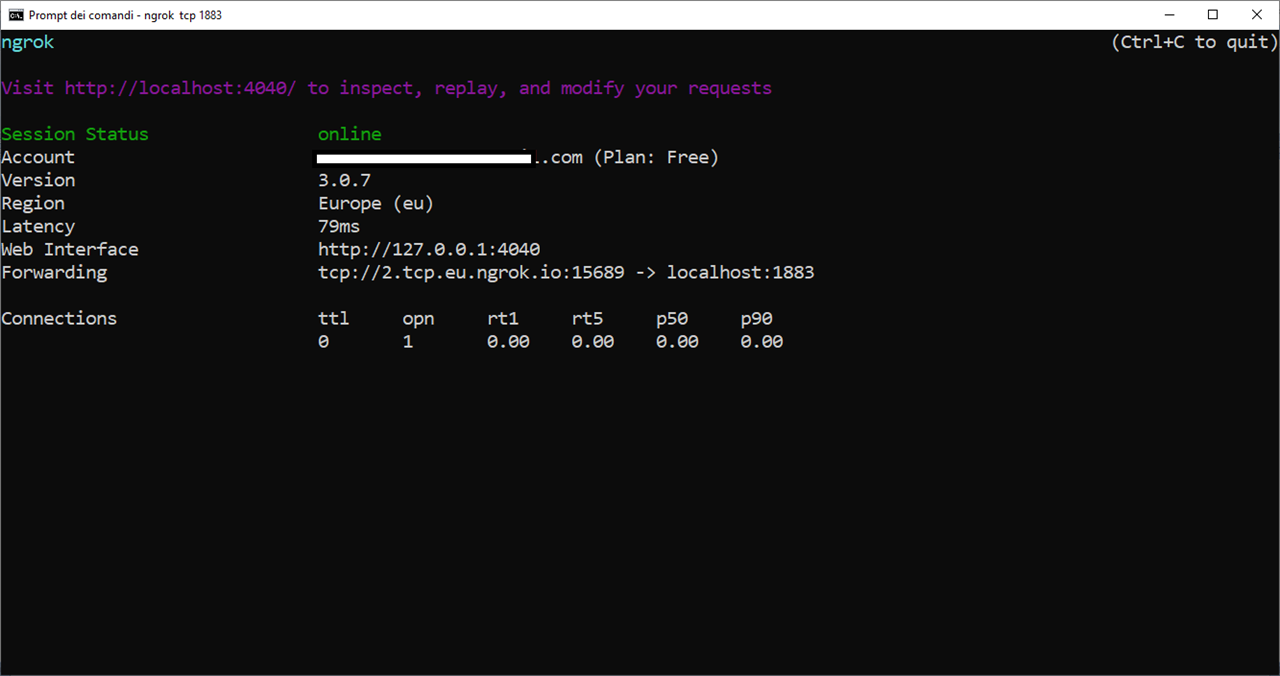
Now we have to copy the link and the port number from ngrok window and we have to modify the code in Arduino IDE.
#define MQTT_BROKER     "2.tcp.eu.ngrok.io"
#define MQTT_PORT       15689
If you use the free version of ngrok, these two values (link and port number) will change every time the connection is used, but this is not a problem if we only want to do some tests with the AVR-IoT Cellular Mini Development Board.
Obviously we will need an MQTT broker to manage MQTT communications and, for this purpose, I will use the Mosquitto software which is simple to use and easily installed on any platform.
I used the Windows version.
The code is very simple. I have only tried to play with the AVR-IoT Cellular Mini Development Board and therefore there are several parts that should be improved.
/**
 * This example connects the Microchip AVR-IoT Cellular Mini Dev Board
 * to your mosquitto broker in order to publish
 * and retrieve MQTT messages.
 */

#include <Arduino.h>
#include <mcp9808.h>
#include <veml3328.h>
#include <led_ctrl.h>
#include <log.h>
#include <lte.h>
#include <mqtt_client.h>

#define MQTT_SUB_TOPIC1 "Temperature"
#define MQTT_PUB_TOPIC1 "Temperature"
#define MQTT_SUB_TOPIC2 "Luminosity"
#define MQTT_PUB_TOPIC2 "Luminosity"
#define MQTT_SUB_TOPIC3 "Button"
#define MQTT_PUB_TOPIC3 "Button"
#define MQTT_SUB_TOPIC4 "Output"
#define MQTT_PUB_TOPIC4 "Output"

#define MQTT_THING_NAME "Ralph"
#define MQTT_BROKER     "0.tcp.eu.ngrok.io"
#define MQTT_PORT       17834
#define MQTT_USE_TLS    false
#define MQTT_USE_ECC    false
#define MQTT_KEEPALIVE  60

// GPIO pin for LED
#define UserLED PIN_PB2
String LEDStatus = "LOW"; // Output LED status

static uint32_t counter = 0;


void setup() {
    pinMode(PIN_PD0, OUTPUT);
    Log.begin(115200);
    LedCtrl.begin();   //all LED in normal mode
    LedCtrl.startupCycle();   // light LED one by one

    digitalWrite(UserLED, HIGH);    //LED OFF
    LEDStatus = "LOW";

  /* Initialize VEM13328 library */
    if (Veml3328.begin()) {
        Log.error("Could not initialize the light sensor");
    }

   /* Initialize MCP9808 library */
    if (Mcp9808.begin(0x18))
    {
    Log.error("Could not initialize the Temperature sensor");
    }
    Log.info("MCP9808 initialized!");

   // Wake up the sensor from its sleep mode
    Log.info("Waking up MCP9808.... ");
    Mcp9808.wake();
    Log.info("Starting initialization of MQTT Polling");

    // Establish LTE connection
    if (!Lte.begin()) {
        Log.error("Failed to connect to operator");
        // Halt here
        while (1) {}
        }
    else { Log.infof("Connected to operator: %s\r\n", Lte.getOperator().c_str());}

    // Attempt to connect to the broker
    if (MqttClient.begin(MQTT_THING_NAME,
                         MQTT_BROKER,
                         MQTT_PORT,
                         MQTT_USE_TLS,
                         MQTT_KEEPALIVE,
                         MQTT_USE_ECC)) {

        Log.infof("Connecting to broker");
        while (!MqttClient.isConnected()) {
            Log.rawf(".");
            delay(500);
        }
        Log.rawf(" OK!\r\n");
        MqttClient.subscribe(MQTT_SUB_TOPIC1);
        MqttClient.subscribe(MQTT_SUB_TOPIC2);
        MqttClient.subscribe(MQTT_SUB_TOPIC3);
        MqttClient.subscribe(MQTT_SUB_TOPIC4);
    } else {
        Log.rawf("\r\n");
        Log.error("Failed to connect to broker");
       // Halt here
        while (1) {}
    }
}

void loop() {
   /* Get celcius value from sensor */
   int TempC = (int)Mcp9808.readTempC();

   // Get RGB luminosity values
   int LumRed = Veml3328.getRed();
   int LumBlue = Veml3328.getBlue();
   int LumGreen = Veml3328.getGreen();

   //publish Temperature, Luminosity and Output MQTT Topics
   String message_to_publish1 = String(TempC);
    bool publishedSuccessfullyTemp = MqttClient.publish(MQTT_PUB_TOPIC1, message_to_publish1.c_str());
    if (publishedSuccessfullyTemp) {
        Log.info("Published message: " + message_to_publish1);
        counter++;
    } else {
        Log.error("Failed to publish");
    }
    delay(1000);

    String message_to_publish2 = String(LumRed) + "-" + String(LumBlue) + "-" +  String(LumGreen);
    bool publishedSuccessfullyLum = MqttClient.publish(MQTT_PUB_TOPIC2, message_to_publish2.c_str());
    if (publishedSuccessfullyLum) {
        Log.info("Published message: " + message_to_publish2);
        counter++;
    } else {
        Log.error("Failed to publish");
    }
    delay(1000);

    String message_to_publish4 = String(LEDStatus);
    bool publishedSuccessfullyLED = MqttClient.publish(MQTT_PUB_TOPIC4, message_to_publish4.c_str());
    if (publishedSuccessfullyLED) {
        Log.info("Published message: " + message_to_publish4);
        counter++;
    } else {
        Log.error("Failed to publish");
    }
    delay(1000);

    // Polling MQTT messages
    // Read message will return an empty string if there were no new
    // messages, so anything other than that means that there was a new
    // message

    String message1 = MqttClient.readMessage(MQTT_SUB_TOPIC1);
    if (message1 != "") {
        Log.infof("Got new message, Temperature: %s\r\n", message1.c_str());
    }
    String message2 = MqttClient.readMessage(MQTT_SUB_TOPIC2);
    if (message2 != "") {
        Log.infof("Got new message, Luminosity: %s\r\n", message2.c_str());
    }
    String message3 = MqttClient.readMessage(MQTT_SUB_TOPIC3);  // message used to control the LED
    if (message3 != "") {
        Log.infof("Got new message, Button %s\r\n", message3.c_str());
    }
    if (message3 == "ON") {
          digitalWrite(UserLED, LOW);
          LEDStatus = "HIGH";
    }
    if (message3 == "OFF") {
          digitalWrite(UserLED, HIGH);
          LEDStatus = "LOW";
    }
    Log.infof("LED status: %s\r\n", LEDStatus.c_str());

    String message4 = MqttClient.readMessage(MQTT_SUB_TOPIC4);
    if (message4 != "") {
        Log.infof("Got new message, LED %s\r\n", message4.c_str());
    }
 }
In practice, I wanted to create a simple remote monitoring that uses the data collected by the temperature and brightness sensors (intensity of the three fundamental colors) and sends them to my PC where the MQTT broker is started. From my PC I will be able to turn on the LED of the board, thus simulating any command that a user could give to a system even hundreds of kilometers away, for example: "turn on the air conditioner", "water plants", etc.
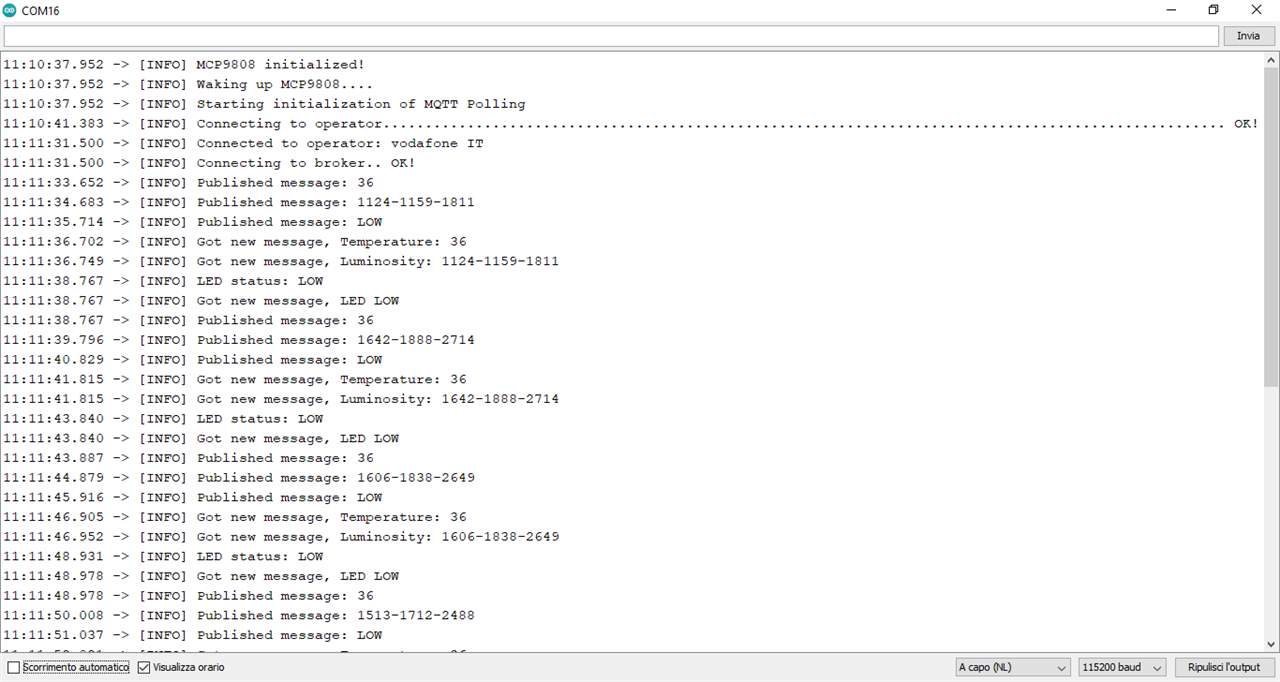
This is the screenshot of the board startup logged on the serial monitor. As you can see, in this case I had some delay with connecting to the cellular network. Often the connection occurs in less time and, fortunately, rarely, I have encountered problems connecting to the network.
The various stages of program execution are easy to understand. The board publishes the temperature on board and the brightness measured in its RGB components, separated by a "-".
As previously mentioned, this is only a test code, so I have not taken care of important aspects such as the security of communications and the reliability of the code, nor have I created a WEB interface or an APP for remote control.
