element14 Community
element14 Community
    Register Log In
  • Site
  • Search
  • Log In Register
  • Community Hub
    Community Hub
    • What's New on element14
    • Feedback and Support
    • Benefits of Membership
    • Personal Blogs
    • Members Area
    • Achievement Levels
  • Learn
    Learn
    • Ask an Expert
    • eBooks
    • element14 presents
    • Learning Center
    • Tech Spotlight
    • STEM Academy
    • Webinars, Training and Events
    • Learning Groups
  • Technologies
    Technologies
    • 3D Printing
    • FPGA
    • Industrial Automation
    • Internet of Things
    • Power & Energy
    • Sensors
    • Technology Groups
  • Challenges & Projects
    Challenges & Projects
    • Design Challenges
    • element14 presents Projects
    • Project14
    • Arduino Projects
    • Raspberry Pi Projects
    • Project Groups
  • Products
    Products
    • Arduino
    • Avnet Boards Community
    • Dev Tools
    • Manufacturers
    • Multicomp Pro
    • Product Groups
    • Raspberry Pi
    • RoadTests & Reviews
  • Store
    Store
    • Visit Your Store
    • Choose another store...
      • Europe
      •  Austria (German)
      •  Belgium (Dutch, French)
      •  Bulgaria (Bulgarian)
      •  Czech Republic (Czech)
      •  Denmark (Danish)
      •  Estonia (Estonian)
      •  Finland (Finnish)
      •  France (French)
      •  Germany (German)
      •  Hungary (Hungarian)
      •  Ireland
      •  Israel
      •  Italy (Italian)
      •  Latvia (Latvian)
      •  
      •  Lithuania (Lithuanian)
      •  Netherlands (Dutch)
      •  Norway (Norwegian)
      •  Poland (Polish)
      •  Portugal (Portuguese)
      •  Romania (Romanian)
      •  Russia (Russian)
      •  Slovakia (Slovak)
      •  Slovenia (Slovenian)
      •  Spain (Spanish)
      •  Sweden (Swedish)
      •  Switzerland(German, French)
      •  Turkey (Turkish)
      •  United Kingdom
      • Asia Pacific
      •  Australia
      •  China
      •  Hong Kong
      •  India
      •  Korea (Korean)
      •  Malaysia
      •  New Zealand
      •  Philippines
      •  Singapore
      •  Taiwan
      •  Thailand (Thai)
      • Americas
      •  Brazil (Portuguese)
      •  Canada
      •  Mexico (Spanish)
      •  United States
      Can't find the country/region you're looking for? Visit our export site or find a local distributor.
  • Translate
  • Profile
  • Settings
RoadTests & Reviews
  • Products
  • More
RoadTests & Reviews
Blog Stepper Motor Driver Kit + Motor - Roadtest Plan
  • Blog
  • RoadTest Forum
  • Documents
  • RoadTests
  • Reviews
  • Polls
  • Files
  • Members
  • Mentions
  • Sub-Groups
  • Tags
  • More
  • Cancel
  • New
Join RoadTests & Reviews to participate - click to join for free!
  • Share
  • More
  • Cancel
  • Author Author: Workshopshed
  • Date Created: 18 Jun 2019 1:25 PM Date Created
  • Views 2940 views
  • Likes 11 likes
  • Comments 11 comments
Related
Recommended
  • trinamic
  • stepper

Stepper Motor Driver Kit + Motor - Roadtest Plan

Workshopshed
Workshopshed
18 Jun 2019

Plan

My road test of the TMC5161-EVAL-KIT by Trinamic is two fold. Firstly to confirm that the setup can accurately and repeatedly step to the required position. Secondly to look at the setup under stall conditions.


Accurate Stepping

To measure accurate stepping the stepper motor will be used to raise a weight on a string. The position of the weight will be recorded and a sequence of steps run to move the weight up and down and to confirm it returns to the desired locations. This can be repeated at different speeds. If the encoder data is available this can be used as a comparison.

image

Stall Detection

The same test rig can be used for the stall detection with an increased load and/or increased drum diameter.


Test Rig

I was planning on the kit taking a week or so to turn up so I could build the test rig before it arrived. But it was promptly delivered after the road test winners were announced so I still need to build my rig. I've got a long length of aluminium extrusion that used to be part of a desk. That has a T-Slot which I will be using to attach the test to.

image


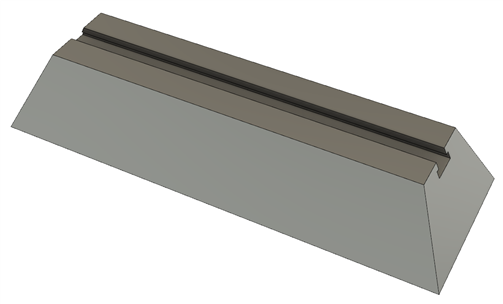
There are a few things to make for the test rig. The some pulleys, a motor mount and a bearing mount. The idea is to have a continuous length of string around the two pulleys with a spring so that it is always tight. This will make measuring the position more straightforward. A weight can then be attached to the string to provide a load. I am hoping that the current limit can be set very small so that the torque test can be done with a small amount of weight.


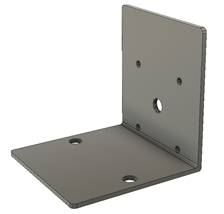
To mount the motor onto the extrusion, I plan to use a big angle plate and a tnut which I'll likely from a steel bar and some flange nuts I have to hand. A smaller plate will be used for the bearing end. The pulleys will be 3D printed as I don't have anything of the right dimensions in the workshop and that will alllow me to mount them straight onto the motor shaft.


imageimage


Wiring the dev kit

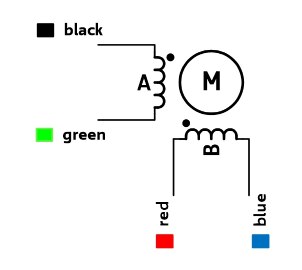
One of the first things I noticed on the stepper motor was that there were no instructions on wiring the motor. Luckily I found the motor data sheet which had the details of the wiring. For these bipolar motors it is also possible to test the wiring using a multimeter as there are simply two pairs of disconnected coils. Then you just have to experiment to see which way around the coils go. The board is labelled A1,A2, B1,B2. It doesn't matters which way around the pairs wired as long as the two are wired consistently. So I'll go with DOT being 1, i.e. Black wire to A1 and Red is B1.

image

Refering to the driver data sheet, it specifies a minimum motor voltage of 2 x CoilNom. The motor data sheet has a "rated voltage" so the minimum voltage should be 2 x 2.3v = 4.6v. It also specifies that the optimim is between 4 and 22 times the nominal voltage. So that's 9.2v for this motor.  There is a section on how to tell if the voltage is too low so I'll start out at 9v and go from there.


Software

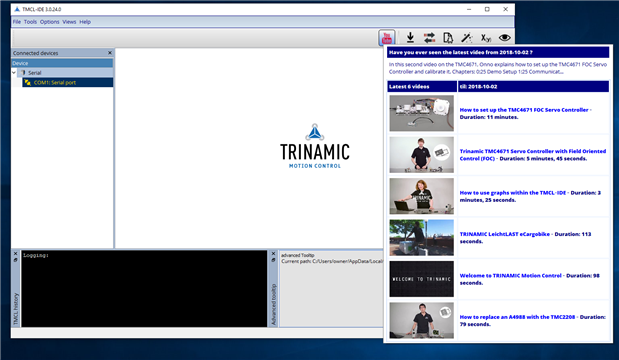
I downloaded and installed the TMCL-IDE, this needed Admin rights to instal on my windows 10 desktop, presumably because it loaded a driver for the board. There are lots of instructions that say start things up with the power supply turned off. So I'll do that. There also seems to be a "emulate" option which could be useful if you did not yet have the kit.


https://www.trinamic.com/support/software/

image


What's next

I'll likely give the motor a simple test before putting it on the rig so I know it's running correctly. Then I'll get everything put together for the first test.

  • Sign in to reply

Top Comments

  • Workshopshed
    Workshopshed over 6 years ago +3
    Got the beam together with the t-nuts and angle brackets. Need to get a couple of drums made so I've designed something I can print
  • Workshopshed
    Workshopshed over 6 years ago in reply to DAB +2
    Yes, I should be able to do some recordings. There is current sensing built in to the boards which is used for the stallGuard etc. I can't see if this is passed back to the controller via the SPI or UART…
  • Jan Cumps
    Jan Cumps over 6 years ago in reply to Workshopshed +2
    I've been looking at the datasheet for the TMC5161 too (thanks Workshopshed for bringing this to attention). There seems to be no straightforward way to ask for the current via SPI. I don't know how realistic…
  • Workshopshed
    Workshopshed over 6 years ago

    The drum was printed over the weekend and fits the spindle nicely.

    image

    • Cancel
    • Vote Up +2 Vote Down
    • Sign in to reply
    • More
    • Cancel
  • dubbie
    dubbie over 6 years ago

    I too favour the 'pile everything on top of each other' approach to storage. I know exactly where everything is - until I have tided stuff up and then I can never find anything. I only seem to be able to remember the first place I put something.


    Dubbie

    • Cancel
    • Vote Up +1 Vote Down
    • Sign in to reply
    • More
    • Cancel
  • Workshopshed
    Workshopshed over 6 years ago

    Got the beam together with the t-nuts and angle brackets. Need to get a couple of drums made so I've designed something I can print

    imageimage

    • Cancel
    • Vote Up +3 Vote Down
    • Sign in to reply
    • More
    • Cancel
  • Workshopshed
    Workshopshed over 6 years ago in reply to dubbie

    Dubbie, there is an encoder cable on the way so checking for missed steps should be straight forward. I'll see how I get on with the tests I'm planning before commiting to doing extra measurements. Maybe one of the other roadtesters is already looking into that aspect?

    • Cancel
    • Vote Up +1 Vote Down
    • Sign in to reply
    • More
    • Cancel
  • dubbie
    dubbie over 6 years ago in reply to Jan Cumps

    Jan,


    When I was working on this I was trying to measure (or at least get some idea of) the load on the motor. I was trying to determine how close the step motor was to missing steps. It was for a mobile robot I was trying to do absolute position calculations for. I didn't get anywhere with this idea much because at higher step frequencies and loads the waveforms seemed to stop looking like steps and just looked like wiggles. It was surprising it still stepped. I guess it is probably the current waveform that is more important. My DSP skills were just not up to the task of decoding the wave-shapes.


    Dubbie

    • Cancel
    • Vote Up +2 Vote Down
    • Sign in to reply
    • More
    • Cancel
>
element14 Community

element14 is the first online community specifically for engineers. Connect with your peers and get expert answers to your questions.

  • Members
  • Learn
  • Technologies
  • Challenges & Projects
  • Products
  • Store
  • About Us
  • Feedback & Support
  • FAQs
  • Terms of Use
  • Privacy Policy
  • Legal and Copyright Notices
  • Sitemap
  • Cookies

An Avnet Company © 2025 Premier Farnell Limited. All Rights Reserved.

Premier Farnell Ltd, registered in England and Wales (no 00876412), registered office: Farnell House, Forge Lane, Leeds LS12 2NE.

ICP 备案号 10220084.

Follow element14

  • X
  • Facebook
  • linkedin
  • YouTube