element14 Community
element14 Community
    Register Log In
  • Site
  • Search
  • Log In Register
  • Community Hub
    Community Hub
    • What's New on element14
    • Feedback and Support
    • Benefits of Membership
    • Personal Blogs
    • Members Area
    • Achievement Levels
  • Learn
    Learn
    • Ask an Expert
    • eBooks
    • element14 presents
    • Learning Center
    • Tech Spotlight
    • STEM Academy
    • Webinars, Training and Events
    • Learning Groups
  • Technologies
    Technologies
    • 3D Printing
    • FPGA
    • Industrial Automation
    • Internet of Things
    • Power & Energy
    • Sensors
    • Technology Groups
  • Challenges & Projects
    Challenges & Projects
    • Design Challenges
    • element14 presents Projects
    • Project14
    • Arduino Projects
    • Raspberry Pi Projects
    • Project Groups
  • Products
    Products
    • Arduino
    • Avnet Boards Community
    • Dev Tools
    • Manufacturers
    • Multicomp Pro
    • Product Groups
    • Raspberry Pi
    • RoadTests & Reviews
  • Store
    Store
    • Visit Your Store
    • Choose another store...
      • Europe
      •  Austria (German)
      •  Belgium (Dutch, French)
      •  Bulgaria (Bulgarian)
      •  Czech Republic (Czech)
      •  Denmark (Danish)
      •  Estonia (Estonian)
      •  Finland (Finnish)
      •  France (French)
      •  Germany (German)
      •  Hungary (Hungarian)
      •  Ireland
      •  Israel
      •  Italy (Italian)
      •  Latvia (Latvian)
      •  
      •  Lithuania (Lithuanian)
      •  Netherlands (Dutch)
      •  Norway (Norwegian)
      •  Poland (Polish)
      •  Portugal (Portuguese)
      •  Romania (Romanian)
      •  Russia (Russian)
      •  Slovakia (Slovak)
      •  Slovenia (Slovenian)
      •  Spain (Spanish)
      •  Sweden (Swedish)
      •  Switzerland(German, French)
      •  Turkey (Turkish)
      •  United Kingdom
      • Asia Pacific
      •  Australia
      •  China
      •  Hong Kong
      •  India
      •  Korea (Korean)
      •  Malaysia
      •  New Zealand
      •  Philippines
      •  Singapore
      •  Taiwan
      •  Thailand (Thai)
      • Americas
      •  Brazil (Portuguese)
      •  Canada
      •  Mexico (Spanish)
      •  United States
      Can't find the country/region you're looking for? Visit our export site or find a local distributor.
  • Translate
  • Profile
  • Settings
RoadTests & Reviews
  • Products
  • More
RoadTests & Reviews
RoadTest Forum Evaluation of the TMS320VC5505 eZdsp USB Stick
  • Blog
  • RoadTest Forum
  • Documents
  • RoadTests
  • Reviews
  • Polls
  • Files
  • Members
  • Mentions
  • Sub-Groups
  • Tags
  • More
  • Cancel
  • New
Join RoadTests & Reviews to participate - click to join for free!
Actions
  • Share
  • More
  • Cancel
Forum Thread Details
  • Replies 18 replies
  • Subscribers 2464 subscribers
  • Views 2286 views
  • Users 0 members are here
  • RoadTest
  • digital
  • texas
  • spectrum
  • instruments
  • tms320vc5505
  • review
  • dsp
  • kit
  • ti
Related

Evaluation of the TMS320VC5505 eZdsp USB Stick

bbolo1
bbolo1 over 14 years ago

Hi guys,


I have received the ezDsp board some time ago but due to some personal matters I am writting this review only now. I am planning to extend it with further information on its usage and creation of an example customer application.

There are also some other great reviews on Roadtest about this product. Sorry for not mentioning all of them. I had a problem when I tried to access the older reviews on this product. Could this be a server problem?


http://www.element-14.com/community/thread/3113?tstart=15


Evaluation of the TMS320VC5505 eZdsp USB Stick

General description

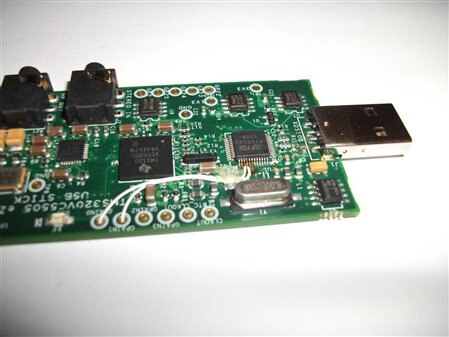
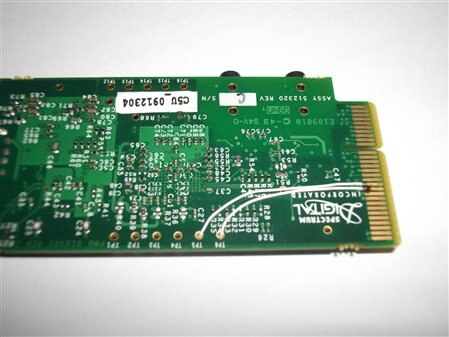
The whole kit comes in a small box (~13cm x 11cm x 4cm) and contains the USB stick itself along with a small 4 page leaflet and a small DVD (~1GB) containg the CCS 4 and a zip package containing useful examples for VC5505. The examples are centered around various peripherals on the DSP.
I wanted to go with the tools on the DVD, try the board and see how it is working and afterwards download and install the latest tools.
 
Tool installation & try-out
The installation process took me something like 10 minutes or so. Besides the installation of the Eclipse based CCS4 IDE, it installed the drivers needed for the board. I haven’t followed yet the steps to activate a licence. Without licence, Code Composer is limited to 30 days of evaluation.
I gave a particular attention to the leaflet since it was describing the necessary steps to be followed immediately after installation of the IDE.
  1. The      first step is to create a target configuration. The settings you have to      make in order to create a target configuration are described in detail      into the leaflet. I also created 2 more targets. One for a cycle accurate      C55 simulator and one for the functional C55 simulator
  2. Then      we can import the workspace containing the example projects for VC5505.      Here as well, the leaflet describes in great detail the needed steps.
  3. The      leaflet contains some links to various resources
 
Then, I tried to run the LED blinker project but I got some errors on the compilation process. It turned out that I needed to set some paths in order to “help” the IDE find some additional files (headers and libraries).
 

Running/Debugging the LED blinker application

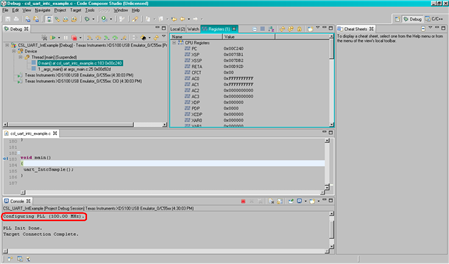
The LED blinker was the first project to be run onto this board. I have started a debugging session for the real target and also for the functional simulator
 

Debugging with the real target

The debugger is built around a FTDI chip (FT2232D) and its speed is limited to only 12Mbps. This makes it a little bit slow in the debugging/program loading process. More on the debugger later…
The total execution time for the project was around ~35seconds (having the PLL set at 100MHz by the GEL file)
 

Debugging with the C55 functional simulator

Running the same LED project on the functional simulator took me more than 10 minutes. A significant difference but I’d say the simulator can have a good use as well, at least when you need to run some signal processing task and you can only provide files.
 

HW extensions

-         One of the things I would have liked to see was the USB signals tied at the expansion connecter. This would have offered some broader portfolio of possible application with the 5505 DSP
 
-         The expansion connector is not a standard one. The pair connector is: SAMTEC - MEC1-130-02-S-D-NP-A
 
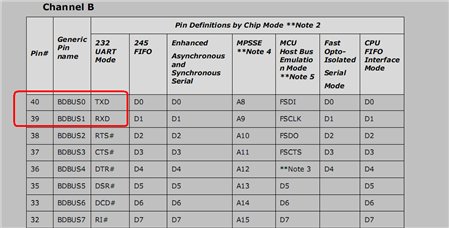
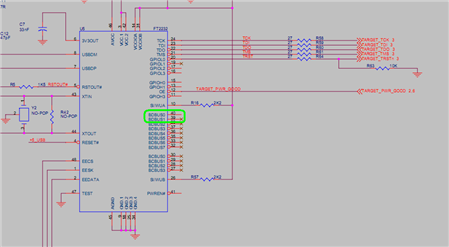
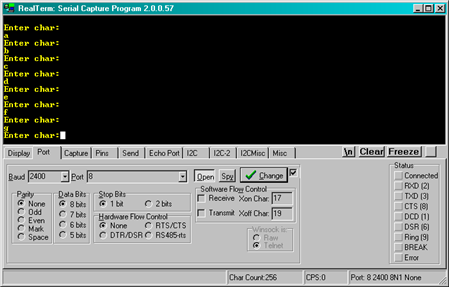
-         USB-UART converter not used
o       The UART pins are not tied with the Rx/Tx into the FTDI chip. This would have offered support for USB-serial port. I will try to connect the Rx/Tx UART pins from the spare FTDI channel B adapter to the UART pins of the DSP onto the expansion connector
 

Application building process

The TI support movies were very useful and they’d helped accelerate my first application. I attached a few links on the clips I have found most useful.
http://e2e.ti.com/videos/m/digital_signal_processors/97397.aspx
http://e2e.ti.com/videos/m/digital_signal_processors/124527.aspx
 
The samples provided at code.google.com have missing files and dependencies. I tried to reference the missing folders where the files in cause were found but I still miss some other files needed to run these projects. I will detail the application development in a following post.
 

USB details

The debugger is built around an FTDI device (FT2232D). This chip is a composite device and it presents 2 interfaces. One of the interfaces is used as a USB-serial port, while the remaining interface is used as an USB-JTAG adapter. Both of the interfaces are using 2 bulk endpoints each. This is important to know because the available USB full-speed bandwidth is split between the JTAG “interface” and the USB-serial port.
image
image
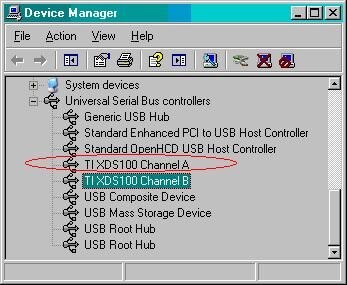
Channel A is used as JTAG, while channel B is used as USB-serial port emulator. When clicking on any of the devices there’s a choice of designating any of the channels as either USB-serial port or USB-JTAG interface.
 
I will continue on this review with my HW modifications and application(s).
Thanks for your patience!
 
Bogdan
  • Sign in to reply
  • Cancel

Top Replies

  • bbolo1
    bbolo1 over 14 years ago +2
    Hi again, I thought I would come back to this topic sooner but I was really busy till now. Anyway, I would like to share the modifications I’ve made to the eZdsp stick in order to enhance its features…
  • bbolo1
    bbolo1 over 14 years ago
    Hi again,
     
    I thought I would come back to this topic sooner but I was really busy till now.
    Anyway, I would like to share the modifications I’ve made to the eZdsp stick in order to enhance its features.
    As in my 1st post on this topic, the board lacks an UART connection with the DSP even though there’s an FTDI2232D chip present on the board and used for debugging purposes.
    Checking the FT2232D’s dataheet one can see the channel B pins used as Tx/Rx for UART are on the pins 40 and 39 (BDBUS0 and BDBUS1).
     
    image
     
    I’ve checked the schematics of the board and indeed on the FT2232’s side, the channel A signals were used for debugging while the channel B signals were not used at all.
     
    image
    Then, I’ve checked in the Device Manager to see if it is possible to “assign” the channel B to UART functionality.
     
    image
    Indeed, I was able to assign the channel B as an UART adapter. Next, I needed to make sure the channel B UART signals were working as expected. I plugged the eZdsp stick and next I opened a terminal utility (e.g. RealTerm) and left it with the default communication parameters (e.g. 57600, 8N1). I typed some characters on the terminal screen to be sure the local echo is not set and afterwards I made a short on pins 39 and 40 of the FTDI2232 to create an electrical loopback between the UART’s Rx and Tx pins. By doing so I was able to see, being echoed back, the characters I was typing.
    So, channel B can be indeed used as an UART adapter.
    Nice! Next thing would be to solder some wires to the UART pins of the DSP.
     
    I went back to the schematics to check where the DSP UART signals were available on the board. Indeed, the DSP’s UART signals were present on the expansion connector of the board.
    image
    So, I would need to link pin 40 on the FTDI chip to pin 38 on the expansion connector and pin 39 on the FTDI to pin 40 on the expansion.
     
    image
    image
    image
    I’ve made the connections between the expansion connector and the UART and then I tried one of the UART examples present in the CSL bundle.
     
    The example I chose had its settings for a 60MHz clock, though my GEL file was setting the clock to 100MHz. So, I’ve made the necessary changes in the settings and the I compiled and ran the project.
     
    image
    image
    I also opened a serial terminal (e.g. RealTerm) with the communication settings as per the the project (2400bps, 8N1). The UART example awaits for a character to be sent from the serial terminal and then echo it back.
     
    image
    The terminal output confirmed the mod is working fine and I think is really neat to be able to use the USB-UART adapter for this board.
    For all of you owning such a board this mod might be really interesting and easy to do.
     
    Good luck!
    • Cancel
    • Vote Up +2 Vote Down
    • Sign in to reply
    • Cancel
  • DAB
    DAB over 14 years ago in reply to bbolo1

    Great report.  I look forward to seeing what you do next with the board.


    Thanks

    DAB

    • Cancel
    • Vote Up 0 Vote Down
    • Sign in to reply
    • Cancel
  • Former Member
    Former Member over 14 years ago in reply to bbolo1

    Nice hack, and well documented. Thank you.

    • Cancel
    • Vote Up 0 Vote Down
    • Sign in to reply
    • Cancel
  • lahcen005
    lahcen005 over 13 years ago

    Good review. thank you.


    Lahcen

    • Cancel
    • Vote Up 0 Vote Down
    • Sign in to reply
    • Cancel
  • DAB
    DAB over 13 years ago in reply to bbolo1

    Excellent update.  I am impressed with the detail of your report.


    Thanks,

    DAB

    • Cancel
    • Vote Up 0 Vote Down
    • Sign in to reply
    • Cancel
  • peterloron
    peterloron over 13 years ago

    As others have said, excellent reporting, and great work on hacking the board to improve it. Thanks.


    -Pete

    • Cancel
    • Vote Up 0 Vote Down
    • Sign in to reply
    • Cancel
  • Former Member
    Former Member over 13 years ago

    nice review... 

    • Cancel
    • Vote Up 0 Vote Down
    • Sign in to reply
    • Cancel
  • bbolo1
    bbolo1 over 13 years ago

    Thank you very much for all your support! I am looking to find some other interesting thing to do with this board.

    I am considering a few applications for this baord and I hope to come back soon with the details.

    It will probably consist of another HW modification (maybe connect a different board to this one) and some firmware as well.

    I'll keep you updated. If you also have suggestions, please let me know. There might be great application ideas and it would be great if you can share them here.


    Thank you all!

    Bogdan

    • Cancel
    • Vote Up 0 Vote Down
    • Sign in to reply
    • Cancel
  • dbarne20
    dbarne20 over 13 years ago

    Nice job on the review and great job documenting the uart hack.

    • Cancel
    • Vote Up 0 Vote Down
    • Sign in to reply
    • Cancel
  • Former Member
    Former Member over 13 years ago in reply to bbolo1

    Really nice evaluation.  Looking forward to more on this thread.  I'd even be interested in seeing something fairly basic like how to implement a real time audio filter... say for filtering CW ham radio signals.

    • Cancel
    • Vote Up 0 Vote Down
    • Sign in to reply
    • Cancel
>
element14 Community

element14 is the first online community specifically for engineers. Connect with your peers and get expert answers to your questions.

  • Members
  • Learn
  • Technologies
  • Challenges & Projects
  • Products
  • Store
  • About Us
  • Feedback & Support
  • FAQs
  • Terms of Use
  • Privacy Policy
  • Legal and Copyright Notices
  • Sitemap
  • Cookies

An Avnet Company © 2025 Premier Farnell Limited. All Rights Reserved.

Premier Farnell Ltd, registered in England and Wales (no 00876412), registered office: Farnell House, Forge Lane, Leeds LS12 2NE.

ICP 备案号 10220084.

Follow element14

  • X
  • Facebook
  • linkedin
  • YouTube