


Review of Microchip Multimedia Expansion Board
Gregory M. Brettell
Road Tester since Dec 2, 2009
Road Tester since Dec 2, 2009
- Evaluation Type: Evaluation Boards
- Application you used the part in: Testing and Evaluation
- Was everything in the box required?: No - Software and documentation is not included. Also, you need a 'starter kit' to interface with this board (see details in the review).
- Comparable Products/Other parts you considered: None.
- What were the biggest problems encountered?: Finding and installing all of the necessary files needed. This is not really a problem ... just part of the process required to get started (see details in the review).
I was not able to create this Road Test using the web template ... I was having problems with this website (uploading files & formatting) ... so, I have also included the Road Test as a word document & PDF ... please see attached.
Thanks,
Gregory
Microchip Multimedia Board - RoadTest
Microchip Multimedia Expansion Board - RoadTest
by Gregory M. Brettell

First of all I’d like to thank element14 and Microchip for giving me the opportunity to review this development board.
The Microchip Multimedia Expansion Board (MEB) kit contains the board, an information sheet, warranty card, and a packing slip. This is not a stand-alone development board, so you will need one of the following Starter kits to interface with the Microchip MEB (prices may vary):
- PIC32 Starter Kit (DM320001) $49.99
- PIC32 USB Starter Kit (no longer available for purchase)
- PIC32 USB Starter Kit II (DM320003-2) $55.00
- PIC32 Ethernet Starter Kit (DM320004) $72.00
- PIC24E Starter Kit (DM240012) $64.99
- dsPIC33E Starter Kit (DM330012) $64.99
I purchased the PIC32 Ethernet Starter Kit for my setup. The starter kits fit nicely on the back of the MEB using a 120-pin Hirose modular expansion connector. I used the USB port on my laptop to provide power to the PIC32/MEB combo (which is a wonderful alternative to using a wall-wart).
I was very anxious to get started; however, there were several things I had to get in place before I could do so. The MEB kit does not include any software in the box, so I had to connect to Microchip’s website and start searching for documentation and software. The following list includes some of the items you will need to get started.
Application Notes:
· AN1136 – How To Use widgets in Microchip graphic Library
· AN1182 – Fonts in the Microchip Graphics Library
· AN1227 – Using a Keyboard with the Microchip Graphics Library
· AN1246 – How to Create Widgets in Microchips Graphics Library
· AN1367 – Porting the Helix MP3 Decoder onto Microchip’s PIC32MX 32-bit MCUs
Next, you’ll want to download their PIC32 MEB Software . This software includes a wide variety of demo projects that showcase the various peripherals included on this development board, such as the accelerometer, joystick, TCP-IP Wi-Fi, SD Card, EEPROM, and more.
During the software installation process, you must be very careful where these files are going to be installed on your computer. The compiler needs to have very specific paths to all of the files in your project or you will receive a plethora of errors (trust me, I know!). I installed the MPLAB IDE in the C:\Program Files\Microchip directory and all of the demos in the root directory within the: Microchip Solutions Folder C:\Microchip Solutions.

Library search paths explicitlydefined to facilitate the “build.”

“Relative” search paths.
Initially, I had a hard time getting all of this to work correctly … my first attempts were fruitless and I wound up at a dead end. As a last ditch effort, I deleted and uninstalled everything to do with Microchip … re-booted … then re-installed all of those files again … finally, that did the trick (who knows why … I installed the files in the exact same directories as before). It must have been just a glitch. Once everything is configured properly, you shouldn’t have to bother with these details in the future (as long as you keep your project files in the same relative directories).
Bear in mind that all of this preliminary work you need to do (searching for files, downloading, installing, configuring, troubleshooting, etc.) is going to take a substantial amount of time – especially if you are in a hurry.
This development board is so cool you will be tempted to just “dive-in” – but unless you have worked with a similar device before, you are going to have to put in some time learning the details behind the development process using the Microchip MEB. I had not used a graphical interface in any of my projects prior to this experience; therefore, I found myself researching for hours-on-end learning about developing projects with the MEB. The learning curve was steep in the beginning. Once I started to get the hang of it - I was off and running. The good news is that the Microchip website has tons of information about their products including documentation, data sheets, user guides, application notes, tutorials, software and more ….
1. 3.2 inch (8.1 cm) QVGA touch screen display with backlight;
2. Five user-controlled LEDs;
3. Four-way joystick (S2);
4. Fire button (S1);
5. Headphone jack;
6. Line output jack;
7. Microphone input jack;
8. Power LED;
9. I/O expansion connector.

The back side of the board includes these key features, as indicated in Figure 1-2:
1. Solomon Systech Graphics Controller (SSD1926);
2. microSD card slot;
3. Regulated 3.3V and 1.8V power supply for powering the board via a starter kit or
9-14V power supply;
4. Accelerometer and temperature sensor (BMA150);
5. 24LC08 EEPROM;
6. 2 MB SPI Flash (SST25VF016).
7. 24-bit stereo audio codec (WM8731);
8. CPLD for SPI and Chip Select configuration;
9. PIC32 starter kit connector;
10. Integrated 802.11 wireless connectivity.

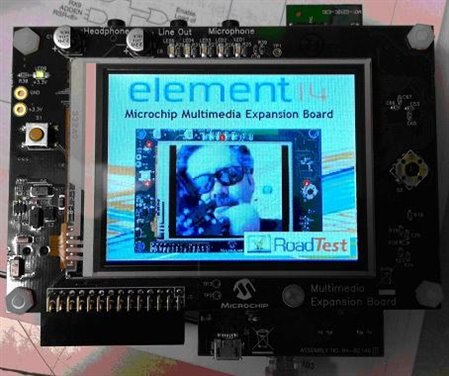
The QVGA (Quarter-VGA … resolution is 320 x 240 pixels) touch screen display looks quite good (once you remove the protective plastic ;-) ). I used the Microsoft Paint program to crop & resize my test image to exactly 320 x 240 before I added it to my test project. (See image P.1)
I was able to load the pre-compiled demos without a hitch (which were pretty impressive). Once I was done playing with the demos, I was ready to try out some of my own ideas. First, I experimented with modifying some of the demo code (simple things such as, modifying colors & text). Next, I tried to use the MPLAB project wizard to start from scratch … also; I tried the Graphics Display Designer plug-in for MPALB. This is a quick way to ‘draw’ your interface and have the software generate the code (at least the bulk of it). I was able to add buttons and text quite easily; however, when I attempted to load a custom image I ran into some problems. (Again, I was trying to run before learning to walk.) After reading the documentation more carefully, I was able to overcome the obstacles before me. It would be helpful to have a pre-flight checklist similar to the one in Lucio De Jasio’s excellent book: Programming 32-bit Micrcontrollers in C: Exploring The Pic32 .

(My first test project using the Graphic Display Designer)

(Screenshot-4)
Screenshot-4 shows some of the rudimentary test code I used for testing a maiden voyage with my new development “buddy.” (Defines were declared for the LEDs on the board, e.g., “LED_1” and joystick positions, such as “left” and “pushed.” This helps make the code self-documenting and easier to work with instead of using cryptic port numbers.)
Feature Request:
Graphics Display Designer – I would really like to have the ability to group & align objects. It can be a little tricky trying to drag and drop items exactly where you want them. Comparing X-Y coordinates among objects is one way to do it, although that is an inefficient, painstaking task (although, still better than hard-coding it – how can I complain?!). Also, being able to move objects around with the arrow keys on a PC keyboard would be nice, too.
Random Notes:
You will need to make some edits with the demo code before you can compile the projects. Some of these changes include memory settings in the build options (for the system heap) and editing the header files for the correct starter kit you’re using, as well as the inclusion of any graphic objects you are incorporating into your project.
Thomas Jepsersen has a good video showing some of the demos in action in his review.
I have not yet experimented with the WiFi or audio CODEC features on the board. I will update the review when I get a chance. The Ethernet demo using DHCP and Google maps was pretty impressive (although a little slow).
The tutorials found within the help files were not 100% all-inclusive of the information that you need … a few blanks need to be filled in order to have success with the compiling/build process. Searching forums for some of the challenges I encountered proved to be helpful & insightful.
Note to Microchip: PLEASE include an installation disk containing the software, demo projects, documentation & tutorial files with all of your development boards. (I realize that you would like us to download the latest versions of everything off of your website; however, it’s a pain-in-the-neck to do so). I wouldn’t mind having outdated software – if it gets me started quickly … I can then download any updated versions at another time. Perhaps the products are packaged before the software is ready for release (??? That’s the only reason I can think of to omit the inclusion of a disk). Unfortunately, this seems to be a trend in development kits … forcing the poor unsuspecting user to search for and download all of the necessary bits & bytes to get going. As a result, imagine all of the suffering going on around the world. Instead of “Hello World” it has become “Where in the World Is the Software & Documentation?!”
As an alternative, the development tools disk could at least have dynamic links to the latest software & documents on the Microchip server. For example, I was recently designing a control system based on a teleconferencing product – their installation disk consisted of a menu panel where the selections you make use dynamic links (in the background) for the installation process (which then downloads and installs the most current software and documents directly from their server). This method greatly simplifies and automates the whole process with just a few mouse clicks. It is also organized in such a way that you don’t have to search for anything. Select what you need and go! They are responsible for managing the links and keeping everything valid and up to date … that seems like the logical way to go.
Summary:
Overall, I was able to compile and run most of the demo projects except for the Helix MP3 application. I’m still trying to figure out what the problem is (I downloaded the source code but it will not successfully compile. Instead, I receive numerous errors that halt the entire build process). In addition, I was not able to find a precompiled hex file to evaluate this demo. I haven’t given up quite yet …
Although the learning process was painful (no pain - no gain) I am now having a lot of fun working with the MEB. This is an awesome development tool. I went through extreme frustration (at times); however, it was all worth it! It is very gratifying to be able to incorporate a GUI interface into a project (touch sensitive to boot!). I am very anxious to use it in my next design.
Attachments:
| RoadTest_Microchip Multimedia Board.doc | |
| RoadTest_Microchip Multimedia Board.pdf |


