RoadTest: Become a Tester of the PSOC™ 6 AI Evaluation Kit enabled with DEEPCRAFT™ AI/ML software solutions
Author: battlecoder
Creation date:
Evaluation Type: Development Boards & Tools
Did you receive all parts the manufacturer stated would be included in the package?: True
What other parts do you consider comparable to this product?: NXP's MCX N Series boards, QuickLogic's QuickFeather, Boards compatible with Tensorflow Lite, etc.
What were the biggest problems encountered?: None
Detailed Review:
Infineon's PSoC 6 AI Dev Kit (CY8CKIT-062S2-AI) is a compact, feature-rich development board built around a powerful architecture and a vast set of ML/AI-ready libraries and supporting tools, with plenty of on-board sensors that allow you to start experimenting with Edge ML/AI applications right out of the box.
Which begs the question...
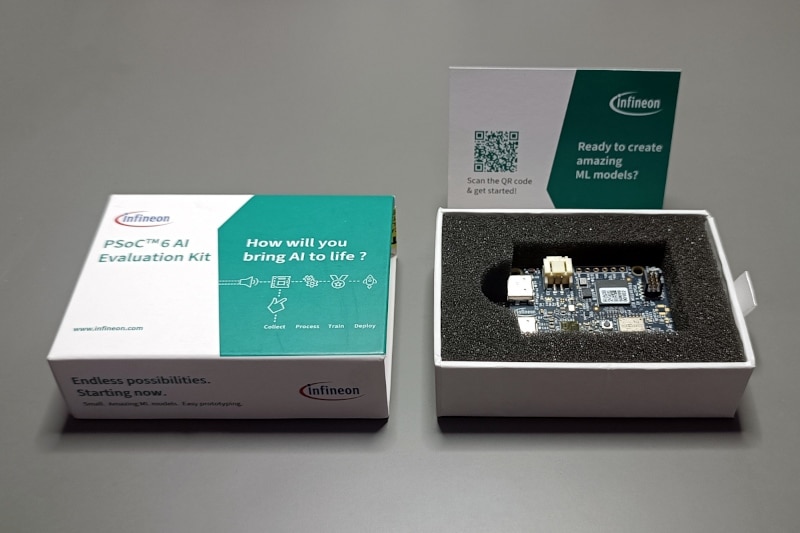
The kit includes the board and a nice introductory card with a QR to a very handy and complete Getting Started page.
The CY8CKIT-062S2-AI development board is extremely compact, and it's powered by a PSoC 62xA MCU based on a dual-core (150MHz ARM Cortex M4F + 100MHz Cortex M0+) CPU design, featuring 2MB of Flash memory and 1MB of RAM.
This board also features a wide array of digital and analog I/O (including SDHC, UART and I2C ports), as well as Wifi and BT/BLE, and a USB-C port (actually two; one for programming, and one for interfacing).
For sensor-rich experiments the board is also fitted with:
As for the power supply, this board can get power from either of the USB-C ports or from a dedicated 3.6V Li-Ion battery connector with on-board charging circuitry.
Finally, the board also includes a PSoC 5LP MCU that acts as a KitProg3 programmer for the main PSoC chip.
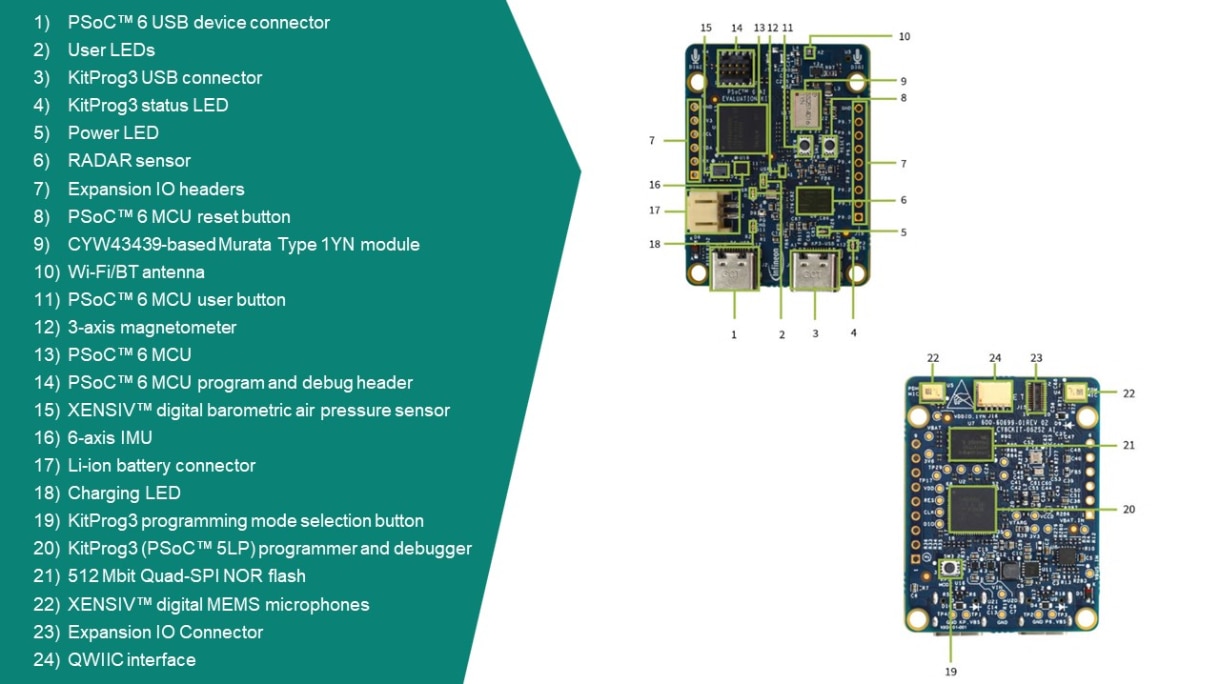
Diagram taken from the Product Page
As you can see the board is packed-full of sensors and resources for ML experiments and applications. More details and documentation here:
https://www.infineon.com/cms/en/product/evaluation-boards/cy8ckit-062s2-ai/
There's plenty of options of environments, libraries, frameworks to develop for this board (including MicroPython!), as listed on the product page, but the ones I'll be focusing on are:
Modus Toolbox: This is a suite of software development tools, libraries, and runtime assets. Works with Eclipse, VS Code, IAR Embedded Workbench, uVision, etc
Modus Toolbox ML provides support for models from other frameworks like TensorFlow. From the webpage: “ModusToolbox ML includes an embedded inference engine which supports optimized implementations of most popular Neural Network operators such as 1D/2D convolutions, a variety of activation functions as well as support for more complex operators for RNN networks such as GRU.”
DEEPCRAFT (previously known as Imagimob Studio). It’s a full environment for designing and testing ML models through a graphically node-oriented workflow. Requires an account to download directly.
Installing the software is super straightforward, and you'll be prompted to select the packages and tools you want to install. For development I selected Eclipse and VSCode to hopefully try both.
The board comes preloaded with a firmware that will stream the on-board sensor data to DEEPCRAFT Studio, making it extremely convenient to run data collection sessions and start training a model.
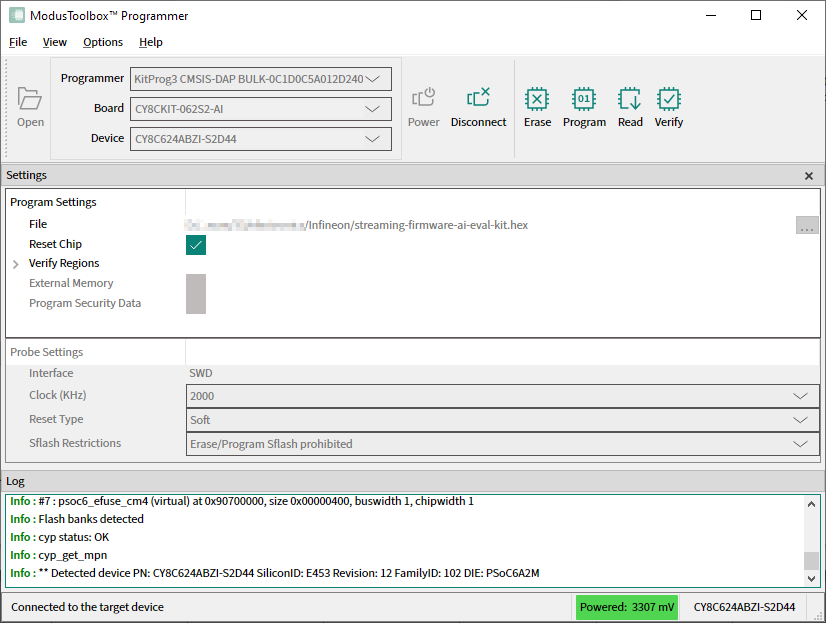
As there seems to be a new version of this firmware, an update is apparently required to use it with the latest version of the Studio (and it’s advised in their Getting Started guide) so I did that first. The ModusToolbox Programmer (used to burn the firmware) was easy to use and it even prompted me to upgrade the bootloader firmware, which I did.
Before we dive into the ML/AI capabilities of the board, I want to try to put together a simple Hello World directly on the board. This will overwrite the “sensor streaming” firmware I just updated, but since I’ve already tested that I can successfully get the latest version and put it into the board, this isn't a concern.
To create my own basic project I started the Modus Toolbox Dashboard, which has handy shortcuts to start a project on any of the installed/configured IDEs through the “Project Creator” interface.
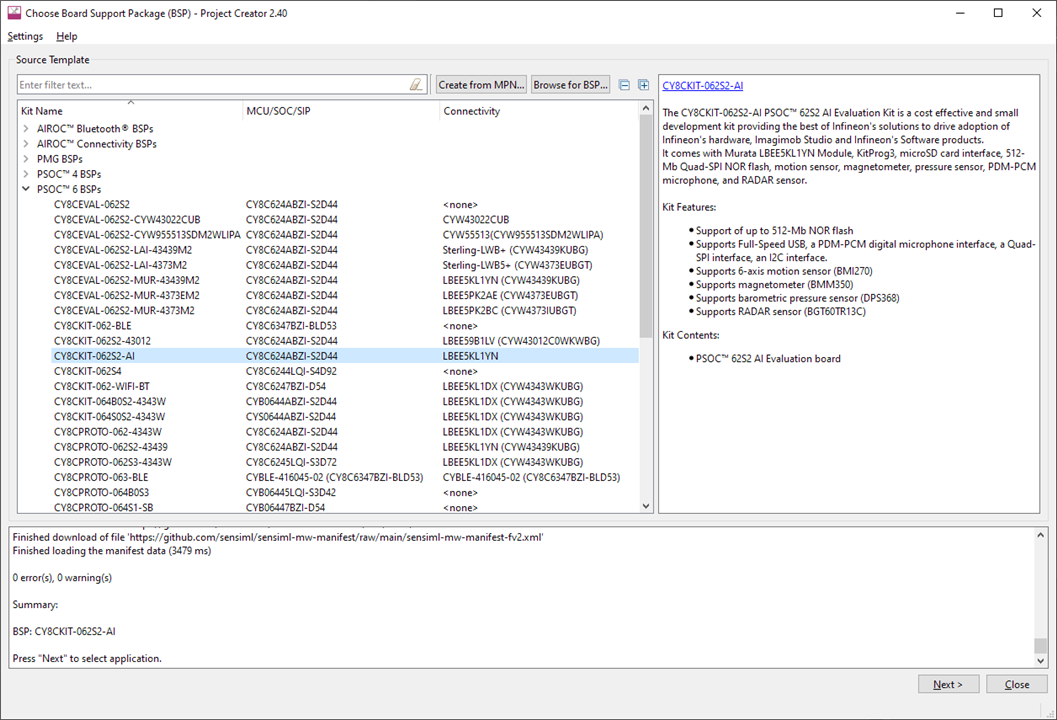
I had to select the board, and a project from the templates, which included a Hello World.
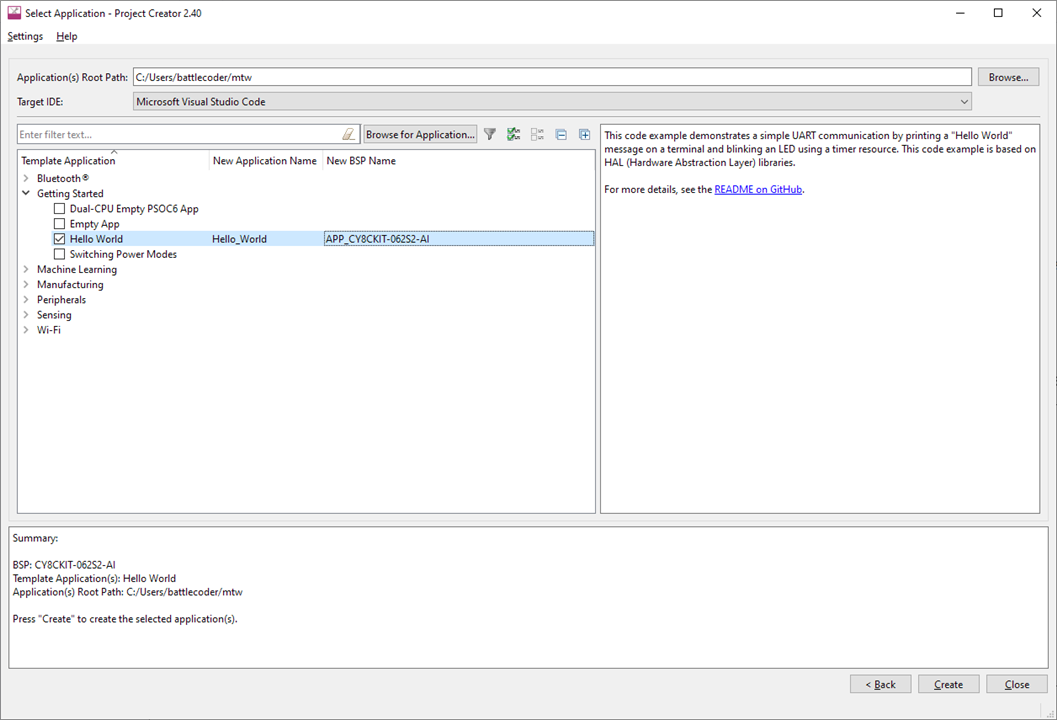
Then it automatically started downloading the code from a GitHub repo .Apparently all the templates seem to be at https://github.com/Infineon/Code-Examples-for-ModusToolbox-Software. I think having them on Git is a really clever way of providing a collection of easy-to-update templates for different platforms and it allows you to browse the code freely.
Once the Hello World demo was downloaded, I opened the project with VS Code and uploaded the code to the board.
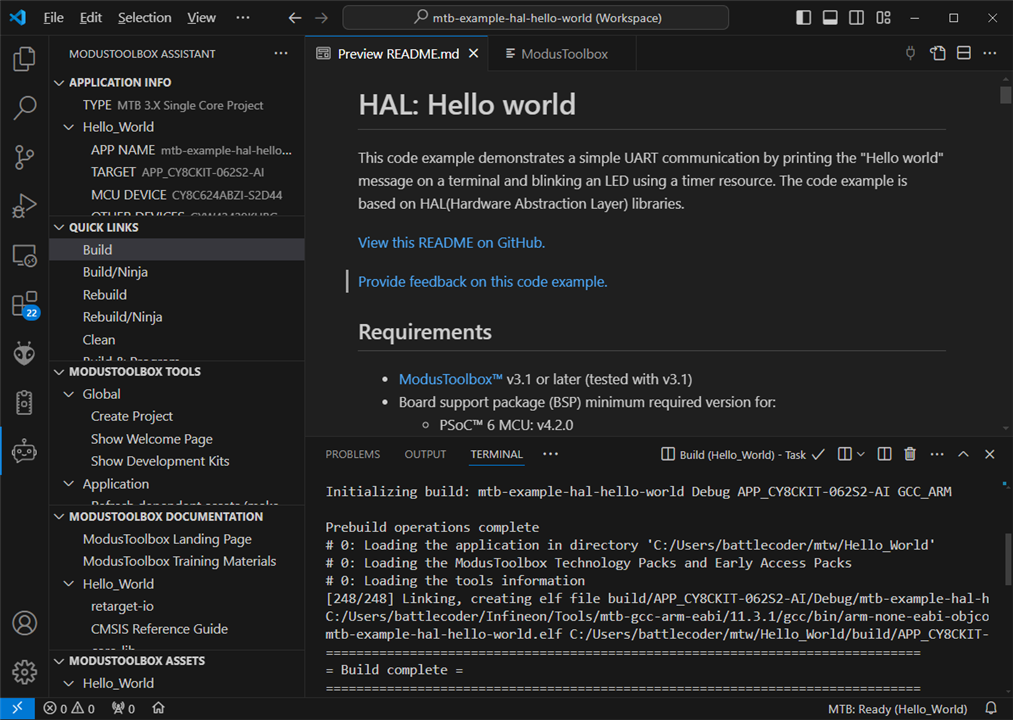
The result? Well, exactly as expected:
A beautiful blinking LED.
If you check the code, this example uses timers and does some standard initialization from which a lot can be learned. In fact, you can get a good idea of how to control every aspect of the MCU by checking the other examples included, but if you really want to take a deeper look at the runtime environment and the low-level handling of the PSoC 6's hardware, I would particularly recommend checking the Modus Toolbox run-time software reference guide and the PSoC 6 MCU Architecture Technical Information document.
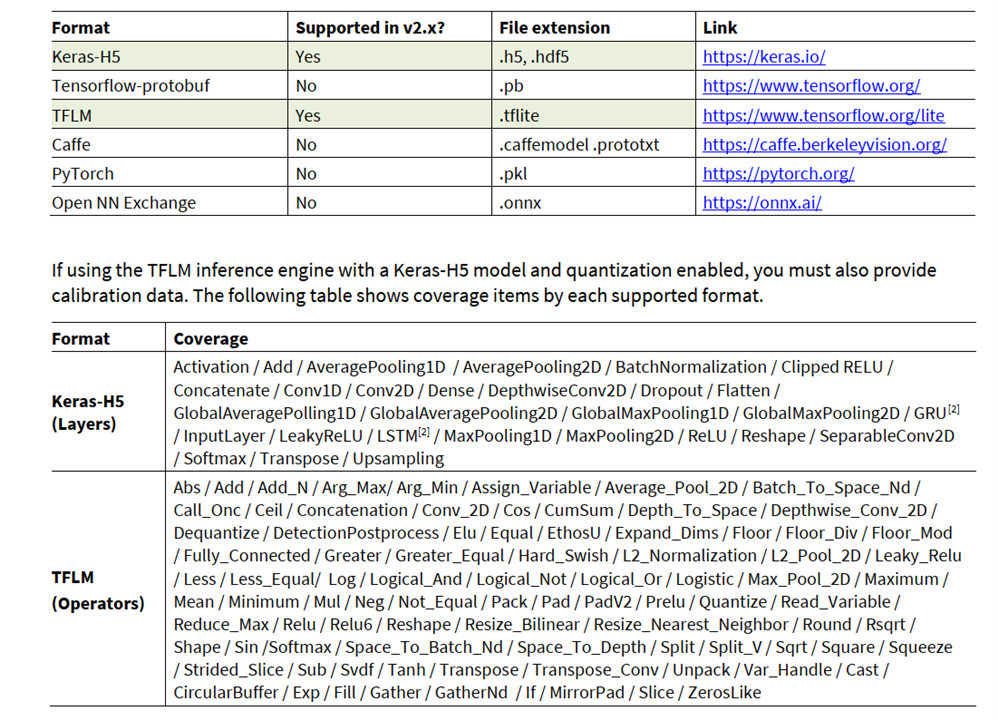
Technically by using the Modus Toolbox ML package you can also run your own models trained on industry-standard frameworks and tools! The best resource if you are interested in this alternative is the ModusToolbox ML User Guide, but here is one of the relevant tables from that document, to give you an idea of the framework's compatibility:
Having verified that it's possible to write applications directly for the board, and getting an idea of what that workflow looks like, I flashed the sensor streaming firmware again, in preparation for doing some ML experiments in DEEPCRAFT Studio.
It's worth noting that there's several very interesting pre-trained examples that include voice-driven keyword detection, fall detection, material detection for drills (one based on vibration and one on sound!), etc, but for the sake of taking a deeper dive, I I'll be training a model from scratch that can differentiate between me "clapping" and "tapping on my desk". It could be useful for triggering actions like turning my lights on/off, or muting my microphone if I'm recording video or streaming.
If you are curious about what Ready Models are currently available though, check https://www.imagimob.com/ready-models
I followed the instructions from the "Getting Started" guide that briefly covers how to create a data collection workflow to acquire and label sensor samples. It's not mentioned in the guide; but for the board to appear in the list of nodes in DEEPCRAFT Studio it needs to be connected to the computer, and it has to be running the sensor streaming firmware. Once everything is ok, you can select the onboard sensors as inputs for your workflow!:


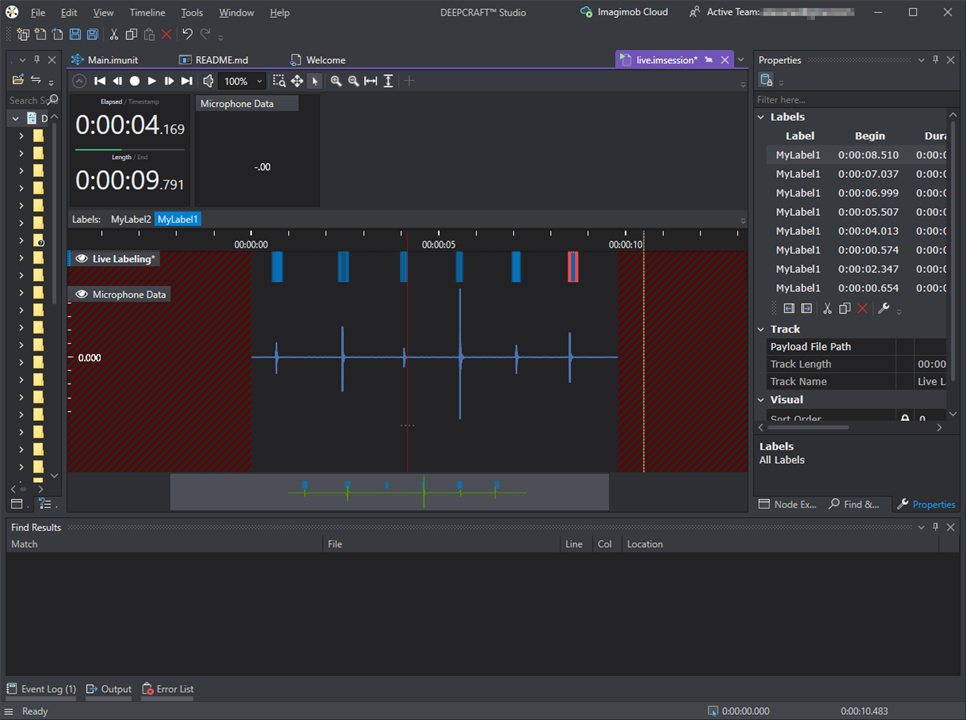
I made a very simple workflow with just the microphone, the labels, and a data visualization node, and then hit "play", which took me to a screen where I could start recording data. For my test I clapped a couple of times and stopped the recording, then I started assigning the same level to each "clap" captured: (I know "Mylabel1" doesn't say much for now, but that's going to be for Clap. Maybe I should have given it a more meaningful name before recording).
After labeling the data and saving that session, I started a new one to record "taps" (not claps!), labeled the samples, and then saved it.
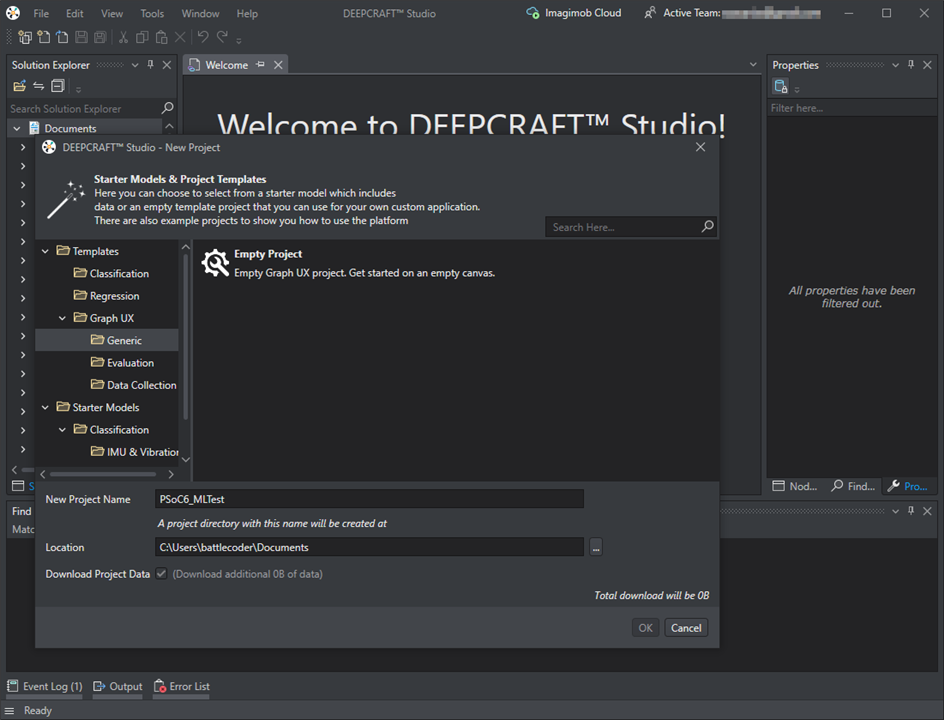
Once I had the data I created an Empty Classification project (from the templates), and imported the labeled audio samples as per the guide in Imagimob's developer portal.

I had some overlapping labels in one of my tracks and the software warned me about it (there was a red X in the Status column. Hovering over it it gave me an explanation of the problem) so I went back to the problematic session, deleted the overlapping labels, and click on "rescan data", which finally made both tracks show as ok!
It's truly great that the system can tell you if there's any issue, and then allows you to fix it before proceeding.
Now, at this point I didn't have enough samples to split between training, test and validation. I only recorded a handful of samples since I was just testing the waters. Now that I was more familiar with the process, I went back and recorded more of both clapping and tapping on my desk, and split them between training, test and validation, as required.
The next step was definining the pre-processor. This is an important step but for the sake of running a quick experiment I went with just a sliding context window, which seemed reasonable for continuous detection of audio patterns, and moved on.

Finally we get to training a model. For this step I decided to use the Model Wizard and see what AutoML is able to do with my data.
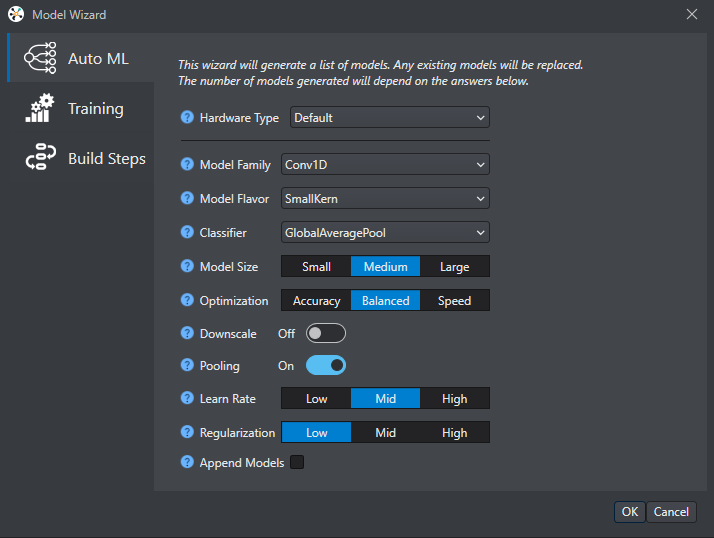
This gave me a list of models with slightly different configurations that I could start training. Clicking on "Start Training Job" uploads everything to the Cloud and schedules a job, giving you the option to monitor the training status.
My first session ended in error but it gave me a clear idea of where it went wrong."Not enough validation data" was a clear enough instruction to help me fix the issue and try again! (I had just 10 examples of each type for validation, so it was to be expected). Going back and adding data was easy enough that I didn't have to resort to the documentation again.
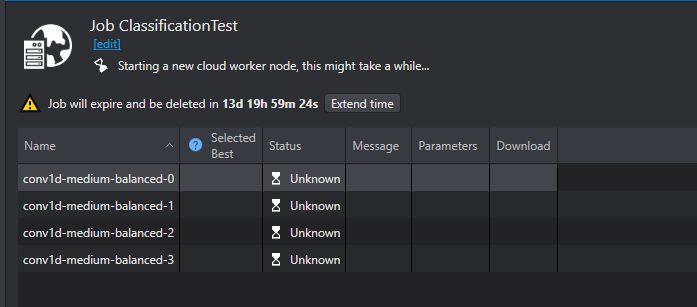
My next attempt went through just fine. This is what the status screen looked like after it had completed a couple of epochs:

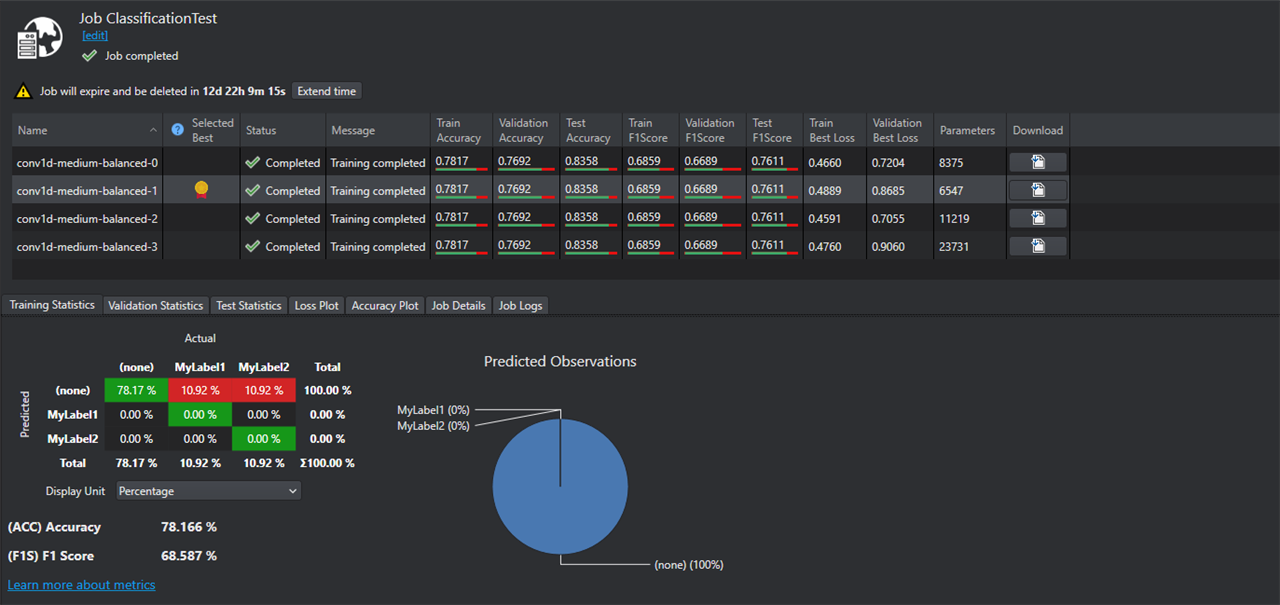
Once finished it, it gave me a lot more data on the performance of each, plus their corresponding confusion matrices. It also selected the best performing model for me. Unfortunately I noticed that despite the apparent "high" accuracy, my models weren't really picking up the clap or tap patterns. I had a model with 78% accuracy, but ...78% of my audio recording were neither claps nor taps, and that's where that figure was coming from. It picked absolutely zero of the actual noises I was interested on. This, again, was really easy to see in the detailed analysis I got after training finished.
I think this is a great time to mention that while I have some experience with ML at work and with my own personal projects, I have no experience with audio detection models, so I was in partially unknown territory (which happens to make this an even better test of the whole process). At any rate, I realized that probably my sliding window strategy was wrong, and I should also append some FFT in the pre-processor stage (since it makes more sense to find patterns in the frequency domain). I also took this opportunity to re-label my data so my labels are "Clap" and "Tap" instead of "Mylabel1" and "Mylabel2".
I decided to keep this failed experiment in this review because failing is part of the process, and I didn't want to just show a successful run with a perfectly tuned model. Trying different variations of models and transformations is how ML/AI development normally goes, so this also showcases the way that DEEPCRAFT Studio handles this trial-and-error cycle.
By the way, as obvious as it is now, it would have been very useful to check the provided examples that do audio detection. Don't be like me; check those first before trying to do something from scratch. You can get some really good insight on what preprocessors and parameters to use.
Going through the workflow again felt very intuitive, and I don't think i can't stress enough how easy it was to jump back and forth in the process and test different things. My FFT-based attempt was a lot more successful, but I refined it a little further until I got a model with these results:
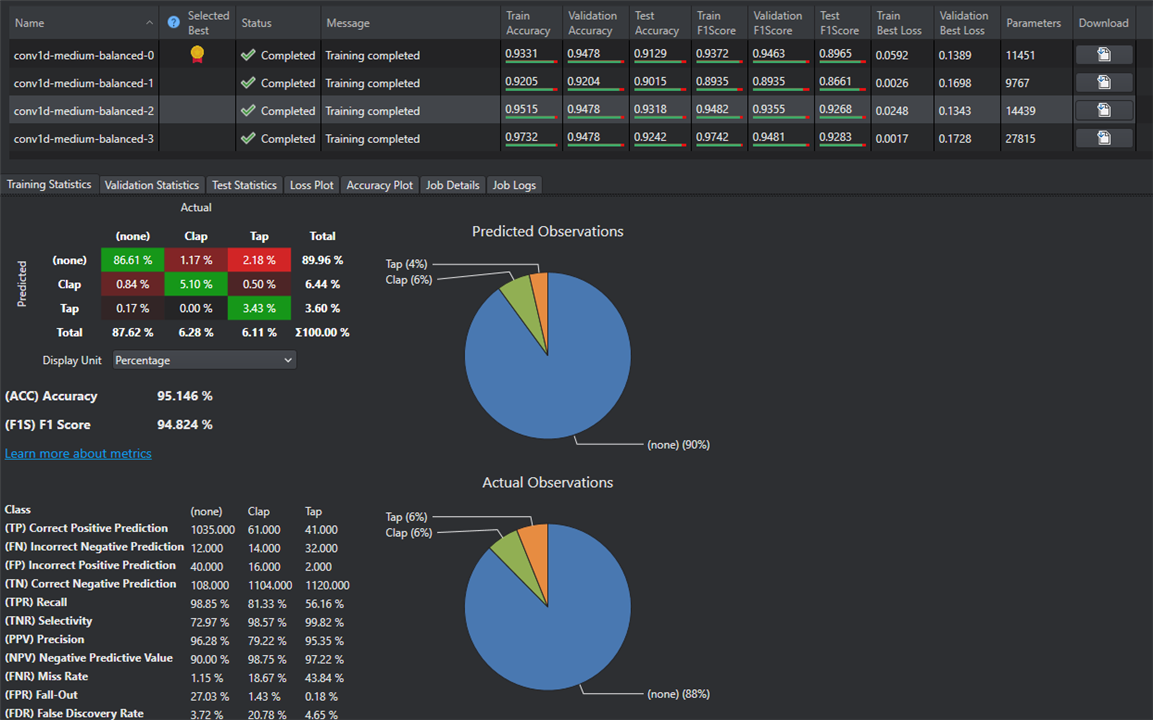
The model automatically selected as "best" had a similar performance that the one I'm highlighting, but less parameters (you get a useful tool-tip informing you of the criteria used to pick the best model). You can change which one is considered best, but you are always free to download and test all the models if you so desire.
Another cool feature is that you can import the model predictions into your recording sessions, and see the model output compared against the recordings. In this example you can see what the model detected (bottom of the window) as clap (green), tap (red) and unlabeled (blue). Note that in the capture below, the first tap sample caused both a clap and tap output, and it was in fact more clap than tap (which is incorrect, it should have been the opposite). The other samples were classified correctly so I think this was more than acceptable for me.

Finally I got back to the model to generate the output code. Here I enabled some optimizations as recommended by the developer's guide, and clicked "Generate Code".

Once exported you get a model.c and model.h file that you can import into a ModusToolbox project. These files define several methods to interact with the model, namely: IMAI_init() to initialize the model, IMAI_enqueue() to pass data to the model, IMAI_dequeue() to retrieve the output from it (if there's a prediction or classification result available), and IMAI_finalize() to close and release any resources.
For my application I needed to create a project that initializes the audio hardware and obtains samples from the microphone that I could pass to the model, checking after every new sample if there's a result available from the classification. Luckily Infineon already has a deploy example for their keyword spotter model, which does exactly that (but with their own model). Now, apparently that repository contains outdated dependencies so I'd recommend to use the Project Creator interface and use the templates offered there, which seem to come from more up-to-date repositories:
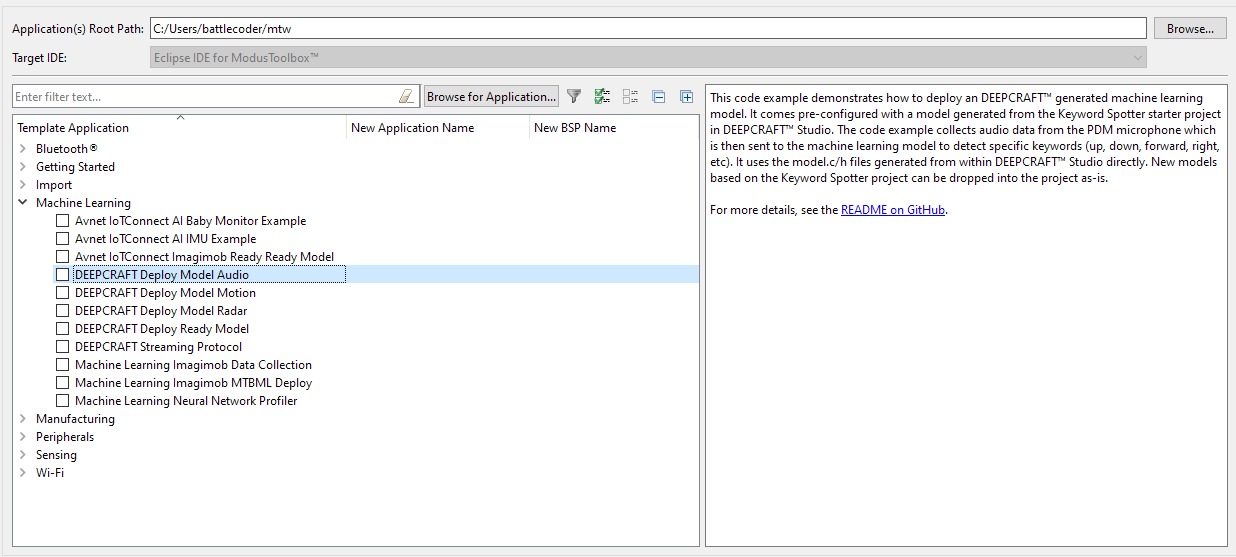
Since this example does exactly what I need (captures audio samples at 16KHz from the onboard microphone, feeds them to the model, and keeps checking if the model has detected a label) I was able to just use that project and replace the model.c and model.h with mine. I made some other small adjustments to the code like changing the microphone gain and tweaked the threshold for the detected label to be selected as the output, and then I run it. Here's a video capture of me testing it:
It works great in my opinion, and I was very happy with the results.
There's a lot of challenges in putting together a board that can run ML/AI models and a whole ecosystem that seamlessly integrates with it while making it easy for newcomers and advanced users alike, but Infineon has accomplished just that. Not only the documentation is great but it covers everything from easy to follow high level walkthroughs, to low-level technical details with plenty of available examples, templates and ready-to-use models and applications that can be used as-is or as reference. At no point I felt left to my luck with anything, and everything I did worked exactly as described in the documentation.
The hardware is also great; I love the selection of on-board sensors, I/O options and features, all in a very compact package. There's several other kits that seem to use the same ecosystem in case you want to explore other Infineon boards with more advanced features.
I also like how open the platform is; You are not locked to a single workflow designed for a specific level or type of user. For directly writing applications I could have continued using ModusToolbox with either Eclipse or VS Code (both worked great) to write apps in C, or switch to MicroPhyton. And for ML/AI models, I could have either trained models in other frameworks and imported them through ModusToolboxML, or make them graphically through DEEPCRAFT Studio, as I did for this RoadTest. There were other IDE integrations, and other alternatives that i didn't explore, but I can only assume they work equally well.
One thing to notice is that for the Cloud training in DEEPCRAFT Studio you are given a certain amount of compute minutes with your account. Currently that limit is 3000 minutes a month, but I think that's plenty, as my longest-running session used 36 minutes, and as I started fine-tuning my models and optimizing the number of training iterations, my experiments were shorter. In fact, my last and most successful training session used only 3 minutes of compute time. In total (counting the many failed experiments while I was still figuring things out) I used 136 minutes, and since I was using AutoML the system was training different variations each run.
If using the Cloud service is not your thing. it should still be possible to use the software to capture the data from the board, and create the preprocessor workflow (which can be exported as Python) and write some code to run your inputs through that preprocessing code, and then use Tensorflow/Keras or similar to train your model. You could also skip DEEPCRAFT Studio altogether, but I would strongly recommend you to try it. The whole capture-process-train-check-repeat loop was quick and easy thanks to it.
I did have a few minor hiccups like a couple of crashes and a single instance of the pre-processor not creating tracks (which only happened once), but all of that was solved by just retrying. As I said I was running a beta version, but even if those problems exists in the stable release, none of them set me back in any measurable way, and they are all issues that can be ironed out as the software matures. DEEPCRAFT Studio is a pretty ambitious application but it's very well designed, friendly and intuitive, but more importantly it gives meaningful error messages that don't leave you scratching your head confused, and it gives you enough data to make decisions or adjustments in your models.
In summary, the whole ecosystem and hardware is well designed and works well, and there's plenty of resources and documentation to help people get started with Edge AI/ML applications on this platform.


