RoadTest: Test out Arduino's Uno Q - The new Single-Board Computer!
Author: skruglewicz
Creation date:
Evaluation Type: Development Boards & Tools
Did you receive all parts the manufacturer stated would be included in the package?: True
What other parts do you consider comparable to this product?: reComputer AI R2130-12 ,RASPBERRY PI AI HAT+ 13 TOPS, PSoC 62S4 Pioneer Kit
What were the biggest problems encountered?: The initial setup can be overwhelming because there are multiple deployment paths. The introductory online materials do not clearly explain how to physically connect the board or start App Lab right away, which can leave new users confused.
Detailed Review:
Welcome to my RoadTest of the Arduino UNO Q!
I’m Steve K, a retired Software Engineer, and I am thrilled to take you along on this journey as we explore the brand-new Arduino UNO Q. If you are familiar with the classic Arduino UNO, you might be looking at this board and wondering, "What makes this one different?" The Arduino Uno Q, launched in October 2025 following its acquisition by Qualcomm, represents a fundamental shift in the Arduino ecosystem. Moving past the traditional microcontroller board, the Uno Q is now a hybrid embedded development system that retains the familiar Uno form factor.This innovative hybrid design essentially combines a powerful MPU with a real time MCU, that are connected over an RPC bridge:
A High-Performance Linux Computer : A Qualcomm Dragonwing microprocessor (MPU) runs a full Debian-based Linux OS. This unit handles demanding tasks such as WEB Services, graphics rendering, AI processing, and executing Python scripts.
A Dedicated Real-Time Controller : An STMicroelectronics microcontroller (MCU) is dedicated to the fast, precise hardware control expected from an Arduino, managing functions like sensor reading and pin toggling.
The Arduino App Lab and the Arduino_RouterBridge library serve as the cohesive framework for the entire platform. This setup enables your application to execute Python on the Linux component and C++ on the microcontroller (MCU), with the Router Bridge managing the communication between the two.
I participated in a Challenge here on Element14 back in the Spring of 2023.That challenge featured a dual CPU MCU evaluation Kit (PSoC 62S4) by Infineon. I was awarded a Finisher prize for my efforts. If your interested here a a link to my final blog in a 5 blog series: At The Core Design Challenge - element14 Community. Having extensive prior experience with the Infineon PSoC 62S4 Pioneer Kit, I've had the opportunity to work closely with its architecture. A key feature of this platform is the dual-CPU microcontroller (MCU), which incorporates both an Arm® Cortex®-M4 core and an Arm® Cortex®-M0+ core. This dual-core arrangement allows for a powerful separation of duties, where the M4 typically handles high-performance tasks and the M0+ is often dedicated to low-power, peripheral, or communication management. The communication and synchronization between these two distinct processing units are managed by a robust mechanism known as the Inner Process Communication Protocol (IPC).
I found this architectural approach of separating processing tasks over two distinct 'brains' to be exceptionally insightful and highly effective for complex embedded system design. This dual-core strategy offers significant advantages: it enhances system responsiveness by allowing non-critical tasks to run on the secondary core without interrupting the primary, high-priority processes; it enables superior power management by allowing the more powerful M4 to sleep while the low-power M0+ handles simple background tasks; and it naturally facilitates a modular approach to software design, making the overall system easier to debug, maintain, and upgrade. The seamless coordination provided by the IPC protocol is what truly enables the potential of this architecture, allowing the two cores to act in concert as a single, powerful system. My familiarity with this advanced, multicore environment and its IPC mechanisms provides a valuable baseline for evaluating and understanding the dual-brain architecture of the UNO Q, which is a perspective I bring to this roadtest.
In contrast, the UNO Q, offers two distinct chips, an MCU and a MPU connected via the RPC Protocol. The UNO Q features a ready-to-use Development Tool (App Lab) designed to specifically utilize Python code and Containers (Bricks) on a Linux OS for AI & other workflows and a real-time operating system running Arduino sketches for sensor control.Both workflows connected by an RPC connection. During the App Lab Build process this is all assembled for you, just run the app from App Lab. For a beginner, this is revolutionary. It means you no longer have to choose between the computing power of a Single-Board Computer (like a Raspberry Pi) and the simplicity of an Arduino—you get both in one package. You can connect a monitor, keyboard, and mouse directly to it via USB-C to use it like a desktop computer, or use the new Arduino App Lab to easily blend Python code and AI models with standard Arduino sketches.
In this review, I will be unboxing 2 memory versions (2/16 GB,4//32 GB ) of the Arduino UNO Q , setting it up from scratch, and testing out these new "hybrid" capabilities to see just how to get started. Whether you are interested in robotics, AI, or just want a more powerful board for your projects. I must state that this is an evolving board and being just released in October 2025, there are always updates being done to the software and documentation. So be aware that the content in this review might be behind the Board that you have purchased.
Let's dive in and see what the UNO Q can do.
To prepare for the road test, I conducted a thorough review of all available documentation for the UNO Q, including user guides, datasheets, and application notes. This groundwork was essential for understanding the board's capabilities and intended use cases, allowing me to begin the testing immediately upon receiving the board.
For this review, I have consulted and will reference three key online resources, listed below for easy access:
1. Arduino Uno Q Datasheet
Description: Datasheet
Origin: ARDUINO
FORMAT: PDF, WEB Wiki
URL: https://docs.arduino.cc/resources/datasheets/ABX00162-ABX00173-datasheet.pdf
This technical document details a sophisticated single-board computer, the Arduino Uno Q, designed for embedded development. It features a unique hybrid architecture, combining a Linux-capable Qualcomm Snapdragon MPU with an STM32 microcontroller. This dual-brain setup allows it to manage demanding applications like Edge AI, computer vision, and 3D graphics while maintaining precise, real-time hardware control through standard Arduino headers.
The powerful platform includes dual-band Wi-Fi, Bluetooth 5.1, and a USB-C port for power and video. Development is simplified via the Arduino App Lab and an RPC Bridge library that ensures seamless communication between the Linux and microcontroller systems. Intended for use in robotics and smart homes, the resource provides comprehensive information on pinout, power management, and the hardware acceleration essential for modern intelligent systems.
My takeaway notes on the datasheet
Core Architecture and Processing
The UNO Q integrates two distinct processing subsystems that communicate through a software-based Remote Procedure Call (RPC) layer known as Arduino Bridge
 QRB2210 System-on-Chip (SoC). 702 GPU @ 845 MHz, supporting hardware-accelerated 3D graphics (OpenGL, Vulkan, OpenCL).
Connectivity and Expansion
The UNO Q maintains compatibility with the Arduino ecosystem while introducing high-speed industrial-grade interfaces.
Standard and Specialized Headers
Hardware Indicators
Software and Development Environment
Arduino App Lab
This is a brand-new unified development environment (IDE) pre-installed on the UNO Q. It allows developers to:
Inter-Processor Communication (Bridge)
The Arduino Bridge library enables seamless interaction between the two processors. A microcontroller sketch can invoke high-level Linux services or receive structured responses, while the Linux side can trigger real-time peripheral responses through the MCU.
Power Management
The UNO Q requires a robust power supply to manage peak loads during wireless bursts or display initialization.
Hardware Acceleration and Media
The Adreno 702 GPU (integrated graphics processing unit embedded within the Qualcomm Dragonwing QRB2210 microprocessor) provides dedicated hardware video encoders and decoders accessible via the V4L2 API.
2. User Manual & Arduino App Lab Guide
The next 2 Arduino Docs links: User Manual and Arduino App Lab are Pages from the https://docs.arduino.cc/ documentation. Navigation around these docs consists of 3 separate frames:

2. USER MANUAL – UNO Q tutorials
Description: Learn about the hardware and software features of the Arduino® UNO Q.
Origin: ARDUINO docs
Number of pages 9
FORMAT: WEB Wiki
Main URL: https://docs.arduino.cc/tutorials/uno-q/user-manual/

3. ARDUINO APP LAB – getting started tutorial
Description: Learn how to setup the Arduino App Lab and launch Apps on the UNO Q board
Origin: ARDUINO docs
Number of pages: 7
FORMAT: WEB Wiki
Main URL:https://docs.arduino.cc/software/app-lab/tutorials/getting-started/

App Lab PAGES (Left frame - Table of Contents to different pages)
The UNO Q is available in two primary models (SKU ABX00162 and ABX00173) to suit different project complexities.
|
Feature |
2 GB model (ABX00162) |
4 GB model (ABX00173) |
|
RAM |
2 GB LPDDR4 |
4 GB LPDDR4 |
|
Storage |
16 GB eMMC |
32 GB eMMC |
|
Recommended Use |
Memory-optimized TinyML; PC-connected dev mode; lightweight Edge AI. |
Standalone desktop experience; multitasking; complex AI models. |
|
Wireless (SAME) |
Dual-band Wi-Fi 5 (2.4/5 GHz), Bluetooth 5.1 |
Dual-band Wi-Fi 5 (2.4/5 GHz), Bluetooth 5.1 |
|
Form Factor (SAME) |
UNO Form Factor (68.85 mm x 53.34 mm) |
UNO Form Factor (68.85 mm x 53.34 mm) |
2 GB model (ABX00162) (back of the box)

4 GB model (ABX00173) (back of the box)

As you can see from the back of the boxes, the only difference between the 2 GB model (ABX00162) and the 4 GB model (ABX00173) are in Memory RAM & Storage (RAM LPDDR4 & eMMC Storage).
What’s in the Box: You will find the Arduino UNO Q board,a small safety leaflet, and a Scan Card.
Other recommended components NOT included in the package:
To use the UNO Q in Single-Board Computer (SBC), the following 2 items a USB HUB and Power Supply , are required, in addition to a mouse, keyboard, and HDMI cable with a display.
I had these lying around and they worked fine

This is what element14 supplied for the roadtest
This is what element14 supplied for the roadtest
Component Information described below:
Output Voltage: 20 V
Output Current: 1.5 A
Total Power: 30 W
Manufacturer Part Number (MPN): MP009260
2. Cables Direct USB4 Type-C Cable POWER CABLE
Model Number: USB4-7200E
Length: 2 meters (approx. 6.5 feet)
Data Transfer Speed: Up to 20 Gbps (USB4 standard)
Power Delivery: 240W Extended Power Range (EPR). As indicated by the "240W" icon on the connector housing, this cable supports the highest current USB-C power delivery specification. It contains an internal e-marker chip to safely negotiate high-wattage charging for power-hungry devices like heavy-duty docking stations or large laptops.
Connectors: USB Type-C to USB Type-C (Male to Male)
3. TP-Link UH9120C USB Type-C 9-in-1 Hub.
UH9120C | USB Type-C 9 in 1 Hub | TP-Link
Designed with an aluminum alloy casing and a braided cable that neatly tucks into the body for self-storage, it expands a single USB-C port into nine distinct connections.the ports include:
1x HDMI: Supports up to 4K resolution at 60Hz for external displays.
1x USB-C PD: Supports up to 100W Power Delivery pass-through charging.
1x RJ45 Ethernet: Supports stable 1 Gbps (Gigabit) wired network speeds.
2x Card Readers: Includes 1x SD and 1x microSD slot, with transfer speeds up to 104 MBps.
4x Data Ports: Features 1x USB-C and 3x USB-A ports, all capable of 5 Gbps SuperSpeed data transfer.
Compatibility: It features driver-free "Plug & Play" support across a wide range of operating systems including Mac OS, Windows, Linux, iPadOS, iOS, Android, and Chrome OS.
To use the UNO Q in Headless mode, In addition to a PC running Windows, MAC OS or Linux a USB type-C cable is needed. I'm sure you have plenty of these around.

The Manual is Digital: Note that there is no thick printed manual;
Unboxing Video: I did not find it necessary to produce an unboxing video. There are plenty of them on Youtube. I listed the ones that I found at the time of the review. I noted the date of the video release, since the Arduino UNO Q is so NEW.
Arduino Uno Q Unboxing – Gary Explains
Oct 23, 2025
https://www.youtube.com/watch?v=_GyD-j9NGEc
Two Months with the Arduino Uno Q: Hackster PRO Jeremy Cook // Getting Started
Jan 7, 2026
https://www.youtube.com/watch?v=5jbS4puIlUs&t=1027s
Hackster Project- Hands-On with the Arduino UNO Q by Jeremy Cook
Dec 19,2025
https://www.hackster.io/news/hands-on-with-the-arduino-uno-q-74eabc1bd962
Arduino Uno Q First Look: Setup, Features & What's New -= DroneBot Workshop
Dec 21, 2025
https://www.youtube.com/watch?v=ConG_fma45M&t=80s
Hardware Inspection:
Courtesy of the User Manual 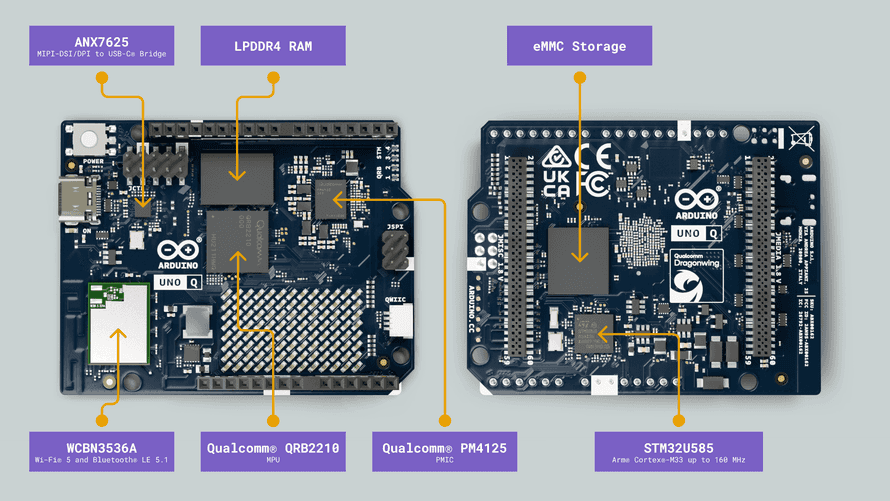 , here is an overview of the board’s main components, as shown in the image above:
LED matrix: Locate the built-in 8x13 LED matrix on the board; this will be your primary source of visual feedback during the initial boot.
Microprocessor MPU: The Qualcomm® QRB2210 is a quad-core Arm® Cortex®-A53 processor running at 2.0 GHz, equipped with an Adreno 702 GPU (845 MHz) for 3D graphics acceleration and dual ISPs supporting up to 25 MP at 30 fps. It runs Debian Linux OS with upstream support, making it well-suited for embedded vision and edge computing applications.
Microcontroller MCU: The STM32U585 microcontroller features an Arm® Cortex®-M33 core running up to 160 MHz, with 2 MB of flash memory and 786 KB of SRAM. It runs the Zephyr OS, providing a secure and efficient platform for low-power embedded applications.
Wireless Connectivity: The WCBN3536A radio module provides dual-band Wi-Fi® 5 (2.4/5 GHz) and Bluetooth® 5.1 connectivity, both with onboard antennas for reliable wireless performance.
Memory: The board features 16 GB or 32 GB options of eMMC storage and 2 GB or 4 GB options of LPDDR4 RAM, delivering fast memory access and reliable storage for embedded applications.
Multimedia Codec: The ANX7625 multimedia codec enables video and audio output through the onboard USB-C connector, providing a high-speed interface for display and sound transmission in embedded applications.
Power Management: The UNO Q includes the Qualcomm® PM4145, a power management integrated circuit (PMIC) to meet the demands of always-connected IoT devices.
Regardless of which of the models you have purchased, there is a “get started” sticker on the box pointing to arduino.cc/uno-q
If you follow this link you will come to this page.
While this is a starting page, I question its effectiveness in helping a new user make an informed decision about the numerous paths they could follow. The very first element is a button to download "APP Lab." A user, unlike myself, might not have read the documentation yet at this stage. The subsequent links are: the 3 modes to running App Lab and then a link to introducing the reader to what Apps are then a link to the Bricks doc page. And at the end of the page there is a link to the extensive user manual at User Manual. There is no mention of HOW TO Connect the board, or use App Lab.I find this to be a shortcoming The comprehensive User Manual and resources are entirely digital and available on the Arduino website. I previously detailed these resources and strongly recommend reviewing at least the Uno Q Datasheet before proceeding. However, if you are eager to get started, I've compiled a quick-start guide for the basic setup and powering up the board. Most of it has been taken from the extensive User Manual.
My Quick Start Guide

Headless Mode
Accessing the Linux OS command line from a remote computer.
The Arduino UNO Q offers two methods for remote access from your PC
This system unifies a Qualcomm® Dragonwing QRB2210 microprocessor (MPU), with a real-time STM32U585 microcontroller (MCU). Bridging these two distinct environments is the Arduino Bridge (RPC library), the critical communication layer that enables seamless data exchange between the Debian Linux on the MPU and the real-time OS on the MCU. As an architect, your choice of setup mode is a strategic resource-management decision: you must align your deployment strategy with the board’s 2GB or 4GB LPDDR4 RAM and 16GB eMMC storage to prevent performance bottlenecks.
Selecting the incorrect mode can result in severe resource contention, particularly on the 2GB model, where OS overhead can starve high-priority Python scripts or AI models. This guide evaluates the two primary setup modes to ensure your hardware is optimized for its intended workload.
The choice between these two configurations is typically driven by the performance requirements and the target application complexity. The lower-end configuration (2 GB RAM / 16 GB Storage) is suitable for basic, resource-light operations, while the higher-end option (4 GB RAM / 32 GB Storage) is designed to handle more demanding applications, multitasking, and larger datasets. The use of LPDDR4 (Low-Power Double Data Rate 4) RAM signifies an emphasis on power efficiency, crucial for battery-powered or heat-sensitive embedded devices. The eMMC (embedded MultiMediaCard) acts as the primary boot and data storage, offering a compact and cost-effective solid-state solution.
Using Arduino App Lab on a host PC to configure and program the Arduino UNO Q is actually the recommended and most efficient approach for the 2 GB RAM and 16 GB eMMC model.
Here is how this setup affects your board's memory and storage:
Impact on RAM (2 GB LPDDR4)
Impact on Storage (16 GB eMMC)
In short, developing in PC-connected mode offloads the development overhead to your computer, maximizing the 2 GB of RAM and 16 GB of storage for your application's real-time execution.

Desktop Mode transitions the Arduino UNO Q into a fully autonomous single-board computer (SBC). In this configuration, the board hosts its own development environment via its pre-installed Debian Linux OS, functioning as an independent workstation that requires no external host PC for daily operation.
To initialize Desktop Mode, a specific hardware interface is mandatory. The USB-C port on the UNO Q handles power, high-definition video, and data throughput. To boot and operate in this mode, you require:
Desktop Mode is built around the Arduino App Lab. It allows developers to manage "Bricks"—pre-built functional modules—alongside containerized AI models and Python logic. This interface is designed for visual-heavy AI tasks, enabling the rapid deployment of models for object/human detection, anomaly detection, keyword spotting, image classification, and voice commands. This mode is the Recommended path for developers utilizing the 4GB UNO Q model who require a "responsive standalone desktop experience." By utilizing the higher memory ceiling, you can run the Debian GUI and the Arduino App Lab simultaneously without compromising the performance of complex, containerized AI processes. If you don't need a monitor or a graphical interface, which can consume unnecessary power and memory, you can opt for a simpler connection. To do this, refer to "Headless Mode," which is detailed in the following section.

Headless Mode is the optimal configuration for memory-optimized, remote, or Tiny Machine Learning (TinyML) applications. In this mode, the board acts as a high-performance development node connected to a primary workstation, bypassing the resource-heavy requirements of a local graphical display.
Physical Connection and Communication Protocols
Connectivity is established via a single USB-C cable to a host PC (Windows, macOS, or Linux).
The dual-brain architecture of the board can be used for app development via the Arduino App Lab (recommended) desktop application (compatible with Windows, macOS, and Linux)
The USB-C cable facilitates both power and high-speed data transfer. Developers can also interact with the Debian Linux subsystem via the computer’s terminal using industry-standard remote protocols:
Resource Optimization and Deployment Efficiency
Headless Mode is the "best choice" for the 2GB RAM model. Operating without a monitor eliminates the significant GUI overhead of Debian Linux, which can otherwise cause memory contention that degrades the performance of real-time AI "Bricks" and Python scripts. This is the formal deployment strategy for remote IoT nodes and "PC-connected" workflows, ensuring that the LPDDR4 RAM is dedicated entirely to core OS libraries and primary application logic.
The decision between these modes rests on the hardware constraints of your specific board model and the visual requirements of your project.
Comparative Logic: Selecting the Right Mode for Your RAM model
Resource-centric planning is vital for maximizing the Qualcomm® Dragonwing architecture. The table below outlines the architectural trade-offs between the 2GB and 4GB models.
|
Feature |
2GB model |
4GB model |
|
Primary Mode |
Headless Mode |
Desktop Mode |
|
Optimization |
Bypasses GUI to prevent RAM contention |
Supports high-level visual processes |
|
Software Focus |
Arduino IDE / CLI, Python, core libs |
Arduino App Lab GUI, Multitasking |
|
Development Style |
Remote Node (via SSH / ADB) |
Standalone SBC (Monitor/Keyboard) |
|
AI Complexity |
Memory-optimized Edge AI / TinyML |
Complex, containerized AI models |
|
Ideal Use Case |
Lightweight IoT, Anomaly Detection nodes |
Visual AI prototyping, Sound recognition |
My Recommendation
Deploy in Desktop Mode if you are using the 4GB model for visual-heavy prototyping, requiring the Arduino App Lab to orchestrate complex AI models and graphical feedback in a standalone environment.
Deploy in Headless Mode if you are using the 2GB model for dedicated IoT tasks. This ensures maximum efficiency by stripping away the GUI, preserving the board’s LPDDR4 resources for critical Python services and Arduino Bridge communication.
Please note: I typically recommend running a specific configuration (Headless or SBC mode), but you can easily switch later if you change your mind. If moving from SBC to Headless mode however, you might need to free up memory due to the overhead of the Linux GUI. I can't confirm this, since I generally run the 2GB UNO Q in Headless mode and the 4GB UNO Q in SBC (Single Board Computer) mode.
Ok now you have the UNO Q out of the box. The temptation is to power it up right? Well no because it needs to be configured first. But in anycase once you have determined your setup type follow the section below based on your desision.
Desktop Mode Initial Setup (SBC)
The good news is that the Arduino APP Lab Dual-Brain development works in both Modes. The Desktop Mode (SBC) is the most straightforward way to begin, since it requires no install and runs on the UNO Q.
If you want to get started with this mode then follow this link: UNO Q as a Single-Board Computer. In this tutorial, you will learn how to set up your UNO Q as a personal computer, ready for everyday tasks like web browsing, office work and media playback, alongside working with product specific features like using Arduino App Lab for developing amazing projects.
No PC Software Needed: You do not need to install anything on your Windows/Mac PC for this initial setup; the setup logic and App Lab software are pre-installed on the board's internal storage.
Once operating in this mode you can always run SSH clients from your PC.
Please Note: that you might have to run the following command on the UNO Q to enable network mode
Headless Mode initial Setup:
This mode uses a Type-C USB cable to connect to the board. Basically you plug a single USB-C cable from a host PC (Windows, macOS, or Linux) to the UNO Q type-C connector on the board.
So what happens if you plug in the Board right out of the box?
Initially I did not install App Lab on my PC. On my 2 GB model, I just Plugged the Type- C into a PC and the board .What happened was,the default app was started. The LED display puts the Arduino logo on first, then displays a heart and blinks the GREEN LED. This indicates that the Board is operational.
At this point you need to configure the environment on the board first. The easiest way to configure the board is to run the Arduino App Lab Development tool. You need to install the Arduino App Lab and run it from your PC after plugging in the USB cable and after the LED matrix screen displays the heart.
To learn how to set up the Arduino App Lab on a PC (Windows, MacOS, Linux), and launch Apps on the UNO Q board follow the directions on the Getting Started with Arduino App Lab Page. You will learn:
Important Note make sure to follow the instruction at section Desktop Mode Over USB (Default) since as noted, “Network mode only works once the first setup is complete, which requires a USB connection”.
The initial execution of App Lab necessitates the use of a USB-C cable connection and involves a four-step setup process:

After the initial setup, subsequent launches of the Arduino App Lab allow you to select "Network" mode. This enables a Wi-Fi connection between App Lab and the UNO Q, eliminating the need for the USB-C cable.
In this network mode, any PC on the same Wi-Fi network as the Uno Q can connect, allowing you to develop and run apps remotely over your Wi-Fi network. Additionally, you can access the board's OS shell directly from App Lab by clicking the >_ icon in the bottom status bar.
After the initial setup, you can choose to connect your PC to the Uno Q without using App Lab at all, this done thru one of the following two connect options: SSH or ADB.
You will learn:
So now that you have connected to WiFi and you have the Linux credentials, and the boardname (found at the bottom status bar of the AppLab) you can SSH into the board.using this command:
$ssh arduino@cherye.local #replace <boardname> with your board name
This dumps you into the ls /home/arduino directory
Now you are able to access the board's shell and perform operations on the UNO Q remotely.
2, Connect to the UNO Q via ADB. This section of the user Manual Connect to UNO Q via ADB, instructs how to use ADB. This is a tool that you install on your PC , where you can access the board's shell and run operations on the system.
Regardless of the mode, the internal arduino-router.service handles the background communication and RPC (Remote Procedure Call) traffic between the Linux and MCU subsystems.
You can read about the Bridge - Remote Procedure Call (RPC) Library
https://docs.arduino.cc/tutorials/uno-q/user-manual/#bridge---remote-procedure-call-rpc-library
The board will begin its "First Boot" behavior, initializing the Debian Linux system. The LED matrix will provide immediate visual feedback to show the board is alive.The 8x13 LED matrix serves as a "system heartbeat." In headless configurations, this matrix acts as a vital diagnostic tool. Seeing the matrix illuminate confirms that the STM32 MCU—which manages the display—is functional and that the primary system power rails have stabilized, ensuring the board is ready for the next layer of interaction.
The UNO Q is supported by the Arduino Cloud, allowing it to send and receive data over the Internet. Refer to the user manual section: Connect UNO Q to the Arduino Cloud for setup and execution. Note that the UNO Q requires the Arduino App Lab to be programmed, which includes the ready-made example that this tutorial is based on. The communication with Arduino Cloud is enabled by the UNO Q's microprocessor (MPU) and Wi-Fi module, and is programmed using Python. Data to and from the Microcontroller (MCU) is handled via the Bridge tool.
The final setup step verifies that the "Dual-Brain" architecture and the internal arduino-router.service are communicating correctly.
NOTE The LED controlled in this example is driven by the STM32 microcontroller through the Arduino sketch.
In the UNO Q ecosystem, a "Blink" is more than a simple GPIO test—it is an end-to-end verification of the RPC (Remote Procedure Call) bridge. When you click "Run," a command is issued from the Linux (Qualcomm) environment, processed by the arduino-router.service, and sent across the high-speed link to the STM32 microcontroller to toggle the pin. A successful blink confirms that your software stack, the service bridge, and the hardware interconnect are operating in perfect systemic harmony.
Conclusion You have now transitioned the Arduino UNO Q from a static piece of hardware to an active development environment. With the system verified and the bridge functional, you are positioned to begin high-level development, leveraging Python for complex logic while maintaining real-time control through the STM32 MCU.
Arduino App Lab is the heart of the UNO Q experience. It is designed to bridge the gap between the Linux MPU and the real-time MCU.
Keep these links handy as you begin developing:
This section covers the Arduino App Lab, the integrated development environment (IDE) designed for the UNO Q's dual-brain architecture. It also includes a discussion of available examples and Bricks.
A Deep Dive into the Arduino App Lab
The Arduino® UNO Q is transforming embedded development by moving beyond the traditional single-MCU, deterministic "infinite loop" model. It achieves this with a "Dual-Brain" architecture that pairs a real-time Microcontroller Unit (MCU) with a Microprocessor Unit (MPU) running Debian Linux. This setup eliminates the common, often blocking, constraints of legacy development. Crucially, the Arduino App Lab simplifies this sophisticated hybrid approach, presenting it as a single, unified "App" experience instead of a complicated systems integration task.
This section's objective is to Evaluate Arduino App Lab development environment. To accomplish this I went over the following arduino Document pages:
Getting Started with Arduino App Lab
Understanding Bricks: Building Blocks in the Arduino App Lab
These are my key takeaways from working thru these Arduino Document Pages
Takeaway 1: The Anatomy of a Hybrid App (MCU + MPU)
In App Lab, your project is no longer just a "sketch"—it is a containerized App. This architecture enforces a clean separation of concerns: deterministic hardware control stays on the MCU, while high-level logic and heavy networking move to the MPU. A standard App consists of a triad of core files:
Analysis: This structure solves the "latency jitter" problem. By offloading a web server or a heavy AI inference model to the MPU, your MCU remains free to pulse-width modulate a motor or sample a sensor at precise intervals.
"The UNO Q is a board unlike any other Arduino board, featuring a microprocessor capable of running Debian OS... and a microcontroller that runs sketch files. These systems can then communicate using a tool called the RPC Bridge.
Takeaway 2: "Bricks" – Modular Power Without the Boilerplate
The App Lab introduces Bricks, modular building blocks that abstract complex Linux-level functionalities—like computer vision or RESTful APIs—into simple Python calls.
Modular Architecture & Professional Isolation Bricks are not just libraries; they are often separate processes—frequently deployed as Docker containers. This is a significant move toward "Full-Stack" professionalization. By using Docker, Arduino ensures that an AI Brick (like YoloX Nano) runs in an isolated, reproducible environment. This prevents the "dependency hell" typical of traditional SBC development where installing one library might break another. Developers can even verify the health of these microservices by SSHing into the board and running docker ps to see real-time container status.
Takeaway 3: The RPC Bridge – Talking Across the Silicon Aisle
The key component of the App Lab is the Bridge tool. It provides a high-level Remote Procedure Call (RPC) layer that allows the Linux MPU and the MCU to communicate without the developer having to write a single line of raw UART or SPI protocol code.
The Bridge API utilizes three fundamental verbs:
Use Case: Imagine a high-speed vibration sensor on the MCU. Instead of the MPU constantly polling, the MCU can use Notify to instantly push a "fault detected" interrupt to the Python logic, which then triggers a cloud-based alert or logs the event to a Docker-managed database.
Workflow Evaluation: From Blinky to Sensor Fusion
Takeaway 4: Professional-Grade Deployment (Docker & Linux)
Arduino's pivot to managing Docker containers is a masterstroke for edge AI. By abstracting the complexity of container orchestration, the App Lab allows developers to focus on the application logic while the backend ensures that the "AI-at-the-edge" stack is isolated from the core OS. For the "Full-Stack" developer, this means the UNO Q isn't just a prototyping board; it’s a deployment-ready micro-server.
Assessment: Maintenance and Long-Term Reliability
For long-term IoT deployments, the App Lab environment offers a level of stability DIY Linux "stacks" rarely achieve. The board features an automatic update mechanism that keeps the OS and App Lab components current, provided it has an internet connection.
The "app.run()" Golden Rule From a "hands-on" technical perspective, the most critical element of the Python workflow is the app.run() function. This function launches the imported Bricks and the Bridge tool. A common "gotcha" for new users is placing logic after this call. In the App Lab environment, app.run() must be the final line in your main.py; any code placed after it will simply not execute. This is the heart of the MPU's execution loop.
Conclusion: The Future of Embedded Development
The Arduino App Lab and the UNO Q represent a fundamental shift in the "Arduino experience." By combining the accessibility of the Arduino IDE with the professional power of containerized microservices and RPC-based inter-processor communication, they have built a bridge between the bit-banging world of microcontrollers and the high-level world of Linux.
Final Thought: As AI and high-level networking become mandatory at the edge, will this hybrid model become the new industry standard? The "Dual-Brain" approach of the App Lab suggests that the days of the isolated, single-loop microcontroller are numbered, replaced by a more sophisticated, modular, and containerized future.
Arduino App Lab Example Applications
The objective of this section is to try out the examples offered in AppLab. To gain more insight into using this tool.
Using the examples is so easy. Just pick the icon in the Examples area and it will be loaded.
Each official example provides a detailed documentation provided in the readme.md file inside of the example App. It provides a detailed description of the example as well as an explanation of the code. Also if you want to browse the example this page https://docs.arduino.cc/software/app-lab/tutorials/examples provides a great overview of each example. You can use these examples as a starting point for your own projects This is done by selecting an available example in the "Examples" section, and duplicating it or you can create empty apps from scratch adding the code and bricks.
A single App can run on the board at any given time, but it can utilize multiple Bricks running concurrently in the background. These Bricks are deployed as independent processes on the board, and the App interacts with them via specialized APIs.
Learn more about bricks on this user manual docs page https://docs.arduino.cc/software/app-lab/tutorials/bricks
Key Takeaways:
Another source of examples are projects on the Project HUB at https://projecthub.arduino.cc/?product=8f917eea-164f-4809-a812-c1f36c5dc892
Objective:
Exercise UNO Q as a desktop‑class Linux SBC, using the 4 GB model (Part # ABX00173).
If you have not set up your UNO Q as a personal computer, follow this link: UNO Q as a Single-Board Computer.
When you're done setting up for the first time you’ll notice that App Lab runs on startup. For now you can exit App Lab, and explore the usage of the Debian Desktop
Here is my update screen for my new Uno Q Installation. . 
And showing the App Lab running version .0.6.0

I experimented with the UNNO Q 4GB model in SBC Mode, performing the six operations detailed below. You can replicate these steps or use the manuals to explore the SBC Mode further on your own.
1. Try everyday tasks like web browsing, office work and media playback.
Here I am running four apps: terminal, File Manager, Web browser and App Lab, Run from the launcher at the bottom of the screen
2. Customize your Debian environment
by installing your preferred software packages using the built-in package manager.
Expand your system's capabilities using Debian's robust package manager, apt. This is the primary method for software installation, removal, and updating.
The apt tool downloads pre-compiled software packages from centralized online repositories. Use sudo apt install <package-name> to automatically download, resolve dependencies, and configure the application.
For example, to install VLC media player:
sudo apt install vlc
Command Breakdown:
Best practice before installing:
Utilizing apt grants seamless access to a vast library of software, enhancing your working environment.
To run, type “vlz” in a terminal and the VLZ app will start.
3. Try connecting additional peripherals
like a USB camera or Ethernet adapter to expand its capabilities.
USB CAMERA USED:
To use a USB camera you can install Cheese, an app that provides a graphical interface to take snapshots and record: Here is how to run the Cheese webcam application on the Arduino UNO Q board by leveraging its built-in Debian Linux operating system.
The process involves three main steps:
1. Hardware Setup (SBC Mode): Configure the UNO Q as a Single-Board Computer by connecting a powered USB-C dock/dongle, monitor, keyboard, mouse, and a USB camera. The 4GB variant of the board is recommended due to the high resource demands.
2. Install Cheese: Open the Terminal in the Debian desktop environment and use the commands sudo apt update and sudo apt install cheese to install the application.
3. Run the Application: Launch Cheese either by typing cheese in the Terminal or by selecting it from the Multimedia Applications menu. Cheese will automatically detect the connected USB camera.

The setup includes a camera, positioned in the lower-left corner of the frame, capturing an image of the UNO Q on the desk. The screen displays three running applications: the terminal (used to launch Cheese), the Cheese application itself, and an image viewer showing the resulting JPEG photo.
Conclusions
Initially, the "cheese app" displayed an error stating that the video was not supported. I was able to resolve this by researching and implementing a fix to force Cheese to use a standard, low resolution (640x480).
While I am still receiving a "critical error" message, the application appears to be functional and is successfully capturing both pictures and videos.
4. Experiment with developing and running both desktop and embedded applications
on the same device. Try running an App Lab example Blink while running other apps like cheese on the same device.
Testing on the UNO Q 4GB model revealed performance degradation when running multiple applications, particularly memory-intensive apps like the browser and 'cheese.' Specifically, the browser appeared sluggish when accessing portals such as Google Drive.
5. Try operating the SBC Uno Q while running App Lab in host mode

The Uno Q in SBC mode is on the LEFT and on the RIGHT, I have App Lab running in host mode connected to the UNO Q on the LEFT. This host is running on Windows running APP Lab On the right Display and on the Left display is the terminal screen. Now you can also exercise your PC in Headless Mode as described in the next section.section
Objective:
Exercise UNO Q as a Headless Computer
Use the 2 GB model (ABX00162)
There are 3 ways to connect to the Link OS on the Uno Q:
You have already used this method of connection
The Linux OS running on the Arduino UNO Q can be accessed over USB, using a tool called Android Debug Bridge (ADB). ADB is a tool that you install on your computer, where you can access the board's shell and run operations on the system.
Based on the Connect to UNO Q via ADB documentation page, here are the key takeaways for setting up and using ADB on your Windows PC:
1. Installation Method
For Windows (refer to the documentation page for Linux and Mac), the recommended way to install the tool is through winget. You simply need to run the following command in your terminal:
winget install Google.PlatformTools
2. Connection & Verification
3. Accessing the Shell
To enter the board's operating system, use the command adb shell.
Pro Tip: If you haven't configured the board previously via the Arduino App Lab, the default password is arduino.
4. Capabilities
Once connected via ADB, you have full shell access to the Linux OS running on the board. 
This allows you to:
5. Exiting
When you are finished with your session, simply type exit to leave the board's terminal and return to your Windows command prompt.
Use an SSH connection from your PC to run the OS in Command line mode .
An SSH client running on your PC is connected over your WiFI network.
Note you must have SSH running on the Uno Q. The rest of this section assumes you have followed Headless mode instruction in the above section titled “Headless Mode initial Setup”. If you have not, you will need to follow the instructions for the initial setup and assure the network mode is operationable.
Once connected you will be in the Arduino directory as opposed to an ADB connection wher you are placed at the root of the Linux OS.
Get familiar with the environment using accessing the board's shell and perform operations on the board remotely, go to Connect to UNO Q via Secure Shell (SSH)
The following section includes my takeaways from the the SSH doc page:
Software And Hardware Requirements
Installing SSH (Local Computer)
Connecting via SSH
To connect to an UNO Q board via SSH, we only need to know the board name and password. This is set up during the first setup.
ssh arduino@<boardname>.local #replace <boardname> with your board name

4. Arduino App CLI
Use the Arduino App CLI to access App Lab. It can be used to start & stop Apps on the board from the terminal. When accessing the board via SSH, you can run commands such as
arduino-app-cli app list
arduino-app-cli app start <app>
Note You CANNOT run multiple Apps at the same time. I’m wondering why?
.
Based on the Arduino App CLI documentation, the system command allows you to manage configurations and updates for the UNO Q board. Here are the available commands:
Other commands available for the arduino-app-cli 
I was unable to find arduino documentation on the other commands More details on the arduino-app-cli tool can be found in the Arduino App CLI guide.
Objective:
To understand and work with the UNO Q Linux distribution of Debian. More specifically to highlight System Monitoring commands available.
The Debian Linux Basics for UNO Q manual page (debian-guide) is an essential resource for grasping the Debian environment on the UNO Q. This comprehensive guide is highly recommended for anyone looking to fully understand the UNO Q's capabilities. For my evaluation, I found several sections of this manual page particularly valuable, and I specifically focused on the following section to aid in my analysis of the UNO Q. I will not be covering all the topics covered on this manual page in this review, but decided to document my takeaways of the System Monitoring commands at system-monitoring This section details essential Linux commands for evaluating the Arduino UNO Q's performance and storage. A core objective for both the 2 GB (ABX00162) and 4 GB (ABX00173) models is to accurately measure the memory footprint and associated performance metrics for each of the two available setup configurations.
Resource Usage (CPU & Memory)
Storage Management (eMMC)
System and Hardware Details
Options for Displaying System Information (via uname command):
|
Short Option |
Long Option |
Description |
Notes |
|
-a |
--all |
Prints all available information in the following order (omits processor and hardware platform if unknown). |
Comprehensive view |
|
-s |
--kernel-name |
Displays the kernel name. |
|
|
-n |
--nodename |
Displays the network node hostname. |
|
|
-r |
--kernel-release |
Displays the kernel release version. |
|
|
-v |
--kernel-version |
Displays the kernel version details. |
|
|
-m |
--machine |
Displays the machine's hardware name. |
|
|
-o |
--operating-system |
Displays the operating system name. |
|
|
-p |
--processor |
Displays the processor type. |
Non-portable |
|
-i |
--hardware-platform |
Displays the hardware platform. |
Non-portable |
|
--help |
Displays this help information and exits. |
||
|
--version |
Outputs version information and exits. |
System Information (uname Breakdown)
The full system information command, $ uname -a, returns:
Linux cherye 6.16.7-g0dd6551ae96b #1 SMP PREEMPT Tue Sep 23 12:46:06 UTC 2025 aarch64 GNU/Linux
The breakdown of the uname command results is as follows:
|
Option |
Command |
Result |
|
Kernel Name |
$ uname -s |
Linux |
|
Network Node Hostname |
$ uname -n |
cherye |
|
Kernel Release |
$ uname -r |
6.16.7-g0dd6551ae96b |
|
Kernel Version |
$ uname -v |
#1 SMP PREEMPT Tue Sep 23 12:46:06 UTC 2025 |
|
Machine Hardware Name |
$ uname -m |
aarch64 |
|
Processor Type |
$ uname -p |
unknown |
|
Hardware Platform |
$ uname -i |
unknown |
|
Operating System |
$ uname -o |
GNU/Linux |
Shutting Down Your UNO Q Safely
In the Shutting Down Your UNO Q Safely section, the guide explains that the UNO Q has an auto-restart feature. To manage this, different commands result in different power states:
Recommended Method (Stay Powered Off)
sudo halt: This is the recommended approach. It stops all system processes and brings Linux to a safe state while keeping the board powered off. This prevents the automatic restart, making it ideal for storage or transport.
Alternative Methods (Clean Shutdown with Auto-Restart)
The following commands perform a clean shutdown of the Debian system, but the board's power management will trigger an automatic restart shortly after:
sudo shutdown now
sudo poweroff
System Reboot
sudo reboot: This command is used to cleanly restart the system as intended.
Important Notes
Visual Indicator: The green power LED on the board will turn off when the system has halted completely.
Manual Power Disconnect: If you use the alternative methods (shutdown or power off) but want the board to stay off, you must physically disconnect the power source (USB-C, VIN, or 5V pin) immediately after the green LED turns off and before the restart sequence begins.
Emergency Situations: While proper procedures are preferred, the UNO Q's eMMC storage includes protections to minimize data loss during unexpected power loss.
The following sections provide an organized, in-depth evaluation covering the documentation quality, a detailed breakdown of the product's strengths and weaknesses, the utility of the associated AppLab environment, and an overall final rating.
Arduino Uno Q Datasheet
This is an extensive document with all the information you should need to develop on this board. Nicely laid out. Easy to find information. This UNO Q document is well above average compared to typical maker-board datasheets, especially for a first‑party board.If the rating scale is “poor / adequate / good / excellent” for a board‑level datasheet, this one lands solidly in the excellent bucket.
Structure and completeness
Hardware detail quality
Software, acceleration, and usage info
Where it is weaker
Overall “rating” versus other datasheets
UNO Q User Manual
This is an extensive web document with all the information you should need to begin developing on this board. Nicely laid out. Easy to find information. This UNO Q web manual is well above average compared to typical maker-board getting-started guides, especially for a first‑party board. If the rating scale is “poor / adequate / good / excellent” for a digital user manual, this one lands solidly in the excellent bucket.
Structure and completeness
Hardware detail quality
Software, acceleration, and usage info
Where it is weaker
Overall “rating” versus other user manuals
Pros of the Arduino UNO Q and App Lab
Cons and Limitations
My Scoring explained 1-5 star ratings Total Score = 27 stars
The Arduino UNO Q and App Lab form a particularly effective development environment for tackling Internet of Things (IoT) embedded projects. My scoring reflects this—in this section, I will elaborate on the specific reasons for the high marks assigned to this powerful combination.
Product Performed to Expectations: 5 Stars The UNO Q represents a revolutionary shift in embedded development. It successfully functions as a "dual-brain" device, combining a 2.0 GHz quad-core Qualcomm Dragonwing QRB2210 microprocessor with a real-time STM32U585 microcontroller. I found that this architecture effectively resolves the notorious "latency jitter" problem. By offloading heavy tasks—like AI inference models or running a web server—to the Debian Linux MPU, the MCU remains completely free for deterministic, real-time hardware control (like pulse-width modulating a motor). It performed exceptionally well during my headless mode testing. However, the slow deployment times when pressing "Run" in App Lab hold it back from a perfect score.
Specifications were sufficient to design with: 5 Stars The documentation for the Arduino Uno Q comprises two distinct resources: a comprehensive single PDF document (the Datasheet) and an extensive official web page wiki containing numerous links to various topics (the User Manual and tutorials). Once I figured out how to navigate these manuals , I quickly was able to find answers to most of my questions This UNO Q 37-page datasheet is well above average compared to typical maker-board documentation, landing solidly in the "excellent" bucket for a first-party board. It provides highly detailed power architecture (such as the 5V_SYS topology and diode ORing) and complete pinouts for all high-speed connectors (JDIGITAL, JANALOG, JMISC, JMEDIA).The UNO Q User Manual is highly comprehensive and serves as the essential bridge between the board's complex hardware and its software ecosystem. It lands solidly in the "excellent" bucket for digital documentation. It goes far beyond a simple pinout guide by thoroughly explaining the "dual-brain" architecture and providing copy-pasteable code snippets for the Arduino App Lab to test peripherals like the ADC, DAC, and PWM
Demo Software was of good quality: 5 Stars The new Arduino App Lab is a major success. It seamlessly unifies Python scripts, C++ sketches, and containerized AI models into one cohesive interface. I was particularly impressed by the "Bricks" feature, which abstracts the complexity of Docker container orchestration, allowing you to deploy Edge AI models without writing boilerplate code. The recent addition of native Edge Impulse integration to train custom machine learning models directly for the board is another massive benefit.
The product was easy to use: 3 Stars While the platform is incredibly powerful, it has a steep initial learning curve. The out-of-the-box experience was confusing at first. The introductory web pages immediately prompt you to download software without clearly explaining the physical connection steps or distinguishing between the Network, PC Hosted, and Single-Board Computer (SBC) modes. Additionally, pressing "Run" in App Lab triggers a full-system deployment that compiles the C++ sketch, sets up the Python environment, and launches Docker containers; this process can take up to a minute, which feels sluggish compared to flashing a traditional AVR Arduino.
Support materials were available: 4 Stars Arduino provides a comprehensive suite of digital support materials. The official web wiki contains 37 distinct links to various tutorials, user manuals, and guides. You have access to pinout PDFs, schematics, CAD files, and STEP files directly from the hardware page. The Arduino Forum also has a dedicated UNO Q section that is actively populated with solutions to common early-adoption issues. I am deducting one star because there is no thick printed manual in the physical box, leaving a slight gap for beginners trying to orient themselves before jumping into the web wikis.
The price to performance ratio was good: 5 Stars The 2 GB model (ABX00162),with 16 GB of eMMC storage, and 2 GB of LPDDR4 RAM is an exceptionally cost-effective choice.For a few dollars more, the 4GB model (Part # ABX00173), with 4 GB of LPDDR4 RAM, and 32 GB of eMMC storage, is an exceptional value for use as a Stand Alone Computer. With either model, you are getting a 2.0 GHz quad-core Qualcomm microprocessor with an Adreno 702 GPU and dual Image Signal Processors capable of handling 25 MP cameras at 30 fps. When paired with the dedicated Arm Cortex-M33 STM32 real-time microcontroller, it provides the processing power of a micro-server alongside the precise I/O of an Arduino. This dual-architecture delivers outstanding value for advanced IoT, AI vision, and robotics projects.
It is crucial to note that while the primary documentation section provides a foundational overview, several essential links and resources related to the Arduino platform are not explicitly mentioned there. A comprehensive list of these external links is vital for a deeper understanding and successful implementation of projects, including the official Arduino project page, the integrated development environment (IDE) download page, and various community forums.Example Pins, Specifications, and Component Context Understanding these hardware details, which extend beyond the basic mention of "Example Pins etc.," provides the necessary context for developing robust and efficient firmware for the Arduino Uno platform.
Official Arduino Documentation on Arduino Uno Q
Description: Arduino Docs Web page
Origin: ARDUINO docs
Number of pages: 37
FORMAT: WEB Wiki
Main URL:https://docs.arduino.cc/hardware/uno-q/

This page provides links to technical resources and tutorials for the Arduino UNO Q, including:
Resources: USER MANUAL, ARDUINO APP LAB, Pinout, Datasheet, Schematics, CAD/STEP Files, Qualcomm QRB2210 overview, and STM32U585 datasheet.
Tutorials: UNO Q User Manual, Single-Board Computer use, Power Specifications, Flashing Images, SSH/ADB connection, Arduino Cloud connection, and Debian Linux Basics.
This information serves as a comprehensive reference and a single source for all the technical details required for your UNO Q projects. I strongly recommend using it when experimenting on UNO Q. The relevant links are provided below.
USER MANUAL – UNO Q tutorials
ARDUINO APP LAB – getting started tutorial
Buy now – UNO Q store product
Downloadable resources
Pinout (PDF) – UNO Q full pinout
Datasheet – UNO Q datasheet PDF
Schematics – UNO Q schematics PDF
CAD Files – UNO Q CAD ZIP
STEP Files – UNO Q STEP model ZIP

Features TAB
Qualcomm QRB2210 overview – Qualcomm product page
STM32U585 microcontroller datasheet
Tutorials TAB
UNO Q User Manual – https://docs.arduino.cc/tutorials/uno-q/user-manual/
UNO Q as a Single-Board Computer – https://docs.arduino.cc/tutorials/uno-q/single-board-computer/
UNO Q Power Specifications – https://docs.arduino.cc/tutorials/uno-q/power-specification/
Flashing a New Image to the UNO Q – https://docs.arduino.cc/tutorials/uno-q/update-image/
Connect to UNO Q via Secure Shell (SSH) – https://docs.arduino.cc/tutorials/uno-q/ssh/
Connect to UNO Q via ADB – https://docs.arduino.cc/tutorials/uno-q/adb/
Connect UNO Q to the Arduino Cloud – https://docs.arduino.cc/tutorials/uno-q/arduino-cloud/
Debian Linux Basics for UNO Q –https://docs.arduino.cc/tutorials/uno-q/debian-guide/
Tech specs TAB
Tech specs tab has the technical-specifications table but no additional unique external links beyond those already listed.
Compatibility TAB
Software
Arduino App Lab – https://www.arduino.cc/en/software/#app-lab-section
Arduino IDE – https://www.arduino.cc/en/software
Arduino CLI – https://arduino.github.io/arduino-cli/
Cloud Editor – https://app.arduino.cc/sketches
Hardware Compatible Shields
Ethernet Shield Rev2 – hardware page
4 Relays Shield – https://docs.arduino.cc/hardware/4-relays-shield
Motor Shield Rev3 – https://docs.arduino.cc/hardware/motor-shield-rev3
UNO SPE Shield – https://docs.arduino.cc/hardware/spe-shield
9 Axis Motion Shield – https://docs.arduino.cc/hardware/9-axis-motion-shield
Suggested Libraries TAB
SPI – https://docs.arduino.cc/language-reference/en/functions/communication/SPI/
Connect and Contribute
Project Hub – UNO Q tagged projects
Arduino docs-content GitHub repository
UNO Q forum section
Arduino Help Center – hardware support article
I have only scratched the surface of using the capabilities of the Arduino UNO Q. The "Dual-Brain" architecture opens up so many possibilities that traditional microcontrollers simply cannot handle. I will keep coming back to this review to refresh my knowledge of the kit and continue to experiment with it. Here are a few advanced projects and hardware features I plan to explore next:
The Arduino UNO Q is not just another microcontroller; it represents a fundamental shift in the "Arduino experience" and a massive leap forward for embedded development. By seamlessly blending a powerful Debian Linux micro-server (the Qualcomm Dragonwing QRB2210) with a real-time deterministic MCU (the STM32U585), it effectively solves the notorious "latency jitter" that plagues traditional Single-Board Computers when trying to perform precise hardware control. While the initial setup has a steep learning curve and the full-system deployment times take longer than a standard Arduino "Blink" upload, the payoff for advanced projects is tremendous. You gain access to isolated Docker container "Bricks," native Edge Impulse AI training, and effortless Remote Procedure Call (RPC) Bridge communication right out of the box. When assessing update and maintenance tasks—such as OS updates, package installs, and container deployments—the UNO Q offers a level of professional stability that DIY Linux "stacks" rarely achieve. The board features an automatic update mechanism that keeps the OS and App Lab components current as long as it has an internet connection. Because advanced features (like AI vision models) are deployed as isolated Docker containers (Bricks), you avoid the "dependency hell" where installing one Python library breaks another over time. Updating your sketches and Python logic feels remarkably seamless once you master the App Lab interface, and for headless deployments, you can easily manage, start, or stop apps remotely using the arduino-app-cli tool over an SSH connection. Ultimately, this unified, containerized workflow transforms the UNO Q from a simple prototyping board into a robust, deployment-ready micro-server.
Thank You to the element14 Community!
I want to extend a huge thank you to everyone here at element14 for taking the time to read and review my RoadTest. I sincerely apologize for the long-winded content! Once I started diving into this board, I found the "Dual-Brain" hardware architecture and this revolutionary approach to embedded development so fascinating that I simply couldn't leave anything out.
As you read through my experiences, please keep in mind that the Arduino App Lab is still a brand-new, evolving product. It hasn't even been stamped with a version 1.0 status yet. There are absolutely bugs to iron out, and I have no doubt that many improvements and new capabilities will be rolling out in the near future.
As the old saying goes: "Hardware is always ahead of the software that will be used on it." Thanks again for following along on this journey, and I look forward to your thoughts and feedback!


