element14 Community
element14 Community
    Register Log In
  • Site
  • Search
  • Log In Register
  • About Us
  • Community Hub
    Community Hub
    • What's New on element14
    • Feedback and Support
    • Benefits of Membership
    • Personal Blogs
    • Members Area
    • Achievement Levels
  • Learn
    Learn
    • Ask an Expert
    • eBooks
    • element14 presents
    • Learning Center
    • Tech Spotlight
    • STEM Academy
    • Webinars, Training and Events
    • Learning Groups
  • Technologies
    Technologies
    • 3D Printing
    • FPGA
    • Industrial Automation
    • Internet of Things
    • Power & Energy
    • Sensors
    • Technology Groups
  • Challenges & Projects
    Challenges & Projects
    • Design Challenges
    • element14 presents Projects
    • Project14
    • Arduino Projects
    • Raspberry Pi Projects
    • Project Groups
  • Products
    Products
    • Arduino
    • Avnet Boards Community
    • Dev Tools
    • Manufacturers
    • Multicomp Pro
    • Product Groups
    • Raspberry Pi
    • RoadTests & Reviews
  • Store
    Store
    • Visit Your Store
    • Choose another store...
      • Europe
      •  Austria (German)
      •  Belgium (Dutch, French)
      •  Bulgaria (Bulgarian)
      •  Czech Republic (Czech)
      •  Denmark (Danish)
      •  Estonia (Estonian)
      •  Finland (Finnish)
      •  France (French)
      •  Germany (German)
      •  Hungary (Hungarian)
      •  Ireland
      •  Israel
      •  Italy (Italian)
      •  Latvia (Latvian)
      •  
      •  Lithuania (Lithuanian)
      •  Netherlands (Dutch)
      •  Norway (Norwegian)
      •  Poland (Polish)
      •  Portugal (Portuguese)
      •  Romania (Romanian)
      •  Russia (Russian)
      •  Slovakia (Slovak)
      •  Slovenia (Slovenian)
      •  Spain (Spanish)
      •  Sweden (Swedish)
      •  Switzerland(German, French)
      •  Turkey (Turkish)
      •  United Kingdom
      • Asia Pacific
      •  Australia
      •  China
      •  Hong Kong
      •  India
      •  Korea (Korean)
      •  Malaysia
      •  New Zealand
      •  Philippines
      •  Singapore
      •  Taiwan
      •  Thailand (Thai)
      • Americas
      •  Brazil (Portuguese)
      •  Canada
      •  Mexico (Spanish)
      •  United States
      Can't find the country/region you're looking for? Visit our export site or find a local distributor.
  • Translate
  • Profile
  • Settings
At The Core Design Challenge
  • Challenges & Projects
  • Design Challenges
  • At The Core Design Challenge
  • More
  • Cancel
At The Core Design Challenge
Blog BLOG#5-Implementation and Challenge Conclusion - Get to the Cores
  • Blog
  • Forum
  • Documents
  • Leaderboard
  • Polls
  • Files
  • Members
  • Mentions
  • Sub-Groups
  • Tags
  • More
  • Cancel
  • New
Join At The Core Design Challenge to participate - click to join for free!
  • Share
  • More
  • Cancel
Group Actions
  • Group RSS
  • More
  • Cancel
Engagement
  • Author Author: skruglewicz
  • Date Created: 9 May 2023 3:55 PM Date Created
  • Views 1153 views
  • Likes 7 likes
  • Comments 8 comments
  • PSoCTm︎ 62 MCU
Related
Recommended

BLOG#5-Implementation and Challenge Conclusion - Get to the Cores

skruglewicz
skruglewicz
9 May 2023

This is the my final blog in a series of 5 blogs for the At The Core Design Challenge. It will describe my finished design for my idea that I presented in my 1st  blog post. Describes how I implemented my idea on the PSoC62S4 kit. 

This blog presents the Design, code and operation of my idea running on the PSoC62S4 kit. The entire project uses only the Pioneer kit and a USB connection to a  PC running Tera Term. The system is implemented using firmware on the two cores, that use the Capsense buttons, ALS and Thermistor sensors. The firmware on each core communicate with each core over IPC Pipes. The code project lives on my GitHub repo mentioned laterj in this blog.

As I've pointed out my Idea involves running A barebones piece of firmware on the CM0+ core and FreeRTOS running on the CM4 core. The who point of this challenge is to use the recently released version of Modustoolbox 3.0 to design and implement a project using the dual core new features. This was a real challenge for me but I managed to learn and am still learning about features of the Modus embedded development toolchain.

I used snippets of code from my previous blogs to implement my final design described in the next section.

FINAL DESIGN

SYSTEM DIAGRAM

image

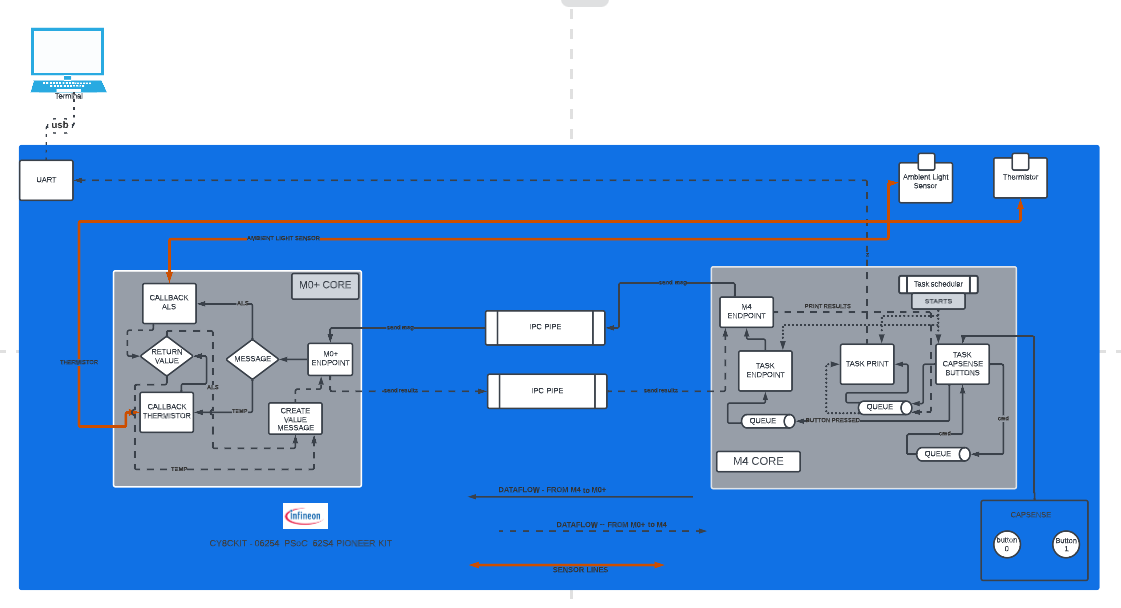
DATAFLOW Description

In the system diagram, I have indicated the Data flow in two directions

  1. FROM M4 to M0+
  2. FROM M0+ to M4
  • Lets follow the DATA FROM M4 to M0+ 
    • ON M4
    • The main module creates the 3 task using the RTOS scheduler.
      • Priorities are set for each task.
    • The Tasks communicate to each other over QUEUES by sending command messages.
    • When A CAPSENSE Button is pressed:
      • The CAPSENSE task determines which button is pressed. I used a lot of the same logic from the FreeRTOS section in blog#4..
        • The SCAN and PROCESS functionality is implemented using a message queue to send SCAN or PROCESS messages from the task callbacks to the main loop of the task.
        • in the main loop when the scan timer fires a SCAN callback is called, which places a SCAN command in the message queue.
        • in the SCAN code the scan is done on all the CAPSENSE widgets.
          • The scan callback sends a PROCESS command to the message queue. 
        • In the PROCESS code:
          • Gets all the Capsense Widgets and determines which button has been pressed.
          • Then, task creates two messages and sends the message to the appropriate QUEUE.
            • MESSAGE1 -- contains which button (ALS(btn0) or (TEMP(btn1)) has been pressed and sends the message to the PRINT task to be printed on the terminal.
            • MESSAGE2 --  contains a GET command to indicate which sensor (ALS or TEMP) to get a value from
      • The PRINT task reads message queue and prints the message.
      • The ENDPOINT task:
        • Reads the message queue 
        • Pulls out the button pressed (ALS or TEMP) 
        • Constructs a message indicating which sensor to get the value from and calls the ipc endpoint to send the message.
    • ON M0+
    • the ENDPOINT callback
      • Reads the PIPE
      • interprets the message to determine which sensor to use to get a value.
      • calls the appropriate sensor function to get the sensor value.
      • When the data is received it follows the path described next
  • Lets follow the DATA FROM M0+ to M4
    • ON M0+
    • Once the sensor value is received from the sensor function a return message with the sensor name and the value is generated. 
    • This message is sent to the SEND ENDPOINT 
    • The SEND ENDPOINT sends the message to CM4 over the Send PIPE
    • ON M4
    • The receive endpoint reads the message
      • Constructs print message from the message contents that was just read.
      • Sends the message to the print queue.
    • The PRINT task reads message queue and prints the message.

The Project

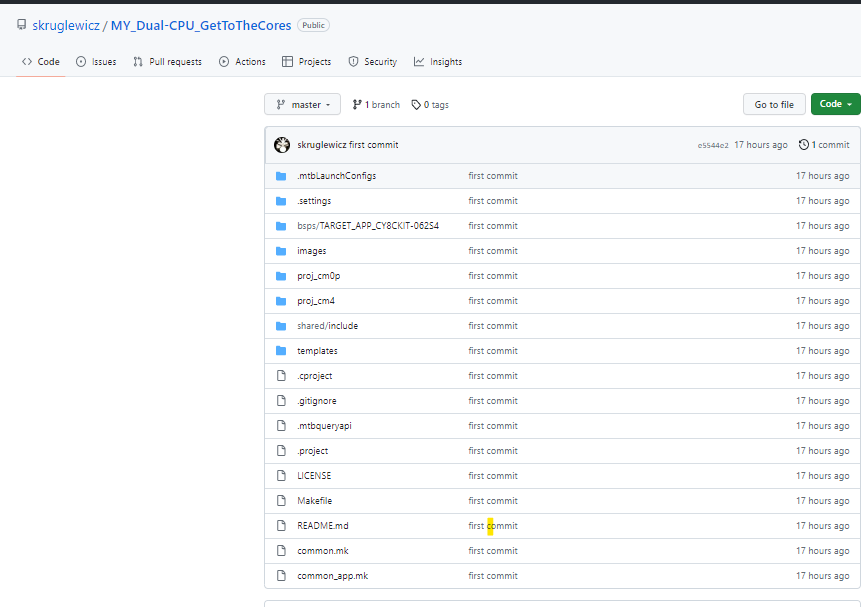
PROJECT NAME: MY_Dual-CPU_GetToTheCores

The project was started by making a new application using the Semaphore template and giving it the project name mentioned above. 

I added  code to the M4 and M0+ projects to implement FreeRTOS, CAPSENSE, ALS &Thermistor sensors used in my design and testing blog#4.and IPC PIPES , I used code from the Migrated PIPE example project describe in Blog#3.

This a breakdown of what code is part of the firmware on each core.

On M0+:

  1. IPC PIPES
  2. Thermistor and Ambient Light Sensors

On M4:

  1. IPC PIPES
  2. FreeRTOS
    1. Task Scheduler
    2. QUEUES
  3. CAPSENSE BUTTONS

I then added the necessary components these using the library manager from the IDE

Now Build the Project and debug it. 

The Project Code on my GitHub repo

I'm still working on the project But I thought to put the code up on my GitHub repo, instead of taking up space here on the blog. It is a work in process and your welcome to take a look at it if you have an interest.

MY_Dual-CPU_GetToTheCores 

image

CONCLUSION

WHAT did I learn?

  1. Dual core programming usiing MTB 3.0
  2. Debugginf Dual Core Firmware using MTB 3.0
  3. IPC semaphores and Pips
  4. FreeRTOS Schedular,Queues and Timers
  5. CAPSENSE
  6. More ModusToolbox tips and tricks.

Problems I had to overcome?

  1. Migrating to ModusToolbox from 2.4 to 3.0
  2. working with multiple versions of ModusToolbox on the Same PC
    1. I have MTB 2.4 and MTB3.0 running on my PV
  3. Understanding the New Project structure for Dual Core Projects in MTB 3.0

How does MTB3.0 compare to MTB2.X??

  • Dual core structure of the project allows for better debugging.

Future Enhancements

  1. Implement UART send receive to my my PSoC62S2 WIFI pioneer kit

Blog links:
BLOG#1-Introduction
Blog#2--Design
Blog#3- Migrating an example MTB 2.x to version 3.x
BLOG#4-Testing
BLOG#5-Implementation and Challenge Conclusion
  • Sign in to reply

Top Comments

  • skruglewicz
    skruglewicz over 2 years ago +1
    Hello all, Time is running out . he challenge will end on Friday May 5, 2023. That is exactly a week away from this point. I'm still working on building and debugging the code that is on my Github…
  • Digimorf
    Digimorf over 2 years ago in reply to skruglewicz +1
    Congratulations Steve, great work! I will check it out for sure!
  • skruglewicz
    skruglewicz over 2 years ago +1
    Hello all finished for now with this challenge.. good luck everyone
  • skruglewicz
    skruglewicz over 2 years ago in reply to Digimorf

    Thank you @Digmorf.

    They need more IPC examples. The pipes migration was a big challenge. 
    thanks agiain

    Steve K

    • Cancel
    • Vote Up 0 Vote Down
    • Sign in to reply
    • More
    • Cancel
  • Digimorf
    Digimorf over 2 years ago

    Great job indeed! It would take many projects like this within the official documentation to give the possibility to learn the complex workings of some systems.

    • Cancel
    • Vote Up +1 Vote Down
    • Sign in to reply
    • More
    • Cancel
  • skruglewicz
    skruglewicz over 2 years ago in reply to DAB

    Thanks for reading my blog DAB 

    I’m still learning about the kit. 

    • Cancel
    • Vote Up 0 Vote Down
    • Sign in to reply
    • More
    • Cancel
  • DAB
    DAB over 2 years ago

    Nice job, the PSOC is so versatile, but takes a while to learn.

    • Cancel
    • Vote Up +1 Vote Down
    • Sign in to reply
    • More
    • Cancel
  • skruglewicz
    skruglewicz over 2 years ago

    Hello all

    finished for now with this challenge..

    good luck everyone

    • Cancel
    • Vote Up +1 Vote Down
    • Sign in to reply
    • More
    • Cancel
>
element14 Community

element14 is the first online community specifically for engineers. Connect with your peers and get expert answers to your questions.

  • Members
  • Learn
  • Technologies
  • Challenges & Projects
  • Products
  • Store
  • About Us
  • Feedback & Support
  • FAQs
  • Terms of Use
  • Privacy Policy
  • Legal and Copyright Notices
  • Sitemap
  • Cookies

An Avnet Company © 2025 Premier Farnell Limited. All Rights Reserved.

Premier Farnell Ltd, registered in England and Wales (no 00876412), registered office: Farnell House, Forge Lane, Leeds LS12 2NE.

ICP 备案号 10220084.

Follow element14

  • X
  • Facebook
  • linkedin
  • YouTube